


h1 { margin-top: 0.6cm; margin-bottom: 0.58cm; line-height: 200%; page-break-inside: avoid; }h1.western { font-family: "Times New Roman",serif; font-size: 22pt; }h1.cjk { font-family: "Arial Unicode MS"; font-size: 22pt; font-style: normal; font-weight: bold; }h1.ctl { font-size: 22pt; font-weight: bold; }h1.样式-标题-1- + -四号-western { font-family: "Times New Roman",serif; font-size: 14pt; line-height: 150%; }h1.样式-标题-1- + -四号-cjk { font-family: "Arial Unicode MS"; font-style: normal; font-weight: bold; line-height: 150%; }h1.样式-标题-1- + -四号-ctl { font-size: 22pt; font-weight: bold; line-height: 150%; }p { margin-bottom: 0.21cm; }a:link { color: rgb(0, 0, 255); }
一. 环境说明
1. 服务器3 台,一台安装apache 服务,两台安装tomcat
2. 使用到的各个组件及下载地址:
apache_2.2.11-win32-x86-no_ssl.msi
http://httpd.apache.org/download.cgi
tomcat 6 压缩版
http://tomcat.apache.org/download-60.cgi
apache 的JK 连接器(Windows 版本),作为apache 的一个module ,网站同时提供了配置文件的使用方法
mod_jk-1.2.28-httpd-2.2.3.so
http://www.apache.org/dist/tomcat/tomcat-connectors/jk/binaries/win32/jk-1.2.28/
3.ip 配置
一台安装apache 的ip 为192.168.1.50 ,两台安装tomcat 的ip 分别为192.168.1.24 和192.168.1.52 (根据各自情况分配)
二.安装过程
1. 在两台安装tomcat 的机器上安装jdk6 (至少jdk5 )
2. 配置jdk 的安装路径, 在环境变量path 中加入jdk 的bin 路径, 新建环境变量JAVA_HOME 指向jdk 的安装路径
3. 安装tomcat ,并测试tomcat 的启动是否正常
三.负载均衡配置过程
1. 在192.168.1.50 机器上安装apache 服务,我的安装路径默认为:D:/Program Files/Apache Software Foundation/Apache2.2
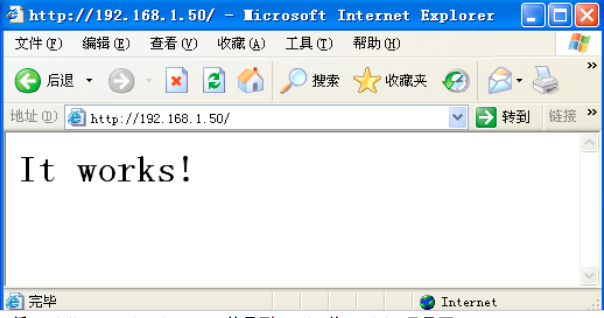
2. 安装完成后测试能否正常启动,http://192.168.1.50 ,如图所示:
3. 将mod_jk-1.2.28-httpd-2.2.3.so 拷贝到apache 的modules 目录下
2. 修改apache 的配置文件 httpd.cof ,在最后加上下面这段话:
LoadModule jk_module modules/mod_jk-1.2.28-httpd-2.2.3.so # 载入jk 连接器
JkWorkersFile conf/workers.properties # 设置负载均衡的配置文件,即定义均衡规则
JkLogFile logs/mod_jk.log # 指定日志文件
JkLogLevel debug # 指定日志级别
# 配置apache 将哪些请求转发给JK 进行均衡
JkMount /*.jsp loadbalancer
JkMount /test/* loadbalancer
3. 分别修改两个tomcat 的配置文件conf/server.xml 文件
修改前:
<!-- An Engine represents the entry point (within Catalina) that processes
every request. The Engine implementation for Tomcat stand alone
analyzes the HTTP headers included with the request, and passes them
on to the appropriate Host (virtual host).
Documentation at /docs/config/engine.html -->
<!-- You should set jvmRoute to support load-balancing via AJP ie :
<Engine name="Catalina" defaultHost="localhost" jvmRoute="jvm1">
-->
<Engine name="Catalina" defaultHost="localhost">
修改后:
<!-- An Engine represents the entry point (within Catalina) that processes
every request. The Engine implementation for Tomcat stand alone
analyzes the HTTP headers included with the request, and passes them
on to the appropriate Host (virtual host).
Documentation at /docs/config/engine.html -->
<!-- You should set jvmRoute to support load-balancing via AJP ie : -->
<Engine name="Catalina" defaultHost="localhost" jvmRoute="node1">
<Engine name="Catalina" defaultHost="localhost" >
将其中的jvmRoute="jvm1" 分别修改为jvmRoute="node1" 和jvmRoute="node2"
4. 在apache 的conf 目录下创建workers.property 文件,输入以下内容:
# fine the communication channel
# 定义负载均衡的所有主机名,和前面tomcat 配置文件的JVMroute 属性相对应
# 其中的loadbalancer 是虚拟的主机,负责负载均衡,姑且当成是apache 本身
worker.list=node1,node2,loadbalancer
# node1 使用AJP 与JK 通讯
worker.node1.port=8009 # 工作端口,若没占用则不用修改
worker.node1.host=192.168.1.24 # node1 的地址为localhost ,如果tomcat 在其他服务器则输入该服务器的地址
worker.node1.type=ajp13 # 类型
worker.node1.lbfactor=100 # 负载平衡因数
worker.node2.port=9009 # 工作端口,若没占用则不用修改
worker.node2.host=192.168.1.52 #node2 服务器的地址
worker.node2.type=ajp13 # 类型
worker.node2.lbfactor=100 # 负载因子,值越大则JK 分发到此tomcat 的负荷越多
# 定义loadbalancer 类型为“负载均衡器(lb )”
worker.loadbalancer.type=lb
# 定义loadbalancer 进行负载均衡的对象
worker.loadbalancer.balanced_workers=node1,node2
worker.loadbalancer.sticky_session=false
worker.loadbalancer.sticky_session_force=false
5. 在两个tomcat 的安装目录中的webapps 建立相同的应用,我的应用名为test ,在两个应用目录中建立相同WEB-INF 目录和页面test.jsp 的页面内容如下
<%@ page language = "java" contentType = "text/html; charset=ISO-8859-1"
pageEncoding = "GBK" %>
<! DOCTYPE html PUBLIC "-//W3C//DTD HTML 4.01 Transitional//EN" "http://www.w3.org/TR/html4/loose.dtd" >
< html >
< head >
< meta http-equiv = "Content-Type" content = "text/html; charset=ISO-8859-1" >
< title > helloapp </ title >
</ head >
< body >
<%
System.out.println( "call test.jsp" ); // 在Tomcat 控制台上打印一些跟踪数据
%>
SessionID: <%= session.getId() %>
</ body >
</ html >
6. 重启 apache 服务器和两个 tomcat 服务器,到此负载均衡已经配置完成,测试负载均衡:http://192.168.1.50/test/test.jsp , 运行正常则已建立负载均衡
四.集群配置
1. 负载均衡的条件下配置tomcat 集群
2 .分别修改两个tomcat 的配置文件conf/server.xml, 修改内容如下
修改前:
<!--
<Cluster className="org.apache.catalina.ha.tcp.SimpleTcpCluster"/>
-->
修改后:
< Cluster className = "org.apache.catalina.ha.tcp.SimpleTcpCluster"
channelSendOptions = "8" >
< Manager className = "org.apache.catalina.ha.session.DeltaManager"
expireSessionsOnShutdown = "false" notifyListenersOnReplication = "true" />
< Channel className = "org.apache.catalina.tribes.group.GroupChannel" >
< Membership
className = "org.apache.catalina.tribes.membership.McastService"
bind = "192.168.1.100" address = "228.0.0.4" port = "45564" frequency = "500"
dropTime = "3000" />
< Receiver
className = "org.apache.catalina.tribes.transport.nio.NioReceiver"
address = "auto" port = "4000" autoBind = "100" selectorTimeout = "5000"
maxThreads = "6" />
< Sender
className = "org.apache.catalina.tribes.transport.ReplicationTransmitter" >
< Transport
className = "org.apache.catalina.tribes.transport.nio.PooledParallelSender" />
</ Sender >
< Interceptor
className = "org.apache.catalina.tribes.group.interceptors.TcpFailureDetector" />
< Interceptor
className = "org.apache.catalina.tribes.group.interceptors.MessageDispatch15Interceptor" />
</ Channel >
< Valve className = "org.apache.catalina.ha.tcp.ReplicationValve" filter = "" />
< Valve className = "org.apache.catalina.ha.session.JvmRouteBinderValve" />
< Deployer className = "org.apache.catalina.ha.deploy.FarmWarDeployer"
tempDir = "/tmp/war-temp/" deployDir = "/tmp/war-deploy/"
watchDir = "/tmp/war-listen/" watchEnabled = "false" />
< ClusterListener
className = "org.apache.catalina.ha.session.JvmRouteSessionIDBinderListener" />
< ClusterListener
className = "org.apache.catalina.ha.session.ClusterSessionListener" />
</ Cluster >
注意:bind 是tomcat 服务器所在的机器的ip 地址
3. 重启两个tomcat ,到此tomcat 的集群配置完成
五.应用配置
对于要进行负载和集群的的tomcat 目录下的webapps 中的应用中的WEB-INF 中的web.xml 文件要添加如下一句配置
<distributable/>
配置前:
<? xml version = "1.0" encoding = "UTF-8" ?>
< web-app id = "WebApp_ID" version = "2.4"
xmlns = "http://java.sun.com/xml/ns/j2ee"
xmlns:xsi = "http://www.w3.org/2001/XMLSchema-instance"
xsi:schemaLocation = "http://java.sun.com/xml/ns/j2ee http://java.sun.com/xml/ns/j2ee/web-app_2_4.xsd" >
< display-name > test </ display-name >
< distributable />
< welcome-file-list >
< welcome-file > index. html </ welcome-file >
< welcome-file > index. htm </ welcome-file >
< welcome-file > index. jsp </ welcome-file >
< welcome-file > default. html </ welcome-file >
< welcome-file > default. htm </ welcome-file >
< welcome-file > default. jsp </ welcome-file >
</ welcome-file-list >
</ web-app >
六.测试集群
重新启动apache 服务器和两个tomcat 服务器,输入地址:http://192.168.1.50/test/test.jsp
运行结果如下:
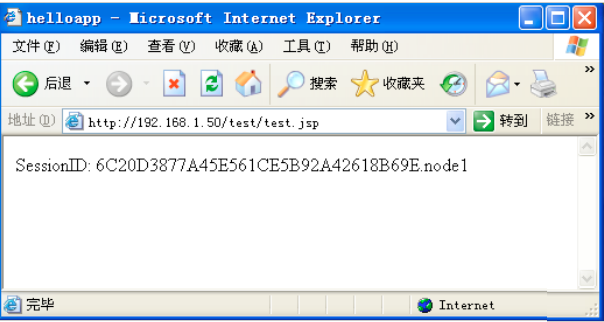
如果同一个浏览器的sessionID 不变,则集群配置成功


 117
117


 被折叠的 条评论
为什么被折叠?
被折叠的 条评论
为什么被折叠?
 到【灌水乐园】发言


