


这里给出大部分主要的代码
联系人模型对象:
#import "NJContatc.h"

@implementation NJContatc

- (void)encodeWithCoder:(NSCoder *)aCoder
{
    [aCoder encodeObject:self.name forKey:@"name"];
    [aCoder encodeObject:self.phoneNumber forKey:@"number"];
}

- (id)initWithCoder:(NSCoder *)aDecoder
{
    if (self = [super init]) {
        self.name = [aDecoder decodeObjectForKey:@"name"];
        self.phoneNumber = [aDecoder decodeObjectForKey:@"number"];
    }
    return self;
}
@end
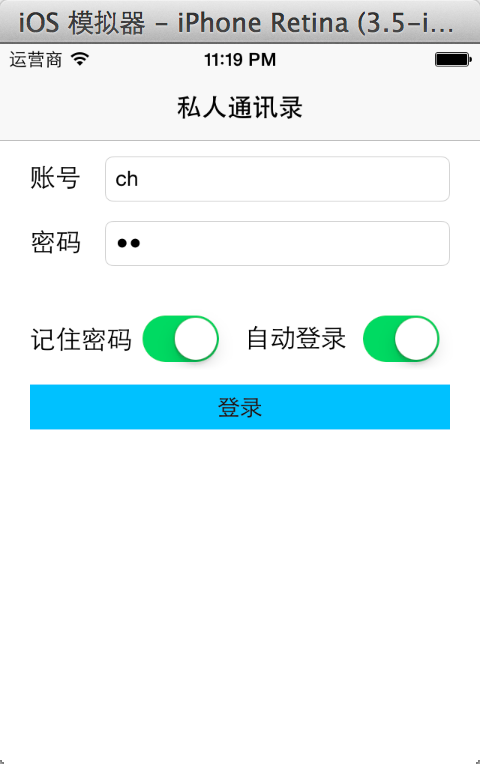
登录控制器中:
1.在viewDidLoad页面刚加载进来的时候,
给两个文本输入框添加通知 NSNotificationCenter *center = [NSNotificationCenter defaultCenter];
并注册监听文本变化 [center addObserver:self selector:@selector(textChange) name:UITextFieldTextDidChangeNotification object:self.acountField]
2.由于记住密码和自动登录都属于偏好设置,所以这种数据要保存到偏好设置中,第一次加载要去除信息:
NSUserDefaults *defaults = [NSUserDefaults standarUserDefaults];
3.使用完通知后,需要移除监听
[[NSNotificationCenter defaultCenter] removeObserver:self];
4.注意两个Switch的逻辑
取消记住密码,肯定也取消了自动登录
选择了自动登录,肯定勾选了记住密码
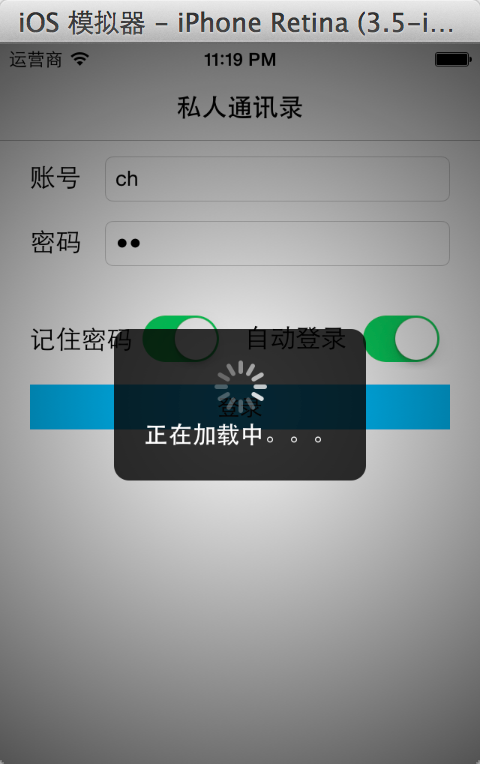
5.在点击登录按钮之后,需要添加一些特效,此时可以使用别人写的HUD,并设置延迟几秒跳转,简介模仿网络请求延迟
使用dispatch_after snippet - GCD Dispatch After 方法,设置延迟时间可块内容
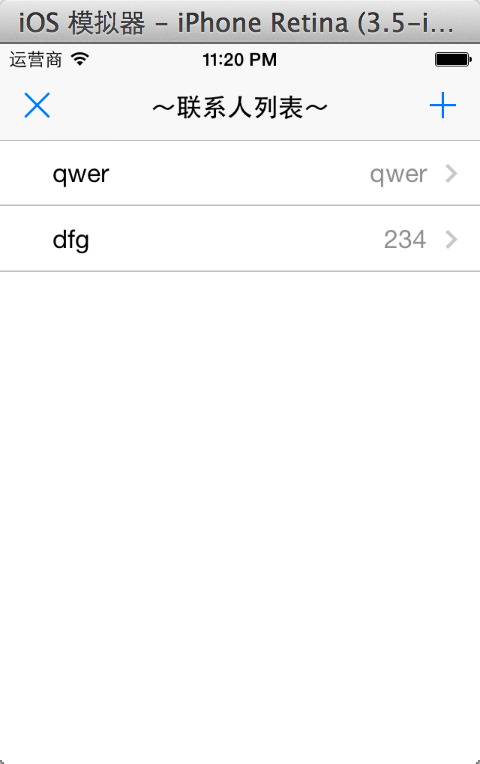
6.点击成功后,通过设置segue的identifier的值:login2contact ,
使用 [self performSegueWithIdentifier:@"login2contact" sender:@"jonathan"];跳转到联系人界面(这是手动执行segue)
7.在成功跳转之前,还需要拿到segue的目标控制器
在固定的prepareForSegue方法中通过[segue.destinationViewController],拿到目标页面的控制器
#import "NJLoginViewController.h"
#import "MBProgressHUD+NJ.h"

#define NJAccount @"account"
#define NJPwd @"pwd"
#define NJRemPwd @"remPwd"
#define NJAutoLogin @"autoLogin"


@interface NJLoginViewController ()<UITextFieldDelegate>
/**
 *  账号输入框
 */
@property (weak, nonatomic) IBOutlet UITextField *accountField;
/**
 *  密码输入框
 */
@property (weak, nonatomic) IBOutlet UITextField *pwdField;
/**
 *  登录按钮
 */
@property (weak, nonatomic) IBOutlet UIButton *loginBtn;
/**
 *  点击记住密码
 */
- (IBAction)remPwdChange:(id)sender;
/**
 *  点击自动登录
 */
- (IBAction)autoLoginChange:(id)sender;
/**
 *  记住密码
 */
@property (weak, nonatomic) IBOutlet UISwitch *remPwdSwitch;
/**
 *  自动登录
 */
@property (weak, nonatomic) IBOutlet UISwitch *autoLoginSwitch;
/**
 *  点击登录按钮
 */
- (IBAction)loginOnClick:(UIButton *)sender;

@end

@implementation NJLoginViewController


- (void)viewDidLoad
{
    [super viewDidLoad];
    // 监听文本输入框的改变
    // 1.拿到通知中心
    NSNotificationCenter *center = [NSNotificationCenter defaultCenter];
    // 2.注册监听
    // 注意点: 一定要写上通知的发布者
    [center addObserver:self selector:@selector(textChange) name:UITextFieldTextDidChangeNotification object:self.accountField];
    [center addObserver:self selector:@selector(textChange) name:UITextFieldTextDidChangeNotification object:self.pwdField];

    // 3. 回显数据(读取保存的偏好设置信息)
   NSUserDefaults *defaults = [NSUserDefaults standardUserDefaults];
    // 设置账号
    self.accountField.text = [defaults objectForKey:NJAccount];
    // 设置密码
    // 判断是否需要记住密码
//    BOOL isSavePwd = [defaults boolForKey:NJRemPwd];
//    [self.remPwdSwitch setOn:isSavePwd animated:YES];

    [self.remPwdSwitch setOn:[defaults boolForKey:NJRemPwd] animated:YES];

    if (self.remPwdSwitch.isOn) {
        self.pwdField.text = [defaults objectForKey:NJPwd];
    }

//    BOOL isAutoLogin = [defaults boolForKey:NJAutoLogin];
    [self.autoLoginSwitch setOn:[defaults boolForKey:NJAutoLogin] animated:YES];
    if (self.autoLoginSwitch.isOn) {
        // 自动登录相当于调用登录方法
        [self loginOnClick:nil];
    }

}

- (void)dealloc
{
    [[NSNotificationCenter defaultCenter] removeObserver:self];
}

- (void)textChange
{
    self.loginBtn.enabled = (self.accountField.text.length > 0  &&
    self.pwdField.text.length > 0);
}

- (IBAction)remPwdChange:(id)sender
{
    // 1.判断是否记住密码
    if (self.remPwdSwitch.isOn == NO) {
        // 2.如果取消记住密码取消自动登录
//        self.autoLoginSwitch.on = NO;
        [self.autoLoginSwitch setOn:NO animated:YES];
    }
}

- (IBAction)autoLoginChange:(id)sender
{
    // 1.判断是否自动登录
    if (self.autoLoginSwitch.isOn) {
        // 2.如果自动登录就记住密码
        [self.remPwdSwitch setOn:YES animated:YES];
    }
}

- (IBAction)loginOnClick:(UIButton *)sender
{
    // 添加蒙版禁止用户操作, 并且提示用户正在登录
    [MBProgressHUD showMessage:@"正在拼命加载ing...."];

    dispatch_after(dispatch_time(DISPATCH_TIME_NOW, (int64_t)(1.0 * NSEC_PER_SEC)), dispatch_get_main_queue(), ^{
        if (![self.accountField.text isEqualToString:@"lnj"]) {
            // 3.登录成功后移除蒙版
            [MBProgressHUD hideHUD];
             [MBProgressHUD showError:@"用户名不正确!!!"];
            return;
        }

        if (![self.pwdField.text isEqualToString:@"123"]) {
            // 3.登录成功后移除蒙版
            [MBProgressHUD hideHUD];
            [MBProgressHUD showError:@"密码不正确!!!"];
             return;
        }

        // 3.登录成功后移除蒙版
        [MBProgressHUD hideHUD];
        // 4.如果正如,跳转到联系人界面(手动执行segue)
        [self performSegueWithIdentifier:@"login2contatc" sender:@"jonathan"];

        // 5.保存用户数据
        NSUserDefaults *defaults = [NSUserDefaults standardUserDefaults];
        [defaults setObject:self.accountField.text forKey:NJAccount];
        [defaults setObject:self.pwdField.text forKey:NJPwd];
        [defaults setBool:self.remPwdSwitch.isOn forKey:NJRemPwd];
        [defaults setBool:self.autoLoginSwitch.isOn forKey:NJAutoLogin];
        [defaults synchronize];

     });
}

// 在segue跳转之前调用, 会传入performSegueWithIdentifier方法创建好的segue对象
- (void)prepareForSegue:(UIStoryboardSegue *)segue sender:(id)sender
{
    // 1.拿到目标控制器
    UIViewController *vc =  segue.destinationViewController;
    // 2.设置目标控制器的标题
    vc.title = [NSString stringWithFormat:@"%@ 的联系人列表", self.accountField.text];

}
@end
联系人控制器中:
1.默认在UIBarButtonItem中只能手动添加一左一右两个按钮,要向再添加按钮,需要代码实现
添加一个有点击事件的编辑按钮,通过[[UIBarButtonItem alloc] initWithBarButtonSystemItem:UIBarButtonSystemItemEdit target:self action:@selector(editBtnClick)];
self.navigationItem.rightBarButtonItems = @[editBtn,addBtn];
2.使用UIActionSheet 设置左上角注销按钮,点击注销后,通过popViewController方法弹回到登录界面
3.由于在联系人界面会有两个跳转界面,所以需要判断segue的目标控制器
由于不管是手动还是自动类型的segue,在跳转前都会执行prepareForSegue方法,所以这个判断就可以在这个方法里写
通过获取到目标控制器对象vc,使用isKindOfClass判断,并各自设置代理
4.接下来就是执行各自的代理方法
NSString *path = [[NSSearchPathForDirectoriesInDomains(NSDocumentDirectory,NSUserDomaininMask,YES) lastObject] stringByAppendingPathComponent:@"contacts.arc"];
[NSKeyedArchiver archiverRootObject:self.contacts toFile:path];
最后不要忘记刷新[self.tableView reloadData];
5.控件是通过xib或者storyboard创建出来的就会调用awakeFrmeNib方法,且只调用一次
在这个方法中把UIView类型的分割线添加到self.contentView中,注意,不要直接将自控件添加到cell 中
6.当控件的frame被修改时会调用layoutSubviews方法,重写任何方法都要先[super layoutSubviews]
#import "NJContatcsViewController.h"
#import "NJAddViewController.h"
#import "NJContatc.h"
#import "NJEditViewController.h"
#import "NJContatcCell.h"

#define NJContactsPath [[NSSearchPathForDirectoriesInDomains(NSDocumentDirectory, NSUserDomainMask, YES) lastObject] stringByAppendingPathComponent:@"contacts.arc"]


@interface NJContatcsViewController ()<UIActionSheetDelegate, NJAddViewControllerDelegate, NJEditViewControllerDelegate>
/**
 *  点击注销按钮
 */
- (IBAction)logout:(UIBarButtonItem *)sender;

/**
 *  保存所有用户数据
 */
@property (nonatomic, strong) NSMutableArray *contatcs;
@end

@implementation NJContatcsViewController
- (void)viewDidLoad
{
    [super viewDidLoad];

    self.tableView.separatorStyle = UITableViewCellSeparatorStyleNone;

    // 给当前控制器的当行控制器添加一个按钮
    UIBarButtonItem *addBtn = self.navigationItem.rightBarButtonItem;
    UIBarButtonItem *editBtn = [[UIBarButtonItem alloc] initWithBarButtonSystemItem:UIBarButtonSystemItemEdit target:self action:@selector(editBtnClick)];

    self.navigationItem.rightBarButtonItems = @[editBtn, addBtn];
}

- (void)editBtnClick
{
//    NSLog(@"editBtnClick");
    // 开启tableview的编辑模式
//    self.tableView.editing = !self.tableView.editing;
    [self.tableView setEditing:!self.tableView.editing animated:YES];
}

- (IBAction)logout:(UIBarButtonItem *)sender
{
    UIActionSheet *sheet = [[UIActionSheet alloc] initWithTitle:@"确定要注销?" delegate:self cancelButtonTitle:@"取消" destructiveButtonTitle:@"确定" otherButtonTitles:nil];
    [sheet showInView:self.view];

}
#pragma mark - UIActionSheetDelegate
- (void)actionSheet:(UIActionSheet *)actionSheet clickedButtonAtIndex:(NSInteger)buttonIndex
{
    if (0 != buttonIndex) return;

    // 移除栈顶控制器
    [self.navigationController popViewControllerAnimated:YES];
}

// 无论是手动类型的segue还是自动类型的segue, 在跳转之前都会执行该方法
// 控制器跳转之前(执行segue之前)执行
- (void)prepareForSegue:(UIStoryboardSegue *)segue sender:(id)sender
{
    // 0.判断目标控制器是添加还是编辑
    // 1.取出目标控制器
    UIViewController *vc = segue.destinationViewController;
    if ([vc isKindOfClass:[NJAddViewController class]]) {
        NJAddViewController *addVc = (NJAddViewController *)vc;
        // 2.设置代理
        addVc.delegate = self;
    }else if ([vc isKindOfClass:[NJEditViewController class]]){
        // 传递数据
        NJEditViewController *editVc = (NJEditViewController *)vc;

        // 通过tableview获取被点击的行号
        NSIndexPath *path = [self.tableView indexPathForSelectedRow];
        // 取出被点击行的模型
        NJContatc *c = self.contatcs[path.row];
        NSLog(@"联系人列表 %p" , c);
        // 赋值模型
        editVc.contatc = c;
        // 设置代理
        editVc.delegate = self;
    }
}

#pragma mark - NJEditViewControllerDelegate
- (void)editViewControllerDidClickSavBtn:(NJEditViewController *)editViewController contatc:(NJContatc *)cpmtatc
{
    // 0.更新保存的数据
//    NSString *path = [[NSSearchPathForDirectoriesInDomains(NSDocumentDirectory, NSUserDomainMask, YES) lastObject] stringByAppendingPathComponent:@"contacts.arc"];
    [NSKeyedArchiver archiveRootObject:self.contatcs toFile:NJContactsPath];

    // 1.刷新表格
    [self.tableView reloadData];
}

#pragma mark - NJAddViewControllerDelegate
- (void)addViewControllerDidAddBtn:(NJAddViewController *)editViewController contatc:(NJContatc *)contatc
{
    // 1.保存数据到数组中
    [self.contatcs addObject:contatc];

    // 在这个地方保存用户添加的所有的联系人信息
//    NSString *path = [[NSSearchPathForDirectoriesInDomains(NSDocumentDirectory, NSUserDomainMask, YES) lastObject ] stringByAppendingPathComponent:@"contacts.arc"];
    [NSKeyedArchiver archiveRootObject:self.contatcs toFile:NJContactsPath];


    // 2.刷新表格
    [self.tableView reloadData];
}

#pragma mark - 数据源方法
- (NSInteger)tableView:(UITableView *)tableView numberOfRowsInSection:(NSInteger)section
{
    return self.contatcs.count;
}
- (UITableViewCell *)tableView:(UITableView *)tableView cellForRowAtIndexPath:(NSIndexPath *)indexPath
{
    // 1.创建cell
    NJContatcCell *cell  = [NJContatcCell cellWithTableView:tableView];
    // 2.设置模型
    // 设置数据
    NJContatc *c = self.contatcs[indexPath.row];//0
    cell.contatc = c;
    // 2.返回cell
    return cell;
}

// 只在在tableview的编辑模式下才有添加

// 只要实现该方法, 手指在cell上面滑动的时候就自动实现了删除按钮
// commitEditingStyle: 传入提交的编辑操作(删除/添加)
// forRowAtIndexPath: 当前正在编辑的行
- (void)tableView:(UITableView *)tableView commitEditingStyle:(UITableViewCellEditingStyle)editingStyle forRowAtIndexPath:(NSIndexPath *)indexPath
{
//    NSLog(@"%d", indexPath.row);

    if (UITableViewCellEditingStyleDelete == editingStyle) {
        // 1.修改数据
        [self.contatcs removeObjectAtIndex:indexPath.row];
        // 2.刷新表格
        // reloadData会重新调用数据的所有方法,刷新所有的行
        //    [self.tableView reloadData];

        // 该方法用于删除tableview上指定行的cell
        // 注意:使用该方法的时候,模型中删除的数据的条数必须和deleteRowsAtIndexPaths方法中删除的条数一致,否则会报错
        // 简而言之,就删除的数据必须和删除的cell保持一致
        [self.tableView deleteRowsAtIndexPaths:@[indexPath] withRowAnimation:UITableViewRowAnimationTop];

        // 3.更新保存的文件
        [NSKeyedArchiver archiveRootObject:self.contatcs toFile:NJContactsPath];

    }else if (UITableViewCellEditingStyleInsert == editingStyle)
    {
        // 添加一条数据
//        NSLog(@"添加一条数据");

        // 1.修改数据
        NJContatc *c = [[NJContatc alloc] init];
        c.name = @"xff";
        c.phoneNumber = @"123456";

//        [self.contatcs addObject:c];
        [self.contatcs insertObject:c atIndex:indexPath.row + 1];

//        NJContatc *c1 = [[NJContatc alloc] init];
//        c1.name = @"xzz";
//        c1.phoneNumber = @"123456";
//        [self.contatcs insertObject:c1 atIndex:indexPath.row + 2];

        // 2.刷新表格
//        [self.tableView reloadData];

        NSIndexPath *path = [NSIndexPath indexPathForRow:indexPath.row + 1 inSection:0];
        // 注意点:数组中插入的条数必须和tableview界面上插入的cell条一致
        // 否则程序会报错
        [self.tableView insertRowsAtIndexPaths:@[path] withRowAnimation:UITableViewRowAnimationBottom];
    }

}

// 用于告诉系统开启的编辑模式是什么模式
- (UITableViewCellEditingStyle)tableView:(UITableView *)tableView editingStyleForRowAtIndexPath:(NSIndexPath *)indexPath
{
//    NSLog(@"indexPath = %d", indexPath.row);
//    return UITableViewCellEditingStyleInsert;

    if (indexPath.row % 2 == 0) {
        return UITableViewCellEditingStyleInsert;
    }else
    {
        return UITableViewCellEditingStyleDelete;
    }
}

#pragma mark - 懒加载
- (NSMutableArray *)contatcs
{
    if (_contatcs == nil) {

        // 1.获取路径
//        NSString *path = [[NSSearchPathForDirectoriesInDomains(NSDocumentDirectory, NSUserDomainMask, YES) lastObject] stringByAppendingPathComponent:@"contacts.arc"];
        // 2.从文件中读取数组
        _contatcs =  [NSKeyedUnarchiver unarchiveObjectWithFile:NJContactsPath];

        // 3.如果第一次启动没有文件,就创建一个空的数组用于保存数据
        if (_contatcs == nil) {
            _contatcs = [NSMutableArray array];
        }

    }
    return _contatcs;
}

@end
添加控制器:
#import "NJAddViewController.h"
//#import "NJContatcsViewController.h"
#import "NJContatc.h"

@interface NJAddViewController ()
@property (weak, nonatomic) IBOutlet UITextField *nameField;
@property (weak, nonatomic) IBOutlet UITextField *phoneField;
@property (weak, nonatomic) IBOutlet UIButton *addBtn;
/**
 *  点击添加按钮
 */
- (IBAction)addBtnOnClick:(UIButton *)sender;

@end

@implementation NJAddViewController
- (void)viewDidLoad
{
    [super viewDidLoad];
    // 监听文本输入框的改变

    // 1.拿到通知中心
    NSNotificationCenter *center = [NSNotificationCenter defaultCenter];
    // 2.注册监听
    // 注意点: 一定要写上通知的发布者
    [center addObserver:self selector:@selector(textChange) name:UITextFieldTextDidChangeNotification object:self.nameField];
    [center addObserver:self selector:@selector(textChange) name:UITextFieldTextDidChangeNotification object:self.phoneField];

}

- (void)viewDidAppear:(BOOL)animated
{
    // 3.主动召唤出键盘
    [self.nameField becomeFirstResponder];
}

- (void)dealloc
{
    [[NSNotificationCenter defaultCenter] removeObserver:self];
}
- (void)textChange
{
    self.addBtn.enabled = (self.nameField.text.length > 0  &&
                             self.phoneField.text.length > 0);
}

- (IBAction)addBtnOnClick:(UIButton *)sender
{
    // 0. 移除栈顶控制器
    [self.navigationController popViewControllerAnimated:YES];

    // 1.获取用户输入的姓名和电话
    NSString *name = self.nameField.text;
    NSString *phone = self.phoneField.text;

    NJContatc *c = [[NJContatc alloc] init];
    c.name = name;
    c.phoneNumber = phone;

    // 2.传递数据给联系人列表
    if ([self.delegate respondsToSelector:@selector(addViewControllerDidAddBtn: contatc:)]) {
        [self.delegate addViewControllerDidAddBtn:self contatc:c];
    }

}
@end
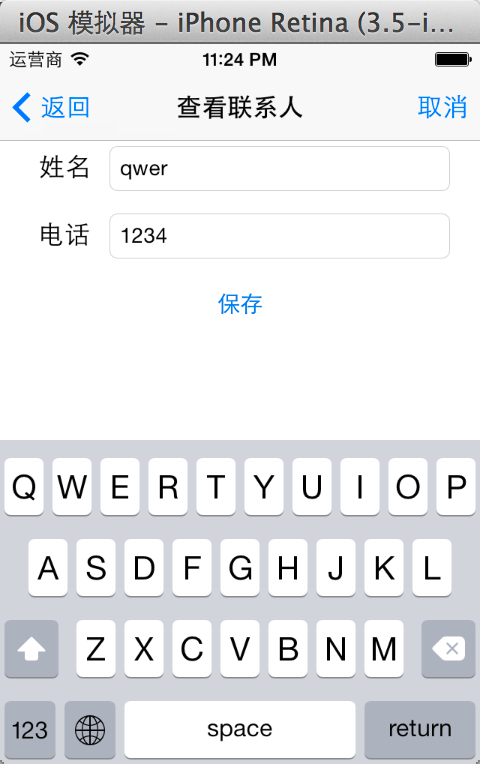
编辑控制器:
#import "NJAddViewController.h"
//#import "NJContatcsViewController.h"
#import "NJContatc.h"

@interface NJAddViewController ()
@property (weak, nonatomic) IBOutlet UITextField *nameField;
@property (weak, nonatomic) IBOutlet UITextField *phoneField;
@property (weak, nonatomic) IBOutlet UIButton *addBtn;
/**
 *  点击添加按钮
 */
- (IBAction)addBtnOnClick:(UIButton *)sender;

@end

@implementation NJAddViewController
- (void)viewDidLoad
{
    [super viewDidLoad];
    // 监听文本输入框的改变

    // 1.拿到通知中心
    NSNotificationCenter *center = [NSNotificationCenter defaultCenter];
    // 2.注册监听
    // 注意点: 一定要写上通知的发布者
    [center addObserver:self selector:@selector(textChange) name:UITextFieldTextDidChangeNotification object:self.nameField];
    [center addObserver:self selector:@selector(textChange) name:UITextFieldTextDidChangeNotification object:self.phoneField];

}

- (void)viewDidAppear:(BOOL)animated
{
    // 3.主动召唤出键盘
    [self.nameField becomeFirstResponder];
}

- (void)dealloc
{
    [[NSNotificationCenter defaultCenter] removeObserver:self];
}
- (void)textChange
{
    self.addBtn.enabled = (self.nameField.text.length > 0  &&
                             self.phoneField.text.length > 0);
}

- (IBAction)addBtnOnClick:(UIButton *)sender
{
    // 0. 移除栈顶控制器
    [self.navigationController popViewControllerAnimated:YES];

    // 1.获取用户输入的姓名和电话
    NSString *name = self.nameField.text;
    NSString *phone = self.phoneField.text;

    NJContatc *c = [[NJContatc alloc] init];
    c.name = name;
    c.phoneNumber = phone;

    // 2.传递数据给联系人列表
    if ([self.delegate respondsToSelector:@selector(addViewControllerDidAddBtn: contatc:)]) {
        [self.delegate addViewControllerDidAddBtn:self contatc:c];
    }

}
@end


 1911
1911

 被折叠的 条评论
为什么被折叠?
被折叠的 条评论
为什么被折叠?
 到【灌水乐园】发言


