


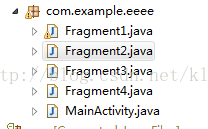
Fragment是activity的界面中的一部分或一种行为。你可以把多个Fragment们组合到一个activity中来创建一个多面界面并且你可以在多个activity中重用一个Fragment。你可以把Fragment认为模块化的一段activity,它具有自己的生命周期,接收它自己的事件,并可以在activity运行时被添加或删除。
Fragment不能独立存在,它必须嵌入到activity中,而且Fragment的生命周期直接受所在的activity的影响。例如:当activity暂停时,它拥有的所有的Fragment们都暂停了,当activity销毁时,它拥有的所有Fragment们都被销毁。然而,当activity运行时(在onResume()之后,onPause()之前),你可以单独地操作每个Fragment,比如添加或删除它们。当你在执行上述针对Fragment的事务时,你可以将事务添加到一个棧中,这个栈被activity管理,栈中的每一条都是一个Fragment的一次事务。有了这个栈,就可以反向执行Fragment的事务,这样就可以在Fragment级支持“返回”键(向后导航)。
本章描述如何使用fragment,包括fragment在加入activity的后退棧中时如何保持自己的状态,如何与activity以及其它fragment们共享事件,如何显示在activity的动作栏等。
形象的说就是Activity是窗,而Fragment就是玻璃。我们可以把窗换不同种类的玻璃,只要窗框不被损坏,玻璃就可以有它的状态,要是窗的框破损了,那玻璃就没有了承载它的物品。它的各种状态就无法展现。当然这都是我自己的理解,要是不好的话希望也帮我纠正一下。
下面举个例子吧!
这是其中的一个Fragment,其它三个都是一样的布局也是一下样 下面我都只写其中的一个
public class Fragment2 extends Fragment {
@Override
public View onCreateView(LayoutInflater inflater, ViewGroup container,
		Bundle savedInstanceState) {
	// TODO Auto-generated method stub
	return inflater.inflate(R.layout.fragment2, null);
}
}
布局:
<?xml version="1.0" encoding="utf-8"?>
<LinearLayout xmlns:android="http://schemas.android.com/apk/res/android"
android:layout_width="match_parent"
android:layout_height="match_parent"
android:orientation="vertical" >
<TextView
android:gravity="center_vertical|center_horizontal"
android:layout_height="match_parent"
android:layout_width="match_parent"
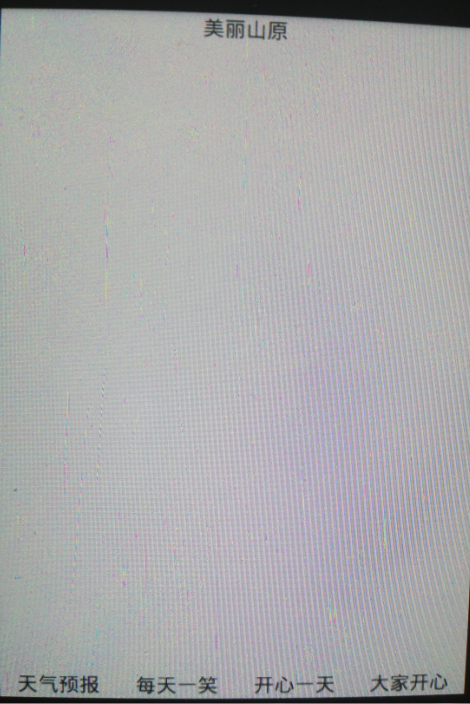
android:text="美丽山原"/>
</LinearLayout>接下来就是主要的Activity了:
public class MainActivity extends Activity implements OnClickListener{
//private LinearLayout content;
private TextView b1,b2,b3,b4;
private FragmentManager fm;
private FragmentTransaction ft;
	@Override
	protected void onCreate(Bundle savedInstanceState) {
		super.onCreate(savedInstanceState);
		setContentView(R.layout.activity_main);
		b1 = (TextView) findViewById(R.id.tab1);
		b2 = (TextView) findViewById(R.id.tab2);
		b3 = (TextView) findViewById(R.id.tab3);
		b4 = (TextView) findViewById(R.id.tab4);
		b1.setOnClickListener(this);
		b2.setOnClickListener(this);
		b3.setOnClickListener(this);
		b4.setOnClickListener(this);
	}
@Override
public void onClick(View v) {
	fm=getFragmentManager();
	 ft = fm.beginTransaction();
switch (v.getId()) {
case R.id.tab1:
	ft.replace(R.id.content, new Fragment1());
	break;
case R.id.tab2:
	ft.replace(R.id.content, new Fragment2());
	break;
case R.id.tab3:
	ft.replace(R.id.content, new Fragment3());
	break;
case R.id.tab4:
	ft.replace(R.id.content, new Fragment4());
	break;

default:
	break;
}
	ft.commit();
}


}
当你替换了Fragment时候 别忘了commit一下。
最后看下布局:
<RelativeLayout xmlns:android="http://schemas.android.com/apk/res/android"
    xmlns:tools="http://schemas.android.com/tools"
    android:layout_width="match_parent"
    android:layout_height="match_parent"
    android:orientation="vertical"
    tools:context=".MainActivity" >

    <LinearLayout
        android:id="@+id/linear"
        android:layout_width="match_parent"
        android:layout_height="wrap_content"
        android:layout_alignParentBottom="true"
        android:orientation="horizontal" >

        <TextView
            android:id="@+id/tab1"
            android:layout_width="match_parent"
            android:layout_height="wrap_content"
            android:layout_weight="1"
            android:gravity="center_vertical|center_horizontal"
            android:text="天气预报" />

        <TextView
            android:id="@+id/tab2"
            android:layout_width="match_parent"
            android:layout_height="wrap_content"
            android:layout_weight="1"
            android:gravity="center_vertical|center_horizontal"
            android:text="每天一笑" />

        <TextView
            android:id="@+id/tab3"
            android:layout_width="match_parent"
            android:layout_height="wrap_content"
            android:layout_weight="1"
            android:gravity="center_vertical|center_horizontal"
            android:text="开心一天" />

        <TextView
            android:id="@+id/tab4"
            android:layout_width="match_parent"
            android:layout_height="wrap_content"
            android:layout_weight="1"
            android:gravity="center_vertical|center_horizontal"
            android:text="大家开心" />
    </LinearLayout>

    <LinearLayout
        android:id="@+id/content"
        android:layout_width="match_parent"
        android:layout_height="match_parent"
        android:layout_above="@id/linear"
        android:orientation="vertical" />

</RelativeLayout>
最后看一下结果图:


 6009
6009


 被折叠的 条评论
为什么被折叠?
被折叠的 条评论
为什么被折叠?
 到【灌水乐园】发言


