


用maven编排测试数据库
单元测试时,我们希望使用独立而干净的数据库,不受开发库中的数据影响,这时可以在单元测试时,使用临时的测试数据库。
用Spring的profile指定不同场景下的数据库配置
为了在单元测试中使用与开发调试和生产环境不同的数据库,可以用Profile指定配置项。
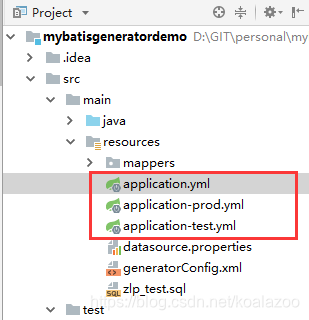
比如,生产环境与测试环境要连接不同的数据库,我们可以定义在生产环境中的profile叫"prod",在单元测试时profile叫"test",则需要新加两份配置文件,分别命名为:application-prod.yml和application-test.yml,命名规则为application-<profile_name>.yml。
在主配置文件application.yml中,只需要写相同部分,并且指定当前默认激活的profile,而不同部分分别在两个配置文件中定义,如下:
- application.yml:
server:
  port: 8080

mybatis:
  mapper-locations: classpath:mappers/*.xml
  type-aliases-package: com.zhulp.mg_demo

spring:
  profiles:
    active: prod
  datasource:
    type: com.alibaba.druid.pool.DruidDataSource
    driver-class-name: com.mysql.jdbc.Driver
    username: root
    password: 123456
- application-prod.yml
spring:
  datasource:
    url: jdbc:mysql://mysql.quncion:3306/zlp_test?useUnicode=true&characterEncoding=UTF-8&zeroDateTimeBehavior=convertToNull&useSSL=true
- application-test.yml
spring:
  datasource:
    url: jdbc:mysql://mysql.quncion:3306/zlp_test_test?useUnicode=true&characterEncoding=UTF-8&zeroDateTimeBehavior=convertToNull&useSSL=true
可以看到,以上两份配置,只是指定了分别使用的数据库URL,另外部分写在主配置文件application.yml中。
有了配置,需要在单元测试时指定使用test这份profile,只需要在单元测试类加上注解@ActiveProfiles(“test”),则单元测试中会连接测试库。而正式运行的类则不需要加,自动使用默认的prod,连接正式数据库。
@RunWith(SpringRunner.class)
@ActiveProfiles("test")
@SpringBootTest(classes = Application.class)
@WebAppConfiguration
public class CourierControllerTest {
    ....
}
用sql-maven-plugin初始化测试数据库及清理
典型的脚本包括以下步骤:
- 删除旧数据库
- 创建新数据库
- 创建表,索引等
- 插入初始数据
- 删除数据库
示例中分别在maven的process-test-resources和test这两个phase中执行初始化数据库和删除数据库操作。
先创建初始化数据库的sql脚本,包括以上的1,2,3,4步:
DROP DATABASE IF EXISTS `zlp_test_test`;
CREATE DATABASE IF NOT EXISTS `zlp_test_test` /*!40100 DEFAULT CHARACTER SET utf8 */;
USE `zlp_test_test`;
CREATE TABLE `tbl_courier` (
    `courier_id` VARCHAR(45) NOT NULL,
    `parent_id` VARCHAR(45) NULL DEFAULT NULL,
    `employee_code` VARCHAR(45) NULL DEFAULT NULL,
    `courier_name` VARCHAR(45) NULL DEFAULT NULL,
    `courier_phone` VARCHAR(100) NOT NULL,
    `region` VARCHAR(45) NULL DEFAULT NULL,
    `active` INT(11) NOT NULL,
    `opertortime` DATETIME(6) NULL DEFAULT NULL,
    PRIMARY KEY (`courier_id`),
    INDEX `tbl_courier_0cabe842` (`courier_phone`)
)
COLLATE='utf8_general_ci'
ENGINE=InnoDB
;
INSERT INTO `tbl_courier` (`courier_id`, `parent_id`, `employee_code`, `courier_name`, `courier_phone`, `region`, `active`, `opertortime`) VALUES
  ('10005', '7394', NULL, '阪泉', '13917275869', NULL, 1, '2015-11-16 09:27:43.557393'),
  ('10006', NULL, NULL, '测试人员', '13012345678', NULL, 1, NULL);
在maven配置文件pom.xml中,引入插件和指定要执行的数据库sql脚本:
<build>
    <plugins>
        <plugin>
            <groupId>org.springframework.boot</groupId>
            <artifactId>spring-boot-maven-plugin</artifactId>
        </plugin>
        <plugin>
            <groupId>org.mybatis.generator</groupId>
            <artifactId>mybatis-generator-maven-plugin</artifactId>
            <version>1.3.7</version>
            <configuration>
                <verbose>true</verbose>
                <overwrite>true</overwrite>
            </configuration>
        </plugin>
        <plugin>
            <groupId>org.codehaus.mojo</groupId>
            <artifactId>sql-maven-plugin</artifactId>
            <version>1.5</version>
            <dependencies>
                <!-- 定义依赖的数据库驱动jar包(mysql) -->
                <dependency>
                    <groupId>mysql</groupId>
                    <artifactId>mysql-connector-java</artifactId>
                    <version>5.1.43</version>
                </dependency>
            </dependencies>
            <configuration>
                <!-- 定义数据库连接参数,这里的URL不能指向具体的库,因为库是在execution过程中临时建立的 -->
                <driver>com.mysql.jdbc.Driver</driver>
                <url>jdbc:mysql://mysql.quncion:3306</url>
                <username>root</username>
                <password>123456</password>
            </configuration>
            <executions>
                <execution>
                    <!-- 准备测试库 -->
                    <id>create-data</id>
                    <phase>process-test-resources</phase>
                    <goals>
                        <goal>execute</goal>
                    </goals>
                    <configuration>
                        <srcFiles>
                            <srcFile>src/test/sql/zlp_test.sql</srcFile>
                        </srcFiles>
                    </configuration>
                </execution>
                <execution>
                    <!-- 删除测试库 -->
                    <id>drop-db-after-test</id>
                    <phase>test</phase>
                    <goals>
                        <goal>execute</goal>
                    </goals>
                    <configuration>
                        <autocommit>true</autocommit>
                        <sqlCommand>drop database zlp_test_test</sqlCommand>
                    </configuration>
                </execution>
            </executions>
        </plugin>
    </plugins>
</build>
当然,为了更好的控制,你也可以将不同的步骤分开,在pom.xml中分别定义。
<build>
    <plugins>
        <plugin>
            <!-- 加入sql-maven-plugin插件 -->
            <groupId>org.codehaus.mojo</groupId>
            <artifactId>sql-maven-plugin</artifactId>
            <version>1.5</version>
            <dependencies>
                <!-- 定义依赖的数据库驱动jar包(mysql) -->
                <dependency>
                    <groupId>mysql</groupId>
                    <artifactId>mysql-connector-java</artifactId>
                    <version>5.1.43</version>
                </dependency>
            </dependencies>
            <configuration>
                <!-- 定义数据库连接参数,这里要指定测试库,这是此插件全局参数设置 -->
                <driver>com.mysql.jdbc.Driver</driver>
                <url>jdbc:mysql://mysql.quncion:3306/zlp_test_test</url>
                <username>root</username>
                <password>123456</password>
            </configuration>
            <executions>
                <execution>
                    <id>drop-db-before-test-if-any</id>
                    <phase>process-test-resources</phase>
                    <goals>
                        <goal>execute</goal>
                    </goals>
                    <!-- 1. 删除旧数据库,由于可能旧库已删除,因此这一步只能连接mysql服务,不能指定库名,需要重定义url覆盖全局url -->
                    <configuration>
                        <url>jdbc:mysql://mysql.quncion:3306</url>
                        <autocommit>true</autocommit>
                        <sqlCommand>drop database zlp_test_test</sqlCommand>
                        <onError>continue</onError>
                    </configuration>
                </execution>
                <execution>
                    <id>create-db</id>
                    <phase>process-test-resources</phase>
                    <goals>
                        <goal>execute</goal>
                    </goals>
                    <!-- 2. 创建测试库,同样不能指定库名 -->
                    <configuration>
                        <url>jdbc:mysql://mysql.quncion:3306</url>
                        <!-- no transaction -->
                        <autocommit>true</autocommit>
                        <sqlCommand>create database zlp_test_test</sqlCommand>
                    </configuration>
                </execution>
                <execution>
                    <id>create-schema</id>
                    <phase>process-test-resources</phase>
                    <goals>
                        <goal>execute</goal>
                    </goals>
                    <!-- 3. 建表,建索引等,运行zlp_test.sql脚本中的sql语句 -->
                    <configuration>
                        <autocommit>true</autocommit>
                        <srcFiles>
                            <srcFile>src/main/resources/zlp_test.sql</srcFile>
                        </srcFiles>
                    </configuration>
                </execution>
                <execution>
                    <id>create-data</id>
                    <phase>process-test-resources</phase>
                    <goals>
                        <goal>execute</goal>
                    </goals>
                    <!-- 4. 插入初始化数据,示例中运行了两个sql脚本,按需要自行修改 -->
                    <configuration>
                        <orderFile>ascending</orderFile>
                        <fileset>
                            <basedir>${basedir}</basedir>
                            <includes>
                                <include>src/test/sql/test-data2.sql</include>
                                <include>src/test/sql/test-data1.sql</include>
                            </includes>
                        </fileset>
                    </configuration>
                </execution>
                <execution>
                    <id>drop-db-after-test</id>
                    <phase>test</phase>
                    <goals>
                        <goal>execute</goal>
                    </goals>
                    <!-- 5. 删除测试库 -->
                    <configuration>
                        <autocommit>true</autocommit>
                        <sqlCommand>drop database zlp_test_test</sqlCommand>
                    </configuration>
                </execution>
            </executions>
        </plugin>
    </plugins>
</build>
至此,maven配置完成,在maven打包触发的单元测试或单独执行的单元测试中,都会在运行单元测试前初始化测试库,在完成单元测试后删除测试库。
类似于插入记录之类的请求测试,由于每次都是从一个干净的库中开始,不再会出现由于ID重复而导致的失败,也不再会由于联调或测试人员的数据干扰了单元测试的结果。
注:每个单元测试case完成后,应该用rollback将测试库中的数据还原,以避免不同test case之间先后顺序和由于单元测试产生的脏数据造成的影响。
调试
为了能用单元测试发起调试,以便于设置断点单步,可以在运行配置中增加执行sql:execute,如下:
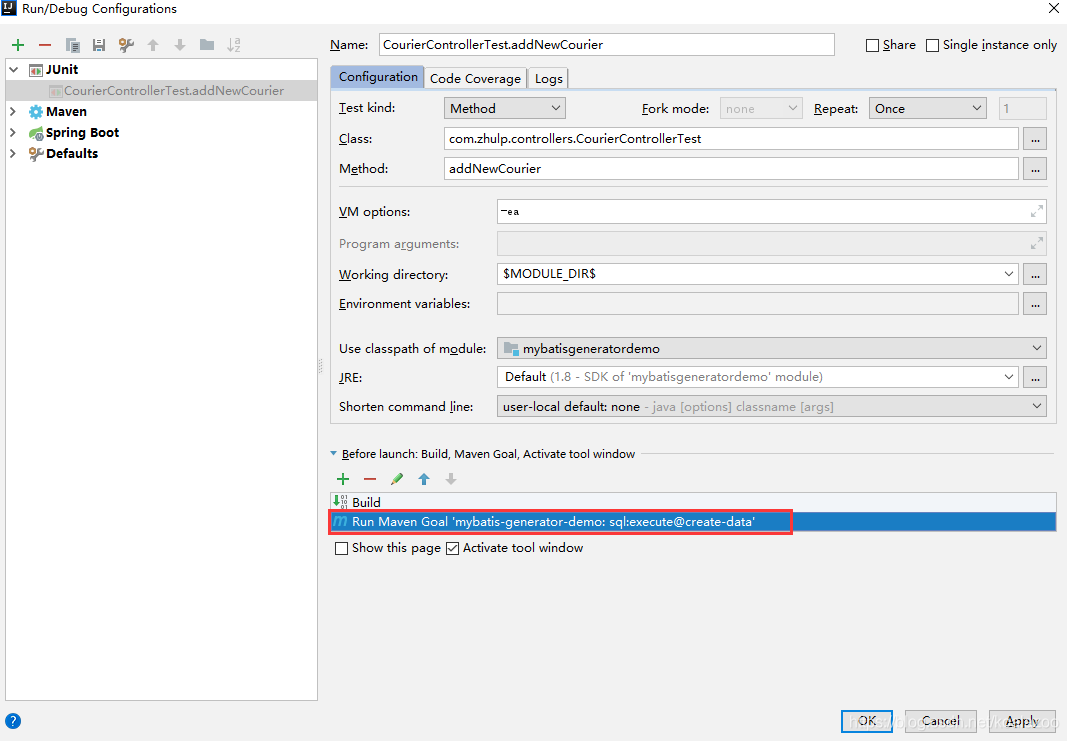
为了简便,可以先发起某Test Case的Debug,有了执行目标后,编辑此目标:
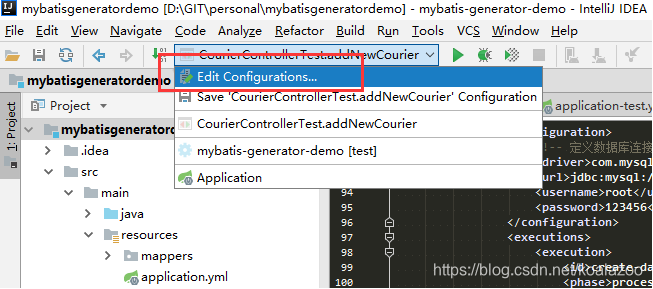
配置中,添加在执行前运行命令:
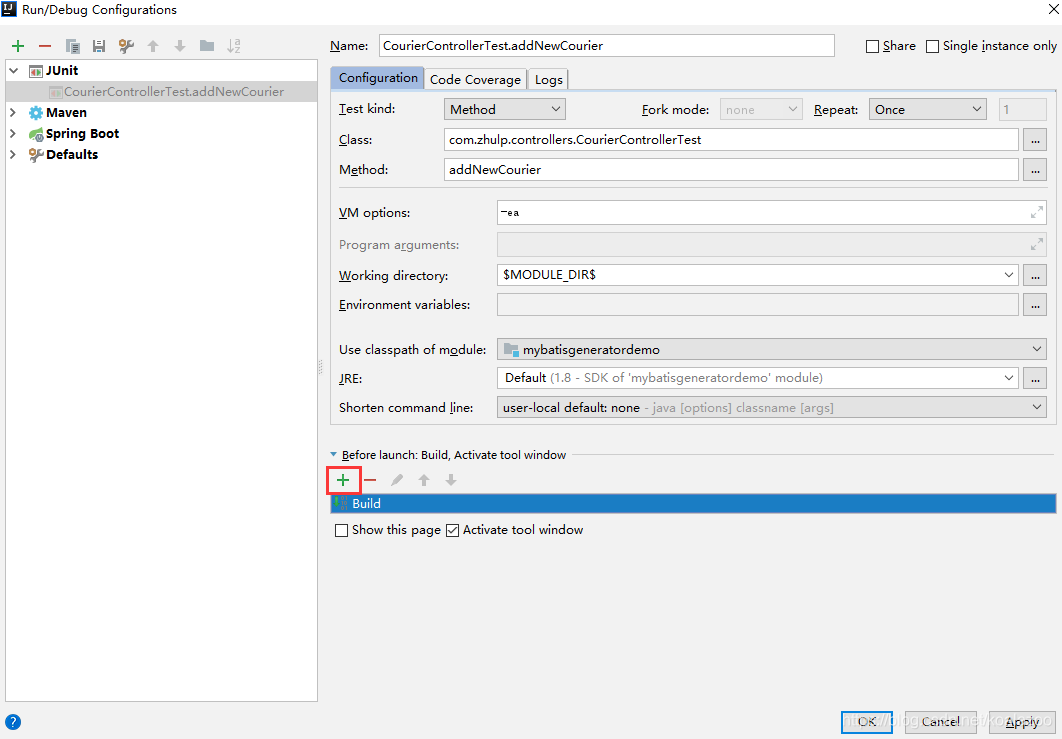
选择Run Maven Goal
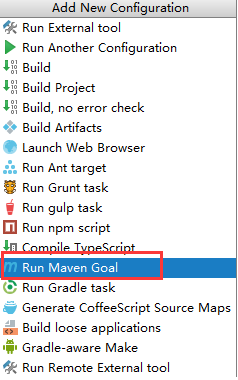
因为之前我们的初始化脚本是在id为create-data的execution中指定的,在弹出的窗口中,运行Command line: sql:execute@create-data

添加完是这样的:
这时再Debug Test Case,就能先初始化数据,并能正确进到断点。
单元测试默认初始化
开发中,经常会需要对某个单元测试进行调试,如果都要按上述方法设置,会非常麻烦,在IDEA中,可以设置默认属性:
因为都是JUnit单元测试,编辑JUnit的默认设置,需要修改"Use classpath of module:",指向本项目,然后在Before launch中,像前一章节中一样,添加Maven Goal: sql:execute@init-db
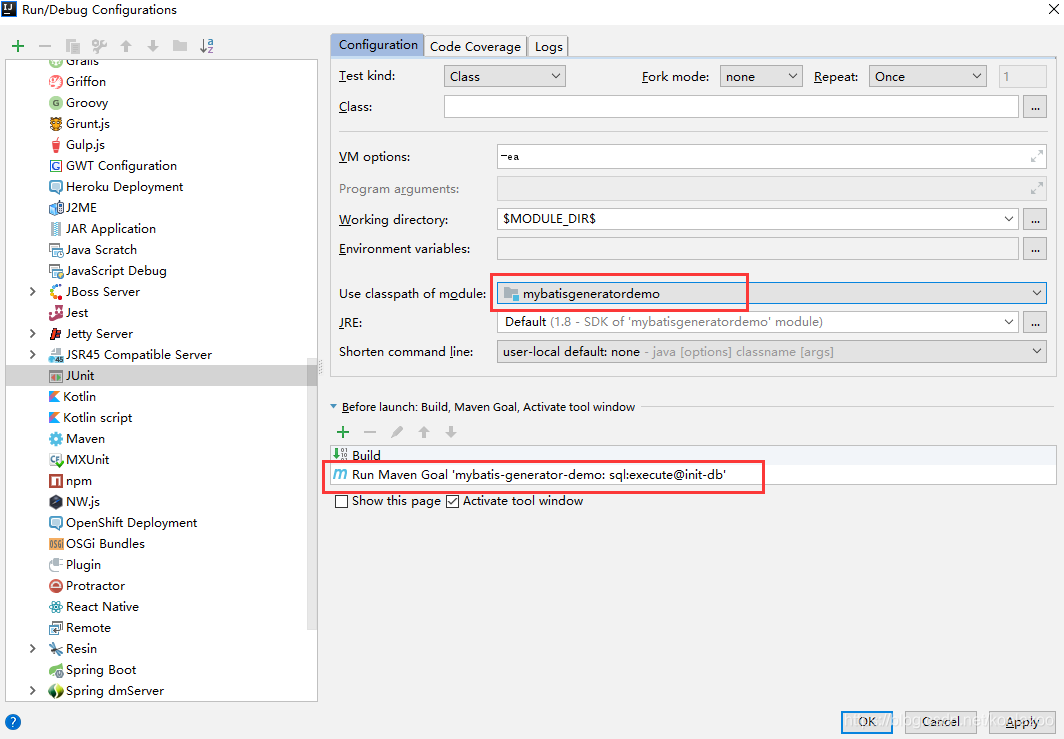
Apply或者OK后,后面再发起的单元测试,自动会执行此目标。


 3066
3066


 被折叠的 条评论
为什么被折叠?
被折叠的 条评论
为什么被折叠?
 到【灌水乐园】发言


