


目录
空白控制
在实际输出的HTML文件中,模板中的jinja2语句,表达式和注释会保留移除后的空行。比如:
实际输出的HTML代码:
<i>kongsh can play the game</i>


<i>kongsh can paly the game only 10 minutes! </i>
这些代码缩进可以增加代码的可读性,但是并不是必须的。如果想要在渲染时自动去掉空行,可以在定界符内侧添加减号,比如{% -endfor%},会移除该语句前的空白,同理,在右边的定界符内侧添加减号可以移除语句后的空白,
在watchlist.html中添加以下代码:
<!DOCTYPE html>
<html lang="en">
<head>
<meta charset="UTF-8">
<title>{{ user.username }}'s watchlist</title>
</head>
<body>
<a href="{{ url_for('index') }}">← Return</a>
<h2>{{ user.username}}</h2>
{% if user.bio %}
<i>{{ user.bio }}</i>
{% else %}
<i>This user has not provided a bio.</i>
{% endif %}
{% set age=23 %}
{% if age > 10 and age <=20%}
<i>{{ user.username }} can play the game</i>
{% endif %}
{% if age > 20 %}
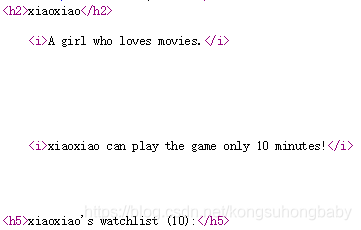
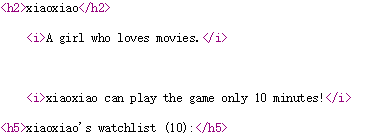
<i>{{ user.username }} can play the game only 10 minutes!</i>
{% endif %}
{# 以下是电影清单(这是注释) #}
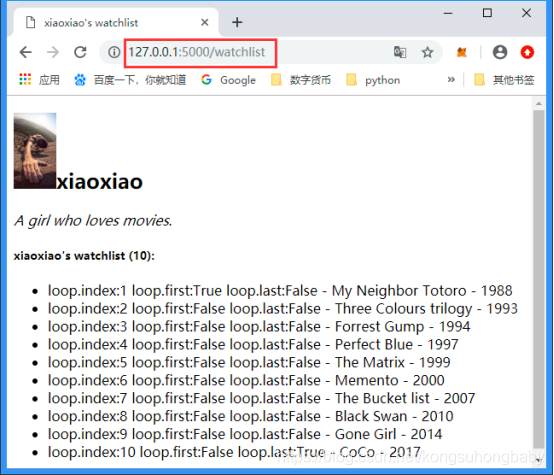
<h5>{{ user.username }}'s watchlist ({{ movies|length }}):</h5>
<ul>
{% for movie in movies %}
<li>loop.index:{{ loop.index }} loop.first:{{ loop.first }}
loop.last:{{ loop.last }} - {{ movie.name }} - {{ movie.year }}</li>
{% endfor %}
</ul>
</body>
</html>
浏览器访问http://127.0.0.1:5000/watchlist后页面渲染后的源码:
添加减号:
{% set age=23 %}
{%- if age > 10  and age <=20%}
    <i>{{ user.username }} can play the game</i>
{% endif -%}

{%- if age > 20 %}
    <i>{{ user.username }} can play the game only 10 minutes!</i>
{% endif -%}
浏览器访问http://127.0.0.1:5000/watchlist后页面渲染后的源码:
除了在模板中使用减号来控制空白,也可以使用模板环境对象提供的trim_blocks和lstrip_blocks属性设置,前者用来删除jinja2语句后的第一个空行,后者用来删除jinja2语句所在行之前的空格和制表符(tab):
app.jinja_env.trim_blocks = True
app.jinja_env.lstrip_blocks = True
trim_blocks中的block指的是使用{% … %}定界符的代码块,与模板继承中的块无关。
加载静态文件
一个web项目不仅需要HTML模板,还需要很多静态文件,比如CSS,javascript文件、图片和声音。在flask程序中,默认需要将静态文件存储在与主脚本(包含程序实例的脚本)同级目录的static文件夹中。
为了在HTML文件中引用静态文件,我们需要使用url_for()函数获取静态文件的URL。falsk内置了用于获取静态文件的视图函数,端点值为static,默认的URL规则为/static/<path:filename>,URL变量filename是相对于文件夹根目录的文件路径。
如果需要使用其他文件夹来存储静态文件,可以在实例化flask类时使用static_folder参数指定,静态文件的URL路径中的static也会自动跟随文件夹名称变化。在实例化flask类时用static_url_path参数可以自定义静态文件的URL路径。
如:app = Flask(__name__, static_folder="static2", static_url_path="/static3")
用static_folder参数指定静态资源的路径,修改了这个参数后,url规则默认会自动修改文件夹名称;static_url_path指定内置的获取静态文件的视图函数的url规则。
在虚拟环境下执行flask routes:
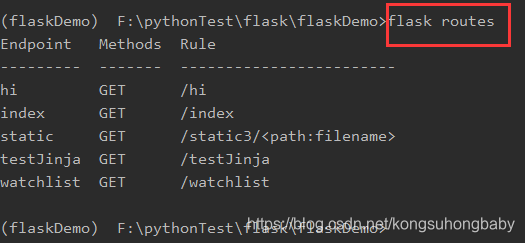
不修改static_folder和static_url_path参数时,静态文件路径和url规则默认为static。
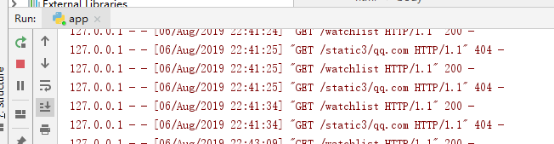
在程序的static目录下存一张图片,例如qq.jpg,我们可以通过url_for(‘static’, filename=’qq.jpg’)获取这个文件的URL,这个函数调用生成的url为/static/qq.jpg。在app.py中修改为app = Flask(__name__),在浏览器中输入127.0.0.1:5000/static/qq.jpg即可访问这个图片。

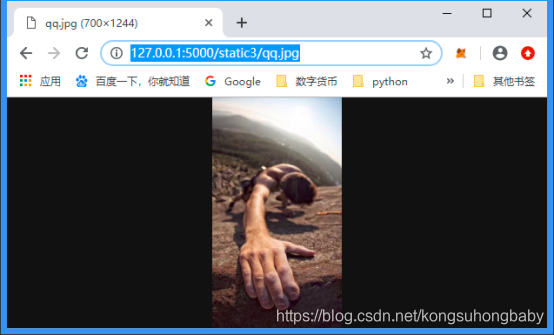
拷贝static命名为static2,在app.py中修改为app = Flask(__name__, static_folder="static2", static_url_path="/static3"),在浏览器中输入http://127.0.0.1:5000/static3/qq.jpg即可访问这个图片。
在watchlist.html中,在用户名的左侧添加这个图片,使用url_for()函数生成图片的src属性所需的图片URL:img src="{{ or('static',filename
<h2><img src="{{ url_for('static',filename='qq.jpg') }}" width="50">{{ user.username}}</h2>='qq.jpg') }}" width="50">{{ user.username}}</h2>
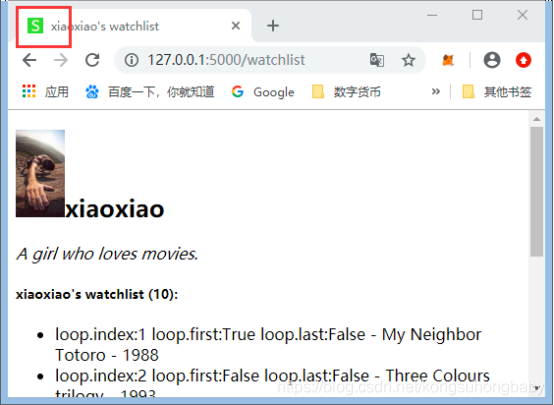
在浏览器中访问:http://127.0.0.1:5000/watchlist可以看到添加的图片
添加Favicon
在运行flask程序时经常在命令行看到一条404状态的GET请求,请求的URL为/favicon.ico,例如:
127.0.0.1 - - [01/Mar/2019 21:27:26] "GET /favicon.ico HTTP/1.1" 404 –
这个favicon.ico文件指的是favicon(favorite icon,收藏夹头像/网站头像),这是一个在浏览器标签页、地址栏和书签收藏夹等处显示的小图标,作为网站的特殊标记。浏览器在发起请求时,会自动向根目录请求这个文件,在前面的实例程序中,我们没有提供这个文件,所有会产生404记录。要想为web项目添加favicon,要先有一个favicon文件,并放置在static目录下,它通常是一个宽和高相同的ico格式文件,命名为favicon.ico。
flask中静态文件默认路径为/static/filename,为了正确返回favicon,可以显示地在HTML页面中声明favicon的路径。首先可以在<head>部分添加一个<link>元素,任何将rel属性设置为icon:
watchlist.html文件修改:
<head>
    <meta charset="UTF-8">
    <title>{{ user.username }}'s watchlist</title>
    <link rel="icon" type="image/x-icon" href="{{ url_for('static', filename='favicon.ico') }}">
</head>
<body>在浏览器中访问:http://127.0.0.1:5000/watchlist
使用CSS框架
在编写web程序时,手动编写CSS很麻烦,更通用的做法是使用CSS框架来为程序添加样式。CSS框架内置了大量可以直接使用的CSS样式类和javascript函数,使用他们可以非常快速的让程序页面变得无关和易用,同时我们也可以定义自己的CSS文件来进行补充和调整。Bootstrap是最流行的开源前端框架之一,它有浏览器支持广泛、响应式设计等特点,使用它可以快速搭建现代的网页。
通常情况下,CSS和javascript的资源引用会在基模板中定义,如:
在基模板base.html中,把styles和scripts块,分别写入如下内容:
{% block styles %}
<link rel="stylesheet" href="{{ url_for('static',filename='css/bootstrap.min.css') }}">
{% endblock %}
{% block scripts %}
<script src="{{ url_for('static', filename='js/jquery.min.js') }}}"></script>>
<script src="{{ url_for('static', filename='js/popper.min.js') }}}"></script>
<script src="{{ url_for('static', filename='js/bootstrap.min.js') }}"></script>
{% endblock %}
index.html:
<!DOCTYPE html>
<html lang="en">
<head>
{% block head %}
<meta charset="utf-8">
<title>{% block title %}Template - HelloFlask{% endblock %}</title>
{% block styles %}
<link rel="stylesheet" href="{{ url_for('static',filename='css/bootstrap.min.css') }}">
{% endblock %}
{% endblock %}
</head>
<body>
<nav>
<ul><li><a href="{{ url_for('index') }}">Home</a></li></ul>
</nav>
<main>
{% block content %}
{% endblock %}
</main>
<footer>
{% block footer %}
{% endblock %}
</footer>
{% block scripts %}
<script src="{{ url_for('static', filename='js/jquery.min.js') }}}"></script>>
<script src="{{ url_for('static', filename='js/popper.min.js') }}}"></script>
<script src="{{ url_for('static', filename='js/bootstrap.min.js') }}"></script>
{% endblock %}
</body>
</html>
如果不适应bootstrap提供的javascript功能,有可以不加载。bootstrap所依赖的jQuery和popper.js需要单独下载,这3个javascript文件再引入时要按照jQuery->popper.js-->bootstrap的顺序引入。
如果想简化开发过程,也可以从CDN加载,这很方便。从CDN加载时,只需要将响应的URL替换为CDN提供的资源URL即可,如:
{% block styles %}
<link rel="stylesheet" href="https://maxcdn.bootstrapcdn.com/bootstrap/4.0.0/css/bootstrap.min.css">
{% endblock %}
...
{% block scripts %}
<script src="https://code.jquery.com/jquery-3.2.1.slim.min.js"></script>
<script src="https://cdnjs.cloudflare.com/ajax/libs/popper.js/1.12.9/umd/popper.min.js"></script>
<script src="https://maxcdn.bootstrapcdn.com/bootstrap/4.0.0/js/bootstrap.min.js"></script>
{% endblock %}
...
使用宏加载静态资源
为了方便加载静态资源,我们可以创建一个专门用于加载静态资源的宏,如:
{% macro static_file(type, filename_or_url, local=True) %}
{% if local %}
{% set filename_or_url = url_for('static', filename=filename_or_url) %}
{% endif %}
{% if type == 'CSS' %}
<link rel="stylesheet" href="{{ filename_or_url }}" type="text/css">
{% elif type == 'js' %}
<scirpt type ="text/javascript" src="{{ filename_or_url }}"></scirpt>
{% elif type == 'icon' %}
<link rel="icon" href="{{ filename_or_url }}">
{% endif %}
{% endmacro %}
在模板中导入宏后,只需要在调用时传入静态资源的类别和文件路径就会获得完整的资源加载语句。使用它加载CSS的例子:
<script src="{{ static_file('css', 'css/bootstrap.min.css') }}"></script>
使用它也可以从CDN加载资源,只需要将关键字参数local设为False,然后传入资源的URL即可:
<script src="{{ static_file('css', 'https://…css/bootstrap.min.css', local=False) }}"></script>
消息闪现
flask提供了一个非常有用的flash()函数,它可以用来实现“闪现”需要提供给用户的消息,比如当用户登录成功后显示“欢迎回来!”。在视图函数调优flash()函数,传入消息内容,flask()函数把消息存储在session中,我们需要在模板中使用全局函数get_flashed_messages()获取消息并将其显示。
除了jinja2内置的全局函数,flask也在模板中内置了2个全局函数:
| 函数 | 说明 |
| url_for() | 用于生成URL的函数 |
| get_flashed_message() | 用于获取flask消息的函数 |
通过flask()函数发送的消息会存储在session对象中,所以我们需要为程序这种密钥。可以通过app.secret_key属性或配置变量SECRET_KEY设置。可以在任意视图函数中调用flash()函数发送消息。如:
just_flash视图中,通过flash()函数发送一条消息,然后重定向到index视图;
@app.route('/flash')
def just_flash():
    flash("I am flask, who is looking for me?")
    return redirect(url_for("index"))
flask提供了get_flashed_messages()函数用来在模板中获取消息,因为程序的每一个页面都有可能需要显示消息,我们把获取并显示信息的代码放到基模板的content块中,这样就可以在页面主体内容上面显示消息。
在base.html中加入处理消息闪现的函数:
<main>
    {% for message in get_flashed_messages() %}
        <div class="alert">{{ message }}</div>
    {% endfor %}
    {% block content %}
    {% endblock %}
</main>
也可以自定义一个CSS规则,放到static/styles.CSS文件中。当get_flashed_messages()函数被调用时,session中存储的所有消息都会被以下。如果这是刷新页面,会发现重载后的页面不再出现此次消息。
jinja2内部使用unicode编码,所以需要向模板传递unicode对象或只包含ASCII字符的字符串。在python2中,如果字符串包含中文,需要在字符串前加u前缀,告诉python把该字符串编码成unicode格式,另外还需要在python文件的首行添加编码声明,这会让python使用utf-8来解码字符串。
在html文件中的head标签中添加编码声明:<meta charset=”utf-8”>
主体代码和文件
在网页上先访问路径127.0.0.1:5000/index,触发index视图函数的执行,index视图对应的模板是index.html,继承自基模板base.html,2个html文件构成网页的主体内容,在index.html中有两个链接分别链接到watchlist视图和just_flash视图,触发just_flash视图时会触发消息闪现。
app.py:
# encoding=utf-8
from flask import Flask, url_for, render_template, flash, redirect
import os
app = Flask(__name__)
# app = Flask(__name__, static_folder="static2", static_url_path="/static3")
app.secret_key = os.getenv("SECRET_KEY", 'KSH')


user = {"username": "xiaoxiao",
         "bio": "A girl who loves movies."}

movies = [
    {'name' : 'My Neighbor Totoro','year':'1988'},
    {'name': 'Three Colours trilogy', 'year': '1993'},
    {'name': 'Forrest Gump', 'year': '1994'},
    {'name': 'Perfect Blue', 'year': '1997'},
    {'name': 'The Matrix', 'year': '1999'},
    {'name': 'Memento', 'year': '2000'},
    {'name': 'The Bucket list', 'year': '2007'},
    {'name': 'Black Swan', 'year': '2010'},
    {'name': 'Gone Girl', 'year': '2014'},
    {'name': 'CoCo', 'year': '2017'}
]


@app.route('/hi')
def hi():
    return "hello flask!"


my_list = [1, 2, 3, 4]
my_tuple = ('a', 'b', 'c')
my_dict = {"name": "xiaoxiao", "age": 18}
my_str = "my string"
foo = "I am foo."

def my_func():
    return "This is my_func"


@app.route("/testJinja")
def testJinja():
    return render_template("testJinja.html", my_list=my_list,
                           my_tuple=my_tuple, my_dict=my_dict,
                           my_str=my_str, my_func=my_func)


@app.route("/watchlist")
def watchlist():
    return render_template("watchlist.html", user=user, movies=movies)


@app.route("/index")
def index():
    return render_template("index.html", arg1='hello', foo=foo)


@app.context_processor
def inject_foo():
    return dict(my_func=my_func)


from flask import Markup


@app.template_filter(name="musical")
def musical(s):
    return str(s) + Markup(" ♫")


def baz(s):
    if s == 'baz':
        return True
    return False


app.jinja_env.tests['baz'] = baz


@app.route('/flash')
def just_flash():
    flash("I am flask, who is looking for me?")
    return redirect(url_for("index"))


if __name__ == "__main__":
    app.run(debug=True)
base.html:
<!DOCTYPE html>
<html lang="en">
<head>
    {% block head %}
        <meta charset="UTF-8">
        <title>{% block title %}Template - HelloFlask{% endblock %}</title>
        {% block styles %}
            <link rel="stylesheet" href="{{ url_for('static', filename='css/bootstrap.min.css' ) }}">
        {% endblock %}
    {% endblock %}
</head>
<body>
    <nav>
        <ul><li><a href="{{ url_for('index') }}">Home</a></li></ul>
    </nav>
    <main>
        {% for message in get_flashed_messages() %}
            <div class="alert">{{ message }}</div>
        {% endfor %}
        {% block content %}
        {% endblock %}
    </main>
    <footer>
        {% block footer %}
            <small>©: 2019
                <a href="https://blog.csdn.net/kongsuhongbaby?t=1",title="kongsh's blog">孔素红的博客</a>/
                <a href="https://github.com/kongsh8778/" title="contact me on Github">Github</a>/
                <a href="http://helloflask.com", title="A helloflask project">Learning helloflask</a>
            </small>
        {% endblock %}
    </footer>
    {% block scripts %}
    {% endblock %}

</body>
</html>
index.html
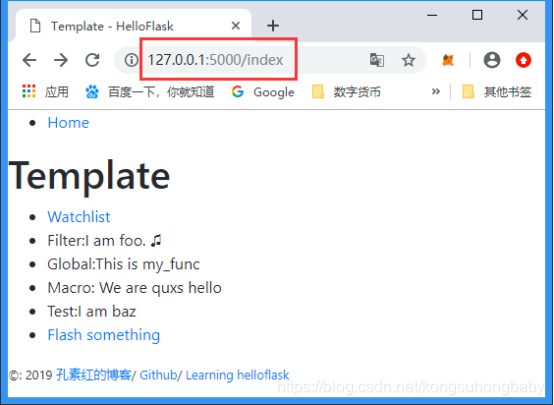
{% extends "base.html" %}
{% from "macros.html" import qux with context %}


{% block content %}
{% set name="baz" %}
    <h1>Template</h1>
    <ul>
        <li><a href="{{ url_for('watchlist') }}">Watchlist</a></li>
        <li>Filter:{{ foo|musical }}</li>
        <li>Global:{{ my_func() }}</li>
        <li>Macro:{{ qux(amount=5) }}</li>
        <li>Test:{% if name is baz %}I am baz{% endif %}</li>
        <li><a href="{{ url_for('just_flash') }}">Flash something</a></li>
    </ul>
{% endblock %}
watchlist.html
<!DOCTYPE html>
<html lang="en">
<head>
    <meta charset="UTF-8">
    <title>{{ user.username }}'s watchlist</title>
    <link rel="icon" type="image/x-icon" href="{{ url_for('static', filename='favicon.ico') }}">
</head>
<body>

<h2><img src="{{ url_for('static',filename='qq.jpg') }}" width="50">{{ user.username}}</h2>
{% if user.bio %}
    <i>{{ user.bio }}</i>
{% else %}
    <i>This user has not provided a bio.</i>
{% endif %}

{# 以下是电影清单(这是注释) #}
<h5>{{ user.username }}'s watchlist ({{ movies|length }}):</h5>
<ul>
    {% for movie in movies %}
        <li>loop.index:{{ loop.index }}  loop.first:{{ loop.first }}
         loop.last:{{ loop.last }} - {{ movie.name }} - {{ movie.year }}</li>
    {% endfor %}
</ul>
</body>
</html>
macros.html
{% macro qux(amount=1) %}
    {% if amount == 1 %}
        I am qux
    {% elif amount > 1 %}
        We are quxs
        {{ arg1 }}
    {% endif %}
{% endmacro %}

{% macro ststic_file(type, filename_or_url, local=True) %}
    {% if local %}
        {% set filename_or_url = url_for("static",filename=filename_or_url) %}
    {% endif %}
    {% if type == 'CSS' %}
        <link rel="stylesheet", href="{{ filename_or_url }}" type="text/css">
    {% elif type == "js" %}
        <script src="{{ filename_or_url }}" type="text/javascript"></script>
    {% elif type == 'icon' %}
        <link rel="icon" href="{{ filename_or_url }}">
    {% endif %}
{% endmacro %}
style.css
body {
    margin: auto;
    width: 750px;
}

nav ul {
    list-style-type: none;
    margin: 0;
    padding: 0;
    overflow: hidden;
    background-color: #333;
}

nav li {
    float: left;
}

nav li a {
    display: block;
    color: white;
    text-align: center;
    padding: 14px 16px;
    text-decoration: none;
}

nav li a:hover {
    background-color: #111;
}

main {
    padding: 10px 20px;
}

footer {
    font-size: 13px;
    color: #888;
    border-top: 1px solid #eee;
    margin-top: 25px;
    text-align: center;
    padding: 10px;

}

.alert {
  position: relative;
  padding: 0.75rem 1.25rem;
  margin-bottom: 1rem;
  border: 1px solid transparent;
  border-radius: 0.25rem;
  color: #004085;
  background-color: #cce5ff;
  border-color: #b8daff;
}网页的整体链接
单击Flash something

自定义错误页面
当程序返回错误响应时,会渲染一个默认的错误页面,我们可以注册错误处理函数来处理错误页面
错误处理函数和视图函数很相似,返回值将作为响应的主体,因此我们先要创建错误页面的模板文件。为了和普通模板区分开,我们在模板文件夹templates里建一个errors子文件夹,在其中为最常见的404和500错误创建模板文件
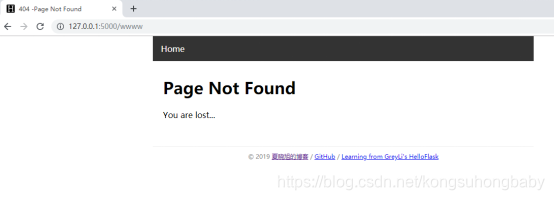
404页面模板404.html:
{% extends 'base.html' %}
{% block title %}404 -Page Not Found{% endblock %}
{% block content %}
<h1>Page Not Found</h1>
<p>You are lost...</p>
{% endblock %}
错误处理函数需要附加app.errorhandler()装饰器,并传入错误状态码作为参数。错误处理函数,并在返回值中注明对应的HTTP状态码。当发生错误时,对应的错误处理函数会被调用,它的返回值会作为错误响应的主体。
下面例子是用来捕捉404错误的错误处理器:
#encoding=utf-8
from flask import Flask,render_template

app=Flask(__name__)

@app.errorhandler(404)
def page_not_found(e):
    return render_remplate('error/404.html'),404
错误处理函数接收异常对象作为参数,内置的异常对象提供了下列常用属性,如:
Werkzeug内置的HTTP异常类的常用属性:
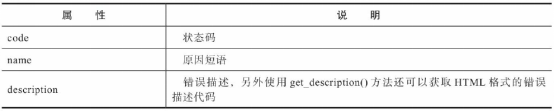
如果不想手动编写错误页面的内容,可以将这些信息传入错误页面模板,在模板中用它们来构建错误页面。不过需要注意的是,传入500错误处理器的真正的异常对象,通常不会提供这几个属性,你需要手动编写这些值。
Flask通过抛出Werkzeug中定义的HTTP异常类来标识HTTP错误,错误处理函数接收的参数就是对应的异常类。基于这个原理,你可以使用app.errorhandler()装饰器为其他异常注册处理函数,并返回自定义响应,只需要在app.errorhandler()装饰器中传入对应的异常类即可。比如使用app.errorhandler(NameError)可以注册处理NameError异常的函数。
这时如果访问一个错误的URL(127.0.0.1:5000/wwww),就会看到这样的错误页面
对应代码app.py
#encoding=utf-8
from flask import Flask,render_template

app=Flask(__name__)

@app.errorhandler(404)
def page_not_found(e):
    return render_template('errors/404.html'),404

@app.route('/')
def index():
    return render_template('index.html')

if __name__ == '__main__':
    app.run(debug = True)


 1万+
1万+

 被折叠的 条评论
为什么被折叠?
被折叠的 条评论
为什么被折叠?
 到【灌水乐园】发言


