


模板语法
一、插值操作
将值插入到html的内容当中
Mustache(就是双大括号)
<!DOCTYPE html>
<html lang="en">
<head>
    <title>Vue demo</title>
</head>
<body>
    <div id="app">
        <h2>hello {{name}}</h2>  //插入到标签中
        <h2>{{first_name}} {{last_name}</h2>  使用了两个mustache
        <h2>{{counter**2}}</h2>  //也可以是一个表达式
    </div>

</body>
<script src="vue.js"></script>
<script>
    let app = new Vue({
        el: '#app',
        data: {
            name: 'Vue',
            first_name: 'kang',
            last_name: 'pc',
            counter: 10
        }
    })
</script>
</html>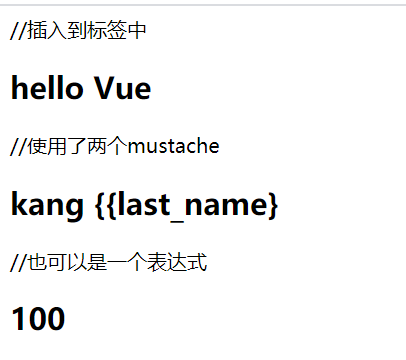
v-once
该指令后面不需要跟任何表达式(比如之前的v-for后面是由跟表达式的)
该指令表示元素和组件(组件后面才会学习)只渲染一次,不会随着数据的改变而改变。
<!DOCTYPE html>
<html lang="en">
<head>
    <title>Vue demo</title>
</head>
<body>
    <div id="app">
        <h2>hello {{name}}</h2>
        <h2 v-once>hello {{name}}</h2>
    </div>

</body>
<script src="vue.js"></script>
<script>
    let app = new Vue({
        el: '#app',
        data: {
            name: 'kang'
        }
    })
</script>
</html>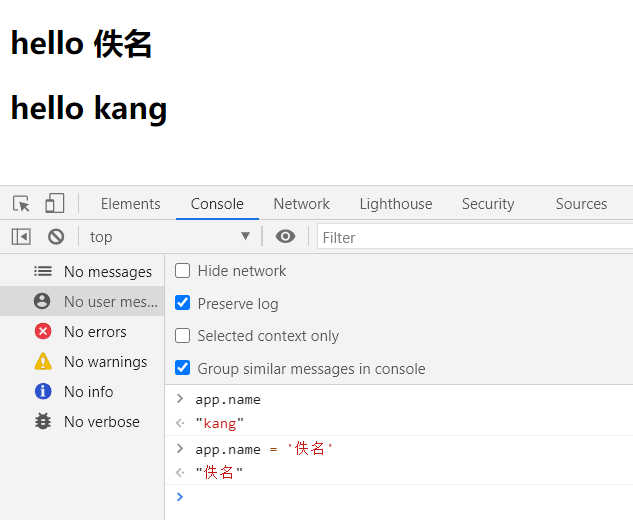
v-html : 使用v-html指令,解析出HTML展示
该指令后面往往会跟上一个string类型
会将string的html解析出来并且进行渲染
<!DOCTYPE html>
<html lang="en">
<head>
    <title>Vue demo</title>
</head>
<body>
    <div id="app">
        <h2>{{url}}</h2>
        <h2 v-html="url"></h2>
    </div>

</body>
<script src="vue.js"></script>
<script>
    let app = new Vue({
        el: '#app',
        data: {
            url: '<a href="https://www.baidu.com">百度一下</a>'
        }
    })
</script>
</html>
v-text 比较少用,因为不灵活
v-text作用和Mustache比较相似:都是用于将数据显示在界面中
v-text通常情况下,接受一个string类型
<!DOCTYPE html>
<html lang="en">
<head>
    <title>Vue demo</title>
</head>
<body>
    <div id="app">
        <h2>{{message}}, kang</h2>
        // message会把, kang覆盖
        <h2 v-text="message">, kang</h2>
    </div>

</body>
<script src="vue.js"></script>
<script>
    let app = new Vue({
        el: '#app',
        data: {
            message: '你好啊'
        }
    })
</script>
</html>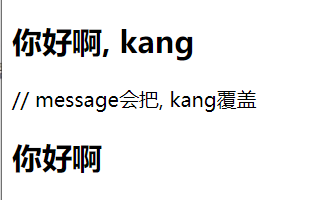
v-pre 比较少用
v-pre用于跳过这个元素和它子元素的编译过程,用于显示原本的Mustache语法。比如下面的代码:
<!DOCTYPE html>
<html lang="en">
<head>
    <title>Vue demo</title>
</head>
<body>
    <div id="app">
        <h2>{{message}}</h2>
        <h2 v-pre>{{message}}</h2>
    </div>

</body>
<script src="vue.js"></script>
<script>
    let app = new Vue({
        el: '#app',
        data: {
            message: '你好啊'
        }
    })
</script>
</html>
第一个h2元素中的内容会被编译解析出来对应的内容
第二个h2元素中会直接显示{{message}}

v-cloak 斗篷 ,少用
在某些情况下,我们浏览器可能会直接显然出未编译的Mustache标签。
<!DOCTYPE html>
<html lang="en">
<head>
    <title>Vue demo</title>
    <style>
        [v-cloak] {
            display: none;
        }
    </style>
</head>
<body>
    <div id="app">
        <h2>{{message}}</h2>
        <h2 v-cloak>{{message}}</h2>
    </div>

</body>
<script src="vue.js"></script>
<script>
    setTimeout(() => {
        let app = new Vue({
        el: '#app',
        data: {
            message: '你好啊'
            }
        })
    },5000)
</script>
</html>
二、绑定属性
v-bind
前面我们学习的指令主要作用是将值插入到我们模板的内容当中。
但是,除了内容需要动态来决定外,某些属性我们也希望动态来绑定。
- 比如动态绑定a元素的href属性
- 比如动态绑定img元素的src属性
这个时候,我们可以使用v-bind指令:
作用:动态绑定属性
缩写::
预期:any (with argument) | Object (without argument)
参数:attrOrProp (optional)
v-bind用于绑定一个或多个属性值,或者向另一个组件传递props值(这个学到组件时再介绍).
在开发中,有哪些属性需要动态进行绑定呢?还是有很多的,比如图片的链接src、网站的链接href、动态绑定一些类、样式等等.
比如通过Vue实例中的data绑定元素的src和href,代码如下:
<!DOCTYPE html>
<html lang="en">
<head>
    <title>Vue demo</title>
</head>
<body>
    <div id="app">
        //v-bind语法糖
        <a :href="url">百度一下</a><br>
        <img v-bind:src="img_url" alt="">
    </div>

</body>
<script src="vue.js"></script>
<script>
    let app = new Vue({
        el: '#app',
        data: {
            img_url: 'https://i0.hdslb.com/bfs/sycp/creative_img/202104/9a5cf4c28ff903549de5702668892dfd.jpg',
            url: 'https://i0.hdslb.com/bfs/feed-admin/6e73bf15d0348ee1313c15b3812b88a7a998513e.jpg',
        }
    })
</script>
</html>
v-bind绑定class
很多时候,我们希望动态的来切换class,比如:
-
当数据为某个状态时,字体显示红色。
-
当数据另一个状态时,字体显示黑色。
绑定class有两种方式:
-
对象语法
-
数组语法
绑定方式:对象语法
对象语法的含义是:class后面跟的是一个对象。
对象语法有下面这些用法:
用法一:直接通过{}绑定一个类
<h2 :class="{active: isActive}">Hello World</h2>

用法二:也可以通过判断,传入多个值
<h2 :class="{active: isActive, line: isLine}">Hello World</h2>

用法三:和普通的类同时存在,并不冲突
注:如果isActive和isLine都为true,那么会有title/active/line三个类
<h2 class="title" :class="{active: isActive, line: isLine}">Hello World</h2>

用法四:如果过于复杂,可以放在一个methods或者computed中
注:classes是一个计算属性
<h2 class="title" :class="classes">Hello World</h2>
示例代码:
<!DOCTYPE html>
<html lang="en">
<head>
    <title>Vue学习demo</title>
    <style>
        .isActive{
            color: red;
        }
    </style>
</head>
<body>
    <div id="app">
        <!-- <h2 class="title" :class="{active: isActive,line:isLine}">{{message}}</h2> -->
        <!-- <button @click="f">按钮</button> -->
        <h3 class="title" :class="classStyle">{{message}}</h3>
        <button @click="btn_click">点一下</button>
    </div>

</body>
<script src="vue.js"></script>
<script>
    let app = new Vue({
        el: '#app',
        data: {
            message: '你好呀',
            lst: [1,2],
            classStyle: {
                isActive: true,
                isLine: true,
            }
        },
        methods: {
            // f: function(){
            //     this.isActive = !this.isActive;
            // },
            btn_click () {
                this.classStyle.isActive =  !this.classStyle.isActive;
                this.classStyle.isLine =  !this.classStyle.isLine

                this.lst
            }
        }
    })
</script>
</html>
绑定方式:数组语法 比较少用
数组语法的含义是:class后面跟的是一个数组。
数组语法有下面这些用法:
用法一:直接通过{}绑定一个类
<h2 :class="['active']">Hello World</h2>

用法二:也可以传入多个值
<h2 :class=“[‘active’, 'line']">Hello World</h2>

用法三:和普通的类同时存在,并不冲突
注:会有title/active/line三个类
<h2 class="title" :class=“[‘active’, 'line']">Hello World</h2>

用法四:如果过于复杂,可以放在一个methods或者computed中
注:classes是一个计算属性
<h2 class="title" :class="classes">Hello World</h2>
示例代码:
<!DOCTYPE html>
<html lang="en">
<head>
    <title>Vue学习demo</title>
</head>
<body>
    <div id="app">
        <h2 class="title" :class="['active','line']">{{message}}</h2>
        <h2 class="title" :class="[active,line]">{{message}}</h2>
        <h3 :class="get_classes()">{{message}}</h3>
    </div>

</body>
<script src="vue.js"></script>
<script>
    let app = new Vue({
        el: '#app',
        data: {
            message: '你好呀',
            active: 'aaa',
            line: 'bbb',
        },
        methods: {
            get_classes: function () {
                return [this.active,this.line]
            }
        }
    })
</script>
</html>
作业:点击列表中的哪一项,那么该项的文字变成红色
<!DOCTYPE html>
<html lang="en">
<head>
    <title>Vue demo</title>
    <style>
        .active {
            color: red;
        }
    </style>
</head>
<body>
    <div id="app">
        <ul>
            <li v-for="(item, index) in movies"
            :class="{active: current_index === index}"
            @click="li_click(index)">
            {{index}}. {{item}}
        </li>
        </ul>
    </div>

</body>
<script src="vue.js"></script>
<script>
    let app = new Vue({
        el: '#app',
        data: {
            movies: ['智能时代','异类','三体','数学之美','阅读和表达讲义'],
            current_index: 0
        },
        methods: {
            li_click (index) {
                this.current_index = index
            }
        }
    })
</script>
</html>
v-bind绑定style
我们可以利用v-bind:style来绑定一些CSS内联样式。
在写CSS属性名的时候,比如font-size
-
我们可以使用驼峰式 (camelCase) fontSize
-
或短横线分隔 (kebab-case,记得用单引号括起来) ‘font-size’
绑定class有两种方式:
-
对象语法
-
数组语法
绑定方式一:对象语法
:style="{color: currentColor, fontSize: fontSize + 'px'}"
style后面跟的是一个对象类型
对象的key是CSS属性名称
对象的value是具体赋的值,值可以来自于data中的属性
示例代码:
<!DOCTYPE html>
<html lang="en">
<head>
    <title>Vue学习demo</title>
</head>
<body>
    <div id="app">
        <!-- <h3 v-for="(movie, index) in movies" :style="{color:color,fontSize:fontSize + 'px'}">{{index}}-{{movie}}</h3> -->
        <h3 v-for="(movie, index) in movies" :style="getStyles()">{{index}}-{{movie}}</h3>
    </div>

</body>
<script src="vue.js"></script>
<script>
    const app = new Vue({
        el: '#app',
        data: {
            movies: ['海贼王','犬夜叉','围棋少年','秦时明月','哪吒'],
            color: 'red',
            fontSize: 20,
        },
        methods: {
            getStyles: function () {
                return {color: this.color, fontSize: this.fontSize + 'px'}
            }
        }
    })
</script>
</html>
绑定方式二:数组语法
<div v-bind:style="[baseStyles, overridingStyles]"></div>
style后面跟的是一个数组类型
多个值以,分割即可
示例代码:
<!DOCTYPE html>
<html lang="en">
<head>
    <title>Vue学习demo</title>
</head>
<body>
    <div id="app">
        <h3 :style="[a, b]">{{message}}</h3>
        <h3 :style="getStyles()">{{message}}</h3>
    </div>

</body>
<script src="vue.js"></script>
<script>
    const app = new Vue({
        el: '#app',
        data: {
            message: '你好呀',
            a: {backgroundColor: 'red'},
            b: {fontSize: '50px'},
        },
        methods: {
            getStyles: function () {
                return [this.a, this.b]
            }
        }
    })
</script>
</html>
三、计算属性
基础操作
在模板中可以直接通过插值语法显示一些data中的数据,但是在某些情况,我们可能需要对数据进行一些转化后再显示,或者需要将多个数据结合起来进行显示。
比如我们有firstName和lastName两个变量,我们需要显示完整的名称。
但是如果多个地方都需要显示完整的名称,我们就需要写多个{{firstName}} {{lastName}}。
我们可以将上面的代码换成计算属性:
<!DOCTYPE html>
<html lang="en">
<head>
    <title>Vue学习demo</title>
</head>
<body>
    <div id="app">
        <h2>{{first_name + ' ' + last_name}}</h2>
        <h2>{{first_name}} {{last_name}}</h2>
        <h2>{{get_full_name()}}</h2>
        <h2>{{full_name}}</h2>
    </div>

</body>
<script src="vue.js"></script>
<script>
    const app = new Vue({
        el: '#app',
        data: {
            first_name: 'Lebron',
            last_name: 'James',
        },
        computed: {
            full_name: function () {
                return this.first_name + ' ' + this.last_name;
            }
        },
        methods: {
            get_full_name: function () {
                return this.first_name + ' ' + this.last_name
            }
        }
    })
</script>
</html>
复杂操作
<!DOCTYPE html>
<html lang="en">
<head>
    <title>Vue学习demo</title>
</head>
<body>
    <div id="app">
        <h2>总价格(RMB):{{total_price}}</h2>
    </div>

</body>
<script src="vue.js"></script>
<script>
    const app = new Vue({
        el: '#app',
        data: {
            books: [
                {id: 1, name: 'Unix编程艺术', price: 140},
                {id: 2, name: '代码大全', price: 130},
                {id: 3, name: '深入理解计算机原理', price: 120},
                {id: 4, name: '现代操作系统', price: 110},
            ]
        },
        computed: {
            total_price: function () {
                let result = 0
                for (let i = 0; i < this.books.length; i++) {
                    result += this.books[i].price
                }
                return result
            }
        }
    })
</script>
</html>
计算属性的setter和getter
每个计算属性都包含一个getter和一个setter
<!DOCTYPE html>
<html lang="en">
<head>
    <title>Vue学习demo</title>
</head>
<body>
    <div id="app">
        <h2>总价格(RMB):{{total_price}}</h2>
    </div>

</body>
<script src="vue.js"></script>
<script>
    const app = new Vue({
        el: '#app',
        data: {
            first_name: 'Kobe',
            last_name: 'Bryant'
        },
        computed: {
            // full_name: {
            //     get: function () {
            //         return this.first_name + ' ' + this.last_name
            //     }
            // },
            full_name: function () {  //computed属性是一个对象集,里面的属性也是一个对象,这里这样写其实是简写,原貌其实是上面的样子
                return this.first_name + ' ' + this.last_name
            }
        }
    })
</script>
</html>
计算属性一般没有set方法,这样叫只读属性,
特殊的也可以有set方法,代码如下:
<!DOCTYPE html>
<html lang="en">
<head>
    <title>Vue学习demo</title>
</head>
<body>
    <div id="app">
        <h2>{{full_name}}</h2>
    </div>

</body>
<script src="vue.js"></script>
<script>
    const app = new Vue({
        el: '#app',
        data: {
            first_name: 'Kobe',
            last_name: 'Bryant'
        },
        computed: {
            full_name: {
                set: function(new_value) {
                    const names = new_value.split(' ');
                    this.first_name = names[0];
                    this.last_name = names[1];
                    console.log('调用set', new_value);
                },
                get: function () {
                    return this.first_name + ' ' + this.last_name
                }
            },
            // full_name: function () {  //computed属性是一个对象集,里面的属性也是一个对象,这里这样写其实是简写,原貌其实是上面的样子
            //     return this.first_name + ' ' + this.last_name
            // }
        }
    })
</script>
</html>
计算属性的缓存
methods和computed看起来都可以实现我们的功能,
那么为什么还要多一个计算属性这个东西呢?
原因:计算属性会进行缓存,如果多次使用时,计算属性只会调用一次,而methods则不然,每一次调用都是执行一次。
所以,考虑性能,我们更提倡多用计算属性computed
示例代码:
<!DOCTYPE html>
<html lang="en">
<head>
    <title>Vue学习demo</title>
</head>
<body>
    <div id="app">
        <h2>总价格(RMB):{{total_price}}</h2>
        <h2>总价格(RMB):{{total_price}}</h2>
        <h2>总价格(RMB):{{total_price}}</h2>

        <h2>总价格(RMB):{{get_total_price()}}</h2>
        <h2>总价格(RMB):{{get_total_price()}}</h2>
        <h2>总价格(RMB):{{get_total_price()}}</h2>
    </div>

</body>
<script src="vue.js"></script>
<script>
    const app = new Vue({
        el: '#app',
        data: {
            books: [
                {id: 1, name: 'Unix编程艺术', price: 140},
                {id: 2, name: '代码大全', price: 130},
                {id: 3, name: '深入理解计算机原理', price: 120},
                {id: 4, name: '现代操作系统', price: 110},
            ]
        },
        computed: {
            total_price: function () {
                console.log('调用total_price');
                let result = 0
                for (let i = 0; i < this.books.length; i++) {
                    result += this.books[i].price
                }
                return result
            }
        },
        methods: {
            get_total_price: function () {
                console.log('调用get_total_price');
                let result = 0
                for (let i = 0; i < this.books.length; i++) {
                    result += this.books[i].price
                }
                return result
            }
        }
    })
</script>
</html>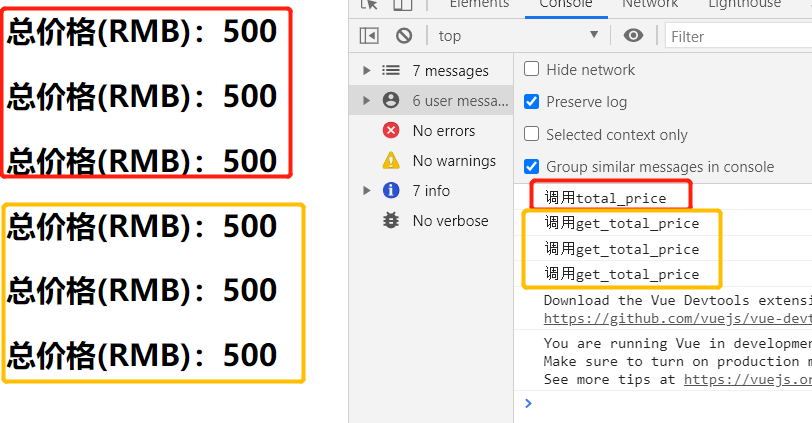
四、事件监听
在前端开发中,我们需要经常和用于交互。
这个时候,我们就必须监听用户发生的时间,比如点击、拖拽、键盘事件等等
在Vue中如何监听事件呢?使用v-on指令
v-on介绍
v-on 可以用来监听DOM事件、组件间自定义事件.
作用:绑定事件监听器
缩写:@
预期:Function | Inline Statement | Object
参数:event
v-on基础使用
<!DOCTYPE html>
<html>
<head>
    <title>Vue demo</title>
</head>
<body>
    <div id="app">
        <h2>当前计数:{{counter}}</h2>
        <button @click="increment">+</button>
        <button @click="decrement">-</button>
    </div>

</body>
<script src="vue.js"></script>
<script>
    const app = new Vue({
        el: '#app',
        data:{
            counter:0,
        },
        methods:{
            increment() {
                this.counter++
            },
            decrement() {
                this.counter--
            }
        }
    })
</script>
</html>
v-on修饰符
.stop 调用 event.stopPropagation()
直接上代码
<!DOCTYPE html>
<html>
<head>
    <title>Vue demo</title>
</head>
<body>
    <div id="app" @click="btn_click">
        --这里是div--
        <!-- 1..stop修饰符 -->
        <!-- <button @click="btn_click">按钮1</button> -->
        <button @click.stop="btn_click">按钮1</button>
    </div>

</body>
<script src="vue.js"></script>
<script>
    const app = new Vue({
        el: '#app',
        data:{
            message: 'hello'
        },
        methods:{
            btn_click() {
                console.log("btn_click");
            },

        }
    })
</script>
</html>
<button @click="btn_click">按钮1</button>button点击后的click事件会传递给div的click,然后执行2次btn_click,有时我们并不想要这样的效果,那么可以在button监听的click事件这里加上.stop修饰符即可。
<button @click.stop="btn_click">按钮1</button>.prevent 调用 event.preventDefault()
<!DOCTYPE html>
<html>
<head>
    <title>Vue demo</title>
</head>
<body>
    <div id="app">
        --这里是div--
        <form action="https://www.baidu.com">
            <!-- <input type="submit" value="提交" @click="submit_click">  //这里会有2个动作1.打印submit_click,2.提交(跳转到baidu) -->
            <input type="submit" value="提交" @click.prevent="submit_click">  //可以看到打印了打印submit_click,但是没有提交
        </form>
    </div>

</body>
<script src="vue.js"></script>
<script>
    const app = new Vue({
        el: '#app',
        data:{
            message: 'hello'
        },
        methods:{
            submit_click() {
                console.log('submit_click');
            }
        }
    })
</script>
</html>
为什么要用.prevent?
有的时候我们并不想使用默认的submit事件去提交数据,而是希望我们自己做一些数据处理,然后再手动提交,那么就可以用上.prevent。
监听键盘按键的点击事件
<!DOCTYPE html>
<html>
<head>
    <title>Vue demo</title>
</head>
<body>
    <div id="app">
        --这里是div--
            <!-- <input type="text" @keyup="key_up">  //监听所有按键 -->
            <!--仅监听ENTER键-->
        <input type="text" @keyup.enter="key_up">

    </div>

</body>
<script src="vue.js"></script>
<script>
    const app = new Vue({
        el: '#app',
        data:{
            message: 'hello'
        },
        methods:{
            key_up() {
                console.log("key_up");
            },
        }
    })
</script>
</html>
.once 仅第一次点击有效
<!DOCTYPE html>
<html>
<head>
    <title>Vue demo</title>
</head>
<body>
    <div id="app">
        --这里是div--
        <input type="text" @keyup.once="xclick">
        <button @click.once="xclick">仅点第一次有效</button>
    </div>

</body>
<script src="vue.js"></script>
<script>
    const app = new Vue({
        el: '#app',
        data:{
            message: 'hello'
        },
        methods:{
            xclick() {
                console.log("key_up");
            },
        }
    })
</script>
</html>
五、条件判断
v-if、v-else-if、v-else
-
这三个指令与JavaScript的条件语句if、else、else if类似。
-
Vue的条件指令可以根据表达式的值在DOM中渲染或销毁元素或组件
v-if的原理:
v-if后面的条件为false时,对应的元素以及其子元素不会渲染。也就是根本不会有对应的标签出现在DOM中
<!DOCTYPE html>
<html>
<head>
    <title>Vue demo</title>
</head>
<body>
    <div id="app">
        <!-- <h2 v-if="score>=90">优秀</h2>
        <h2 v-else-if="score>=80">良好</h2>
        <h2 v-else-if="score>=60">及格</h2>
        <h2 v-else>不及格</h2> -->
        <h2>{{result}}</h2>
    </div>

</body>
<script src="vue.js"></script>
<script>
    const app = new Vue({
        el: '#app',
        data:{
            score:90
        },
        computed: {
            result(){
                let show_message = '';
                if (this.score >= 90) {
                    show_message = '优秀'
                }else if (this.score >= 80) {
                    show_message = '良好'
                }else if (this.score >= 60) {
                    show_message = '及格'
                }else {
                    show_message = '不及格'
                }
                return show_message
            }
        },
        methods:{

        }
    })
</script>
</html>
条件渲染案例
用户登录时,可以切换使用用户账号登录还是邮箱登录
<!DOCTYPE html>
<html>
<head>
    <title>Vue demo</title>
</head>
<body>
    <div id="app">
        <span v-if="is_user">
            <label for="username">用户账号</label>
            <input type="text" id="username" placeholder="用户账号">
        </span>
        <span v-else>
            <label for="email">用户邮箱</label>
            <input type="text" id="email" placeholder="用户邮箱">
        </span>
        <button @click="is_user = !is_user">切换登录方式</button>
    </div>

</body>
<script src="vue.js"></script>
<script>
    const app = new Vue({
        el: '#app',
        data:{
            is_user:true
        }
    })
</script>
</html>-
Vue不会直接把元素无脑的渲染到浏览器页面上,而是会经过一个虚拟DOM来加载到内存,代码 -> 虚拟DOM -> 浏览器页面。
-
在切换操作中,Vue在进行渲染时,出于性能考虑,会尽可能复用已经存在的元素,而不是重新创建新的元素
-
如果我们不希望Vue出现类似重复利用的问题,可以给对应的元素添加唯一key
<!DOCTYPE html>
<html>
<head>
    <title>Vue demo</title>
</head>
<body>
    <div id="app">
        <span v-if="is_user">
            <label for="username">用户账号</label> 《!--for:label和input绑定-->
            <input type="text" id="username" placeholder="用户账号" key="username">
        </span>
        <span v-else>
            <label for="email">用户邮箱</label>
            <input type="text" id="email" placeholder="用户邮箱" key="email">
        </span>
        <button @click="is_user = !is_user">切换登录方式</button>
    </div>

</body>
<script src="vue.js"></script>
<script>
    const app = new Vue({
        el: '#app',
        data:{
            is_user:true
        }
    })
</script>
</html>
v-show
v-show的用法和v-if非常相似,也用于决定一个元素是否渲染.
-
v-show当条件为false时,仅仅是将元素的display属性设置为none而已
-
v-if当条件为false时,元素不会存在于DOM中
-
既然如此,那如何选择?
当需要在显示与隐藏之间切片很频繁时,使用v-show
当只有一次切换时,通过使用v-if
<!DOCTYPE html>
<html>
<head>
    <title>Vue demo</title>
</head>
<body>
    <div id="app">
        <h2 v-if="is_show">{{message}}</h2>
        <h2 v-show="is_show">{{message}}</h2>
    </div>

</body>
<script src="vue.js"></script>
<script>
    const app = new Vue({
        el: '#app',
        data:{
            message:'hello world!',
            is_show: true
        }
    })
</script>
</html>
六、循环遍历
v-for遍历数组
<!DOCTYPE html>
<html lang="en">
<head>
    <title>Vue demo</title>
</head>
<body>
    <div id="app">
        <ul>
            <li>hello {{names}}</li><br>
            <li v-for = "name in names">{{name}}</li><br>
            <li v-for = "(name,index) in names">{{index}}.{{name}}</li>
        </ul>

    </div>

</body>
<script src="vue.js"></script>
<script>
    let app = new Vue({
        el: '#app',
        data: {
            names: ['zhangsan','lisi','wangwu','kang']
        }
    })
</script>
</html>
v-for遍历对象
<!DOCTYPE html>
<html lang="en">
<head>
    <title>Vue demo</title>
</head>
<body>
    <div id="app">
        <ul>
            <!--一个item是获取value-->
            <li v-for="item in info">{{item}}</li><br>
            <!--同时拿到key和value-->
            <li v-for="(value,key) in info">{{key}}: {{value}}</li><br>
            <!--获取key,value,index-->
            <li v-for="(value,key,index) in info">{{index}}.{{key}}: {{value}}</li>
        </ul>

    </div>

</body>
<script src="vue.js"></script>
<script>
    let app = new Vue({
        el: '#app',
        data: {
            info: {
                name: 'kang',
                age: 18,
                salary: 30000
            }
        }
    })
</script>
</html>
组件的key属性
官方推荐我们在使用v-for时,给对应的元素或组件添加上一个:key属性。
-
为什么需要这个key属性呢(了解)?
这个其实和Vue的虚拟DOM的Diff算法有关系。
这里我们借用React’s diff algorithm中的一张图来简单说明一下:
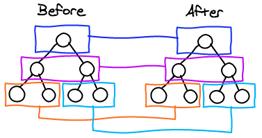
-
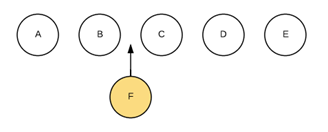
当某一层有很多相同的节点时,也就是列表节点时,我们希望插入一个新的节点
我们希望可以在B和C之间加一个F,Diff算法默认执行起来是这样的。
即把C更新成F,D更新成C,E更新成D,最后再插入E,是不是很没有效率?

-
所以我们需要使用key来给每个节点做一个唯一标识
Diff算法就可以正确的识别此节点
找到正确的位置区插入新的节点。
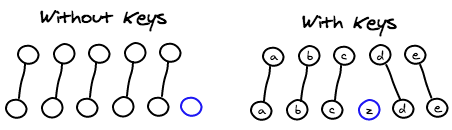
所以一句话,key的作用主要是为了高效的更新虚拟DOM
检测数组更新
因为Vue是响应式的,所以当数据发生变化时,Vue会自动检测数据变化,视图会发生对应的更新。
Vue中包含了一组观察数组编译的方法,使用它们改变数组也会触发视图的更新。
-
push()
-
pop()
-
shift()
-
unshift()
-
splice()
-
sort()
-
reverse()
<!DOCTYPE html>
<html lang="en">
<head>
    <title>Vue demo</title>
</head>
<body>
    <div id="app">
        <ul>
            <li v-for="item in letters">{{item}}</li>
        </ul>
        <button @click="btnclick">点一下</button>

    </div>

</body>
<script src="vue.js"></script>
<script>
    let app = new Vue({
        el: '#app',
        data: {
            letters: ['A','B','C','D','E']
        },
        methods: {
            btnclick(){
                // //非响应式操作:通过索引添加元素
                // this.letters[0] = 'X'
                // //在最后插入
                // this.letters.push('F','G')
                // //在开头插入
                // this.letters.unshift('XYZ','oo','yy')
                // //删除最后一个元素
                // this.letters.pop()
                // //删除第一个元素
                // this.letters.shift()
                // //插入、删除、替换
                // this.letters.splice(2,this.letters.length-2)  //从第二个元素开始,删除后面全部元素(第三个、第四个...最后一个)
                // this.letters.splice(2,3,'m','n','l')  //替换CDE为mnl
                // this.letters.splice(1,0,'x')  //在第一个后面插入charuyuansu
                this.letters.splice(0,1,'x')  //在第一个元素前面插入x
                //Vue.set(this.letters,1,9)  // Vue内置函数:set(要修改的对象,索引值,修改后的值)
                // //排序
                // this.letters.sort()
                // //反转
                // this.letters.reverse()

            }
        }
    })
</script>
</html>
七、阶段案例
图书购物车
index.html
<!DOCTYPE html>
<html lang="en">
<head>
  <meta charset="UTF-8">
  <title>Title</title>
  <link rel="stylesheet" href="style.css">
</head>
<body>

<div id="app">
  <div v-if="books.length">
    <table>
      <thead>
        <tr>
            <th></th>
            <th>书籍名称</th>
            <th>出版日期</th>
            <th>价格</th>
            <th>购买数量</th>
            <th>操作</th>
        </tr>
      </thead>
      <tbody>
        <tr v-for="(item, index) in books">
            <td>{{item.id}}</td>
            <td>{{item.name}}</td>
            <td>{{item.date}}</td>
            <td>{{item.price | showPrice}}</td>
            <td>
                <button @click="decrement(index)" v-bind:disabled="item.count <= 1">-</button>
                {{item.count}}
                <button @click="increment(index)">+</button>
            </td>
            <td>
                <button @click="removeHandle(index)">移除</button>
            </td>
        </tr>
      </tbody>
    </table>
    <h2>总价格: {{totalPrice | showPrice}}</h2>
  </div>
  <h2 v-else>购物车为空</h2>
</div>

<script src="../vue.js"></script>
<script src="main.js"></script>
</body>
</html>
main.js
const app = new Vue({
  el: '#app',
  data: {
    books: [
      {
        id: 1,
        name: '《算法导论》',
        date: '2006-9',
        price: 85.00,
        count: 1
      },
      {
        id: 2,
        name: '《UNIX编程艺术》',
        date: '2006-2',
        price: 59.00,
        count: 1
      },
      {
        id: 3,
        name: '《编程珠玑》',
        date: '2008-10',
        price: 39.00,
        count: 1
      },
      {
        id: 4,
        name: '《代码大全》',
        date: '2006-3',
        price: 128.00,
        count: 1
      },
    ]
  },
  methods: {
    // getFinalPrice(price) {
    //   return '¥' + price.toFixed(2)
    // }
    increment(index) {
      this.books[index].count++
    },
    decrement(index) {
      this.books[index].count--
    },
    removeHandle(index) {
      this.books.splice(index, 1)
    }
  },
  computed: {
    totalPrice() {
      //写法1
      // let totalPrice = 0
      // for (let i = 0; i < this.books.length; i++) {
      //   totalPrice += this.books[i].price * this.books[i].count
      // }
      // return totalPrice

      //写法2
      return this.books.reduce(function(preValue, book){
        return preValue + book.price * book.count
      }, 0)
    }
  },
  filters: {
    showPrice(price) {
      return '¥' + price.toFixed(2)
    }
  }
})
style.css
table {
  border: 1px solid #e9e9e9;
  border-collapse: collapse;
  border-spacing: 0;
}

th, td {
  padding: 8px 16px;
  border: 1px solid #e9e9e9;
  text-align: left;
}

th {
  background-color: #f7f7f7;
  color: #5c6b77;
  font-weight: 600;
}
八、javascript for补充
books: [
      {
        id: 1,
        name: '《算法导论》',
        date: '2006-9',
        price: 85.00,
        count: 1
      },
      {
        id: 2,
        name: '《UNIX编程艺术》',
        date: '2006-2',
        price: 59.00,
        count: 1
      },
      {
        id: 3,
        name: '《编程珠玑》',
        date: '2008-10',
        price: 39.00,
        count: 1
      },
      {
        id: 4,
        name: '《代码大全》',
        date: '2006-3',
        price: 128.00,
        count: 1
      },
    ]

for(let i of books){console.log(i.price)}
九、v-model
双向绑定 基本使用
v-model绑定的变量,无论输入什么,赋值的时候都是当作字符串处理
<html lang="en">
<head>
    <title></title>
</head>
<body>
    <div id="app">
        <input type="text" v-model="message">
        {{message}}
    </div>

</body>
<script src="vue.js"></script>
<script>
    let app = new Vue({
        el: '#app',
        data: {
            message: 'hello world!'
        }
    })
</script>
</html>
> app.message
<· "hello world!"
可以看到在控制台修改app.message = 'good',页面上会随着改变,当然这是我们前面的内容mustache语法已经可以实现的效果
> app.message = 'good'
<· "good"
> app.message
<· "good"
但是你在页面上的input里面输入一个内容,然后在控制台输出下app.message,会发现,Vue里面的数据也改变了,这样就形成了双向绑定,这里不同于mustache的能力
> app.message
<· "good night"v-model其实是下面这段代码的高级实现,如果不用v-model,下面这段代码也是一样的实现
<!DOCTYPE html>
<html lang="en">
<head>
    <title></title>
</head>
<body>
    <div id="app">
        <!--<input type="text" v-model="message" @input="valueChange">-->
        <!--或者一般我们更常用这种写法:不写methods,这样写-->
        <input type="text" :value="message" @input="message = $event.target.value">
        <h2>{{message}}</h2>
    </div>

</body>
<script src="vue.js"></script>
<script>
    let app = new Vue({
        el: '#app',
        data: {
            message: 'hello world!'
        },
        //methods: {
            //valueChange (event) {
                //this.message = event.target.value;
            //}
       //}
    })
</script>
</html>
原理
v-model其实是一个语法糖,它的背后本质上是包含两个操作:
-
v-bind绑定一个value属性
-
v-on指令给当前元素绑定input事件
<input type="text" v-model="message">
等同于
<input type="text" v-bind:value="message" v-on:input="message = $event.target.value">
radio v-model结合radio的使用
<!DOCTYPE html>
<html lang="en">
<head>
    <title></title>
</head>
<body>
    <div id="app">
        <label for="male">
            <input type="radio" id="male" value="男" v-model="sex">男
        </label>
        <label for="female">
            <input type="radio" id="female" value="女" v-model="sex">女
        </label>
        <h2>你选择的性别是: {{sex}}</h2>
    </div>

</body>
<script src="vue.js"></script>
<script>
    let app = new Vue({
        el: '#app',
        data: {
            sex: '男'  //默认选择男
        },
    })
</script>
</html>
加name是为了让两个radio互斥,要么男要么女
<input type="radio" id="male" name="sex" value="男">男
<input type="radio" id="female" value="女" v-model="sex">女
如果我们用了v-model,就不需要name,他们也已经是互斥
<input type="radio" id="male"value="男" v-model="sex">男checkbox v-model结合checkbox使用
复选框分为两种情况:单个勾选框和多个勾选框
-
单个勾选框:
v-model即为布尔值,此时input的value并不影响v-model的值。
-
多个复选框:
当是多个复选框时,因为可以选中多个,所以对应的data中属性是一个数组。
当选中某一个时,就会将input的value添加到数组中。
<!DOCTYPE html>
<html lang="en">
<head>
    <title></title>
</head>
<body>
    <div id="app">
        <!--单选框-->
        <!-- <label for="licence">  label的好处是点文字也可以选中 -->
            <!-- <input type="checkbox" id="licence" v-model="licence">同意协议 -->
        <!-- </label> -->
        <!-- <h2>你选择的是: {{licence}}</h2> -->
        <!-- <button :disabled="!licence">同意协议,进行下一步</button> -->
        <br><br><br>
        <!--多选框-->
        <input type="checkbox" value="篮球" v-model="likes">篮球<br>
        <input type="checkbox" value="足球" v-model="likes">足球<br>
        <input type="checkbox" value="乒乓球" v-model="likes">乒乓球<br>
        <input type="checkbox" value="羽毛球" v-model="likes">羽毛球
        <h2>你的爱好是: {{likes}}</h2>

    </div>

</body>
<script src="vue.js"></script>
<script>
    let app = new Vue({
        el: '#app',
        data: {
            licence: false,
            likes: []
        },
    })
</script>
</html>
select v-model结合select的使用
和checkbox一样,select也分单选和多选两种情况。
-
单选:只能选中一个值。
v-model绑定的是一个值。
当我们选中option中的一个时,会将它对应的value赋值到fruit中 -
多选:可以选中多个值。
v-model绑定的是一个数组。
当选中多个值时,就会将选中的option对应的value添加到数组fruits中
<!DOCTYPE html>
<html lang="en">
<head>
  <meta charset="UTF-8">
  <title>Title</title>
</head>
<body>

<div id="app">
  <!--1.选择一个-->
  <select name="abc" v-model="fruit">
    <option value="苹果">苹果</option>
    <option value="香蕉">香蕉</option>
    <option value="榴莲">榴莲</option>
    <option value="葡萄">葡萄</option>
  </select>
  <h2>您选择的水果是: {{fruit}}</h2>

  <!--2.选择多个: multiple属性可以选择多个值-->
  <select name="abc" v-model="fruits" multiple>
    <option value="苹果">苹果</option>
    <option value="香蕉">香蕉</option>
    <option value="榴莲">榴莲</option>
    <option value="葡萄">葡萄</option>
  </select>
  <h2>您选择的水果是: {{fruits}}</h2>
</div>
</body>
<script src="vue.js"></script>
<script>
  const app = new Vue({
    el: '#app',
    data: {
      message: '你好啊',
      fruit: '香蕉',
      fruits: []
    }
  })
</script>
</html>
值绑定 v-bind结合input的使用
通过v-bind:value,动态的给value赋值,以下动态绑定有3处(:for,:value,:id),还有一处mustache绑定({{item}})
<!DOCTYPE html>
<html lang="en">
<head>
    <title></title>
</head>
<body>
    <div id="app">
        <input type="checkbox" value="篮球" v-model="likes">篮球<br>
        <input type="checkbox" value="足球" v-model="likes">足球<br>
        <input type="checkbox" value="乒乓球" v-model="likes">乒乓球<br>
        <input type="checkbox" value="羽毛球" v-model="likes">羽毛球

        <h2>你的爱好是: {{likes}}</h2>

        <label v-for="item in origin_likes" :for="item">  <!--遍历origin_likes把每项存到likes数组-->
            <input type="checkbox" :value="item" :id="item" v-model="likes">{{item}}
        </label>
    </div>

</body>
<script src="vue.js"></script>
<script>
    let app = new Vue({
        el: '#app',
        data: {
            likes: [],
            origin_likes: ["篮球","足球","乒乓球","羽毛球"]
        },
    })
</script>
</html>
修饰符
lazy修饰符:
默认情况下,v-model默认是在input事件中同步输入框的数据的,也就是说,一旦有数据发生改变对应的data 中的数据就会自动发生改变。lazy修饰符可以让数据在失去焦点或者回车时才会更新。
number修饰符:
默认情况下,在输入框中无论我们输入的是字母还是数字,都会被当做字符串类型进行处理,但是如果我们希 望处理的是数字类型,那么最好直接将内容当做数字处理,number修饰符可以让在输入框中输入的内容自动转成数字类型
trim修饰符:
如果输入的内容首尾有很多空格,通常我们希望将其去除,trim修饰符可以过滤掉内容左右两边的空格
<!DOCTYPE html>
<html lang="en">
<head>
  <meta charset="UTF-8">
  <title>Title</title>
</head>
<body>

<div id="app">
  <!--1.修饰符: lazy,让数据在失去焦点或者回车时才会更新data中对应的变量-->
  <input type="text" v-model.lazy="message">
  <h2>{{message}}</h2>


  <!--2.修饰符: number,让在输入框中输入的内容自动转成数字类型-->
  <input type="number" v-model.number="age">
  <h2>{{age}}-{{typeof age}}</h2>  <!--typeof age:获取age的类型-->

  <!--3.修饰符: trim,过滤掉内容左右两边的空格-->
  <input type="text" v-model.trim="name">
  <h2>您输入的名字:{{name}}</h2>
</div>

<script src="vue.js"></script>
<script>
  const app = new Vue({
    el: '#app',
    data: {
      message: '你好啊',
      age: 0,
      name: ''
    }
  })

  var age = 0
  age = '1111'
  age = '222'
</script>

</body>
</html>


 999
999


 被折叠的 条评论
为什么被折叠?
被折叠的 条评论
为什么被折叠?
 到【灌水乐园】发言


