


刚刚自学了一点ssh的内容,所以简单地把这三个框架整到一起!(这个只是最简单的整合,并不涉及高级的内容)
直接进入主题
一.首先配struts:
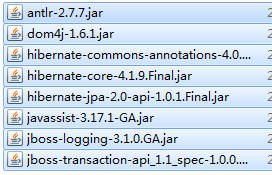
1.以下为刚开始要用到的jar包(要加的jar包每个版本好像都有变化,多试试就知道加要哪个包了,下面要加的包都同理):

2.接下来配web.xml:
- <?xml version="1.0" encoding="UTF-8"?>
- <web-app version="3.0"
- xmlns="http://java.sun.com/xml/ns/javaee"
- xmlns:xsi="http://www.w3.org/2001/XMLSchema-instance"
- xsi:schemaLocation="http://java.sun.com/xml/ns/javaee
- http://java.sun.com/xml/ns/javaee/web-app_3_0.xsd">
- <display-name></display-name>
- <filter>
- <filter-name>struts2</filter-name>
- <filter-class>org.apache.struts2.dispatcher.ng.filter.StrutsPrepareAndExecuteFilter</filter-class>
- </filter>
- <filter-mapping>
- <filter-name>struts2</filter-name>
- <url-pattern>/*</url-pattern>
- </filter-mapping>
- <welcome-file-list>
- <welcome-file>index.jsp</welcome-file>
- </welcome-file-list>
- </web-app>
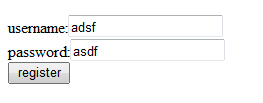
3.接下来新建index.jsp
- <%@ page language="java" import="java.util.*" pageEncoding="UTF-8"%>
- <!DOCTYPE HTML PUBLIC "-//W3C//DTD HTML 4.01 Transitional//EN">
- <html>
- <head>
- <title>register page</title>
- </head>
- <body>
- <form action="register.action">
- username:<input type="text" name="username"/><br/>
- password:<input type="text" name="password"/><br/>
- <input type="submit" value="register"/>
- </form>
- </body>
- </html>
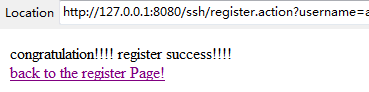
4.再新建registerOK.jsp
- <%@ page language="java" import="java.util.*" pageEncoding="UTF-8"%>
- <!DOCTYPE HTML PUBLIC "-//W3C//DTD HTML 4.01 Transitional//EN">
- <html>
- <head>
- <title>register success</title>
- </head>
- <body>
- congratulation!!!! register success!!!!<br>
- <a href="index.jsp">back to the register Page!</a>
- </body>
- </html>
5.接下来新建action类RegisterAction.java
- package com.ice.action;
- import com.opensymphony.xwork2.Action;
- public class RegisterAction implements Action
- {
- private long userID;
- private String username;
- private String password;
- public long getUserID()
- {
- return userID;
- }
- public void setUserID(long userID)
- {
- this.userID = userID;
- }
- public String getUsername()
- {
- return username;
- }
- public void setUsername(String username)
- {
- this.username = username;
- }
- public String getPassword()
- {
- return password;
- }
- public void setPassword(String password)
- {
- this.password = password;
- }
- @Override
- public String execute() throws Exception
- {
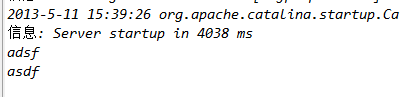
- System.out.println(getUsername());
- System.out.println(getPassword());
- return SUCCESS;
- }
- }
6.最后新建struts.xml:
- <!DOCTYPE struts PUBLIC
- "-//Apache Software Foundation//DTD Struts Configuration 2.0//EN"
- "http://struts.apache.org/dtds/struts-2.0.dtd">
- <struts>
- <package name="register" namespace="/" extends="struts-default">
- <action name="register" class="com.ice.action.RegisterAction" >
- <result name="success">registerOK.jsp</result>
- </action>
- </package>
- </struts>
7.这时struts最简单的就完了。
以下为结果图:
这是控制台的输出:
二.把Spring整合进去(这一部分是使用xml配置的,只是写了,懒得删掉了 ,第三部分是使用Annotation配置的,本部分可以跳过直接进入第三部分)
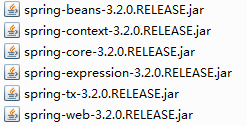
1.加入spring的jar包
另外还要加入一个包,在struts的目录下:

2.在web.xml加下spring的支持,以下为修改后的web.xml:
- <?xml version="1.0" encoding="UTF-8"?>
- <web-app version="3.0" xmlns="http://java.sun.com/xml/ns/javaee"
- xmlns:xsi="http://www.w3.org/2001/XMLSchema-instance"
- xsi:schemaLocation="http://java.sun.com/xml/ns/javaee
- http://java.sun.com/xml/ns/javaee/web-app_3_0.xsd">
- <display-name></display-name>
- <filter>
- <filter-name>struts2</filter-name>
- <filter-class>org.apache.struts2.dispatcher.ng.filter.StrutsPrepareAndExecuteFilter</filter-class>
- </filter>
- <filter-mapping>
- <filter-name>struts2</filter-name>
- <url-pattern>/*</url-pattern>
- </filter-mapping>
- <welcome-file-list>
- <welcome-file>index.jsp</welcome-file>
- </welcome-file-list>
- <context-param>
- <param-name>contextConfigLocation</param-name>
- <param-value>classpath*:applicationContext.xml</param-value>
- </context-param>
- <listener>
- <listener-class>org.springframework.web.context.ContextLoaderListener</listener-class>
- </listener>
- </web-app>
- <?xml version="1.0" encoding="UTF-8"?>
- <beans xmlns="http://www.springframework.org/schema/beans"
- xmlns:context="http://www.springframework.org/schema/context"
- xmlns:xsi="http://www.w3.org/2001/XMLSchema-instance"
- xsi:schemaLocation="
- http://www.springframework.org/schema/beans
- http://www.springframework.org/schema/beans/spring-beans.xsd
- http://www.springframework.org/schema/context
- http://www.springframework.org/schema/context/spring-context.xsd">
- <bean id="reigsterAction"
- class="com.ice.action.RegisterAction">
- </bean>
- </beans>
- <!DOCTYPE struts PUBLIC
- "-//Apache Software Foundation//DTD Struts Configuration 2.0//EN"
- "http://struts.apache.org/dtds/struts-2.0.dtd">
- <struts>
- <package name="register" namespace="/" extends="struts-default">
- <action name="register" class="reigsterAction" >
- <result name="success">registerOK.jsp</result>
- </action>
- </package>
- </struts>
5.结果就不上图了,因为跟前面一样,这一步只是把Actioin交给spring而己
三.把struts整合进spring(想一想spring好像用Annotation比较方便,那就改成Annotation吧!(那第二部分可以略过 ))
))
1.加入spring的jar包
另外还要加入一个包,在struts的目录下:
2.在web.xml加下spring的支持,以下为修改后的web.xml:
- <?xml version="1.0" encoding="UTF-8"?>
- <web-app version="3.0" xmlns="http://java.sun.com/xml/ns/javaee"
- xmlns:xsi="http://www.w3.org/2001/XMLSchema-instance"
- xsi:schemaLocation="http://java.sun.com/xml/ns/javaee
- http://java.sun.com/xml/ns/javaee/web-app_3_0.xsd">
- <display-name></display-name>
- <filter>
- <filter-name>struts2</filter-name>
- <filter-class>org.apache.struts2.dispatcher.ng.filter.StrutsPrepareAndExecuteFilter</filter-class>
- </filter>
- <filter-mapping>
- <filter-name>struts2</filter-name>
- <url-pattern>/*</url-pattern>
- </filter-mapping>
- <welcome-file-list>
- <welcome-file>index.jsp</welcome-file>
- </welcome-file-list>
- <context-param>
- <param-name>contextConfigLocation</param-name>
- <param-value>classpath*:applicationContext.xml</param-value>
- </context-param>
- <listener>
- <listener-class>org.springframework.web.context.ContextLoaderListener</listener-class>
- </listener>
- </web-app>
3.在src目录下新建一个applicationContext.xml:
- <?xml version="1.0" encoding="UTF-8"?>
- <beans xmlns="http://www.springframework.org/schema/beans"
- xmlns:context="http://www.springframework.org/schema/context"
- xmlns:xsi="http://www.w3.org/2001/XMLSchema-instance"
- xsi:schemaLocation="
- http://www.springframework.org/schema/beans
- http://www.springframework.org/schema/beans/spring-beans.xsd
- http://www.springframework.org/schema/context
- http://www.springframework.org/schema/context/spring-context.xsd">
- <!-- 添加对Annotation的支持 -->
- <context:annotation-config />
- <!-- 扫描该包下的所有Bean(@Component) -->
- <context:component-scan base-package="com.ice" />
- </beans>
4.个改struts.xml:
- <!DOCTYPE struts PUBLIC
- "-//Apache Software Foundation//DTD Struts Configuration 2.0//EN"
- "http://struts.apache.org/dtds/struts-2.0.dtd">
- <struts>
- <package name="register" namespace="/" extends="struts-default">
- <action name="register" class="registerAction" >
- <result name="success">registerOK.jsp</result>
- </action>
- </package>
- </struts>
5.修改一下Aaction:
- package com.ice.action;
- import org.springframework.context.annotation.Scope;
- import org.springframework.stereotype.Controller;
- import com.opensymphony.xwork2.Action;
- @Controller(value="reigsterAction")
- @Scope(value="prototype")
- public class RegisterAction implements Action
- {
- private long userID;
- private String username;
- private String password;
- public long getUserID()
- {
- return userID;
- }
- public void setUserID(long userID)
- {
- this.userID = userID;
- }
- public String getUsername()
- {
- return username;
- }
- public void setUsername(String username)
- {
- this.username = username;
- }
- public String getPassword()
- {
- return password;
- }
- public void setPassword(String password)
- {
- this.password = password;
- }
- @Override
- public String execute() throws Exception
- {
- System.out.println(getUsername());
- System.out.println(getPassword());
- return SUCCESS;
- }
- }
5.结果就不上图了,因为跟前面一样,这一步只是把Actioin交给spring而己
四.把hibernate整进去;
1.还是先加包:
hibernate下的必需包(required):
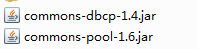
还 需要dbcp的这两个包:
除此之外还需要再加这个包(在spring的目录下):

2.建立与数据库对映的model:
- package com.ice.model;
- import javax.persistence.Entity;
- import javax.persistence.GeneratedValue;
- import javax.persistence.GenerationType;
- import javax.persistence.Id;
- import javax.persistence.Table;
- @Entity
- @Table(name="user_table")
- public class UserModel
- {
- private long userID;
- private String username;
- private String password;
- @Id
- @GeneratedValue(strategy= GenerationType.AUTO)
- public long getUserID()
- {
- return userID;
- }
- public void setUserID(long userID)
- {
- this.userID = userID;
- }
- public String getUsername()
- {
- return username;
- }
- public void setUsername(String username)
- {
- this.username = username;
- }
- public String getPassword()
- {
- return password;
- }
- public void setPassword(String password)
- {
- this.password = password;
- }
- }
3.建立DAO层:
- package com.ice.dao;
- import com.ice.model.UserModel;
- public interface UserDAO
- {
- public void save(UserModel userModel);
- }
- package com.ice.dao.impl;
- import javax.annotation.Resource;
- import org.hibernate.Session;
- import org.hibernate.SessionFactory;
- import org.hibernate.Transaction;
- import org.springframework.stereotype.Repository;
- import com.ice.dao.UserDAO;
- import com.ice.model.UserModel;
- @Repository
- public class UserDAOImpl implements UserDAO
- {
- private SessionFactory sessionFactory;
- public SessionFactory getSessionFactory()
- {
- return sessionFactory;
- }
- @Resource(name="mySessionFactory")
- public void setSessionFactory(SessionFactory sessionFactory)
- {
- this.sessionFactory = sessionFactory;
- }
- @Override
- public void save(UserModel userModel)
- {
- Session session = sessionFactory.getCurrentSession();
- Transaction tx = session.getTransaction();
- try{
- tx.begin();
- session.save(userModel);
- tx.commit();
- }catch (Exception e) {
- tx.rollback();
- e.printStackTrace();
- }
- }
- }
4.建立Service层:
- package com.ice.service;
- import com.ice.model.UserModel;
- public interface UserService
- {
- public void save(UserModel userModel);
- }
- package com.ice.service.impl;
- import javax.annotation.Resource;
- import org.springframework.stereotype.Repository;
- import org.springframework.stereotype.Service;
- import com.ice.dao.UserDAO;
- import com.ice.model.UserModel;
- import com.ice.service.UserService;
- @Service
- public class UserServiceImpl implements UserService
- {
- private UserService loginService;
- private UserDAO loginDAO;
- public UserService getLoginService()
- {
- return loginService;
- }
- public void setLoginService(UserService loginService)
- {
- this.loginService = loginService;
- }
- public UserDAO getLoginDAO()
- {
- return loginDAO;
- }
- @Resource(name="userDAOImpl")
- public void setLoginDAO(UserDAO loginDAO)
- {
- this.loginDAO = loginDAO;
- }
- @Override
- public void save(UserModel userModel)
- {
- loginDAO.save(userModel);
- }
- }
5.修改Action:
- package com.ice.action;
- import javax.annotation.Resource;
- import org.springframework.context.annotation.Scope;
- import org.springframework.stereotype.Controller;
- import com.ice.model.UserModel;
- import com.ice.service.UserService;
- import com.opensymphony.xwork2.Action;
- @Controller(value="registerAction")
- @Scope(value="prototype")
- public class RegisterAction implements Action
- {
- private long userID;
- private String username;
- private String password;
- private UserService loginService;
- public long getUserID()
- {
- return userID;
- }
- public void setUserID(long userID)
- {
- this.userID = userID;
- }
- public String getUsername()
- {
- return username;
- }
- public void setUsername(String username)
- {
- this.username = username;
- }
- public String getPassword()
- {
- return password;
- }
- public void setPassword(String password)
- {
- this.password = password;
- }
- public UserService getLoginService()
- {
- return loginService;
- }
- @Resource(name="userServiceImpl")
- public void setLoginService(UserService loginService)
- {
- this.loginService = loginService;
- }
- @Override
- public String execute() throws Exception
- {
- UserModel userModel = new UserModel();
- userModel.setUserID(userID);
- userModel.setUsername(username);
- userModel.setPassword(password);
- loginService.save(userModel);
- return SUCCESS;
- }
- }
6.把hibernate交给spring:
- <?xml version="1.0" encoding="UTF-8"?>
- <beans xmlns="http://www.springframework.org/schema/beans"
- xmlns:context="http://www.springframework.org/schema/context"
- xmlns:xsi="http://www.w3.org/2001/XMLSchema-instance"
- xsi:schemaLocation="
- http://www.springframework.org/schema/beans
- http://www.springframework.org/schema/beans/spring-beans.xsd
- http://www.springframework.org/schema/context
- http://www.springframework.org/schema/context/spring-context.xsd">
- <!-- 添加对Annotation的支持 -->
- <context:annotation-config />
- <!-- 扫描该包下的所有Bean(@Component) -->
- <context:component-scan base-package="com.ice" />
- <bean id="myDataSource" class="org.apache.commons.dbcp.BasicDataSource"
- destroy-method="close">
- <property name="driverClassName" value="com.mysql.jdbc.Driver" />
- <property name="url" value="jdbc:mysql://localhost:3306/ssh" />
- <property name="username" value="root" />
- <property name="password" value="" />
- </bean>
- <bean id="mySessionFactory"
- class="org.springframework.orm.hibernate4.LocalSessionFactoryBean">
- <property name="dataSource" ref="myDataSource" />
- <property name="packagesToScan">
- <list>
- <value>com.ice.model</value>
- </list>
- </property>
- <property name="hibernateProperties">
- <props>
- <prop key="hibernate.dialect">org.hibernate.dialect.MySQLDialect</prop>
- <prop key="hibernate.current_session_context_class">org.springframework.orm.hibernate4.SpringSessionContext</prop>
- <prop key="hibernate.current_session_context_class">thread</prop>
- <prop key="hibernate.show_sql">true</prop>
- <prop key="hibernate.format_sql">true</prop>
- <prop key="hibernate.hbm2ddl.auto">update</prop>
- </props>
- </property>
- </bean>
- </beans>
7.在数据库中新建一个数据库:
- create database ssh;
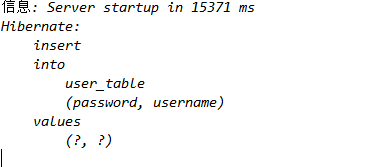
8.运行,成功!结果最后结果:
五.这是我第一次技术博客,大家多多指教!
这是项目的源文件:http://download.csdn.net/detail/yingbingxue/5356867


 713
713

 被折叠的 条评论
为什么被折叠?
被折叠的 条评论
为什么被折叠?
 到【灌水乐园】发言


