


一般的芯片启动流程都是Romcode –> BL1 –> BL2 –> Kernel –> User Image,
TI的芯片也不例外,Romcode –> ML0(SPL) –> uboot.img
整个boot阶段被分为三部分,
第一部分是芯片固化的Romcode,上电自动执行,一般支持flash,sd,uart,usb等启动方式,引导加载spl至片内ram运行;
第二部分是uboot spl,这里被称为ML0,是uboot的第一阶段,主要是初始化必要的硬件外设,关闭看门狗,关中断,配置时钟,初始化外部RAM,Flash控制器等。然后从对应启动方式中获取uboot.img,也就是uboot的第二阶段,加载到片外sdram中运行;
第三部分是uboot.img,主要是板级初始化,用来引导加载内核。
下面针对Romcode –> ML0(SPL) –> uboot.img这个流程做一个说明:
1.Romcode
芯片的Boot Rom,存放在总计176KB的ROM当中,如下图:

![]()
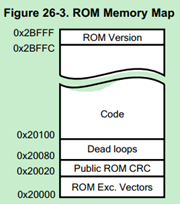
该地址区域存放了芯片的引导加载程序,板子上电后会自动执行这些代码。
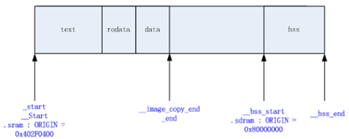
2. ML0(SPL)
系统上电后根据启动方式,到对应的地方把MLO加载到芯片内部的RAM中运行。
![]()

图中的Downloaded Image区域是用来保存 MLO(SPL)文件的,其最大可达到 109 KB
Downloaded Image = 0X4030B800 – 0X402F0400 = 0X1B400 = 109KB
MLO(SPL)的内存分布:
3.uboot.img
该阶段的代码搬到了芯片外的SDRAM中运行:(物理起始地址为0x8000000)
![]()
uboot.img的内存分布:

在对以上概念有一个整体的了解之后,下面开始来分析uboot的SPL阶段:
一、SPL的简介:
SPL(Secondary programloader)是uboot第一阶段执行的代码。主要负责搬移uboot第二阶段的代码到片外内存中运行。SPL是由固化在芯片内部的ROM引导的。我们知道很多芯片厂商固化的ROM支持从nandflash、SD卡等外部介质启动。所谓启动,就是从这些外部介质中搬移一段固定大小(4K/8K/16K等)的代码到内部RAM中运行。这里搬移的就是SPL。在最新版本的uboot中,可以看到SPL也支持nandflash,SD卡等多种启动方式。当SPL本身被搬移到内部RAM中运行时,它会从nandflash、SD卡等外部介质中搬移uboot第二阶段的代码到片外内存中。
二、SPL的功能:
1.Basic Arm Initialization
2.UART console initialization
3.Clocks and DPLL Locking(minimal)
4.SDRAM initialization
5.Mux(minimal)
6.Boot Device Initialization, based on where we are booting from MMC1, or MMC2,or Nand, or Onenand
7.Bootloading real u-boot from the Boot Device and passing control to it.
三、SPL链接文件U-boot-spl.lds
链接文件决定一个可执行程序的各个段的存储(加载)地址,以及运行(链接)地址。下面来看看SPL的链接文件U-boot-spl.lds:

从该链接文件中可以看出,程序执行是从_start标号开始的。
_start位于vectors.S (arch/arm/lib)
-
_start:
-
-
#ifdef CONFIG_SYS_DV_NOR_BOOT_CFG
-
.word CONFIG_SYS_DV_NOR_BOOT_CFG
-
#endif
-
/*
-
跳转到reset之后就不会返回了。不然就是没关中断出错了,
-
然后跳转到下面7种状态之一:死循环。
-
*/
-
b reset
-
ldr pc, _undefined_instruction
-
ldr pc, _software_interrupt
-
ldr pc, _prefetch_abort
-
ldr pc, _data_abort
-
ldr pc, _not_used
-
ldr pc, _irq
-
ldr pc, _fiq
-
-
/*
-
*************************************************************************
-
*
-
* Indirect vectors table
-
*
-
* Symbols referenced here must be defined somewhere else
-
*
-
*************************************************************************
-
*/
-
-
.globl _undefined_instruction
-
.globl _software_interrupt
-
.globl _prefetch_abort
-
.globl _data_abort
-
.globl _not_used
-
.globl _irq
-
.globl _fiq
-
-
_undefined_instruction: .word undefined_instruction
-
_software_interrupt: .word software_interrupt
-
_prefetch_abort: .word prefetch_abort
-
_data_abort: .word data_abort
-
_not_used: .word not_used
-
_irq: .word irq
-
_fiq: .word fiq
-
/*
-
前面占据了(8 + 7) * 4 = 60字节 ,不是16的倍数,所以要
-
填充0xdeadbeef字段,变成64字节。
-
*/
-
.balignl
16,
0xdeadbeef
-
-
/*
-
*************************************************************************
-
*
-
* Interrupt handling
-
*
-
*************************************************************************
-
*/
-
-
/* SPL interrupt handling: just hang */
-
-
#ifdef CONFIG_SPL_BUILD
-
-
.align
5
-
undefined_instruction:
-
software_interrupt:
-
prefetch_abort:
-
data_abort:
-
not_used:
-
irq:
-
fiq:
-
-
1:
-
bl
1b
/* hang and never return */
reset: 位于start.S (arch/arm/cpu/armv7)
-
.globl reset
-
.globl save_boot_params_ret
-
-
reset:
-
/* Allow the board to save important registers */
-
b save_boot_params
-
save_boot_params_ret:
-
/*
-
* disable interrupts (FIQ and IRQ), also set the cpu to SVC32 mode,
-
* except if in HYP mode already
-
*/
-
mrs r0, cpsr
-
and r1, r0, #
0x1f @ mask mode bits
-
teq r1, #
0x1a @ test
for HYP mode
-
bicne r0, r0, #
0x1f @ clear all mode bits
-
orrne r0, r0, #
0x13 @
set SVC mode
-
orr r0, r0, #
0xc0 @ disable FIQ
and IRQ
-
msr cpsr,r0
-
-
/*
-
* Setup vector:
-
* (OMAP4 spl TEXT_BASE is not 32 byte aligned.
-
* Continue to use ROM code vector only in OMAP4 spl)
-
*/
-
#if !(defined(CONFIG_OMAP44XX) && defined(CONFIG_SPL_BUILD))
-
/* Set V=0 in CP15 SCTLR register - for VBAR to point to vector */
-
mrc p15,
0, r0, c1, c0,
0 @ Read CP15 SCTLR Register
-
bic r0, #CR_V @ V =
0
-
mcr p15,
0, r0, c1, c0,
0 @ Write CP15 SCTLR Register
-
-
/* Set vector address in CP15 VBAR register */
-
ldr r0, =_start
-
mcr p15,
0, r0, c12, c0,
0 @Set VBAR
-
#endif
-
-
/* the mask ROM code should have PLL and others stable */
-
#ifndef CONFIG_SKIP_LOWLEVEL_INIT
-
bl cpu_init_cp15
-
bl cpu_init_crit
-
#endif
-
-
bl _main
reset部分做了如下动作:
关闭中断,设置cpu为SVC32模式(管理模式)。
cpu_init_cp15初始化了协处理器:关闭cathe以及mmu。
cpu_init_crit准备临时堆栈,初始化锁相环以及内存。
-
ENTRY(cpu_init_crit)
-
/*
-
* Jump to board specific initialization...
-
* The Mask ROM will have already initialized
-
* basic memory. Go here to bump up clock rate and handle
-
* wake up conditions.
-
*/
-
b lowlevel_init @ go setup pll,mux,
memory
-
ENDPROC
(cpu_init_crit)
跳转至lowlevel_init :位于lowlevel_init.S (arch/arm/cpu/armv7)
-
ENTRY(lowlevel_init)
-
/*
-
* Setup a temporary stack. Global data is not available yet.
-
*/
-
ldr sp, =CONFIG_SYS_INIT_SP_ADDR
-
bic sp, sp, #
7
/* 8-byte alignment for ABI compliance */
-
#ifdef CONFIG_SPL_DM
-
mov r9, #
0
-
#
else
-
/*
-
* Set up global data for boards that still need it. This will be
-
* removed soon.
-
*/
-
#ifdef CONFIG_SPL_BUILD
-
ldr r9, =gdata
-
#
else
-
sub sp, sp, #GD_SIZE
-
bic sp, sp, #
7
-
mov r9, sp
-
#endif
-
#endif
-
/*
-
* Save the old lr(passed in ip) and the current lr to stack
-
*/
-
push {ip, lr}
-
-
/*
-
* Call the very early init function. This should do only the
-
* absolute bare minimum to get started. It should not:
-
*
-
* - set up DRAM
-
* - use global_data
-
* - clear BSS
-
* - try to start a console
-
*
-
* For boards with SPL this should be empty since SPL can do all of
-
* this init in the SPL board_init_f() function which is called
-
* immediately after this.
-
*/
-
bl s_init
-
pop {ip, pc}
-
ENDPROC(lowlevel_init)
为调用c函数准备一个临时堆栈,这个堆栈在cpu的片上内存
ldr sp, =CONFIG_SYS_INIT_SP_ADDR
bic sp, sp, #7 /* 8-byte alignment for ABI compliance */
跟踪代码,找到CONFIG_SYS_INIT_SP_ADDR的定义:
ti_armv7_common.h (include/configs)
#define CONFIG_SYS_INIT_SP_ADDR (NON_SECURE_SRAM_END - GENERATED_GBL_DATA_SIZE)
#define NON_SECURE_SRAM_START 0x402F0400
#define NON_SECURE_SRAM_END 0x40310000
#define SRAM_SCRATCH_SPACE_ADDR 0x4030B800
#define GENERATED_GBL_DATA_SIZE 224 /* (sizeof(struct global_data) + 15) & ~15 @ */
所以算出CONFIG_SYS_INIT_SP_ADDR = 0x40310000 - 224 = 0x4030FF20
(反汇编u-boot.spl,查看dump文件,发现的确是0x4030FF20)
![]()
![]()
继续跳转至s_init: board.c (arch/arm/cpu/armv7/am33xx)
-
void s_init(void)
-
{
-
#if defined(CONFIG_SPL_BUILD) && defined(CONFIG_SPL_RTC_ONLY_SUPPORT)
-
rtc_only();
-
#endif
-
/*
-
* The ROM will only have set up sufficient pinmux to allow for the
-
* first 4KiB NOR to be read, we must finish doing what we know of
-
* the NOR mux in this space in order to continue.
-
*/
-
#ifdef CONFIG_NOR_BOOT
-
enable_norboot_pin_mux();
-
#endif
-
watchdog_disable();
-
set_uart_mux_conf();
-
setup_clocks_for_console();
-
uart_soft_reset();
-
#if defined(CONFIG_SPL_AM33XX_ENABLE_RTC32K_OSC)
-
/* Enable RTC32K clock */
-
rtc32k_enable();
-
#endif
-
}
主要工作:关闭看门狗、设置串口的引脚以及时钟、使能RTC时钟信号
最后返回至reset代码,跳转到_main执行:crt0.S (arch/arm/lib)
-
ENTRY(_main)
-
-
/*
-
* Set up initial C runtime environment and call board_init_f(0).
-
*/
-
-
#if defined(CONFIG_SPL_BUILD) && defined(CONFIG_SPL_STACK)
-
ldr sp, =(CONFIG_SPL_STACK)
-
#
else
-
ldr sp, =(CONFIG_SYS_INIT_SP_ADDR)
-
#endif
-
#
if defined(CONFIG_CPU_V7M)
/* v7M forbids using SP as BIC destination */
-
mov r3, sp
-
bic r3, r3, #
7
-
mov sp, r3
-
#
else
-
bic sp, sp, #
7
/* 8-byte alignment for ABI compliance */
-
#endif
-
mov r0, sp
//r0 = sp,之后调用board_init_f_alloc_reserve函数,r0作为形参
-
bl board_init_f_alloc_reserve
-
//返回之后,r0里面存放的是global_data的地址
-
//注意,同时也是堆栈地址,因为堆栈是向下增长的,所以不必担心和global_data冲突的问题
-
mov sp, r0
//sp = board_init_f_alloc_reserve函数返回的top,也就是global_data的地址
-
/* set up gd here, outside any C code */
-
mov r9, r0
//r9 = r0 = global_data的起始地址
-
//调用board_init_f_init_reserve对global_data进行初始化
-
bl board_init_f_init_reserve
-
-
mov r0, #
0
-
bl board_init_f
-
-
#
if ! defined(CONFIG_SPL_BUILD)
-
-
/*
-
* Set up intermediate environment (new sp and gd) and call
-
* relocate_code(addr_moni). Trick here is that we'll return
-
* 'here' but relocated.
-
*/
-
-
ldr sp, [r9, #GD_START_ADDR_SP]
/* sp = gd->start_addr_sp */
-
#
if defined(CONFIG_CPU_V7M)
/* v7M forbids using SP as BIC destination */
-
mov r3, sp
-
bic r3, r3, #
7
-
mov sp, r3
-
#
else
-
bic sp, sp, #
7
/* 8-byte alignment for ABI compliance */
-
#endif
-
ldr r9, [r9, #GD_BD]
/* r9 = gd->bd */
-
sub r9, r9, #GD_SIZE
/* new GD is below bd */
-
-
adr lr, here
-
ldr r0, [r9, #GD_RELOC_OFF]
/* r0 = gd->reloc_off */
-
add lr, lr, r0
-
#
if defined(CONFIG_CPU_V7M)
-
orr lr, #
1
/* As required by Thumb-only */
-
#endif
-
ldr r0, [r9, #GD_RELOCADDR]
/* r0 = gd->relocaddr */
-
b relocate_code
-
here:
-
/*
-
* now relocate vectors
-
*/
-
-
bl relocate_vectors
-
-
/* Set up final (full) environment */
-
-
bl c_runtime_cpu_setup
/* we still call old routine here */
-
#endif
-
#
if !defined(CONFIG_SPL_BUILD) || defined(CONFIG_SPL_FRAMEWORK)
-
# ifdef CONFIG_SPL_BUILD
-
/* Use a DRAM stack for the rest of SPL, if requested */
-
bl spl_relocate_stack_gd
-
cmp r0, #
0
-
movne sp, r0
//new_gd指针存入sp
-
movne r9, r0
//new_gd指针存入r9
-
# endif
-
ldr r0, =__bss_start
/* this is auto-relocated! */
-
-
#ifdef CONFIG_USE_ARCH_MEMSET
-
ldr r3, =__bss_end
/* this is auto-relocated! */
-
mov r1, #
0x00000000
/* prepare zero to clear BSS */
-
-
subs r2, r3, r0
/* r2 = memset len */
-
bl
memset
-
#
else
-
ldr r1, =__bss_end
/* this is auto-relocated! */
-
mov r2, #
0x00000000
/* prepare zero to clear BSS */
-
/*
-
r0 = __bss_start
-
r1 = __bss_end
-
r2 = 0
-
*/
-
clbss_l:cmp r0, r1
/* while not at end of BSS */
-
#
if defined(CONFIG_CPU_V7M)
-
itt lo
-
#endif
-
//HS - Higher or Same, LO - Lower
-
//__bss_start比__bss_end小,则把r2的值加载到以r0地址的存储器中
-
strlo r2, [r0]
/* clear 32-bit BSS word */
-
//r0 = r0 + 4
-
addlo r0, r0, #
4
/* move to next */
-
blo clbss_l
-
#endif
-
-
#
if ! defined(CONFIG_SPL_BUILD)
-
bl coloured_LED_init
-
bl red_led_on
-
#endif
-
/* call board_init_r(gd_t *id, ulong dest_addr) */
-
mov r0, r9
/* gd_t */
-
//r1 = r9 + GD_RELOCADDR
-
ldr r1, [r9, #GD_RELOCADDR]
/* dest_addr */
-
/* call board_init_r */
-
#
if defined(CONFIG_SYS_THUMB_BUILD)
-
//r0以及r1作为形参传递
-
ldr lr, =board_init_r
/* this is auto-relocated! */
-
//BX指令跳转到指令中所指定的目标地址,若目标地址的bit[0]为0,
-
//则跳转时自动将CPSR中的标志位T复位,即把目标地址的代码解释
-
//为ARM代码;若目标地址的bit[0]为1,则跳转时自动将CPSR中的标志位
-
//T置位,即把目标地址的代码解释为Thumb代码。
-
bx lr
-
#
else
-
ldr pc, =board_init_r
/* this is auto-relocated! */
-
#endif
-
/* we should not return here. */
-
#endif
-
-
ENDPROC(_main)
ldr sp, =(CONFIG_SYS_INIT_SP_ADDR)
设置栈,上面已经计算出来:
sp = CONFIG_SYS_INIT_SP_ADDR = 0x4030FF20
mov r0, sp //r0 = sp,之后调用board_init_f_alloc_reserve函数,r0作为形参
-
// 这个函数用于给global_data分配空间,在relocation之前调用
-
// 传入的参数是顶部地址,但是不一定是要内存顶部的地址,
-
//可以自己进行规划,后面_main函数会说明
-
ulong board_init_f_alloc_reserve(ulong top)
-
{
-
/* Reserve early malloc arena */
-
#if defined(CONFIG_SYS_MALLOC_F)
-
// 先从顶部向下分配一块CONFIG_SYS_MALLOC_F_LEN大小的空间给early malloc使用
-
// 关于CONFIG_SYS_MALLOC_F_LEN可以参考README
-
// 这块内存是用于在relocation前用于给malloc函数提供内存池。
-
top -= CONFIG_SYS_MALLOC_F_LEN;
//top = top - CONFIG_SYS_MALLOC_F_LEN = r0(sp)-CONFIG_SYS_MALLOC_F_LEN
-
#endif
-
/* LAST : reserve GD (rounded up to a multiple of 16 bytes) */
-
// 继续向下分配sizeof(struct global_data)大小的内存给global_data使用,向下16byte对齐
-
// 这时候得到的地址就是global_data的地址。
-
top = rounddown(top-
sizeof(struct global_data),
16);
-
// 将top,也就是global_data的地址返回
-
return top;
-
}
mov sp, r0 //sp = board_init_f_alloc_reserve函数返回的top,也就是global_data的地址。注意,同时也是堆栈地址,因为堆栈是向下增长的,所以不必担心和global_data冲突的问题
mov r9, r0 //r9 = r0 = global_data的起始地址
跳转至board_init_f_init_reserve函数,r0作为形参:board_init.c (common/init)
-
// 这个函数用于对global_data区域进行初始化,也就是清空global_data区域
-
// 传入的参数就是global_data的基地址
-
void board_init_f_init_reserve(ulong base)
-
{
-
struct global_data *gd_ptr;
-
#ifndef _USE_MEMCPY
-
int *ptr;
-
#endif
-
-
/*
-
* clear GD entirely and set it up.
-
* Use gd_ptr, as gd may not be properly set yet.
-
*/
-
-
gd_ptr = (struct global_data *)base;
-
/* zero the area */
-
#ifdef _USE_MEMCPY
-
// 先通过memset函数对global_data数据结构进行清零
-
memset(gd_ptr,
'\0',
sizeof(*gd));
-
#else
-
for (ptr = (
int *)gd_ptr; ptr < (
int *)(gd_ptr +
1); )
-
*ptr++ =
0;
-
#endif
-
/* set GD unless architecture did it already */
-
#if !defined(CONFIG_ARM)
-
arch_setup_gd(gd_ptr);
-
#endif
-
/* next alloc will be higher by one GD plus 16-byte alignment */
-
// 因为global_data区域是16Byte对齐的,对齐后,后面的地址就是early malloc
-
//的内存池的地址,具体参考上述board_init_f_alloc_reserve
-
// 所以这里就获取了early malloc的内存池的地址
-
base += roundup(
sizeof(struct global_data),
16);
-
-
/*
-
* record early malloc arena start.
-
* Use gd as it is now properly set for all architectures.
-
*/
-
-
#if defined(CONFIG_SYS_MALLOC_F)
-
/* go down one 'early malloc arena' */
-
// 将内存池的地址写入到gd->malloc_base中
-
gd->malloc_base = base;
-
/* next alloc will be higher by one 'early malloc arena' size */
-
//加上CONFIG_SYS_MALLOC_F_LEN,获取early malloc的内存池的末尾地址,
-
//这里并没有什么作用,是为了以后在early malloc的内存池后面多
-
//加一个区域时的修改方便。
-
base += CONFIG_SYS_MALLOC_F_LEN;
-
#endif
-
}
这里首先为调用board_init_f准备一个临时堆栈。然后将堆栈初始的地址保存在r9,所以r9就是gd的起始地址,后面需要靠r9访问gd中的成员。然后将r0赋值成0,r0就是要调用的board_init_f函数的第一个参数。
global_data内存分布如下:
———————- CONFIG_SYS_INIT_SP_ADDR —————————–高地址
…………………………….. early malloc 内存池
————————-early malloc 内存池基地址 —————————
………………………………… global_data区域
—————-global_data基地址(r9), 也是堆栈的起始地址————-
………………………………………堆栈空间
————————————–堆栈结束—————————————-低地址
跳转至board_init_f 函数:board.c (arch/arm/cpu/armv7/am33xx)
-
#ifdef CONFIG_SPL_BUILD
-
void board_init_f(ulong dummy)
-
{
-
board_early_init_f();
-
sdram_init();
-
}
-
#endif
该函数主要功能是初始化clock、dpll、timer、IO引脚(mmc、i2c、cpsw、nand)、ddr。
然后跳转至spl_relocate_stack_gd: spl.c (common/spl)
-
/**
-
* spl_relocate_stack_gd() - Relocate stack ready for board_init_r() execution
-
*
-
* Sometimes board_init_f() runs with a stack in SRAM but we want to use SDRAM
-
* for the main board_init_r() execution. This is typically because we need
-
* more stack space for things like the MMC sub-system.
-
*
-
* This function calculates the stack position, copies the global_data into
-
* place, sets the new gd (except for ARM, for which setting GD within a C
-
* function may not always work) and returns the new stack position. The
-
* caller is responsible for setting up the sp register and, in the case
-
* of ARM, setting up gd.
-
*
-
* All of this is done using the same layout and alignments as done in
-
* board_init_f_init_reserve() / board_init_f_alloc_reserve().
-
*
-
* @return new stack location, or 0 to use the same stack
-
*/
-
ulong spl_relocate_stack_gd(void)
-
{
-
#ifdef CONFIG_SPL_STACK_R
-
gd_t *new_gd;
-
ulong ptr = CONFIG_SPL_STACK_R_ADDR;
//0x82000000, SDRAM的地址
-
-
#ifdef CONFIG_SPL_SYS_MALLOC_SIMPLE
-
if (CONFIG_SPL_STACK_R_MALLOC_SIMPLE_LEN) {
-
if (!(gd->flags & GD_FLG_SPL_INIT))
-
panic_str(
"spl_init must be called before heap reloc");
-
-
ptr -= CONFIG_SPL_STACK_R_MALLOC_SIMPLE_LEN;
-
gd->malloc_base = ptr;
-
gd->malloc_limit = CONFIG_SPL_STACK_R_MALLOC_SIMPLE_LEN;
-
gd->malloc_ptr =
0;
-
}
-
#endif
-
/* Get stack position: use 8-byte alignment for ABI compliance */
-
//roundup(x, y)类似于一个数学函数,它总是尝试找到大于x并接近x的可以整
-
//除y的那个数,也即向上圆整。
-
ptr = CONFIG_SPL_STACK_R_ADDR - roundup(
sizeof(
gd_t),
16);
-
//将之前在片内内存中的global_data对象重定位到SDRAM中(new_gd)
-
new_gd = (
gd_t *)ptr;
-
memcpy(new_gd, (
void *)gd,
sizeof(
gd_t));
-
#if !defined(CONFIG_ARM)
-
gd = new_gd;
-
#endif
-
//返回新的栈指针
-
return ptr;
-
#else
-
return
0;
-
#endif
-
}
功能在注释那里说的很清楚了:
This function calculates the stack position, copies the global_data into place, sets the new gd (except for ARM, for which setting GD within a C function may not always work) and returns the new stack position.
返回至_main代码中,继续运行(r0存放了新的gd指针,同时也是新的栈指针):
cmp r0, #0
movne sp, r0
movne r9, r0
cmp命令是比较r0和0的大小(第一个操作数减去第二个操作数,但不影响第两个操作数的值,最后结果影响CPSR状态寄存器):
EQ和NE条件码:当两个数据相等时,条件码EQ有效,否则条件码NE有效。
最后把new_gd指针放在了r9寄存器里面。
然后继续往下走,主要功能是清除bss段:(存储未初始化的全局变量和未初始化的static变量)
-
ldr r0, =__bss_start
/* this is auto-relocated! */
-
-
#ifdef CONFIG_USE_ARCH_MEMSET
-
ldr r3, =__bss_end
/* this is auto-relocated! */
-
mov r1, #
0x00000000
/* prepare zero to clear BSS */
-
-
subs r2, r3, r0
/* r2 = memset len */
-
bl
memset
-
#
else
-
ldr r1, =__bss_end
/* this is auto-relocated! */
-
mov r2, #
0x00000000
/* prepare zero to clear BSS */
-
/*
-
r0 = __bss_start
-
r1 = __bss_end
-
r2 = 0
-
*/
-
clbss_l:cmp r0, r1
/* while not at end of BSS */
-
#
if defined(CONFIG_CPU_V7M)
-
itt lo
-
#endif
-
//HS - Higher or Same, LO - Lower
-
//__bss_start比__bss_end小,则把r2的值加载到以r0地址的存储器中
-
strlo r2, [r0]
/* clear 32-bit BSS word */
-
//r0 = r0 + 4
-
addlo r0, r0, #
4
/* move to next */
-
blo clbss_l
-
#endif
然后把新的gd指针存入r0,gd指针加上偏移量GD_RELOCADDR存入r1,两者作为形参传递给board_init_r,最后跳转到board_init_r中执行:spl.c (common/spl)
-
void board_init_r(gd_t *dummy1, ulong dummy2)
-
{
-
int i;
-
-
debug(
">>spl:board_init_r()\n");
-
//CONFIG_SYS_SPL_MALLOC_START = 0x80a80000, CONFIG_SYS_SPL_MALLOC_SIZE = 0x100000
-
#if defined(CONFIG_SYS_SPL_MALLOC_START)
-
//初始化:设置0x80a80000 ~0x80B80000内容为0
-
mem_malloc_init(CONFIG_SYS_SPL_MALLOC_START,
-
CONFIG_SYS_SPL_MALLOC_SIZE);
-
gd->flags |= GD_FLG_FULL_MALLOC_INIT;
-
#endif
-
if (!(gd->flags & GD_FLG_SPL_INIT)) {
-
if (spl_init())
-
hang();
-
}
-
#ifndef CONFIG_PPC
-
/*
-
* timer_init() does not exist on PPC systems. The timer is initialized
-
* and enabled (decrementer) in interrupt_init() here.
-
*/
-
timer_init();
-
#endif
-
-
#ifdef CONFIG_SPL_BOARD_INIT
-
spl_board_init();
-
#endif
spl_board_init: boot-common.c (arch/arm/cpu/armv7/omap-common)
主要工作:把片内ram的启动参数加载到片外内存,初始化串口、gpmc、i2c、usb、看门狗、dpll
其中,里面的save_omap_boot_params函数就是把片内ram的启动参数加载到片外内存,获取boot_device类型以及boot_mode,设置gd结构体。具体的启动参数结构如下:

-
void save_omap_boot_params(void)
-
{
-
//OMAP_SRAM_SCRATCH_BOOT_PARAMS = 0x4030B800 + 0x24 = 0x4030B824
-
//boot_params参数存储在片内的RAM区
-
u32 boot_params = *((u32 *)OMAP_SRAM_SCRATCH_BOOT_PARAMS);
-
struct omap_boot_parameters *omap_boot_params;
-
int sys_boot_device =
0;
-
u32 boot_device;
-
u32 boot_mode;
-
-
if ((boot_params < NON_SECURE_SRAM_START) ||
-
(boot_params > NON_SECURE_SRAM_END))
-
return;
-
-
omap_boot_params = (struct omap_boot_parameters *)boot_params;
-
-
boot_device = omap_boot_params->boot_device;
-
boot_mode = MMCSD_MODE_UNDEFINED;
回到board_init_r函数:
-
//获取gd结构体中的boot_device
-
board_boot_order(spl_boot_list);
-
for (i =
0; i < ARRAY_SIZE(spl_boot_list) &&
-
spl_boot_list[i] != BOOT_DEVICE_NONE; i++) {
-
announce_boot_device(spl_boot_list[i]);
//打印从哪里启动uboot
-
if (!spl_load_image(spl_boot_list[i]))
//找到并且加载u-boot.img到内存
-
break;
-
}
-
-
if (i == ARRAY_SIZE(spl_boot_list) ||
-
spl_boot_list[i] == BOOT_DEVICE_NONE) {
-
puts(
"SPL: failed to boot from all boot devices\n");
-
hang();
-
}
-
-
switch (spl_image.os) {
-
case IH_OS_U_BOOT:
-
debug(
"Jumping to U-Boot\n");
-
break;
-
#ifdef CONFIG_SPL_OS_BOOT
-
case IH_OS_LINUX:
-
debug(
"Jumping to Linux\n");
-
spl_board_prepare_for_linux();
-
jump_to_image_linux((
void *)CONFIG_SYS_SPL_ARGS_ADDR);
-
#endif
-
default:
-
debug(
"Unsupported OS image.. Jumping nevertheless..\n");
-
}
-
#if defined(CONFIG_SYS_MALLOC_F_LEN) && !defined(CONFIG_SYS_SPL_MALLOC_SIZE)
-
debug(
"SPL malloc() used %#lx bytes (%ld KB)\n", gd->malloc_ptr,
-
gd->malloc_ptr /
1024);
-
#endif
-
-
debug(
"loaded - jumping to U-Boot...");
-
jump_to_image_no_args(&spl_image);
//跳转到u-boot.img中继续运行
-
}
将镜像加载到内存的时候,此时SPL进行判断,加载的镜像是uboot还是kernel,然后便跳转到镜像的入口中进行执行。此时,SPL的使命便完成了。
==>jump_to_image_no_args(&spl_image);


 9451
9451


 被折叠的 条评论
为什么被折叠?
被折叠的 条评论
为什么被折叠?
 到【灌水乐园】发言


