


SpringBoot+Redis 实现Session会话共享
Git地址:https://gitee.com/liu-miaos-xiaojing/springboot-readis-session.git
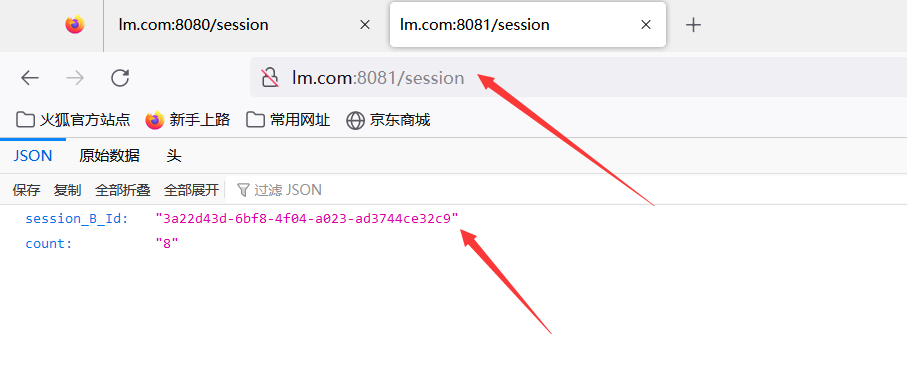
效果如下:
A服务器:

B服务器:
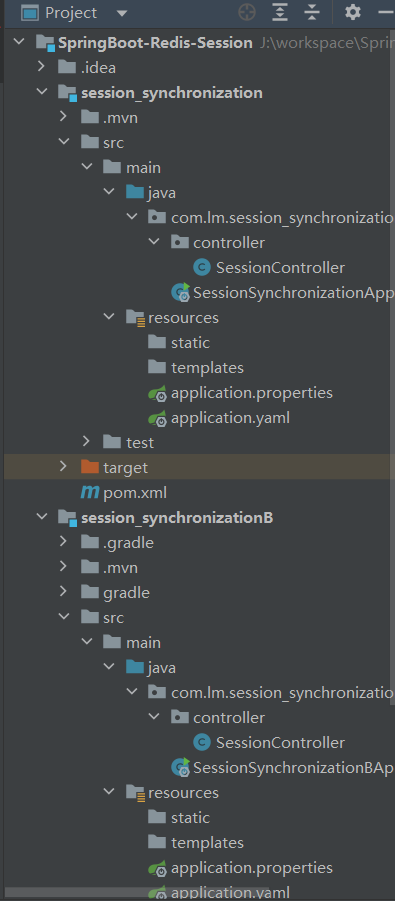
目录结构如下:
A服务器构件步骤:
pom.xml添加依赖
        <!-- SpringBoot 和 Redis的整合启动场景 -->
        <dependency>
            <groupId>org.springframework.boot</groupId>
            <artifactId>spring-boot-starter-data-redis</artifactId>
        </dependency>

        <!-- spring 引入 session 信息存储到redis里的依赖包  -->
        <dependency>
            <groupId>org.springframework.session</groupId>
            <artifactId>spring-session-data-redis</artifactId>
        </dependency>
2.修改application.properties文件
server.port=8080 #配置端口号创建application.yaml文件
# session的存储方式配置为redis
spring:
  session:
    store-type: redis
# session存活时间(自定义)
server:
  reactive:
    session:
      timeout: 300
创建Controller,给web提供接口
package com.lm.session_synchronization.controller;

import lombok.extern.slf4j.Slf4j;
import org.springframework.web.bind.annotation.RequestMapping;
import org.springframework.web.bind.annotation.RequestMethod;
import org.springframework.web.bind.annotation.RestController;

import javax.servlet.http.HttpServletRequest;
import javax.servlet.http.HttpSession;
import java.util.Enumeration;
import java.util.HashMap;
import java.util.Map;

/**
 * @author: lm
 * @createDate: 2023-02-15 17:56
 * @description:
 */
@Slf4j
@RestController
public class SessionController {

    /**
     * 访问接口,返回sessionId
     * @param request
     * @return Map<tomcatA,sessionID>
     */
    @RequestMapping(value = "/session",method = RequestMethod.GET)
    public Object getSession(HttpServletRequest request) {
        HttpSession httpSession = request.getSession();
        Map<String,Object> rtnMap = new HashMap<>();
        Enumeration<String> attributeNames = request.getSession().getAttributeNames();
        while(attributeNames.hasMoreElements()){
            String name = attributeNames.nextElement();
            rtnMap.put(name, httpSession.getAttribute(name));
        }
        int count;
        try {
            count = Integer.parseInt(String.valueOf(httpSession.getAttribute("count")));
            count++;
        }catch (NumberFormatException e){
            count = 1;
        }
        httpSession.setAttribute("count",count+"");

        rtnMap.put("session_A_Id", httpSession.getId());
        return rtnMap;
    }

    /**
     * 清空session
     * @param request
     */
    @RequestMapping(value = "/invalidate",method = RequestMethod.GET)
    public int invalidate(HttpServletRequest request) {
        HttpSession httpSession = request.getSession();
        httpSession.invalidate();
        return 1;
    }

}
B服务器构件步骤:
1.修改application.properties文件
server.port=8081 #配置端口号2.其余参见:A服务器构件步骤
注:这里做个标记,用于区分服务器

测试效果见:文章首页
清除A服务器的session会话,测试B服务器的session是否会被踢出
A服务器
执行controller中 invalidate 的接口

B服务器
重新刷新页面:(访问session接口)

这里可以发现,B服务器的当前session会话已经被踢出


 525
525


 被折叠的 条评论
为什么被折叠?
被折叠的 条评论
为什么被折叠?
 到【灌水乐园】发言


