


jdk&tomcat安装
1.上传jdk、tomcat安装包
2.解压两个工具包
#解压
tar -zxvf apache-tomcat-8.5.20.tar.gz
#解压jdk
tar -zxvf jdk-8u151-linux-x64.tar.gz
3.配置并且测试jdk安装
#配置环境变量
vim /etc/profile
#java environment
export JAVA_HOME=/soft/jdk1.8.0_151
export JRE_HOME=${JAVA_HOME}/jre
export CLASSPATH=.:${JAVA_HOME}/lib:${JRE_HOME}/lib
export PATH=${JAVA_HOME}/bin:$PATH
#设置环境变量生效
source /etc/profile
先进入 cd apache-tomcat-8.5.20/然后 cd webapps/然后cd manager/然后cd META-INF/然后编辑 vim context.xml进入
![]() 页面进行删除两行数据然后cd .. cd .. cd ..退出到bin/目录启动tomcat
页面进行删除两行数据然后cd .. cd .. cd ..退出到bin/目录启动tomcat
./start.sh
开放端口firewall-cmd --zone=public --add-port=8080/tcp --permanent
刷新防火墙firewall-cmd --reload
然后去游览器上登录ip地址
更改登录密码
Cd ..
Cd conf/进入这个文件目录进行编辑
Vim tomcat-users.xml文件

把这行密码放进去更改
更改完成之后cd ..返回进入到bin/目录
启动tomcat 先./shutdown.sh关闭服务,然后./start.sh进行刷新
这个时候就可以登录tomcat了
4.启动tomcat
./start.sh
5.防火墙设置
#开放端口
firewall-cmd --zone=public --add-port=3306/tcp --permanentfirewall-cmd --zone=public --add-port=8080/tcp --permanent
#跟新防火墙规则
firewall-cmd --reload
#防火墙列表
firewall-cmd --zone=public --list-ports
#防火墙状态
systemctl status firewalld
#启动防火墙
systemctl start firewalld
#关闭防火墙
systemctl stop firewalld.service
systemctl disable firewalld.service
设置系统服务
新建tomcat.service文件,配置成长度系统服务 ==文件在素材中可以找到,注意修改路径==
vi /usr/lib/systemd/system/tomcat.service
重载系统服务
systemctl daemon-reload
相关指令
MySQL安装
#1.卸载mariadb,否则安装MySql会出现冲突(先查看后删除再查看)
[root@192 ~]#mariadb[root@192 ~]# rpm -qa|grep mariadb
mariadb-libs-5.5.56-2.el7.x86_64
[root@192 ~]# rpm -e --nodeps mariadb-libs-5.5.68-1.el7.x86_64
#2.在线下载MySQL安装包(也可提前下载好上传)
wget https://downloads.mysql.com/archives/get/p/23/file/mysql-5.7.35-1.el7.x86_64.rpm-bundle.tar
#3.将MySQL安装包解压到指定目录
mkdir mysql-5.7
tar -xvf mysql-5.7.35-1.el7.x86_64.rpm-bundle.tar -C mysql-5.7
#4.开始安装,-ivh 其中i表示安装,v表示显示安装过程,h表示显示进度
cd mysql-5.7
rpm -ivh mysql-community-common-5.7.35-1.el7.x86_64.rpm
rpm -ivh mysql-community-libs-5.7.35-1.el7.x86_64.rpm
rpm -ivh mysql-community-client-5.7.35-1.el7.x86_64.rpm
rpm -ivh mysql-community-server-5.7.35-1.el7.x86_64.rpm
#5.启动MySQL服务
systemctl start mysqld
#6.登录mysql修改密码
[root@192 mysql-5.7]# grep "password" /var/log/mysqld.log
2022-10-12T13:19:16.313408Z 1 [Note] A temporary password is generated for root@localhost: o8N#/CfWD+sh
[root@192 mysql-5.7]# mysql -uroot -p
Enter password:
Welcome to the MySQL monitor. Commands end with ; or \g.
#设置密码校验策略(0 or LOW),要不密码太LOW不让你过
set global validate_password_policy=0;
#设置密码校验长度,要不密码太短不让你过(多次测试发现密码最小长度为4位)
set global validate_password_length=4;
#更新密码
set password = password("123456");
#输入后使修改生效还需要下面的语句
FLUSH PRIVILEGES;
#可以退出,试试用新密码重新登录
exit
创建新的用户grant all on *.* to lf@'%' identified by '123456';
登录新用户里面去创建新的数据库
create database bookshop;
然后use bookshop;
加载数据库脚本source /soft/mysql-5.7/book.sql;
查看数据select * from t_book;
然后可以去tomcat 发布项目**.sql数据
#Centos7下无法远程连接mysql数据库
#数据库没有授权,允许以root身份远程登录mysql
GRANT ALL PRIVILEGES ON *.* TO 'root'@'%' IDENTIFIED BY '123456' WITH GRANT OPTION;
#输入后使修改生效还需要下面的语句
FLUSH PRIVILEGES;
#Navicat链接MySQL测试
#查看MySQL版本
rpm -qa | grep mysql
然后搜索自己的lp:8080/bs/book/list
这个时候会报500错误,然后看以下操作
进行编辑
编辑完成之后退到cd ap然后cd bin/
重起tomcat,./sh,./st然后重新刷新一下项目后端就能运行了
Redis 安装
如果没有安装则通过以下命令安装:
yum install -y gcc
然后进行redis安装包并进行解压
Wget https://download.redis.io/releases/redis-6.2.6.tar.gz
解压
tar -zxvf redis-6.2.6.tar.gz
进入解压目录并编译
cd redis-6.2.6
编译
make
指定安装目录并进行安装
make install PREFIX=/soft/redis
启动redis服务
cd /soft/redis/bin
然后进入到redis目录
cd bin/启动 ./redis-server
然后退出把redis-6.2.6目录里面的redis.conf复制到redis里面
mv redis.conf /soft/redis/bin
复制完成后切回到 /soft/redis/bin
然后编辑
Vim redis.conf
把75行注释掉
![]()
把94行注释掉
![]()
把257行改成yes
把901改密码
![]()
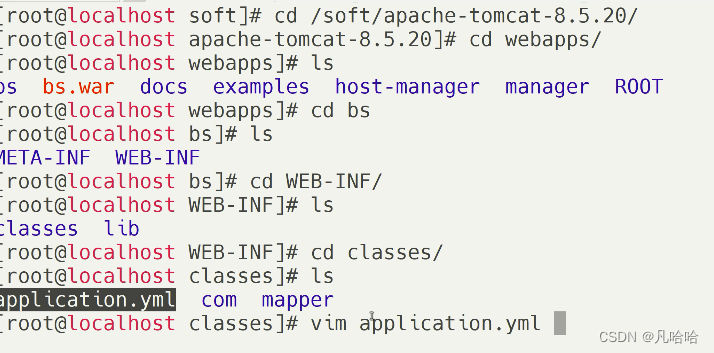
然后新开一个虚拟机
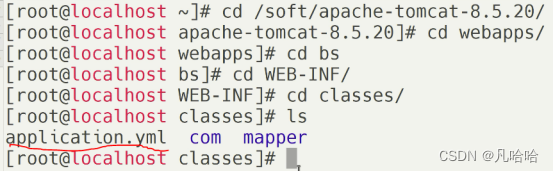
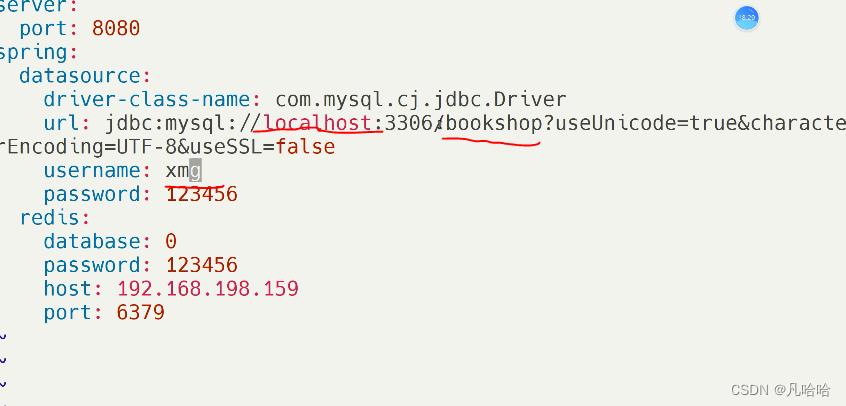
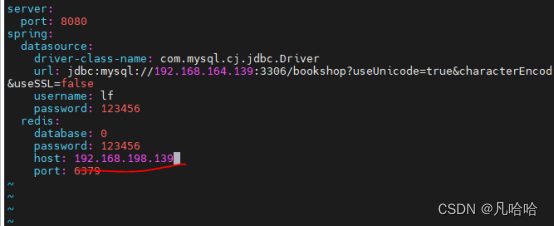
进入这个目录进行编辑vim application.yul
更改这个ip改成自己的保存退出
然后重启一下tomcat
cd appche-tomcat-8.5.20/
cd bin/
./sh
./st
然后回到浏览器上面
项目部署
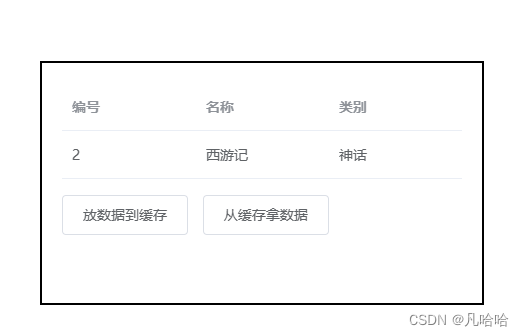
然后去浏览器上面搜索ip:8080/bs/book/put
#1.启动后台项目测试
http://localhost:8080/T216_SSH/vue/treeNodeAction.action
#2.maven install将项目打包
#3.将打包好的项目放入tomcat/webapps/
#4.启动tomcat
./start.sh
#5.浏览器测试
http://192.168.195.139:8080/T216_SSH/vue/treeNodeAction.action
Nginx负载均衡
1.Nginx安装
1) 添加 nginx 官方提供的 yum 源(需要联网且时间较长)
rpm -Uvh http://nginx.org/packages/centos/7/x86_64/RPMS/nginx-1.14.2-1.el7_4.ngx.x86_64.rpm
2) 使用 yum 安装 nginx
yum install nginx
注1:yum方式安装nginx,它的安装根目录为/etc/nginx
注2:查看nginx版本
rpm -qa | grep nginx
3) 启动及设置开机启动
systemctl start nginx.service
systemctl enable nginx.service
4) 设置防火墙开放 80 端口
firewall-cmd --zone=public --add-port=80/tcp --permanent
firewall-cmd --reload && firewall-cmd --list-port
5) 测试 nginx 是否可被访问,应该显示nginx的欢迎界面
http://服务器IP地址:80/
浏览器输入ip地址就可以了
然后去到自己本机c盘,sys32位,driers,etc,hosts右击属性
点击安全把Users全部控制权限打开
然后编辑hosts,里面全部删掉改成自己的ip地址 www.zkingedu.com
然后去浏览器上搜索www.zkingedu.com然后就成功了
Cd /etc/nginx目录里面把自己的文件覆盖掉nginx.conf
然后编辑vim nginx.conf
更改后端集群

更改完之后保存退出,然后cd /usr/local把dist素材扔进去cd 进入cd dist/
然后nginx -t查看文件有没有异常,ok之后,重启nginx,systemctl restart nginx
去浏览器上面刷新nginx
就完成了
如果不成功,应该是端口没有打开,输入 firewall-cmd --list=port
firewall-cmd --list-port
firewall-cmd --add-port=80/tcp
setenforce 0
重新启动nginx浏览器
2.tomcat负载均衡
#准备2个tomcat
cp -r apache-tomcat-8.5.20/ apache-tomcat-8.5.20_8081/
#第2个修改的配置如下
1. HTTP端口,默认8080,如下改为8081
2.远程停服务端口,默认8005,如下改为8006
3.AJP端口,默认8009,如下改,8010
#测试访问
http://192.168.195.139:8080/
http://192.168.195.139:8081/
3.Nginx配置
配置模板如下
#user nobody;
worker_processes 1;
#error_log logs/error.log;
#error_log logs/error.log notice;
#error_log logs/error.log info;
#pid logs/nginx.pid;
events {
worker_connections 1024;
}
http {
include mime.types;
default_type application/octet-stream;
#log_format main '$remote_addr - $remote_user [$time_local] "$request" '
# '$status $body_bytes_sent "$http_referer" '
# '"$http_user_agent" "$http_x_forwarded_for"';
#access_log logs/access.log main;
sendfile on;
#tcp_nopush on;
#keepalive_timeout 0;
keepalive_timeout 65;
#gzip on;
#服务器的集群
upstream tomcat_list { #服务器集群名字
server 127.0.0.1:8080 weight=1; #服务器1 weight是权重的意思,权重越大,分配的概率越大。
#server 172.17.0.4:8080 weight=2; #服务器2 weight是权重的意思,权重越大,分配的概率越大
}
server {
listen 80; #监听80端口,可以改成其他端口
#server_name localhost; #当前服务的域名
server_name www.zking.com; #当前服务的域名(虚拟域名也可以)
root html/crm; #将要访问的网站的根目录,nginx节点会自动继承父节点的配置
#charset koi8-r;
#access_log logs/host.access.log main;
location / {
#该句代码是为解决history路由不能跳转的问题,在vue-router官网有介绍
try_files $uri $uri/ /index.html;
}
location ^~/api/ {
#^~/api/表示匹配前缀是api的请求,proxy_pass的结尾有/, 则会把/api/*后面的路径直接拼接到后面,即移除api
proxy_pass http://tomcat_list/;
}
#error_page 404 /404.html;
# redirect server error pages to the static page /50x.html
#
error_page 500 502 503 504 /50x.html;
location = /50x.html {
root html;
}
# proxy the PHP scripts to Apache listening on 127.0.0.1:80
#
#location ~ \.php$ {
# proxy_pass http://127.0.0.1;
#}
# pass the PHP scripts to FastCGI server listening on 127.0.0.1:9000
#
#location ~ \.php$ {
# root html;
# fastcgi_pass 127.0.0.1:9000;
# fastcgi_index index.php;
# fastcgi_param SCRIPT_FILENAME /scripts$fastcgi_script_name;
# include fastcgi_params;
#}
# deny access to .htaccess files, if Apache's document root
# concurs with nginx's one
#
#location ~ /\.ht {
# deny all;
#}
}
# another virtual host using mix of IP-, name-, and port-based configuration
#
#server {
# listen 8000;
# listen somename:8080;
# server_name somename alias another.alias;
# location / {
# root html;
# index index.html index.htm;
# }
#}
# HTTPS server
#
#server {
# listen 443 ssl;
# server_name localhost;
# ssl_certificate cert.pem;
# ssl_certificate_key cert.key;
# ssl_session_cache shared:SSL:1m;
# ssl_session_timeout 5m;
# ssl_ciphers HIGH:!aNULL:!MD5;
# ssl_prefer_server_ciphers on;
# location / {
# root html;
# index index.html index.htm;
# }
#}
}
根据上面配置模板
在nginx.conf添加
upstream tomcat_list { #服务器集群名字
server 127.0.0.1:8080 weight=1; #服务器1 weight是权重的意思,权重越大,分配的概率越大。
server 127.0.0.1:8081 weight=1; #服务器2 weight是权重的意思,权重越大,分配的概率越大
}
在default.conf添加
location / {
#root /usr/share/nginx/html;
#proxy_pass http://172.17.0.3:8080;
proxy_pass http://tomcat_list;
index index.html index.htm;
}
重启Nginx服务,让配置生效
systemctl restart nginx
出现权限问题
#现象:connect() to 192.168.195.139:8080 failed (13: Permission denied) while connecting to upstream
#解决方案:执行下面命令
setsebool -P httpd_can_network_connect 1
测试Nginx负载2个tomcat的效果
# 来回切换tomcat:8080、tomcat:8081两个服务器的类容
http://192.168.195.139/
# 停掉1个tomcat
发现还是可以访问项目
4.负载均衡后台项目发布
#保障以下3个链接都能访问项目
http://192.168.195.139:8080/T216_SSH/vue/treeNodeAction.action
http://192.168.195.139:8081/T216_SSH/vue/treeNodeAction.action
http://192.168.195.139/T216_SSH/vue/treeNodeAction.action
#注意:确保云数据库中是有数据的
#附录
#查看端口号
#查看所有端口号
lsof -i
#查看指定端口号
lsof -i:端口号
#杀死指定端口号进程 kill -9 PID
kill -9 42177
#查看nginx的访问日志和错误日志
cat /var/log/nginx/access.log
cat /var/log/nginx/error.log
最终的结果就是,Nginx访问一个网址,是由两个tomcat共同承担压力;
Nginx前台部署
1.本地测试
#将前端项目打包,生成dist文件夹,点击index.html访问项目测试
npm run build
2.项目前端部署
#1.C:\Windows\System32\drivers\etc\hosts中增加映射关系
192.168.195.139 www.zking.com
#2.action.js更改配置
'SERVER': 'http://www.zking.com/api/T216_SSH', //服务器
#3.default.conf
server {
listen 80; #监听80端口,可以改成其他端口
#server_name localhost; #当前服务的域名
server_name www.zking.com; #当前服务的域名(虚拟域名也可以)
root /usr/local/mypro/dist; #将要访问的网站的根目录,nginx节点会自动继承父节点的配置;这里放到/usr/local/*,放到其他路径下会有权限相关问题;必要的时候配置Nginx.conf的user为root
•
# 代理配置
location / {
#该句代码是为解决history路由不能跳转的问题,在vue-router官网有介绍
try_files $uri $uri/ /index.html;
}
location ^~/api/ {
#^~/api/表示匹配前缀是api的请求,proxy_pass的结尾有/, 则会把/api/*后面的路径直接拼接到后面,即移除api
proxy_pass http://tomcat_list/;
}
#4.Nginx启动测试
systemctl restart nginx
#5.前端访问地址
http://www.zking.com/
附录
附录一:linux 里rpm包到底是干什么用的
Linux RPM全称是“RedHat Package Manager”,最早是Red Hat公司开发的,后来在CentOS、Fedora、SUSE都用它。
而rpm包则是软件编译完成后按照RPM机制打包起来的一个文件,可以用rpm命令安装的一个软件安装包,
它省去了Linux软件安装中编译的步骤,安装成功后软件就可以用了。
附录二:centos7中虚拟域名设置
vim /etc/hosts
附录三:
在进行Nginx+Tomcat 负载均衡的时候遇到了这个权限问题,在error.log日志中,我们可以看到如下:
connect() to 127.0.0.1:8080 failed (13: Permission denied) while connecting to upstream
解决方案参考《解决Nginx的connect() to 127_0_0_18080 failed (13 Permission denied) while connect_Osheep-昔日暖阳-CSDN博客_connect() to 127_0_0_18080 failed (13 permission.mht》
附录四:hbuilderX打包vue项目白屏问题
将项目目录下的config文件夹里的index.js文件中,将build对象下的assetsPublicPath中的“/”,改为“./”后,再打包生成的 dist 文件
build: {
// assetsPublicPath: '/',//修改前
assetsPublicPath: './',//修改后
}
附录五:hbuilderX打包vue项目,element-ui的icon图标无法正常显示问题
问题:使用vue-cli3脚手架搭建的项目,在打包文件上服务器的时候,其他的css,js样式都能正确加载出路径,
但是element的icon图标却不能正常加载出来。
问题分析:
加载的路径https://yxq.linksign.cn/static/css/static/fonts/element-icons.535877f.woff
本应该加载的路径https://yxq.linksign.cn/static/fonts/element-icons.535877f.woff
打包的路径
事实上是打包时候读取的文件路径多了两层;
找到build文件的utils.js 中有打包的路径,看看generateLoaders();
Extract CSS when that option is specified, 指定该选项时提取CSS
发现少了个公共路径,加上pubilcPath
if (options.extract) {
return ExtractTextPlugin.extract({
use: loaders,
fallback: 'vue-style-loader',
// 解决icon路径加载错误
publicPath:'../../'
})
} else {
return ['vue-style-loader'].concat(loaders)
}


 485
485

 被折叠的 条评论
为什么被折叠?
被折叠的 条评论
为什么被折叠?
 到【灌水乐园】发言


