目录
说明
下面的几个案例都是基于如下的项目。模仿了QQ的界面,集成了Fragment和RecycleView。如何做出这个界面这里就不贴很多代码了。代码上传在了github,在第六讲笔记中有制作的方法,可以参考。
贴一张效果图

项目结构

1.圆形图片
在很多的地方,比如上述的QQ案例,在我们常使用的QQ界面中,联系人的头像都是圆形的。但是在Android Studio的ImageView并没有内置的方法设置圆角。接下来介绍一下设置圆角的方法。
新建一个类CircleImageView
用来写一个圆形图片,可以直接复制使用
package com.hnucm.myapplication;


import android.annotation.SuppressLint;
import android.content.Context;
import android.graphics.Bitmap;
import android.graphics.BitmapShader;
import android.graphics.Canvas;
import android.graphics.Matrix;
import android.graphics.Paint;
import android.graphics.Shader;
import android.graphics.drawable.BitmapDrawable;
import android.graphics.drawable.Drawable;
import android.util.AttributeSet;

import androidx.annotation.Nullable;

public class CircleImageView extends androidx.appcompat.widget.AppCompatImageView {

    //画笔
    private Paint mPaint;
    //圆形图片的半径
    private int mRadius;
    //图片的宿放比例
    private float mScale;

    public CircleImageView(Context context) {
        super(context);
    }

    public CircleImageView(Context context, @Nullable AttributeSet attrs) {
        super(context, attrs);
    }

    public CircleImageView(Context context, @Nullable AttributeSet attrs, int defStyleAttr) {
        super(context, attrs, defStyleAttr);
    }

    @Override
    protected void onMeasure(int widthMeasureSpec, int heightMeasureSpec) {
        super.onMeasure(widthMeasureSpec, heightMeasureSpec);
        //由于是圆形,宽高应保持一致
        int size = Math.min(getMeasuredWidth(), getMeasuredHeight());
        mRadius = size / 2;
        setMeasuredDimension(size, size);
    }

    @SuppressLint("DrawAllocation")
    @Override
    protected void onDraw(Canvas canvas) {

        mPaint = new Paint();

        Drawable drawable = getDrawable();

        if (null != drawable) {
            Bitmap bitmap = ((BitmapDrawable) drawable).getBitmap();

            //初始化BitmapShader,传入bitmap对象
            BitmapShader bitmapShader = new BitmapShader(bitmap, Shader.TileMode.CLAMP, Shader.TileMode.CLAMP);
            //计算缩放比例
            mScale = (mRadius * 2.0f) / Math.min(bitmap.getHeight(), bitmap.getWidth());

            Matrix matrix = new Matrix();
            matrix.setScale(mScale, mScale);
            bitmapShader.setLocalMatrix(matrix);
            mPaint.setShader(bitmapShader);
            //画圆形,指定好坐标,半径,画笔
            canvas.drawCircle(mRadius, mRadius, mRadius, mPaint);
        } else {
            super.onDraw(canvas);
        }
    }

}
把原来布局中的ImageView改成包名.CircleImageView
2.网络图片
学会使用开源代码。最大的同性交友网站github是我们程序员的首选。
网络图片开源代码:https://github.com/bumptech/glide
1.加入依赖包到build.gradle
在这个文件的dependencies下方加入依赖。
  implementation 'com.github.bumptech.glide:glide:4.12.0'
  annotationProcessor 'com.github.bumptech.glide:compiler:4.12.0'

2.在manifests中添加网络访问权限
因为网络图片需要获得网络权限,所以需要添加。
其他地理位置权限,读取用户的相册等等权限都需要在这里添加

android:usesCleartextTraffic 这句代码意思是如果访问的地址是http开头也可以访问,没有加就无法访问,https开头的地址可以不用加。
3.回到MessageFragment.java中加入网络图片
核心代码,用于加载网络图片
Glide.with(getActivity()).load("https://p3.ssl.qhimgs1.com/sdr/400__/t0188e5449327de5e33.jpg").into(holder.imageView);

3.下拉刷新,上拉加载
1.导入依赖
// 注意:分包之后不会有默认的Header和Footer需要手动添加!还是原来的三种方法!
implementation  'com.scwang.smart:refresh-layout-kernel:2.0.3'      //核心必须依赖
implementation  'com.scwang.smart:refresh-header-classics:2.0.3'    //经典刷新头
implementation  'com.scwang.smart:refresh-header-radar:2.0.3'       //雷达刷新头
implementation  'com.scwang.smart:refresh-header-falsify:2.0.3'     //虚拟刷新头
implementation  'com.scwang.smart:refresh-header-material:2.0.3'    //谷歌刷新头
implementation  'com.scwang.smart:refresh-header-two-level:2.0.3'   //二级刷新头
implementation  'com.scwang.smart:refresh-footer-ball:2.0.3'        //球脉冲加载
implementation  'com.scwang.smart:refresh-footer-classics:2.0.3'    //经典加载
同样要点击同步
2.在message.xml中添加SmartRefreshLayout布局
SmartRefreshLayout就是

里面嵌套了之前的RecyclerView
<?xml version="1.0" encoding="utf-8"?>
<androidx.constraintlayout.widget.ConstraintLayout xmlns:android="http://schemas.android.com/apk/res/android"
    xmlns:app="http://schemas.android.com/apk/res-auto"
    xmlns:tools="http://schemas.android.com/tools"
    android:layout_width="match_parent"
    android:layout_height="match_parent"
    android:background="#cccccc"
    tools:context=".MessageFragment">

    <com.scwang.smart.refresh.layout.SmartRefreshLayout
        android:id="@+id/SmartRefreshLayout"
        android:layout_width="match_parent"
        android:layout_height="match_parent"
        app:layout_constraintBottom_toBottomOf="parent"
        app:layout_constraintEnd_toEndOf="parent"
        app:layout_constraintStart_toStartOf="parent"
        app:layout_constraintTop_toTopOf="parent">

        <androidx.recyclerview.widget.RecyclerView
            android:id="@+id/recyclerview"
            android:layout_width="match_parent"
            android:layout_height="match_parent" />
    </com.scwang.smart.refresh.layout.SmartRefreshLayout>


</androidx.constraintlayout.widget.ConstraintLayout>
3.添加上拉加载下拉刷新代码
开源代码里有样例
RefreshLayout refreshLayout = (RefreshLayout)findViewById(R.id.refreshLayout);
refreshLayout.setRefreshHeader(new ClassicsHeader(this));
refreshLayout.setRefreshFooter(new ClassicsFooter(this));
refreshLayout.setOnRefreshListener(new OnRefreshListener() {
    @Override
    public void onRefresh(RefreshLayout refreshlayout) {
        refreshlayout.finishRefresh(2000/*,false*/);//传入false表示刷新失败
    }
});
refreshLayout.setOnLoadMoreListener(new OnLoadMoreListener() {
    @Override
    public void onLoadMore(RefreshLayout refreshlayout) {
        refreshlayout.finishLoadMore(2000/*,false*/);//传入false表示加载失败
    }
});
这个时候可以实现简单的刷新了,但是数据没有发生任何变化
在每次刷新之后清除数据,然后重新添加新数据
在MessageFragment.java中修改

每次上拉之后添加数据

完整代码
package com.hnucm.myapplication;

import android.os.Bundle;

import androidx.annotation.NonNull;
import androidx.annotation.Nullable;
import androidx.fragment.app.Fragment;
import androidx.recyclerview.widget.LinearLayoutManager;
import androidx.recyclerview.widget.RecyclerView;

import android.view.LayoutInflater;
import android.view.View;
import android.view.ViewGroup;
import android.widget.ImageView;
import android.widget.TextView;


import com.bumptech.glide.Glide;
import com.scwang.smart.refresh.footer.ClassicsFooter;
import com.scwang.smart.refresh.header.ClassicsHeader;
import com.scwang.smart.refresh.layout.SmartRefreshLayout;
import com.scwang.smart.refresh.layout.api.RefreshLayout;
import com.scwang.smart.refresh.layout.listener.OnLoadMoreListener;
import com.scwang.smart.refresh.layout.listener.OnRefreshListener;

import java.util.ArrayList;
import java.util.List;


public class MessageFragment extends Fragment {
    RecyclerView recyclerView;
    List<Chat> chatList = new ArrayList<>();
    MyAdapter myAdapter;
    SmartRefreshLayout smartRefreshLayout;

    @Override
    public View onCreateView(LayoutInflater inflater, ViewGroup container,
                             Bundle savedInstanceState) {
        View view = inflater.inflate(R.layout.fragment_message, container, false);
        return view;
    }

    @Override
    public void onActivityCreated(@Nullable Bundle savedInstanceState) {
        super.onActivityCreated(savedInstanceState);
        recyclerView = getActivity().findViewById(R.id.recyclerview);
//        无下拉功能
//        上拉刷新,数据到底  重新加载新数据
//        开源
        for (int i = 0; i < 10; i++) {
            Chat chat = new Chat();
            chat.setTime("下午4:00");
            chat.setContent("content" + i);
            chat.setName("name" + i);
            chat.setImg(R.drawable.a1);
            chatList.add(chat);
        }
        myAdapter = new MyAdapter();
        recyclerView.setAdapter(myAdapter);
        recyclerView.setLayoutManager(new LinearLayoutManager(getActivity()));

        smartRefreshLayout=getActivity().findViewById(R.id.SmartRefreshLayout);
        smartRefreshLayout.setRefreshHeader(new ClassicsHeader(getActivity()));
        smartRefreshLayout.setRefreshFooter(new ClassicsFooter(getActivity()));
        smartRefreshLayout.setOnRefreshListener(new OnRefreshListener() {
            @Override
            public void onRefresh(RefreshLayout refreshlayout) {
//                todo 清除数据
                chatList.clear();
                refreshlayout.finishRefresh(2000/*,false*/);//传入false表示刷新失败
                for (int i = 0; i < 10; i++) {
                    Chat chat = new Chat();
                    chat.setTime("下午4:00  new");
                    chat.setContent("content  new" + i);
                    chat.setName("name  new" + i);
                    chat.setImg(R.drawable.a1);
                    chatList.add(chat);
                }
                myAdapter.notifyDataSetChanged();
            }
        });
        smartRefreshLayout.setOnLoadMoreListener(new OnLoadMoreListener() {
            @Override
            public void onLoadMore(RefreshLayout refreshlayout) {
//                todo 添加数据
//                重新添加数据
                for (int i = 10; i < 20; i++) {
                    Chat chat = new Chat();
                    chat.setTime("下午4:00");
                    chat.setContent("content" + i);
                    chat.setName("name" + i);
                    chat.setImg(R.drawable.a1);
                    chatList.add(chat);
                }
                refreshlayout.finishLoadMore(2000/*,false*/);//传入false表示加载失败
                myAdapter.notifyDataSetChanged();
            }
        });
    }


    public class MyAdapter extends RecyclerView.Adapter<MyViewHolder> {

        @NonNull
        @Override
        public MyViewHolder onCreateViewHolder(@NonNull ViewGroup parent, int viewType) {
            View view = LayoutInflater.from(getActivity()).inflate(R.layout.item_chat, parent, false);
            MyViewHolder myViewHolder = new MyViewHolder(view);
            return myViewHolder;
        }

        @Override
        public void onBindViewHolder(@NonNull MyViewHolder holder, int position) {
            holder.nameTv.setText(chatList.get(position).getName());
            holder.contentTv.setText(chatList.get(position).getContent());
            holder.timeTv.setText(chatList.get(position).getTime());
            holder.imageView.setImageResource(chatList.get(position).getImg());
//          getActivity       如果当前类继承了Activity,就用当前类.this
            //Glide.with(getActivity()).load("https://p3.ssl.qhimgs1.com/sdr/400__/t0188e5449327de5e33.jpg").into(holder.imageView);
        }

        @Override
        public int getItemCount() {
            return chatList.size();
        }
    }


    public class MyViewHolder extends RecyclerView.ViewHolder {
        TextView nameTv;
        TextView contentTv;
        TextView timeTv;
        ImageView imageView;

        public MyViewHolder(@NonNull View itemView) {
            super(itemView);
            nameTv = itemView.findViewById(R.id.nametextview);
            contentTv = itemView.findViewById(R.id.contenttextview);
            timeTv = itemView.findViewById(R.id.timetextview);
            imageView = itemView.findViewById(R.id.imageView);
        }
    }

}
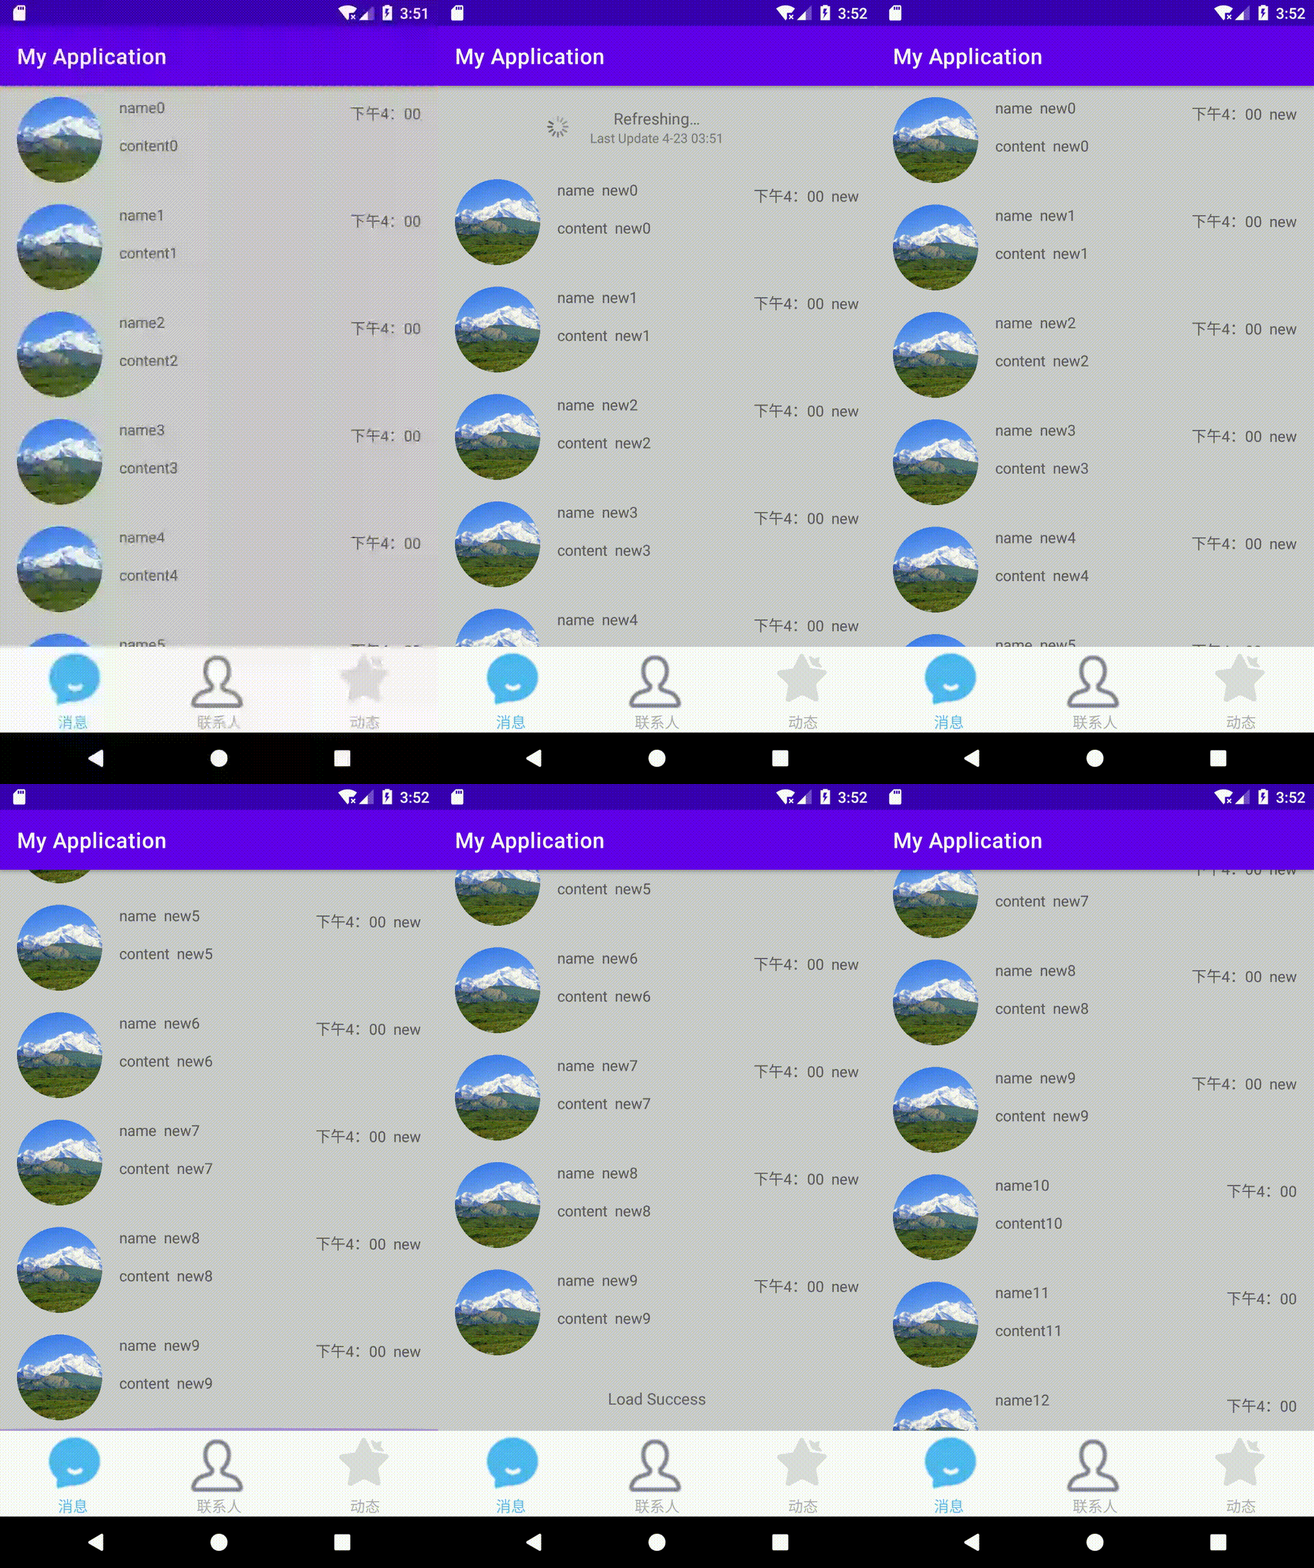
效果图


 1122
1122


 被折叠的 条评论
为什么被折叠?


