


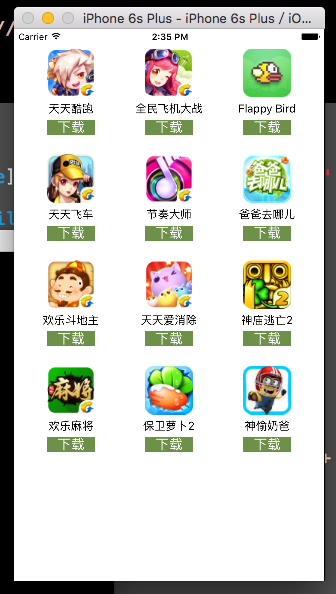
3*4式内容显示
@implementation ViewController
-(NSArray *)apps{
    if (_apps==nil) {
        NSString *path=[[NSBundle mainBundle] pathForResource:@"app.plist" ofType:nil];
        _apps=[NSArray arrayWithContentsOfFile:path];
    }
    return _apps;
}
- (void)viewDidLoad {
    [super viewDidLoad];
    //设置相关大小宽度
    int appCount=3;
    CGFloat appH=120;
    CGFloat appW=110;
    //计算间隙距离
    CGFloat margin=(self.view.frame.size.width-appW * appCount)/(appCount+1);
    //计算行号列号

    for (int index=0; index<self.apps.count; index++) {
        int col =index % appCount;
        int row =index / appCount;

        //设置一个小uiview
        UIView *appView=[[UIView alloc]init];
        //设置大小位置
        CGFloat appx=margin + col*(margin+appW);
        CGFloat appy=margin + row*(margin+appH);
        appView.frame=CGRectMake(appx, appy, appW, appH);
//        appView.backgroundColor=[UIColor blueColor];

        //添加到view
        [self.view addSubview:appView];
        //得到图片信息
        NSString *path=[[NSBundle mainBundle]pathForResource:@"app.plist" ofType:nil];
        NSArray *imageDate=[NSArray arrayWithContentsOfFile:path];
        NSDictionary *dicImage =imageDate[index];
        //在view中添加小控件
        // 添加图片
        UIImageView *imageView=[[UIImageView alloc]init];

        imageView.image=[UIImage imageNamed:dicImage[@"icon"]];
        //设置imageview 的大小

        CGFloat imageW=65;
        CGFloat imageH=65;
        CGFloat iamgex=(appView.frame.size.width-imageW)/2;
//        CGFloat iamgey=(appView.frame.size.height-imageH)/2;

        imageView.frame=CGRectMake(iamgex, 5, imageW, imageH);
        [appView addSubview:imageView];
        //添加lable 控件来显示文字
        UILabel *text=[[UILabel alloc]init];
        CGFloat texty=imageH+5;

        text.frame=CGRectMake(0, texty, appW, 30);
        text.text=dicImage[@"name"];
        text.font=[UIFont systemFontOfSize:15];
        text.textAlignment=NSTextAlignmentCenter;
//        text.backgroundColor=[UIColor greenColor];
        [appView addSubview:text];
        //添加按钮控件
        UIButton *xzbut=[UIButton buttonWithType:UIButtonTypeCustom];
        CGFloat butH=20;
        CGFloat butW=65;
        CGFloat butx=(appW-65)/2;
        CGFloat buty=100;
        xzbut.frame=CGRectMake(butx, buty, butW, butH);
        UIImage *iamgenor=[UIImage imageNamed:@"buttongreen"];
        [xzbut setBackgroundImage:iamgenor forState:UIControlStateNormal];
        iamgenor=[UIImage imageNamed:@"buttongreen_highlighted"];
        [xzbut setBackgroundImage:iamgenor forState:UIControlStateHighlighted];
        xzbut.backgroundColor=[UIColor grayColor];
        [xzbut setTitle:@"下载" forState:UIControlStateNormal];
        [xzbut setTitle:@"安装" forState:UIControlStateHighlighted];
        [appView addSubview:xzbut];


    }
在这个例子中需要掌握的知识点有
通过plist文件来对内容的加载,从而减少对代码的修改
在plist中需要知道文件的加载,文件是从相当于手机的项目文件夹中加载
首先就得知道plist文件的路径
NSBdle类
NSString *path=[[NSBundle mainBundle]pathForResource:@”app.plist” ofType:nil];知道frame属性的x,y 是参考的是它的父控件
- 在UIButton 中的setTitle:@”下载” forState:UIControlStateNormal和setBackgroundImage:iamgenor forState:UIControlStateHighlighted


 被折叠的 条评论
为什么被折叠?
被折叠的 条评论
为什么被折叠?
 到【灌水乐园】发言


