


一、基础回顾
这里先回顾一下Struts1.x的基础,到底一个最简单的Struts程序包含哪些部分?
- ActionServlet:它是整个Struts框架的中央控制器,包括请求的接收、分发、处理和页面跳转。它是Struts自带的Servlet类,需要在web.xml中配置,并初始化config参数,这个参数指定struts配置文件的位置。
- struts配置文件:是一个xml格式的文件,不配置的话默认是/WEB-INF/struts-config.xml。
- ActionForm:封装、验证客户提交过来的表单数据,并传入Action中。
- Action:用户自定义的Control类,需要继承Action类并重写execute方法,在execute方法里面进行逻辑代码的调用和处理,并返回ActionForward控制页面跳转。
- ActionForward:根据配置文件的标签配置的数据,控制页面跳转。
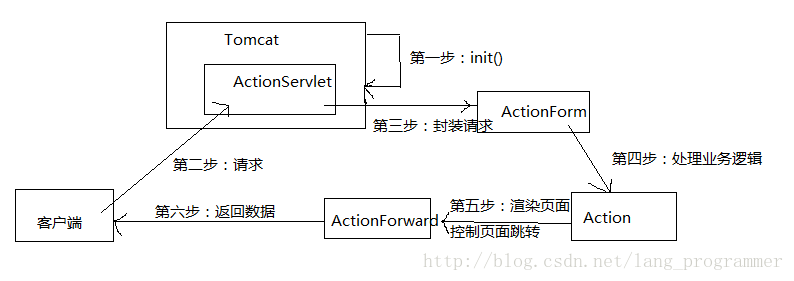
好了,有了以上部分,我们来猜测一下它的处理流程。众所周知,Tomcat启动时就会加载web.xml文件,根据Servlet的生命周期,Tomcat启动时就会创建Servlet的实例,并调用它的init()方法。因为整个Web项目是从服务器启动开始的,所以整个Struts程序就从ActionServlet开始。因为struts配置文件的路径会作为ActionServlet的初始化参数配进去,所以struts配置文件也是在服务器启动时解析并加载的。
初始化完成后,接下来,就轮到接受用户的请求了。很明显,ActionForm就是用来封装用户请求数据的,所以用户请求后第一个站出来操作的就是ActionForm。
ActionForm接收了数据之后对整个流程有什么推进作用呢?当然是将用户数据交给Action进行业务处理啦。为了让用户看到结果,Action处理完成之后肯定要跳转并渲染前端页面,然后将前端页面返回给用户的。
说了一大堆废话,好像看得有点懵了,接下来我们用一张图梳理一下上面这些话:
以上只是我们对业务流程的猜想,从原理上讲已经八九不离了,因为每个环节都环环相扣,接下来我们从源码验证。
二、Struts源码解析
首先,Struts的所有配置都是在Tomcat启动时加载进来的,因为web.xml中配置了ActionServlet的config初始化参数,而它的值正是struts配置文件的路径。所以不难看出ActionServlet是Struts的中心控制器,原因有两点:
- 它在服务器启动时便创建了实例并运行init()方法,相当于整个程序的始祖;
- 在Tomcat服务器中,每个项目最先请求的只有Servlet(jsp本质上也是Servlet),所以每个用户请求实际上都是交给Servlet操作的。
好吧,上面说了那么多都只是为了说明一点:ActionServlet是Struts源码分析的切入点。
1、从配置加载开始
以下是配置解析加载的核心代码:
protected ModuleConfig initModuleConfig(String prefix, String paths) throws ServletException {
        if(log.isDebugEnabled()) {
            log.debug("Initializing module path \'" + prefix + "\' configuration from \'" + paths + "\'");
        }

        //创建工厂类
        ModuleConfigFactory factoryObject = ModuleConfigFactory.createFactory();
        //创建配置组件
        ModuleConfig config = factoryObject.createModuleConfig(prefix);
        //创建并初始化文件解析器
        Digester digester = this.initConfigDigester();
        //解析多个配置文件路径,存到列表中
        List urls = this.splitAndResolvePaths(paths);
        Iterator i = urls.iterator();

        while(i.hasNext()) {
            URL url = (URL)i.next();
            digester.push(config);
            //从列表取出配置文件路径,读取并解析文件,保存在config模块中
            this.parseModuleConfigFile(digester, url);
        }

        //将ModuleConfig存到ServletContext的一个属性中
        this.getServletContext().setAttribute("org.apache.struts.action.MODULE" + config.getPrefix(), config);
        return config;
    }
以上的注释已经把配置文件的解析说得很清楚了,这里我们用一张图捋一下处理流程。
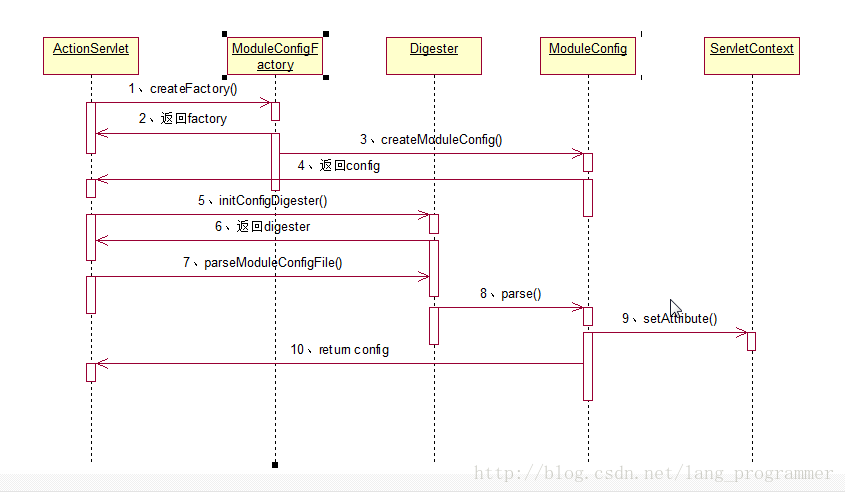
到这里,各个类的工作基本上就明晰了,Digester负责解析,不过重中之重就是:ModuleConfig存储了所有Struts配置。
2、处理用户请求
接下来就到了最重要的一部分,Struts是怎样处理用户请求的?我们都知道,Servlet的处理方法主要是service(),或者doGet()和doPost(),所以我们就从这几个方法入手。而doGet()和doPost()都调用了process(request, response)方法,所以先来看一下ActionServlet的process方法。
protected void process(HttpServletRequest request, HttpServletResponse response) throws IOException, ServletException {
        //根据prefix选取ModuleConfig,将MessageResources和ModuleConfig一并存在request中
ModuleUtils.getInstance().selectModule(request, this.getServletContext());
//在request或context中获取config
ModuleConfig config = this.getModuleConfig(request);
//获取模块的Processor(处理器),保存在request中
RequestProcessor processor = this.getProcessorForModule(config);
if(processor == null) {
    processor = this.getRequestProcessor(config);
}
processor.process(request, response);

    }
由上述代码看出,这个方法主要做了两个操作:
- 根据请求获取config
- 根据config获取processor
接下来,就执行processor的process方法,这是这个process方法的重头戏,代码如下:
    public void process(HttpServletRequest request, HttpServletResponse response) throws IOException, ServletException {
        //判断是否为Multipart请求,是则将request指定为MultipartRequestWrapper,否则还是HttpServletRequest
        request = this.processMultipart(request);
        //解析出请求路径
        String path = this.processPath(request, response);
        if(path != null) {
            if(log.isDebugEnabled()) {
                log.debug("Processing a \'" + request.getMethod() + "\' for path \'" + path + "\'");
            }
            //将客户端语言环境保存到session中
            this.processLocale(request, response);
            // response.setContentType(contentType);
            this.processContent(request, response);
            //设置响应头无缓存
            this.processNoCache(request, response);
            if(this.processPreprocess(request, response)) {
                //把之前的ActionMessage移除
                this.processCachedMessages(request, response);
                //根据请求path在ModuleConfig中获取ActionConfig,存在request中
                ActionMapping mapping = this.processMapping(request, response, path);
                if(mapping != null) {
                    if(this.processRoles(request, response, mapping)) {
                        //创建ActionForm并存在request或session中
                        ActionForm form = this.processActionForm(request, response, mapping);
                        //填充ActionForm的参数
                        this.processPopulate(request, response, form, mapping);

                        ActionForward forward;
                        try {
                            //执行校验,若执行完,则return;否则,继续执行
                            if(!this.processValidate(request, response, form, mapping)) {
                                return;
                            }
                        } catch (InvalidCancelException var8) {
                            //当校验时抛出异常时,进行异常处理
                            forward = this.processException(request, response, var8, form, mapping);
                            this.processForwardConfig(request, response, forward);
                            return;
                        } catch (IOException var9) {
                            throw var9;
                        } catch (ServletException var10) {
                            throw var10;
                        }
                        //如果配置的action标签中配置了forward属性或include属性,则直接跳转
                        if(this.processForward(request, response, mapping)) {
                            if(this.processInclude(request, response, mapping)) {
                                //创建action,加了锁,线程安全,每个action只有一个实例,用HashMap存储
                                Action action = this.processActionCreate(request, response, mapping);
                                if(action != null) {
                                    //执行Action的execute方法。ActionMessages保存在request域中
                                    forward = this.processActionPerform(request, response, action, form, mapping);
                                    //控制页面跳转
                                    this.processForwardConfig(request, response, forward);
                                }
                            }
                        }
                    }
                }
            }
        }
    }
接下来用一幅图来阐述整个流程:
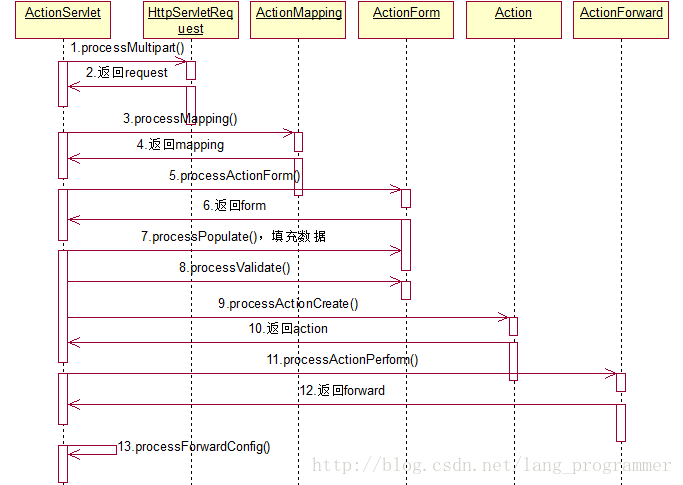
分析了源代码之后,发现我们的猜想跟它的处理流程已经八九不离十了,接下来我们再从源码来阐述一遍它的处理流程:
- 解析请求,给response和session做一些默认设置,并根据请求路径获取mapping,即映射。
- 创建ActionForm并填充数据
- 如果设置指明不执行校验或者无校验方法,则继续下一步;否则,执行校验,并跳转返回。如果校验期间出现异常,则执行异常处理方法后返回。
- 如果配置的action标签中配置了forward属性或include属性,则直接跳转;否则,执行创建Action并执行它的execute方法,期间将可以ActionMessages保存在request域,然后返回forward后进行页面跳转。
以上是我对Struts1.x核心源码的解析,如有疏漏之处还请指正。


 1万+
1万+

 被折叠的 条评论
为什么被折叠?
被折叠的 条评论
为什么被折叠?
 到【灌水乐园】发言


