


(请读者务必看完,我写的文章都是一步步慢慢来的,不读完,看不到结论)
今天为了完成我自己定的任务,所以必须得用component,以前我都怕难所以不敢去面对,但是,今天花了几个小时,发现其实自定义组件也不是很难,所以希望您在看这篇文章之前,最起码自己看了component,并研究了一下
文章目录
首先,我们们应该明确,如何才能自己做一个自定义组件,不然怎么去实验?
第一,Component概念
Component像页面一样由wxml、wxss、js和json4个文件组成,且需要把这4个文件放在同一个目录中。与页面不一样的是,Component中的构造函数(也可以称构造器)是Component({}),而页面中的构造函数是Page({})。
第二,创建两个page,一个定义component,一个引用component
我建立如下:

然后由于这是我之前写的3d轮播图,所以正好,里面js也有,而且比较简单
3d轮播wxml代码:
<block>
  <swiper
    class="components_swiper"
    bindchange="swiperChange"
    autoplay="{{true}}"
    circular="{{true}}"
    duration="1000"
    interval="3000"
    previous-margin="150rpx"
    next-margin="150rpx"
  >
    <swiper-item class="components_swiper_item" wx:for="{{imglist}}" wx:key="index">
      <view class="components_swiper_item_view {{nowIdx==index?'act':''}}" bind:tap="gototest">
        <image class="components_swiper_item_view_img" src="{{item.img}}"></image>
        <view style="width:90%;font-size:13px;margin-top:15rpx">
          <text>{{item.text}}</text>
        </view>
      </view>
    </swiper-item>
  </swiper>
</block>
3d轮播wxss代码
.components_swiper{
  padding: 20rpx;
}
.components_swiper_item_view{
  background-color: gainsboro;
  display: flex;
  flex-direction: column;
  justify-content: center;
  align-items: center;
  width: 100%;
  height: 100%;
  transform: scale(0.7);
  transition: all 1s; //添加动画效果,不然会很突然
  border-radius: 20rpx;
}
.components_swiper_item_view.act{
  transform: scale(1);
  transition: all 1s;
}
.components_swiper_item_view_img{
  width: 90%;
  height: 75%;
  border-radius: 15rpx;
}
3d轮播的json、js代码
Component({
  properties:{
    min: {
      type: Number,
      value: 0
    },
  },
  //这里的值打印得用this.data.min
  data: {
    nowIdx:0,
    imglist:[
      {
        img:"../../imgs/s1.jpg",
        text: "课程理论"
      },
      {
        img:"../../imgs/s2.jpg",
        text: "学习视频"
      },
      {
        img:"../../imgs/s3.jpg",
        text: "仪器演示"
      },
      {
        img:"../../imgs/s4.jpg",
        text: "我的考试"
      }
      /*图片自己弄*/
    ]
  },

  methods:{
    swiperChange:function(e){
      this.setData({
          nowIdx: e.detail.current,
          min:10
      })
    },
  },

  observers:{
    "min":function(e) {
      console.log("observers")
    }
  },

  created:function () {
      console.log("created")
      console.log(this.data.min)
    },

  attached:function () {
      console.log("attached")
      console.log(this.data.min)
  }
})
{
  "Component":"true",
  "usingComponents": {}
}
json文件应该不要我强调,“component”:true必须写
js里面的component代码接下来将为你讲解,在此之前,还是先讲讲3d轮播的思路:
每当swiper改变的时候就获取得到这个图片对应的e.detail.current(就相当于是该图片是数组中的第几张),然后将其与wxml里面循环遍历的index比较,相等就表示该图片在第一张,就用大的样式
引用页面:
wxml:
<lunbo min="1"></lunbo>
<!--这里的lunbo是json文件引入的component,可以任意取名,但最好是其功能-->
json:
{
  "usingComponents": {
    "lunbo":"../lunbo/land"
  }
}
接下来步入正轨:
我一开始就是看的微信小程序文档,但是我表示,真的难以看懂,还是得敲才是硬道理。
所以,我就一个一个的试
首先自然得知道页面的数据怎么来的
这个官方文档倒是很清楚,页面的数据分两种
1、data
这是component里面的私有数据,相当于,这是你必须自己写在component里面的(当然也可以是拉取的数据),直接用于你页面的渲染,引用该component的页面无法传递过来
2、properties
这就是component留给引用页面传递参数的,也是用来直接渲染页面用的
所以,可以很轻松的将以前的:
Page({
  data: {
    nowIdx:0,
    imglist:[
      {
        img:"../../imgs/s1.jpg",
        text: "课程理论"
      },
      {
        img:"../../imgs/s2.jpg",
        text: "学习视频"
      },
      {
        img:"../../imgs/s3.jpg",
        text: "仪器演示"
      },
      {
        img:"../../imgs/s4.jpg",
        text: "我的考试"
      }
      /*图片自己弄*/
    ]
  },
  swiperChange:function(e){
     this.setData({
          nowIdx: e.detail.current,
      })
  },
改成:
Component({
  data: {
    nowIdx:0,
    imglist:[
      {
        img:"../../imgs/s1.jpg",
        text: "课程理论"
      },
      {
        img:"../../imgs/s2.jpg",
        text: "学习视频"
      },
      {
        img:"../../imgs/s3.jpg",
        text: "仪器演示"
      },
      {
        img:"../../imgs/s4.jpg",
        text: "我的考试"
      }
      /*图片自己弄*/
    ]
  },
  swiperChange:function(e){
     this.setData({
          nowIdx: e.detail.current,
      })
  },
这时页面会警告:

翻看文档,你会发现,原来自定义的函数必须得写道一个叫 methods 的东西里面:

Component({
  data: {
    nowIdx:0,
    imglist:[
     {
        img:"../../imgs/s1.jpg",
        text: "课程理论"
      },
      {
        img:"../../imgs/s2.jpg",
        text: "学习视频"
      },
      {
        img:"../../imgs/s3.jpg",
        text: "仪器演示"
      },
      {
        img:"../../imgs/s4.jpg",
        text: "我的考试"
      }
      /*图片自己弄*/
    ]
  },
 methods:{
    swiperChange:function(e){
      this.setData({
          nowIdx: e.detail.current,
      })
    },
  },
}
这样基本上就大致知道了component的用法,但是,最重要的当然是生命周期了,所以我接下来这样干了:
Component({
   data: {
    nowIdx:0,
    imglist:[
      {
        img:"../../imgs/s1.jpg",
        text: "课程理论"
      },
      {
        img:"../../imgs/s2.jpg",
        text: "学习视频"
      },
      {
        img:"../../imgs/s3.jpg",
        text: "仪器演示"
      },
      {
        img:"../../imgs/s4.jpg",
        text: "我的考试"
      }
      /*图片自己弄*/
    ]
  },
  methods:{
	swiperChange:function(e){
      this.setData({
          nowIdx: e.detail.current,
      })
    }
  },
  created:{
    function(){
      console.log(aaa)
    }
  },
  attached:{
    function(){
      console.log(bbb)
    }
  }
})
但是这里报错莫名其妙:

我一开始看着懵了,我没定义生命n.apply呀?为什么会报错,后来才发现关注点错了,因该是后面的一句:
[component]:Lifetime Methods Eorror
可是我去搜,搜到的都是什么鸡巴东西,所以还是得看文档,后来发现,原来是:
生命周期函数不能用{}括起来,而且function必须写在冒号后面,不然也会报错
千万不要小看这一个,这真的是致命错误,可能大佬也不能很快发现。
所以代码变成了这样:
Component({
//这里的值打印得用this.data.min
  data: {
    nowIdx:0,
    imglist:[
      {
        img:"../../imgs/s1.jpg",
        text: "课程理论"
      },
      {
        img:"../../imgs/s2.jpg",
        text: "学习视频"
      },
      {
        img:"../../imgs/s3.jpg",
        text: "仪器演示"
      },
      {
        img:"../../imgs/s4.jpg",
        text: "我的考试"
      }
      /*图片自己弄*/
    ]
  },

  methods:{
    swiperChange:function(e){
      this.setData({
          nowIdx: e.detail.current,
      })
    },
  },

  created:function () {
      console.log("created")
    },

  attached:function () {
      console.log("attached")
  }
})
发现运行结果如下:
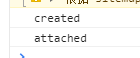
这成功的说明了,这两个函数的顺序,还有其它生命周期函数,有兴趣的读者可以去自己试试
然后菜鸟又想呀!这component咋传参数进来的?
可是搜了半天也只有这篇文章讲得比较好:链接给大家,有兴趣可以看看

可是这样,我表示,我想知道是否传进去了呀?于是我变成了这样:
Component({
  properties:{
    myProperty: {
      type: String,
      value: '',
    }
  },
  data: {
    nowIdx:0,
    imglist:[
      {
        img:"../../imgs/s1.jpg",
        text: "课程理论"
      },
      {
        img:"../../imgs/s2.jpg",
        text: "学习视频"
      },
      {
        img:"../../imgs/s3.jpg",
        text: "仪器演示"
      },
      {
        img:"../../imgs/s4.jpg",
        text: "我的考试"
      }
    ]
  },

  methods:{
    swiperChange:function(e){
      this.setData({
          nowIdx: e.detail.current,
      })
    },
  },

  created:function () {
      console.log("created")
      console.log(this.properties.myProperty.value)
    },

  attached:function () {
      console.log("attached")
      console.log(this.properties.myProperty.value)
  }
})
这样只会得到这样的结果:
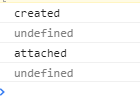
为什么是undefined?自然是因为没有得到该值,我又做了好多改法还是不行,最后终于在小程序文档里面发现了:
原来 properties里面的值其实实质跟data里面的值一样,就是一个对外一个对内,所以打印因该用this.data.XXXX
于是代码变成了这样:
Component({
  properties:{
    min: {
      type: Number,
      value: 0
    },
  },
  //这里的值打印得用this.data.min
  data: {
    nowIdx:0,
    imglist:[
      {
        img:"../../imgs/s1.jpg",
        text: "课程理论"
      },
      {
        img:"../../imgs/s2.jpg",
        text: "学习视频"
      },
      {
        img:"../../imgs/s3.jpg",
        text: "仪器演示"
      },
      {
        img:"../../imgs/s4.jpg",
        text: "我的考试"
      }
      /*图片自己弄*/
    ]
  },

  methods:{
    swiperChange:function(e){
      this.setData({
          nowIdx: e.detail.current,
      })
    },
  },

  created:function () {
      console.log("created")
      console.log(this.data.min)
    },

  attached:function () {
      console.log("attached")
      console.log(this.data.min)
  }
})
然后菜鸟还是感觉不行,这知道的太少了,最起码再会一个,于是就将目标锁定在了observers,文档里面说:

然后我的代码就变成了这样:
Component({
  properties:{
    min: {
      type: Number,
      value: 0
    },
  },
  //这里的值打印得用this.data.min
  data: {
    nowIdx:0,
    imglist:[
      {
        img:"../../imgs/s1.jpg",
        text: "课程理论"
      },
      {
        img:"../../imgs/s2.jpg",
        text: "学习视频"
      },
      {
        img:"../../imgs/s3.jpg",
        text: "仪器演示"
      },
      {
        img:"../../imgs/s4.jpg",
        text: "我的考试"
      }
      /*图片自己弄*/
    ]
  },

  methods:{
    swiperChange:function(e){
      this.setData({
          nowIdx: e.detail.current,
          min:10
      })
    },
  },

  observers:{
    sja:function(e) {
    //这里随便起的,忘记我起的啥了
      console.log("observers")
    }
  },

  created:function () {
      console.log("created")
      console.log(this.data.min)
    },

  attached:function () {
      console.log("attached")
      console.log(this.data.min)
  }
})
然后会发现,啥也不会发生,我就一直很奇怪,后来看文档,越看越感觉奇怪
sja:function(e) {
    /这里随便起的,忘记我起的啥了
      console.log("observers")
    }
最后发现原来这里的sja不是乱写的,而是你要监听的字段的名字
好的!今天就讲到这里,希望大家喜欢,希望大佬指点江山,激扬文字
感觉这两个鸽了几天,没有时间看js,哎!伤心T_T,而且说理解透彻真的很难,我想个例子都想不出来,我还得继续精进,希望大家督促!


 357
357


 被折叠的 条评论
为什么被折叠?
被折叠的 条评论
为什么被折叠?
 到【灌水乐园】发言


