在具体介绍本文内容之前,先给大家看一下Hadoop业务的整体开发流程:

从Hadoop的业务开发流程图中可以看出,在大数据的业务处理过程中,对于数据的采集是十分重要的一步,也是不可避免的一步,从而引出我们本文的主角—Flume。本文将围绕Flume的架构、Flume的应用(日志采集)进行详细的介绍。
(一)Flume架构介绍
1、Flume的概念
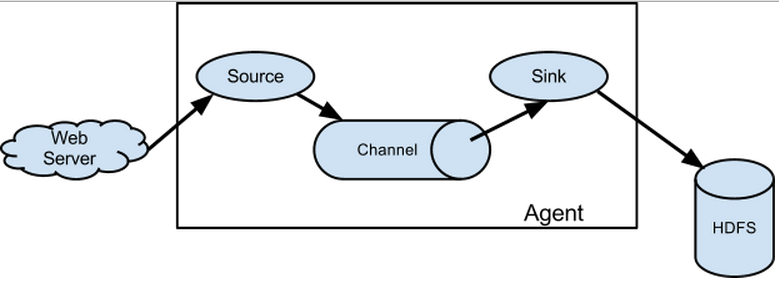
flume是分布式的日志收集系统,它将各个服务器中的数据收集起来并送到指定的地方去,比如说送到图中的HDFS,简单来说flume就是收集日志的。
2、Event的概念
在这里有必要先介绍一下flume中event的相关概念:flume的核心是把数据从数据源(source)收集过来,在将收集到的数据送到指定的目的地(sink)。为了保证输送的过程一定成功,在送到目的地(sink)之前,会先缓存数据(channel),待数据真正到达目的地(sink)后,flume在删除自己缓存的数据。
在整个数据的传输的过程中,流动的是event,即事务保证是在event级别进行的。那么什么是event呢?—–event将传输的数据进行封装,是flume传输数据的基本单位,如果是文本文件,通常是一行记录,event也是事务的基本单位。event从source,流向channel,再到sink,本身为一个字节数组,并可携带headers(头信息)信息。event代表着一个数据的最小完整单元,从外部数据源来,向外部的目的地去。
为了方便大家理解,给出一张event的数据流向图:
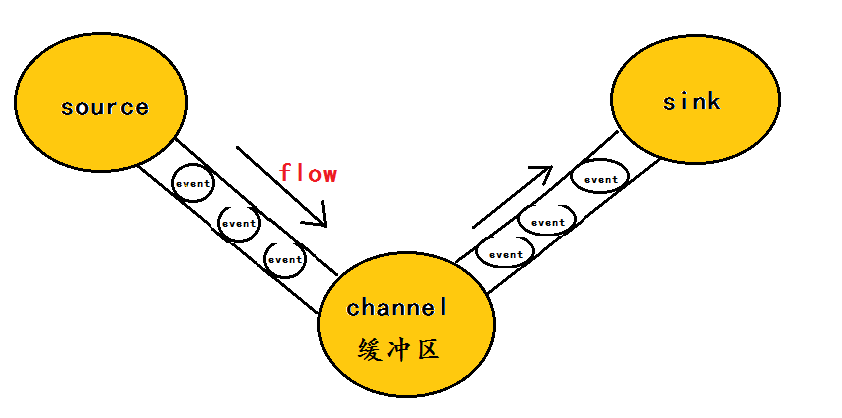
一个完整的event包括:event headers、event body、event信息(即文本文件中的单行记录),如下所以:

其中event信息就是flume收集到的日记记录。
3、flume架构介绍
flume之所以这么神奇,是源于它自身的一个设计,这个设计就是agent,agent本身是一个java进程,运行在日志收集节点—所谓日志收集节点就是服务器节点。
agent里面包含3个核心的组件:source—->channel—–>sink,类似生产者、仓库、消费者的架构。
source:source组件是专门用来收集数据的,可以处理各种类型、各种格式的日志数据,包括avro、thrift、exec、jms、spooling directory、netcat、sequence generator、syslog、http、legacy、自定义。
channel:source组件把数据收集来以后,临时存放在channel中,即channel组件在agent中是专门用来存放临时数据的——对采集到的数据进行简单的缓存,可以存放在memory、jdbc、file等等。
sink:sink组件是用于把数据发送到目的地的组件,目的地包括hdfs、logger、avro、thrift、ipc、file、null、hbase、solr、自定义。
4、flume的运行机制
flume的核心就是一个agent,这个agent对外有两个进行交互的地方,一个是接受数据的输入——source,一个是数据的输出sink,sink负责将数据发送到外部指定的目的地。source接收到数据之后,将数据发送给channel,chanel作为一个数据缓冲区会临时存放这些数据,随后sink会将channel中的数据发送到指定的地方—-例如HDFS等,注意:只有在sink将channel中的数据成功发送出去之后,channel才会将临时数据进行删除,这种机制保证了数据传输的可靠性与安全性。
5、flume的广义用法
flume之所以这么神奇—-其原因也在于flume可以支持多级flume的agent,即flume可以前后相继,例如sink可以将数据写到下一个agent的source中,这样的话就可以连成串了,可以整体处理了。flume还支持扇入(fan-in)、扇出(fan-out)。所谓扇入就是source可以接受多个输入,所谓扇出就是sink可以将数据输出多个目的地destination中。
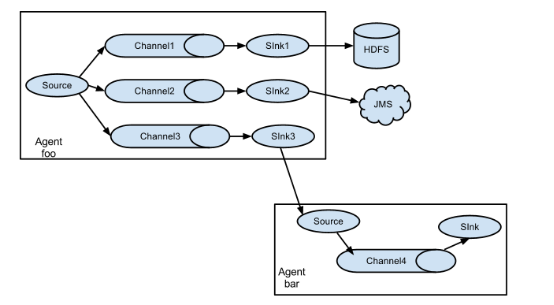
(二)flume应用—日志采集
对于flume的原理其实很容易理解,我们更应该掌握flume的具体使用方法,flume提供了大量内置的Source、Channel和Sink类型。而且不同类型的Source、Channel和Sink可以自由组合—–组合方式基于用户设置的配置文件,非常灵活。比如:Channel可以把事件暂存在内存里,也可以持久化到本地硬盘上。Sink可以把日志写入HDFS, HBase,甚至是另外一个Source等等。下面我将用具体的案例详述flume的具体用法。
其实flume的用法很简单—-书写一个配置文件,在配置文件当中描述source、channel与sink的具体实现,而后运行一个agent实例,在运行agent实例的过程中会读取配置文件的内容,这样flume就会采集到数据。
配置文件的编写原则:
1>从整体上描述代理agent中sources、sinks、channels所涉及到的组件
    # Name the components on this agent
    a1.sources = r1
    a1.sinks = k1
    a1.channels = c1
2>详细描述agent中每一个source、sink与channel的具体实现:即在描述source的时候,需要
指定source到底是什么类型的,即这个source是接受文件的、还是接受http的、还是接受thrift
的;对于sink也是同理,需要指定结果是输出到HDFS中,还是Hbase中啊等等;对于channel
需要指定是内存啊,还是数据库啊,还是文件啊等等。
    # Describe/configure the source
    a1.sources.r1.type = netcat
    a1.sources.r1.bind = localhost
    a1.sources.r1.port = 44444

    # Describe the sink
    a1.sinks.k1.type = logger

    # Use a channel which buffers events in memory
    a1.channels.c1.type = memory
    a1.channels.c1.capacity = 1000
    a1.channels.c1.transactionCapacity = 100
3>通过channel将source与sink连接起来
    # Bind the source and sink to the channel
    a1.sources.r1.channels = c1
    a1.sinks.k1.channel = c1
启动agent的shell操作:
    flume-ng  agent -n a1  -c  ../conf   -f  ../conf/example.file
    -Dflume.root.logger=DEBUG,console
参数说明: -n 指定agent名称(与配置文件中代理的名字相同)
-c 指定flume中配置文件的目录
-f 指定配置文件
-Dflume.root.logger=DEBUG,console 设置日志等级
具体案例:
案例1: NetCat Source:监听一个指定的网络端口,即只要应用程序向这个端口里面写数据,这个source组件就可以获取到信息。 其中 Sink:logger Channel:memory
flume官网中NetCat Source描述:
Property Name Default     Description
channels       –
type           –     The component type name, needs to be netcat
bind           –  日志需要发送到的主机名或者Ip地址,该主机运行着netcat类型的source在监听
port           –  日志需要发送到的端口号,该端口号要有netcat类型的source在监听
a) 编写配置文件:
# Name the components on this agent
a1.sources = r1
a1.sinks = k1
a1.channels = c1

# Describe/configure the source
a1.sources.r1.type = netcat
a1.sources.r1.bind = 192.168.80.80
a1.sources.r1.port = 44444

# Describe the sink
a1.sinks.k1.type = logger

# Use a channel which buffers events in memory
a1.channels.c1.type = memory
a1.channels.c1.capacity = 1000
a1.channels.c1.transactionCapacity = 100

# Bind the source and sink to the channel
a1.sources.r1.channels = c1
a1.sinks.k1.channel = c1
- 1
- 2
- 3
- 4
- 5
- 6
- 7
- 8
- 9
- 10
- 11
- 12
- 13
- 14
- 15
- 16
- 17
- 18
- 19
- 20
- 21
b) 启动flume agent a1 服务端
flume-ng agent -n a1 -c ../conf -f ../conf/netcat.conf -Dflume.root.logger=DEBUG,console
c) 使用telnet发送数据
telnet 192.168.80.80 44444 big data world!(windows中运行的)
d) 在控制台上查看flume收集到的日志数据:

案例2:NetCat Source:监听一个指定的网络端口,即只要应用程序向这个端口里面写数据,这个source组件就可以获取到信息。 其中 Sink:hdfs Channel:file (相比于案例1的两个变化)
flume官网中HDFS Sink的描述:

a) 编写配置文件:
# Name the components on this agent
a1.sources = r1
a1.sinks = k1
a1.channels = c1

# Describe/configure the source
a1.sources.r1.type = netcat
a1.sources.r1.bind = 192.168.80.80
a1.sources.r1.port = 44444

# Describe the sink
a1.sinks.k1.type = hdfs
a1.sinks.k1.hdfs.path = hdfs://hadoop80:9000/dataoutput
a1.sinks.k1.hdfs.writeFormat = Text
a1.sinks.k1.hdfs.fileType = DataStream
a1.sinks.k1.hdfs.rollInterval = 10
a1.sinks.k1.hdfs.rollSize = 0
a1.sinks.k1.hdfs.rollCount = 0
a1.sinks.k1.hdfs.filePrefix = %Y-%m-%d-%H-%M-%S
a1.sinks.k1.hdfs.useLocalTimeStamp = true

# Use a channel which buffers events in file
a1.channels.c1.type = file
a1.channels.c1.checkpointDir = /usr/flume/checkpoint
a1.channels.c1.dataDirs = /usr/flume/data

# Bind the source and sink to the channel
a1.sources.r1.channels = c1
a1.sinks.k1.channel = c1
- 1
- 2
- 3
- 4
- 5
- 6
- 7
- 8
- 9
- 10
- 11
- 12
- 13
- 14
- 15
- 16
- 17
- 18
- 19
- 20
- 21
- 22
- 23
- 24
- 25
- 26
- 27
- 28
- 29
b) 启动flume agent a1 服务端
flume-ng agent -n a1 -c ../conf -f ../conf/netcat.conf -Dflume.root.logger=DEBUG,console
c) 使用telnet发送数据
telnet 192.168.80.80 44444 big data world!(windows中运行的)
d) 在HDFS中查看flume收集到的日志数据:
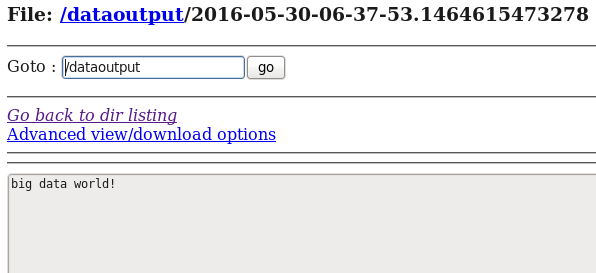
案例3:Spooling Directory Source:监听一个指定的目录,即只要应用程序向这个指定的目录中添加新的文件,source组件就可以获取到该信息,并解析该文件的内容,然后写入到channle。写入完成后,标记该文件已完成或者删除该文件。其中 Sink:logger Channel:memory
flume官网中Spooling Directory Source描述:
Property Name       Default      Description
channels              –
type                  –          The component type name, needs to be spooldir.
spoolDir              –          Spooling Directory Source监听的目录
fileSuffix         .COMPLETED    文件内容写入到channel之后,标记该文件
deletePolicy       never         文件内容写入到channel之后的删除策略: never or immediate
fileHeader         false         Whether to add a header storing the absolute path filename.
ignorePattern      ^$           Regular expression specifying which files to ignore (skip)
interceptors          –          指定传输中event的head(头信息),常用timestamp
Spooling Directory Source的两个注意事项:
①If a file is written to after being placed into the spooling directory, Flume will print an error to its log file and stop processing.
即:拷贝到spool目录下的文件不可以再打开编辑
②If a file name is reused at a later time, Flume will print an error to its log file and stop processing.
即:不能将具有相同文件名字的文件拷贝到这个目录下
a) 编写配置文件:
# Name the components on this agent
a1.sources = r1
a1.sinks = k1
a1.channels = c1

# Describe/configure the source
a1.sources.r1.type = spooldir
a1.sources.r1.spoolDir = /usr/local/datainput
a1.sources.r1.fileHeader = true
a1.sources.r1.interceptors = i1
a1.sources.r1.interceptors.i1.type = timestamp

# Describe the sink
a1.sinks.k1.type = logger

# Use a channel which buffers events in memory
a1.channels.c1.type = memory
a1.channels.c1.capacity = 1000
a1.channels.c1.transactionCapacity = 100

# Bind the source and sink to the channel
a1.sources.r1.channels = c1
a1.sinks.k1.channel = c1
- 1
- 2
- 3
- 4
- 5
- 6
- 7
- 8
- 9
- 10
- 11
- 12
- 13
- 14
- 15
- 16
- 17
- 18
- 19
- 20
- 21
- 22
- 23
b) 启动flume agent a1 服务端
flume-ng agent -n a1 -c ../conf -f ../conf/spool.conf -Dflume.root.logger=DEBUG,console
c) 使用cp命令向Spooling Directory 中发送数据
cp datafile /usr/local/datainput (注:datafile中的内容为:big data world!)
d) 在控制台上查看flume收集到的日志数据:

从控制台显示的结果可以看出event的头信息中包含了时间戳信息。
同时我们查看一下Spooling Directory中的datafile信息—-文件内容写入到channel之后,该文件被标记了:
[root@hadoop80 datainput]
datafile.COMPLETED
案例4:Spooling Directory Source:监听一个指定的目录,即只要应用程序向这个指定的目录中添加新的文件,source组件就可以获取到该信息,并解析该文件的内容,然后写入到channle。写入完成后,标记该文件已完成或者删除该文件。 其中 Sink:hdfs Channel:file (相比于案例3的两个变化)
a) 编写配置文件:
# Name the components on this agent
a1.sources = r1
a1.sinks = k1
a1.channels = c1

# Describe/configure the source
a1.sources.r1.type = spooldir
a1.sources.r1.spoolDir = /usr/local/datainput
a1.sources.r1.fileHeader = true
a1.sources.r1.interceptors = i1
a1.sources.r1.interceptors.i1.type = timestamp

# Describe the sink
# Describe the sink
a1.sinks.k1.type = hdfs
a1.sinks.k1.hdfs.path = hdfs://hadoop80:9000/dataoutput
a1.sinks.k1.hdfs.writeFormat = Text
a1.sinks.k1.hdfs.fileType = DataStream
a1.sinks.k1.hdfs.rollInterval = 10
a1.sinks.k1.hdfs.rollSize = 0
a1.sinks.k1.hdfs.rollCount = 0
a1.sinks.k1.hdfs.filePrefix = %Y-%m-%d-%H-%M-%S
a1.sinks.k1.hdfs.useLocalTimeStamp = true

# Use a channel which buffers events in file
a1.channels.c1.type = file
a1.channels.c1.checkpointDir = /usr/flume/checkpoint
a1.channels.c1.dataDirs = /usr/flume/data

# Bind the source and sink to the channel
a1.sources.r1.channels = c1
a1.sinks.k1.channel = c1
- 1
- 2
- 3
- 4
- 5
- 6
- 7
- 8
- 9
- 10
- 11
- 12
- 13
- 14
- 15
- 16
- 17
- 18
- 19
- 20
- 21
- 22
- 23
- 24
- 25
- 26
- 27
- 28
- 29
- 30
- 31
- 32
b) 启动flume agent a1 服务端
flume-ng agent -n a1 -c ../conf -f ../conf/spool.conf -Dflume.root.logger=DEBUG,console
c) 使用cp命令向Spooling Directory 中发送数据
cp datafile /usr/local/datainput (注:datafile中的内容为:big data world!)
d) 在控制台上可以参看sink的运行进度日志:

d) 在HDFS中查看flume收集到的日志数据:


从案例1与案例2、案例3与案例4的对比中我们可以发现:flume的配置文件在编写的过程中是非常灵活的。
案例5:Exec Source:监听一个指定的命令,获取一条命令的结果作为它的数据源
常用的是tail -F file指令,即只要应用程序向日志(文件)里面写数据,source组件就可以获取到日志(文件)中最新的内容 。 其中 Sink:hdfs Channel:file
这个案列为了方便显示Exec Source的运行效果,结合Hive中的external table进行来说明。
a) 编写配置文件:
# Name the components on this agent
a1.sources = r1
a1.sinks = k1
a1.channels = c1

# Describe/configure the source
a1.sources.r1.type = exec
a1.sources.r1.command = tail -F /usr/local/log.file

# Describe the sink
a1.sinks.k1.type = hdfs
a1.sinks.k1.hdfs.path = hdfs://hadoop80:9000/dataoutput
a1.sinks.k1.hdfs.writeFormat = Text
a1.sinks.k1.hdfs.fileType = DataStream
a1.sinks.k1.hdfs.rollInterval = 10
a1.sinks.k1.hdfs.rollSize = 0
a1.sinks.k1.hdfs.rollCount = 0
a1.sinks.k1.hdfs.filePrefix = %Y-%m-%d-%H-%M-%S
a1.sinks.k1.hdfs.useLocalTimeStamp = true

# Use a channel which buffers events in file
a1.channels.c1.type = file
a1.channels.c1.checkpointDir = /usr/flume/checkpoint
a1.channels.c1.dataDirs = /usr/flume/data

# Bind the source and sink to the channel
a1.sources.r1.channels = c1
a1.sinks.k1.channel = c1
- 1
- 2
- 3
- 4
- 5
- 6
- 7
- 8
- 9
- 10
- 11
- 12
- 13
- 14
- 15
- 16
- 17
- 18
- 19
- 20
- 21
- 22
- 23
- 24
- 25
- 26
- 27
- 28
b)在hive中建立外部表—–hdfs://hadoop80:9000/dataoutput的目录,方便查看日志捕获内容
hive> create external table t1(infor  string)
    > row format delimited
    > fields terminated by '\t'
    > location '/dataoutput/';
OK
Time taken: 0.284 seconds
c) 启动flume agent a1 服务端
flume-ng agent -n a1 -c ../conf -f ../conf/exec.conf -Dflume.root.logger=DEBUG,console
d) 使用echo命令向/usr/local/datainput 中发送数据
echo big data > log.file
d) 在HDFS和Hive分别中查看flume收集到的日志数据:
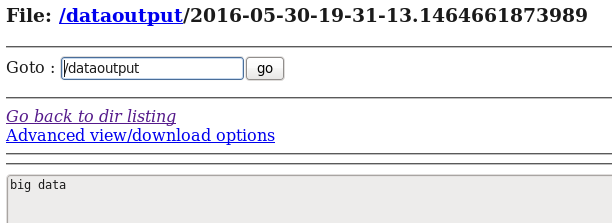
hive> select * from t1;
OK
big data
Time taken: 0.086 seconds
e)使用echo命令向/usr/local/datainput 中在追加一条数据
echo big data world! >> log.file
d) 在HDFS和Hive再次分别中查看flume收集到的日志数据:


hive> select * from t1;
OK
big data
big data world!
Time taken: 0.511 seconds
总结Exec source:Exec source和Spooling Directory Source是两种常用的日志采集的方式,其中Exec source可以实现对日志的实时采集,Spooling Directory Source在对日志的实时采集上稍有欠缺,尽管Exec source可以实现对日志的实时采集,但是当Flume不运行或者指令执行出错时,Exec source将无法收集到日志数据,日志会出现丢失,从而无法保证收集日志的完整性。
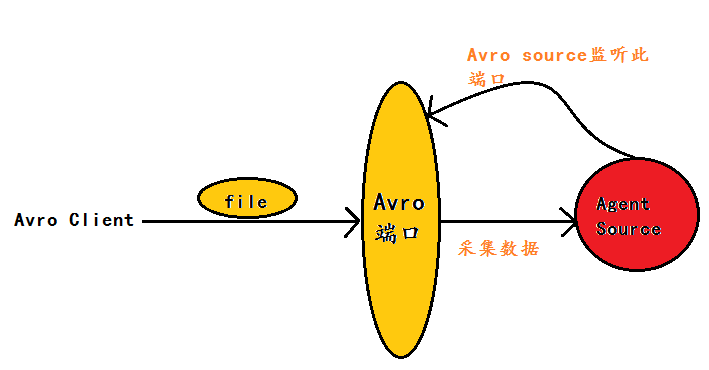
案例6:Avro Source:监听一个指定的Avro 端口,通过Avro 端口可以获取到Avro client发送过来的文件 。即只要应用程序通过Avro 端口发送文件,source组件就可以获取到该文件中的内容。 其中 Sink:hdfs Channel:file
(注:Avro和Thrift都是一些序列化的网络端口–通过这些网络端口可以接受或者发送信息,Avro可以发送一个给定的文件给Flume,Avro 源使用AVRO RPC机制)
Avro Source运行原理如下图:
flume官网中Avro Source的描述:
Property     Name   Default Description
channels      –
type          –     The component type name, needs to be avro
bind          –     日志需要发送到的主机名或者ip,该主机运行着ARVO类型的source
port          –     日志需要发送到的端口号,该端口要有ARVO类型的source在监听
1)编写配置文件
# Name the components on this agent
a1.sources = r1
a1.sinks = k1
a1.channels = c1

# Describe/configure the source
a1.sources.r1.type = avro
a1.sources.r1.bind = 192.168.80.80
a1.sources.r1.port = 4141

# Describe the sink
a1.sinks.k1.type = hdfs
a1.sinks.k1.hdfs.path = hdfs://hadoop80:9000/dataoutput
a1.sinks.k1.hdfs.writeFormat = Text
a1.sinks.k1.hdfs.fileType = DataStream
a1.sinks.k1.hdfs.rollInterval = 10
a1.sinks.k1.hdfs.rollSize = 0
a1.sinks.k1.hdfs.rollCount = 0
a1.sinks.k1.hdfs.filePrefix = %Y-%m-%d-%H-%M-%S
a1.sinks.k1.hdfs.useLocalTimeStamp = true

# Use a channel which buffers events in file
a1.channels.c1.type = file
a1.channels.c1.checkpointDir = /usr/flume/checkpoint
a1.channels.c1.dataDirs = /usr/flume/data

# Bind the source and sink to the channel
a1.sources.r1.channels = c1
a1.sinks.k1.channel = c1
- 1
- 2
- 3
- 4
- 5
- 6
- 7
- 8
- 9
- 10
- 11
- 12
- 13
- 14
- 15
- 16
- 17
- 18
- 19
- 20
- 21
- 22
- 23
- 24
- 25
- 26
- 27
- 28
- 29
b) 启动flume agent a1 服务端
flume-ng agent -n a1 -c ../conf -f ../conf/avro.conf -Dflume.root.logger=DEBUG,console
c)使用avro-client发送文件
flume-ng avro-client -c ../conf -H 192.168.80.80 -p 4141 -F /usr/local/log.file
注:log.file文件中的内容为:
[root@hadoop80 local]# more log.file
big data
big data world!
d) 在HDFS中查看flume收集到的日志数据:

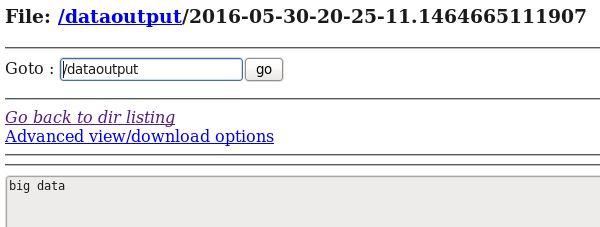
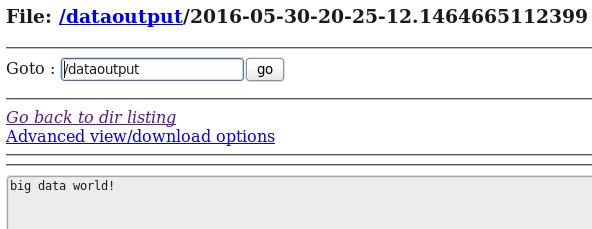
通过上面的几个案例,我们可以发现:flume配置文件的书写是相当灵活的—-不同类型的Source、Channel和Sink可以自由组合!
最后对上面用的几个flume source进行适当总结:
① NetCat Source:监听一个指定的网络端口,即只要应用程序向这个端口里面写数据,这个source组件
就可以获取到信息。
②Spooling Directory Source:监听一个指定的目录,即只要应用程序向这个指定的目录中添加新的文
件,source组件就可以获取到该信息,并解析该文件的内容,然后写入到channle。写入完成后,标记
该文件已完成或者删除该文件。
③Exec Source:监听一个指定的命令,获取一条命令的结果作为它的数据源
常用的是tail -F file指令,即只要应用程序向日志(文件)里面写数据,source组件就可以获取到日志(文件)中最新的内容 。
④Avro Source:监听一个指定的Avro 端口,通过Avro 端口可以获取到Avro client发送过来的文件 。即只要应用程序通过Avro 端口发送文件,source组件就可以获取到该文件中的内容。
如有问题,欢迎留言指正!


 832
832

 被折叠的 条评论
为什么被折叠?


