


Hadoop install
Standalone operation
Step #1, install
1. Install VMWare ESXi 6.0,vSphere Client.

2. Install Ubuntu 16.04 (ubuntu-16.04.1-desktop-amd64.iso)
3. Install rsync, openssh-server,x11vnc
4. Download Hadoop (hadoop-2.7.3.tar.gz)and JDK (jdk-8u101-linux-x64.tar.gz).
5. Install java and set the javaEnvs.
$ sudo mkdir –p /opt/java
$ sudo tar xzvf /home/jiguoh/Downloads/jdk-8u101-linux-x64.tar.gz–C /opt/java

6. Add Hadoop group and user.
$ sudo addgroupHadoop
$ sudo adduser--ingroup hadoop Hadoop
$ sudo vi/etc/sudoers

7. Login with Hadoop user
8. Setup ssh to localhost withpassword .
$ ssh-keygen
$ ssh-copy-id localhost
$ ssh localhost $ test
$ exit $ exittest
9. Install Hadoop
$ mkdir –p /home/hadoop/Hadoop
$ tar xzvf /home/jiguoh/Downloads/hadoop-2.7.3.tar.gz –C /opt/hadoop
$ sudo vi /etc/profile.d/Hadoop-path.sh

$ sudo vi /opt/hadoop/hadoop-2.7.3/etc/hadoop/hadoop-env.sh

Step #2, testing
1.	Reboot and login with hadoop.
2.	$ mkdir –p ~/input
3.	$ rm –rf ~/output
4.	$ cp xxx ~/input
5.	$ hadoop jar $HADOOP_HOME/share/hadoop/mapreduce/sources/hadoop-mapreduce-examples-2.7.3-sources.jar org.apache.hadoop.examples.WordCount ~/input ~/output
Pseudo-Distributed Operation
Hadoop can also be run on a single-node in a pseudo-distributedmode where each Hadoop daemon runs in a separate Java process.
Step #1, Configure hadoop without yarn
1. Based on the Standaloneoperation.
2. Login as user: hadoop
3. Add the host
$ vi /etc/hosts

$ ssh hadoop@hadoop-master
4. Configure the Hadoop
$ vi /opt/hadoop/hadoop-2.7.3/etc/hadoop/core-site.xml

$ vi /opt/hadoop/hadoop-2.7.3/etc/hadoop/hdfs-site.xml

5. Format the hdfs node
$ hdfs namenode -format

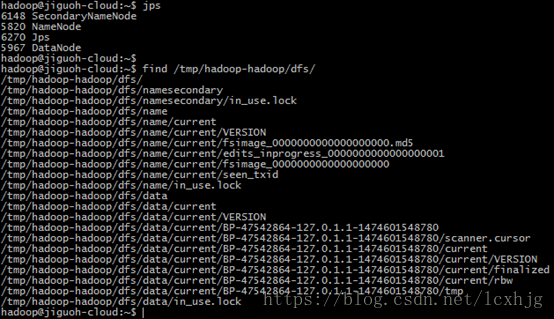
6. Start the dfs
$ start-dfs.sh
 最低0.47元/天 解锁文章


 6747
6747

 被折叠的 条评论
为什么被折叠?
被折叠的 条评论
为什么被折叠?
 到【灌水乐园】发言


