


前言
转眼已经毕业一年了,工作一年还是学到了很多东西,但是由于公司维护的老项目,目前还是用eclipse开发,看着android studio 2.0 出来了,还是很想去尝试的,另外很多高版本的API,github上的开源控件以及Material Design,于是我就决定做个简单的应用,来熟悉一下android studio 以及对我来说这些比较新颖的东西。所以梳理一下自己的开发过程和参考的文章。
效果图
先看一下效果图吧,具体的可以去应用宝下载
账号管家下载地址
整体思路
于是我想到做一个账号管家的应用,来管理生活工作中乱七八糟的账号。可是这个真的也不好做,谁放心把账号密码交给一个不知名的app呢,这里我做了一些防护。
- 为了用户放心使用,这是一个单机应用。
- 可以使用不可逆加密的尽量使用不可逆加密。(比如登录时候的解锁密码,不需要展示的都使用不可逆加密)
- 数据库不可备份
- 代码混淆
主要的技术
1.登录
可以是密码登录或者九宫格解锁(用到的是github上的PatternLock,有兴趣的可以自己去看一下)
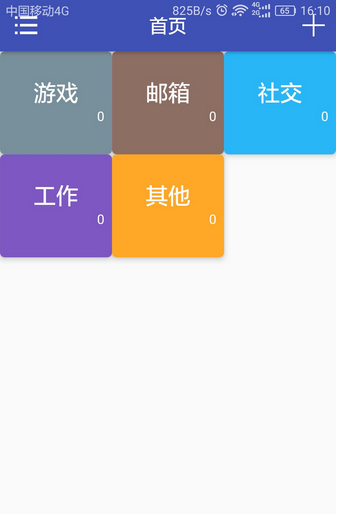
2.应用的主页
还是采用github上的FlowingDrawer 控件(带手势流动效果侧滑菜单github对于如何使用说的很清楚)抽屉导航NavigationView,可以参考一下(上面有效果图):
下面是Navigation View的使用的参考
Navigation View的使用
3.RecyclerView展示
是用RecyclerView的瀑布流来展示,item是CardView,CardView是v7包下的。。遇到的坑可以参考
cardView开发中的小问题
4.使用到的输入框
EditText+TextInputLayout,自带动画,非常炫酷。
以及EditText中的setError(“错误提示”)。如图:
只要把TextInputLayout 作为Edittext控件的父布局即可。
    <android.support.design.widget.TextInputLayout
        android:layout_width="match_parent"
        android:layout_height="wrap_content">

        <EditText
            android:id="@+id/password"
            android:layout_width="match_parent"
            android:layout_height="wrap_content"
            android:hint="@string/login_password"
            android:inputType="textPassword"
            android:maxLines="1"
            android:singleLine="true" />

    </android.support.design.widget.TextInputLayout>
可以看出来TextInputLayout是MD里面提供的控件。
5.SnackBar:
Snackbar是Android Support Design Library库中的一个控件,可以在屏幕底部快速弹出消息,比Toast更加好用。我在登录成功的时候默认做了一个SnackBar,用于提示系统时间。
参考:SnackBar使用
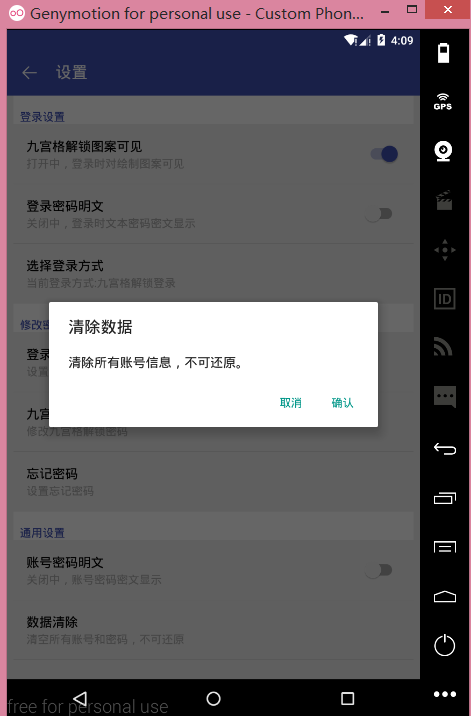
6.设置界面
像手机原生的设置页面,这里我用的是android 提供了一种设置界面的写法:使用继承PreferenceFragment 然后实现Preference.OnPreferenceChangeListener,Preference.OnPreferenceClickListener 监听。在监听的回调中处理自己的业务逻辑,界面如图所示:
1. 首先要新建xml 包,在里面新建preference.xml,选择PreferenceScreen作为document的根。
2. 以下面布局为例,简单说一下
    <PreferenceScreen xmlns:android="http://schemas.android.com/apk/res/android"
        android:layout_width="match_parent"
        android:layout_height="match_parent"
        android:layout="@layout/preference_item"
        android:title=""
    >
        <PreferenceCategory
            android:layout="@layout/preference_category_widget"
            android:title="@string/title_login_settings"
            >
            <CheckBoxPreference
                android:key="@string/MODE_PATTERN_LOCK_MODE_VISIBLE"
                android:layout="@layout/preference_item"
                android:summaryOff="@string/pattern_lock_visible_off"
                android:summaryOn="@string/pattern_lock_visible_on"
                android:widgetLayout="@layout/switch_layout"
                android:checked="true"
                android:title="@string/pattern_lock_visible"/>
        </PreferenceCategory>
</PreferenceScreen>
其中:
PreferenceCategory中的title为显示偏好种类的名字,我这边用的是‘登录设置’
CheckBoxPreference 中的key 为这个偏好的sp中存储的key值,summaryOff 和 summaryOn表示开关操作是下方显示的summary概述信息 title 为上方标题。
widgetLayout 表示这个组件的布局 。我这边使用的SwitchCompat控件 ,对应的switch_layout布局如下:
<?xml version="1.0" encoding="utf-8"?>
<android.support.v7.widget.SwitchCompat xmlns:android="http://schemas.android.com/apk/res/android"
android:id="@android:id/checkbox"
android:layout_width="wrap_content"
android:layout_height="wrap_content"
android:clickable="false"
android:focusable="false"
android:focusableInTouchMode="false"
android:textOff="OFF"
android:textOn="ON" />
其中的android:id=”@android:id/checkbox” 表示为系统的checkbox,不可随意修改
在java代码中:
    public class SettingFragment extends PreferenceFragment implements  Preference.OnPreferenceChangeListener,Preference.OnPreferenceClickListener{

        private CheckBoxPreference loginLockVisiablePre;
        @Override
        public void onCreate(Bundle savedInstanceState) {
            super.onCreate(savedInstanceState);
            addPreferencesFromResource(R.xml.preferences);
            loginLockVisiablePre = (CheckBoxPreference) getPreferenceManager()
                    .findPreference(getString(R.string.MODE_PATTERN_LOCK_MODE_VISIBLE));
            loginLockVisiablePre.setOnPreferenceChangeListener(this);
        }

        @Override
        public boolean onPreferenceChange(Preference preference, Object newValue) {
            if(preference instanceof  CheckBoxPreference) {
                boolean checked = Boolean.valueOf(newValue.toString());
                //获取到对应的key 和value
                Log.i("test",preference.getKey()+"=="+checked);
            }
            return true;
        }

        //如果有点击事件,可以在这里处理
        @Override
        public boolean onPreferenceClick(Preference preference) {
            return false;
        }
    }
7.分享功能
分享应用和分享账号密码,这个需要阅读微信开放平台去了解。大概流程是:
- 1.申请appId
- 2.集成微信开发sdk,只用分享好像不需要联网。在app包名下新建一个wxapi的包(如应用的包名是com.a.b,则必须有com.a.b.wxapi)需要新建一个WXEntryActivity的类。
- 3.调用sdk,发送请求,并且分享成功之后在WXEntryActivity中的onResp会回调到。我们这里选择finish当前的activity,防止显示空白的activity。
    public class WXEntryActivity extends Activity implements IWXAPIEventHandler {
        private IWXAPI mIWXAPI;

        @Override
        protected void onCreate(Bundle savedInstanceState) {
            super.onCreate(savedInstanceState);
            mIWXAPI = WXAPIFactory.createWXAPI(this, WXConstants.APP_ID);
            mIWXAPI.handleIntent(getIntent(), this);
        }


        @Override
        public void onReq(BaseReq baseReq) {
        }

        @Override
        public void onResp(BaseResp baseResp) {
            finish();
        }
    }
其他的一些控件
很多v7包下的系统控件android.support.v7.app.AlertDialog;,ProgressDialog等等这些,其实已经做得很好看了,有机会还是多使用使用。
遇到的问题
1.application中theme主题的理解
新建一个空项目的时候,在清单文件中的android:theme=”@style/AppTheme”,对应的
<style name="AppTheme" parent="Theme.AppCompat.Light.NoActionBar">
    <!-- Customize your theme here. -->
    <item name="colorPrimary">@color/colorPrimary</item>
    <item name="colorPrimaryDark">@color/colorPrimaryDark</item>
    <item name="colorAccent">@color/colorAccent</item>
    <item name="patternViewStyle">@style/PatternView.Light</item>
    <!-- Or PatternView.Light, or your own style extending these two or not. -->
</style>
下面这张图,可以帮我们更好的理解这些参数的意义:
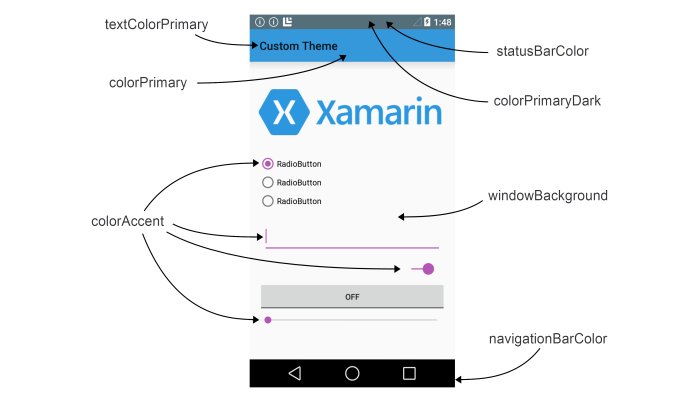
我一开始创建的editText是粉红色的,纠结了半天,原来是colorAccent 这个值设置的问题。。。
2.cardView显示的问题
虽然上面的坑中有提到,但是我还是想再说一下:android 5.0以上和和以下是不一样。
有问题的界面截图:
主要是android 5.0前后的差异:在xml 中写的
android:layout_margin=”@dimen/cardview_default_margin”,这个cardview_default_margin值在不同value包中的值需要不同:
我这里是这样写的:
- res/values/dimens.xml中:
<dimen name="cardview_default_margin">0dp</dimen> - res/values-v21/dimens.xml中
<dimen name="cardview_default_margin">8dp</dimen>
这样就能解决这样的显示问题
3.进入输入界面,自动弹出软键盘,这样显得不友好,处理方式:
可以在EditText前面放置一个看不到的LinearLayout
<LinearLayout
android:focusable="true"
android:focusableInTouchMode="true"
android:layout_width="0px"
android:layout_height="0px"/>
或者在他的父布局中加入
android:focusable="true"
android:focusableInTouchMode="true"


 3286
3286

 被折叠的 条评论
为什么被折叠?
被折叠的 条评论
为什么被折叠?
 到【灌水乐园】发言


