


 本文详细介绍了如何在PostgreSQL中创建用户(包括默认登录权限的CREATEUSER和无登录权限的CREATEROLE),以及如何进行权限授予、回收,包括对schema和表的权限管理。最后提到删除用户的操作。
PostgreSQL的用户管理
1 创建用户(角色)
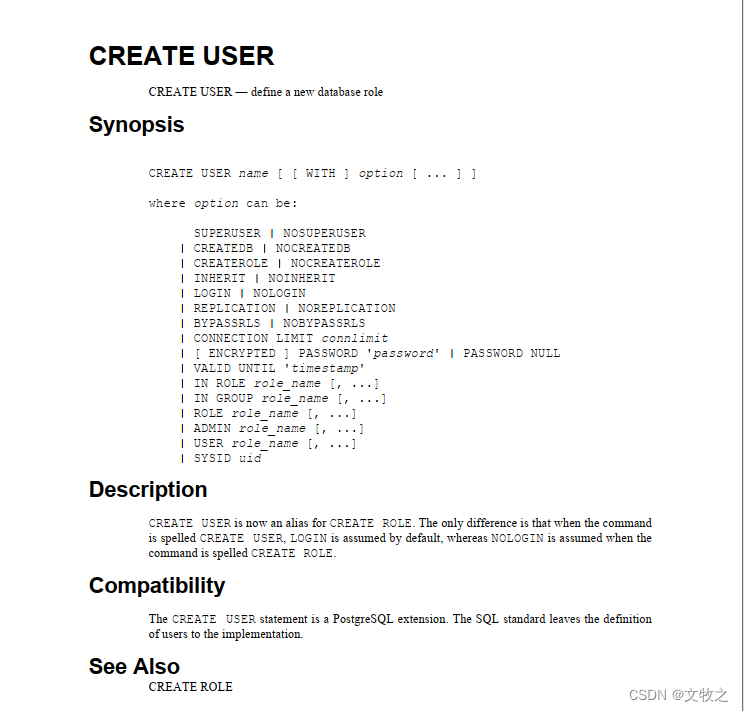
CREATE USER现在是CREATE ROLE的别名。唯一的区别是,当命令的拼写为CREATE USER时,默认情况下会使用LOGIN,而当命令拼写为CREATE ROLE时会使用NOLOGIN。
官方文档:
创建测试用户test1:使用create user方式
--可以看到create user 命令提示的是CREATE ROLE,并且默认带有login权限
postgres=# create user test1 with password 'Dameng123';
CREATE ROLE
postgres=# select * from pg_roles where rolname like 'test%';
 rolname | rolsuper | rolinherit | rolcreaterole | rolcreatedb | rolcanlogin | rolreplication | rolconnlimit | rolpassword | rolvaliduntil | rolbypassrls | rolconfig |  oid
---------+----------+------------+---------------+-------------+-------------+----------------+--------------+-------------+---------------+--------------+-----------+-------
 test1   | f        | t          | f             | f           | t           | f              |           -1 | ********    |               | f            |           | 16402
(1 row)
--test1用户可以正常登录postgres数据库
[pg16@test ~]$ psql -d postgres -U test1 -W
Password:
psql (16.2)
Type "help" for help.

postgres=> \conninfo
You are connected to database "postgres" as user "test1" via socket in "/tmp" at port "5777".
postgres=>
创建测试用户test2:使用create role方式
--创建test2角色,并带登录权限。
postgres=# create role test2 with login password 'Dameng123';
CREATE ROLE
postgres=# select * from pg_roles where rolname like 'test%';
 rolname | rolsuper | rolinherit | rolcreaterole | rolcreatedb | rolcanlogin | rolreplication | rolconnlimit | rolpassword | rolvaliduntil | rolbypassrls | rolconfig |  oid
---------+----------+------------+---------------+-------------+-------------+----------------+--------------+-------------+---------------+--------------+-----------+-------
 test1   | f        | t          | f             | f           | t           | f              |           -1 | ********    |               | f            |           | 16402
 test2   | f        | t          | f             | f           | t           | f              |           -1 | ********    |               | f            |           | 16403
(2 rows)

postgres=#
--test2用户(角色)可以正常登录postgres数据库
[pg16@test ~]$ psql -d postgres -U test2 -W
Password:
psql (16.2)
Type "help" for help.

postgres=> \conninfo
You are connected to database "postgres" as user "test2" via socket in "/tmp" at port "5777".
postgres=>
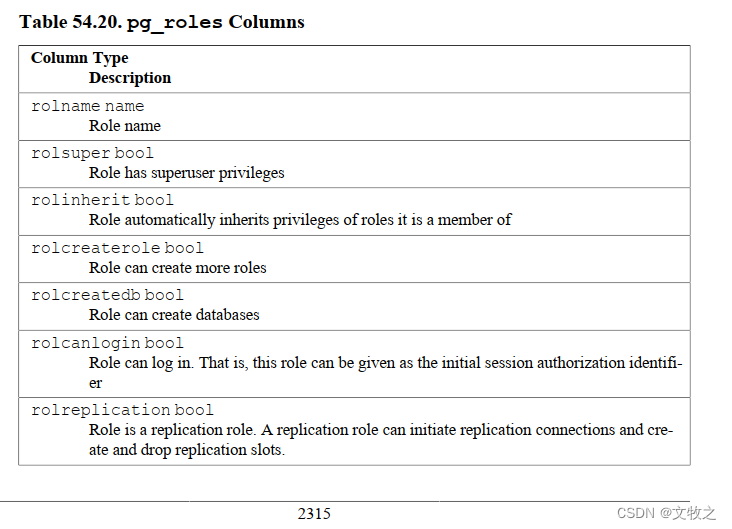
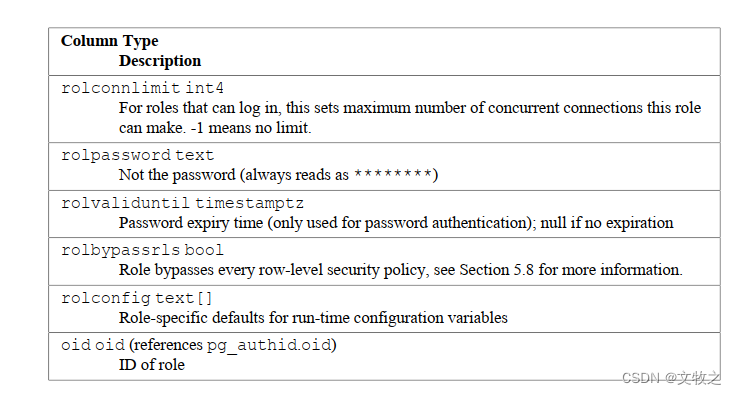
视图pg_roles可以查出当前所有的角色,以及一些属性。
2 授权
当前状态:
已创建测试数据库white,并创建schema yewu1,yewu1有t1,t2两张表。
2.1 授权
测试1:将yewu1.t1 的select 权限授给test1
第一步:执行 grant select on yewu1.t1 to test1;
white=# grant select on yewu1.t1 to test1;
GRANT
第二步:test1用户执行查询,发现报错
white=> select * from yewu1.t1;
ERROR:  permission denied for schema yewu1
LINE 1: select * from yewu1.t1;
第三步:执行 grant usage on schema yewu1 to test1;
white=# grant usage on schema yewu1 to test1;
GRANT
第四步:test1用户再次执行查询,可以正常访问表yewu1.t1
white=> select * from yewu1.t1;
 id
----
  1
(1 row)
postgresql相比其它数据库,多了要授予usage这个权限,不然对应的用户访问不了这个schema。也就是:
1、先授予使用模式的权限, usage
2、再授予对模式内对象的权限,insert\delete\update\select 等
2.2 查询用户(角色)的所有权限
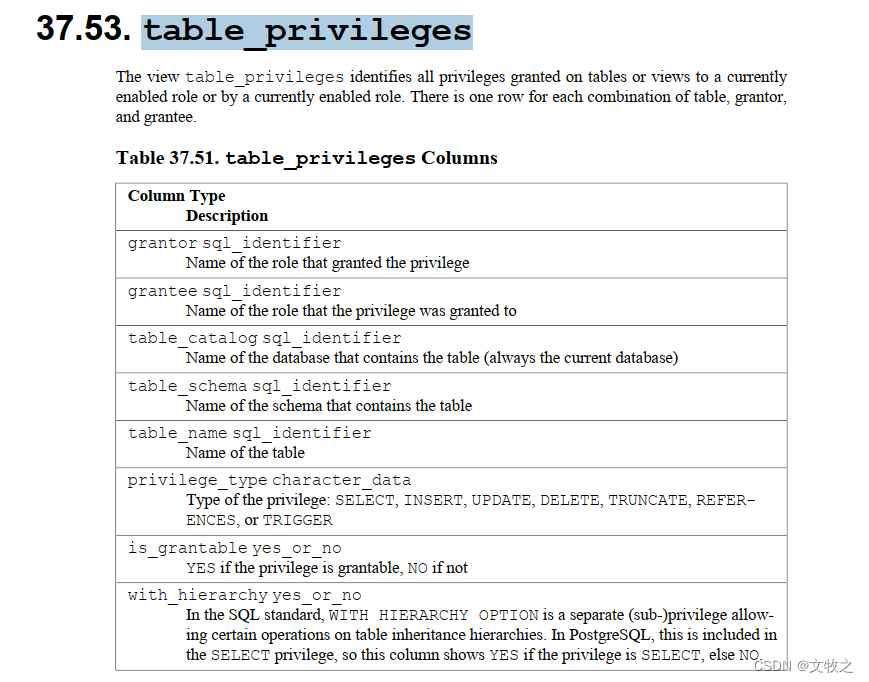
可以通过查看视图information_schema.table_privileges 和 information_schema.role_table_grants 来确认用户(角色)有哪些表的权限。
视图information_schema.table_privileges:
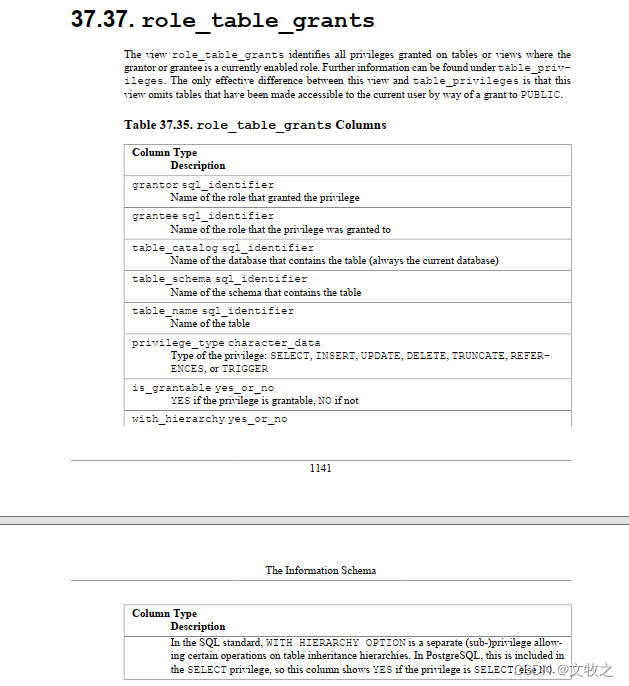
视图information_schema.role_table_grants:
–登录对应的数据库,再查询。即可看到角色所拥有的权限。
white=# select * from information_schema.role_table_grants where grantee = 'test1';
 grantor  | grantee | table_catalog | table_schema | table_name | privilege_type | is_grantable | with_hierarchy
----------+---------+---------------+--------------+------------+----------------+--------------+----------------
 postgres | test1   | white         | yewu1        | t1         | SELECT         | NO           | YES
(1 row)

white=# select * from information_schema.table_privileges where grantee = 'test1';
 grantor  | grantee | table_catalog | table_schema | table_name | privilege_type | is_grantable | with_hierarchy
----------+---------+---------------+--------------+------------+----------------+--------------+----------------
 postgres | test1   | white         | yewu1        | t1         | SELECT         | NO           | YES
2.3 回收权限
语法和其它数据库相似,更详细的用法请查看官方文档。
white=# revoke select on yewu1.t1 from test1;
REVOKE
white=# revoke usage on schema yewu1 from test1;
REVOKE

--再查询权限。test1的select权限已被回收。
white=# select * from information_schema.table_privileges where grantee = 'test1';
 grantor | grantee | table_catalog | table_schema | table_name | privilege_type | is_grantable | with_hierarchy
---------+---------+---------------+--------------+------------+----------------+--------------+----------------
(0 rows)

white=# select * from information_schema.role_table_grants where grantee = 'test1';
 grantor | grantee | table_catalog | table_schema | table_name | privilege_type | is_grantable | with_hierarchy
---------+---------+---------------+--------------+------------+----------------+--------------+----------------
(0 rows)
3 删除用户
语法和其它数据库相似,更详细的用法请查看官方文档。
white=# drop role test1;
DROP ROLE
white=# \du
                             List of roles
 Role name |                         Attributes
-----------+------------------------------------------------------------
 postgres  | Superuser, Create role, Create DB, Replication, Bypass RLS
 test2     |
谨记:心存敬畏,行有所止。


 1908
1908

 被折叠的 条评论
为什么被折叠?
被折叠的 条评论
为什么被折叠?
 到【灌水乐园】发言


