


这篇文章算是对前面三篇文章的一个总结
- 5.x控件:Toolbar、TabLayout、CoordinatorLayout
- 5.x控件:FloatingActionButton、SnackBar、DrawerLayout、NavigationView
- 5.x控件:CardView、RecyclerView、SwipeRefreshLayout
从自定义主题开始一步步构建Material Design风格的App,这里说的Material Design风格仅指使用那些Android L后新出的控件,因为真正实现Material Design是一门很讲究的设计学问,应该更多是由设计师去学习交付。另外,这篇文章只贴代码和效果,不会有讲解说明,除非是上面几篇文没提到的才会另外附上。
现在开始来一步步来构建这个最终的效果吧
0、依赖
compile 'com.android.support:design:22.2.1'
compile 'com.android.support:recyclerview-v7:22.2.1'
compile 'com.android.support:cardview-v7:22.2.1'
1、自定义主题
<style name="AppTheme" parent="Theme.AppCompat.Light.NoActionBar">
    <item name="colorPrimary">#2196F3</item>
    <item name="colorPrimaryDark">#1565C0</item>
    <item name="colorAccent">#E91E63</item>
</style>
2、Toolbar替换ActionBar
1、xml
res/layout/activity_main
<android.support.design.widget.CoordinatorLayout
    xmlns:android="http://schemas.android.com/apk/res/android"
    xmlns:app="http://schemas.android.com/apk/res-auto"
    android:layout_width="match_parent"
    android:layout_height="match_parent">

    <android.support.v7.widget.Toolbar
        android:id="@+id/toolbar"
        android:layout_width="match_parent"
        android:layout_height="?attr/actionBarSize"
        android:background="?attr/colorPrimary"
        app:title="MaterialDesignDemo"/>

</android.support.design.widget.CoordinatorLayout>
2、如果需要,可以编辑一下menu的xml
res/menu/menu_main
<menu xmlns:android="http://schemas.android.com/apk/res/android"
      xmlns:app="http://schemas.android.com/apk/res-auto"
      xmlns:tools="http://schemas.android.com/tools"
      tools:context=".MainActivity">
    <item
        android:id="@+id/action_settings"
        android:icon="@drawable/ic_fa_edit"
        android:orderInCategory="100"
        android:title="@string/action_settings"
        app:showAsAction="always"/>
</menu>
3、java
private Toolbar mToolbar;

@Override
protected void onCreate(Bundle savedInstanceState) {
    super.onCreate(savedInstanceState);
    setContentView(R.layout.activity_main);
    initInstances();

    // Toolbar替换ActionBar
    setSupportActionBar(mToolbar);

}

// 后面所有控件的实例都会先放在此方法,确保相互调用时不出现nullPointer
private void initInstances() {
    mToolbar = (Toolbar) findViewById(R.id.toolbar);
}

@Override
public boolean onCreateOptionsMenu(Menu menu) {
    // Inflate the menu; this adds items to the action bar if it is present.
    getMenuInflater().inflate(R.menu.menu_main, menu);
    return true;
}
4、效果
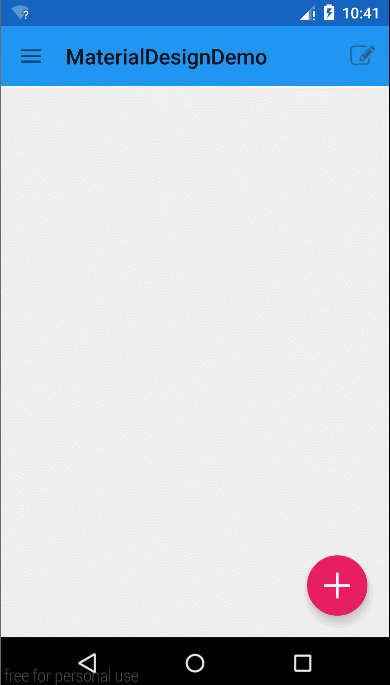
3、FloatingActionButton
1、xml
<android.support.design.widget.CoordinatorLayout...>
    <android.support.v7.widget.Toolbar.../>

    <android.support.design.widget.FloatingActionButton
        android:id="@+id/fabBtn"
        android:layout_width="wrap_content"
        android:layout_height="wrap_content"
        android:layout_gravity="bottom|right"
        android:layout_marginBottom="20dp"
        android:layout_marginRight="20dp"
        android:src="@drawable/ic_plus"/>

</android.support.design.widget.CoordinatorLayout>
2、效果

4、DrawerLayout&NavigationView
1、xml
<android.support.v4.widget.DrawerLayout
    android:id="@+id/drawerLayout"
    xmlns:android="http://schemas.android.com/apk/res/android"
    xmlns:app="http://schemas.android.com/apk/res-auto"
    android:layout_width="match_parent"
    android:layout_height="match_parent">

    <android.support.design.widget.CoordinatorLayout...>
        ...
    </android.support.design.widget.CoordinatorLayout>

    <android.support.design.widget.NavigationView
        android:id="@+id/navigationView"
        android:layout_width="match_parent"
        android:layout_height="match_parent"
        android:layout_gravity="start"
        app:headerLayout="@layout/nav_header"
        app:menu="@menu/menu_nav">
    </android.support.design.widget.NavigationView>

</android.support.v4.widget.DrawerLayout>2、此处省略@layout/nav_header,@menu/menu_nav
3、java
    ...
        getSupportActionBar().setDisplayHomeAsUpEnabled(true);
        getSupportActionBar().setHomeButtonEnabled(true);
        mDrawerToggle = new ActionBarDrawerToggle(this, mDrawerLayout, mToolbar, R.string.hello_world, R.string.hello_world);
        mDrawerLayout.setDrawerListener(mDrawerToggle);
        mNavigationView.setNavigationItemSelectedListener(new NavigationView.OnNavigationItemSelectedListener() {
            @Override
            public boolean onNavigationItemSelected(MenuItem menuItem) {
                mDrawerLayout.closeDrawers();
                Toast.makeText(MainActivity.this, menuItem.getTitle(), Toast.LENGTH_SHORT).show();
                return false;
            }
        });
    ...

    @Override
    protected void onPostCreate(Bundle savedInstanceState) {
        super.onPostCreate(savedInstanceState);
        mDrawerToggle.syncState();
    }

    @Override
    public void onConfigurationChanged(Configuration newConfig) {
        super.onConfigurationChanged(newConfig);
        mDrawerToggle.onConfigurationChanged(newConfig);
    }
4、效果
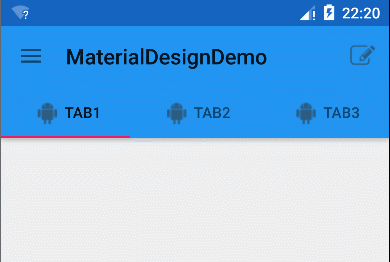
5、AppBarLayout&TabLayout
1、xml
<android.support.design.widget.AppBarLayout
            android:layout_width="match_parent"
            android:layout_height="wrap_content">

            <android.support.v7.widget.Toolbar
                .../>

            <android.support.design.widget.TabLayout
                android:id="@+id/tabLayout"
                android:layout_width="match_parent"
                android:layout_height="wrap_content"
                android:background="?attr/colorPrimary">
            </android.support.design.widget.TabLayout>


        </android.support.design.widget.AppBarLayout>
2、java
// mTabLayout.setTabMode(TabLayout.MODE_SCROLLABLE); // tab数量超过一屏
mTabLayout.addTab(mTabLayout.newTab().setText("Tab1").setIcon(R.drawable.ic_fa_android));
mTabLayout.addTab(mTabLayout.newTab().setText("Tab2").setIcon(R.drawable.ic_fa_android));
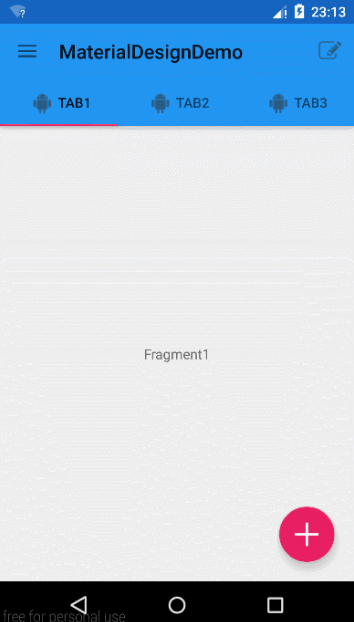
mTabLayout.addTab(mTabLayout.newTab().setText("Tab3").setIcon(R.drawable.ic_fa_android));3、效果
6、TabLayout&ViewPager
如果你想自己管理Tab完全可以setOnTabSelectedListener然后自主把控,通常都是管理Fragment;你也可以集成TabLayout与ViewPager。
1、xml
    <android.support.design.widget.CoordinatorLayout
        android:layout_width="match_parent"
        android:layout_height="match_parent">

        <android.support.design.widget.AppBarLayout
            ...>
            ...
        </android.support.design.widget.AppBarLayout>

        <android.support.v4.view.ViewPager
            android:id="@+id/viewPager"
            android:layout_width="match_parent"
            android:layout_height="match_parent"
            app:layout_behavior="@string/appbar_scrolling_view_behavior">
        </android.support.v4.view.ViewPager>

        <android.support.design.widget.FloatingActionButton
            .../>

</android.support.design.widget.CoordinatorLayout>2、java,首先注释掉上面TabLayout的addTab代码,因为这里会自动帮我们addTab。
final List<Fragment> fragments = new ArrayList<>();
final List<String> titles = new ArrayList<>();

for (int i = 1; i <= 3; i++) {
    fragments.add(MyFragment.getInstance("Fragment" + i));
    titles.add("Tab" + i);
}

mViewPager.setAdapter(new FragmentPagerAdapter(getSupportFragmentManager()) {

    @Override
    public CharSequence getPageTitle(int position) {
        return titles.get(position);
    }

    @Override
    public Fragment getItem(int position) {
        return fragments.get(position);
    }

    @Override
    public int getCount() {
        return fragments.size();
    }
});
mViewPager.setOffscreenPageLimit(fragments.size());
mTabLayout.setupWithViewPager(mViewPager);
// 如果需要icon
for (int i = 0; i < fragments.size(); i++) {
    mTabLayout.getTabAt(i).setIcon(R.drawable.ic_fa_android);
}
3、效果
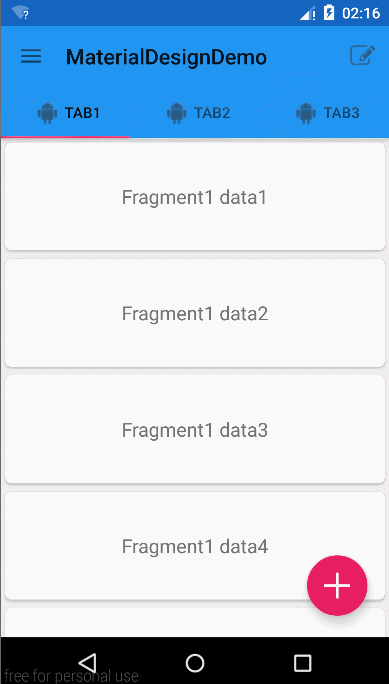
7、SwipeRefreshLayout&RecyclerView&CardView
1、xml
res/layout/fragment_item
<?xml version="1.0" encoding="utf-8"?>
<android.support.v4.widget.SwipeRefreshLayout
    android:id="@+id/swipeRefreshLayout"
    xmlns:android="http://schemas.android.com/apk/res/android"
    android:layout_width="match_parent"
    android:layout_height="match_parent">

    <android.support.v7.widget.RecyclerView
        android:id="@+id/recyclerView"
        android:layout_width="match_parent"
        android:layout_height="wrap_content">

    </android.support.v7.widget.RecyclerView>

</android.support.v4.widget.SwipeRefreshLayout>
res/layout/recycler_item
android:foreground="?android:attr/selectableItemBackground"这条属性可以使CardView有点击效果。
<LinearLayout
    xmlns:android="http://schemas.android.com/apk/res/android"
    xmlns:app="http://schemas.android.com/apk/res-auto"
    android:layout_width="match_parent"
    android:layout_height="wrap_content">


    <android.support.v7.widget.CardView
        android:id="@+id/cardView"
        android:layout_width="match_parent"
        android:layout_height="100dp"
        android:layout_margin="4dp"
        android:clickable="true"
        android:foreground="?android:attr/selectableItemBackground"
        app:cardCornerRadius="5dp">

        <RelativeLayout
            android:layout_width="match_parent"
            android:layout_height="match_parent">


            <TextView
                android:id="@+id/textView"
                android:layout_width="wrap_content"
                android:layout_height="wrap_content"
                android:layout_centerInParent="true"
                android:text="@string/hello_world"
                android:textSize="18sp"/>

        </RelativeLayout>


    </android.support.v7.widget.CardView>
</LinearLayout>
2、java
修改MyFragment
public class MyFragment extends Fragment {

    private RecyclerView mRecyclerView;
    private SwipeRefreshLayout mSwipeRefreshLayout;

    @Nullable
    @Override
    public View onCreateView(LayoutInflater inflater, ViewGroup container, Bundle savedInstanceState) {
        View view = inflater.inflate(R.layout.fragment_item, container, false);
        mSwipeRefreshLayout = (SwipeRefreshLayout) view.findViewById(R.id.swipeRefreshLayout);
        mRecyclerView = (RecyclerView) view.findViewById(R.id.recyclerView);
        mRecyclerView.setLayoutManager(new LinearLayoutManager(container.getContext()));
        String text = getArguments().getString("key", "default");
        List<String> list = new ArrayList<>();
        for (int i = 1; i <= 10; i++) {
            list.add(text + " data" + i);
        }
        final MyAdapter adapter = new MyAdapter(list);
        mRecyclerView.setAdapter(adapter);

        adapter.setOnItemClickListener(new MyAdapter.OnItemClickListener() {
            @Override
            public void onItemClick(View view, int position) {
                adapter.removeData(position);
            }
        });

        mSwipeRefreshLayout.setOnRefreshListener(new SwipeRefreshLayout.OnRefreshListener() {
            @Override
            public void onRefresh() {
                new Handler().postDelayed(new Runnable() {
                    @Override
                    public void run() {
                        adapter.addData(0,new String[]{"new data1","new data2"});
                        mRecyclerView.scrollToPosition(0);
                        mSwipeRefreshLayout.setRefreshing(false);
                    }
                }, 2000);
            }
        });
        return view;
    }

    public static MyFragment getInstance(String text) {
        MyFragment myFragment = new MyFragment();
        Bundle bundle = new Bundle();
        bundle.putString("key", text);
        myFragment.setArguments(bundle);
        return myFragment;
    }
}
MyAdapter
public class MyAdapter extends RecyclerView.Adapter<MyAdapter.ViewHolder> {

    private List<String> mList;
    private OnItemClickListener mOnItemClickListener;


    public MyAdapter(List<String> list) {
        mList = list;
    }

    @Override
    public MyAdapter.ViewHolder onCreateViewHolder(ViewGroup parent, int viewType) {
        return new ViewHolder(LayoutInflater.from(parent.getContext()).inflate(R.layout.recycler_item, parent, false));
    }

    @Override
    public void onBindViewHolder(final MyAdapter.ViewHolder holder, int position) {
        holder.textView.setText(mList.get(position));
        if (mOnItemClickListener != null) {
            holder.cardView.setOnClickListener(new View.OnClickListener() {
                @Override
                public void onClick(View v) {
                    int pos = holder.getLayoutPosition();
                    mOnItemClickListener.onItemClick(v, pos);
                }
            });
        }
    }

    @Override
    public int getItemCount() {
        return mList.size();
    }


    public void setOnItemClickListener(OnItemClickListener onItemClickListener) {
        mOnItemClickListener = onItemClickListener;
    }

    public interface OnItemClickListener {
        void onItemClick(View view, int position);
    }

    public void addData(int position, String[] data) {
        int length = data.length;
        for (int i = 0; i < length; i++) {
            mList.add(position + i, data[i]);
        }
        notifyItemRangeInserted(position, length);
    }

    public void addData(int position, String data) {
        mList.add(position, data);
        notifyItemInserted(position);
    }

    public void removeData(int position) {
        mList.remove(position);
        notifyItemRemoved(position);
    }

    public class ViewHolder extends RecyclerView.ViewHolder {
        public TextView textView;
        public CardView cardView;

        public ViewHolder(View itemView) {
            super(itemView);
            textView = (TextView) itemView.findViewById(R.id.textView);
            cardView = (CardView) itemView.findViewById(R.id.cardView);
        }
    }
}
3、效果

4、发挥CoordinatorLayout强大作用,一行代码让Toolbar滚动起来。
<android.support.v7.widget.Toolbar
    ...
    app:layout_scrollFlags="scroll|enterAlways"/>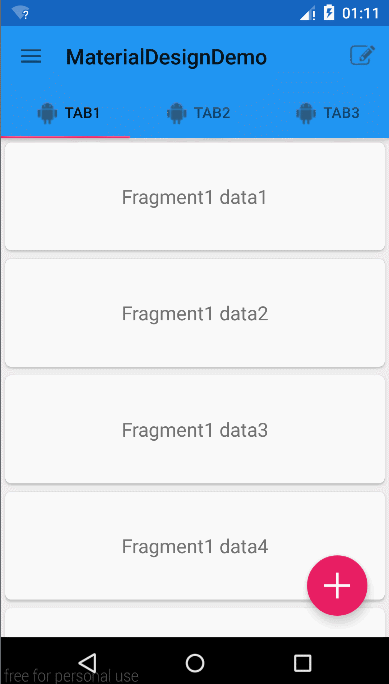
8、more
- CollapsingToolbarLayout
- TextInputLayout
通过CollapsingToolbarLayout和layout_scrollFlags实现酷炫效果。


 253
253


 被折叠的 条评论
为什么被折叠?
被折叠的 条评论
为什么被折叠?
 到【灌水乐园】发言


