


概述
- linux系统中的时间机制
在linux系统中有两种时钟,一种是硬件时钟,一种是系统时钟。
1.1 The Hardware Clock
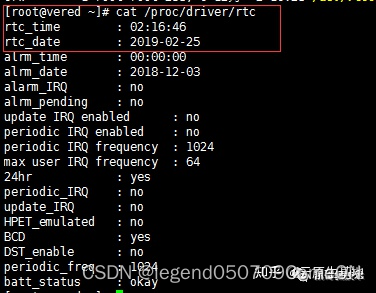
硬件时钟跟运行在cpu上的程序是独立不相关的,甚至在服务器关机之后仍然可以正常运行,这就保证了服务器时间的正常运行,硬件时间也有着各种各样的称呼,例如:hardware clock, real time clock, RTC, BIOS clock以及CMOS clock等,在目前主流的服务器都采用RTC芯片实现:

该芯片采用32768HZ的晶振来满足计时的需求,同时拥有独立的电源可以保证断电之后依然可以正常计时,在系统中可以看到硬件时钟的值:
1.2 The System Clock
在linux 内核中还有一个称为系统时钟或者系统时间的概念,这就是我们平时在系统中经常接触到时间,也是应用程序在执行与时间相关的操作会用到的时间,它只是在系统运行时存在,其记录形式为UTC时间(the number of seconds since 00:00:00 January 1, 1970 UTC)。
硬件时钟和系统时间的关系应该如何定义呢?
硬件时钟是用来保证在操作系统关机之后仍然可以正常计时必要硬件,而系统时间是我们在日常操作中才会经常使用到的时间,仅仅在操作系统初始化时,操作系统才会去RTC芯片中拿到硬件时钟的值,之后便是独立运行和独立计时。
由上面的分析,我们可以知道在正常应用中是不会去使用硬件时间,一般都会考虑用系统时间
- Linux系统时间分类:
(1)日历时间。该值是自协调世界时(UTC)1970年1月1日00:00:00这个特定时间以来所经过的秒数累计值。基本数据类型用time_t保存。最后通过转换才能得到我们平时所看到的24小时制或者12小时间制的时间。
(2)进程时间。也被称为CPU时间,用以度量进程使用的中央处理器资源。进程时间以时钟滴答计算。
进程时间是进程被创建后使用CPU的时间 ,进程时间被分为以下两个部分:
用户CPU时间:在用户态模式下使用CPU的时间
内核CPU时间:在内核态模式下使用CPU的时间。这是执行内核调用或其他特殊任务所需要的时间。
Linux下获取时间的方法
背景
用户空间获取代码段的执行时间。
While user application developers are working on performance sensitive code, one common requirement is do latency/time measurement in their code. This kind of code could be temporary code for debug, test or profiling purpose, or permanent code that could provide performance tracing data in software production mode.
Linux kernel provides gettimeofday() and clock_gettime() system calls for user application high resolution time measurement. The gettimeofday() is us level, and clock_gettime is ns level. However, the major concerns of these system calls usage are the additional performance cost caused by calling themselves.
In order to minimize the perf cost of gettimeofday() and clock_gettime() system calls, Linux kernel uses the vsyscalls(virtual system calls) and VDSOs (Virtual Dynamically linked Shared Objects) mechanisms to avoid the cost of switching from user to kernel. On x86, gettimeofday() and clock_gettime() could get better performance due to vsyscalls kernel patch, by avoiding context switch from user to kernel space. But some other arch still need follow the regular system call code path. This is really hardware dependent optimization.
内核函数
1> 获取时间戳
time_t time(time_t *calptr)
int gettimeofday(struct timeval *tp, void *tzp);
因为历史原因tzp的唯一合法值是NULL,因此调用时写入NULL即可。
int clock_gettime(clockid_t clock_id, strcut timespec *tsp);
clock_id有多个选择,当选择为CLOCK_REALTIME时与time的功能相似,但是时间精度更高。
struct timeval
{
long tv_sec; /*秒*/
long tv_usec; /*微秒*/
};
struct timespec
{
time_t tv_sec; //秒
long tv_nsec; //纳秒
};
2> 可视化时间
tm结构体
struct tm
{
int tm_sec; /*秒,正常范围0-59, 但允许至61*/
int tm_min; /*分钟,0-59*/
int tm_hour; /*小时, 0-23*/
int tm_mday; /*日,即一个月中的第几天,1-31*/
int tm_mon; /*月, 从一月算起,0-11*/ 1+p- tm_mon;
int tm_year; /*年, 从1900至今已经多少年*/ 1900+ p- tm_year;
int tm_wday; /*星期,一周中的第几天, 从星期日算起,0-6*/
int tm_yday; /*从今年1月1日到目前的天数,范围0-365*/
int tm_isdst; /*日光节约时间的旗标*/
};
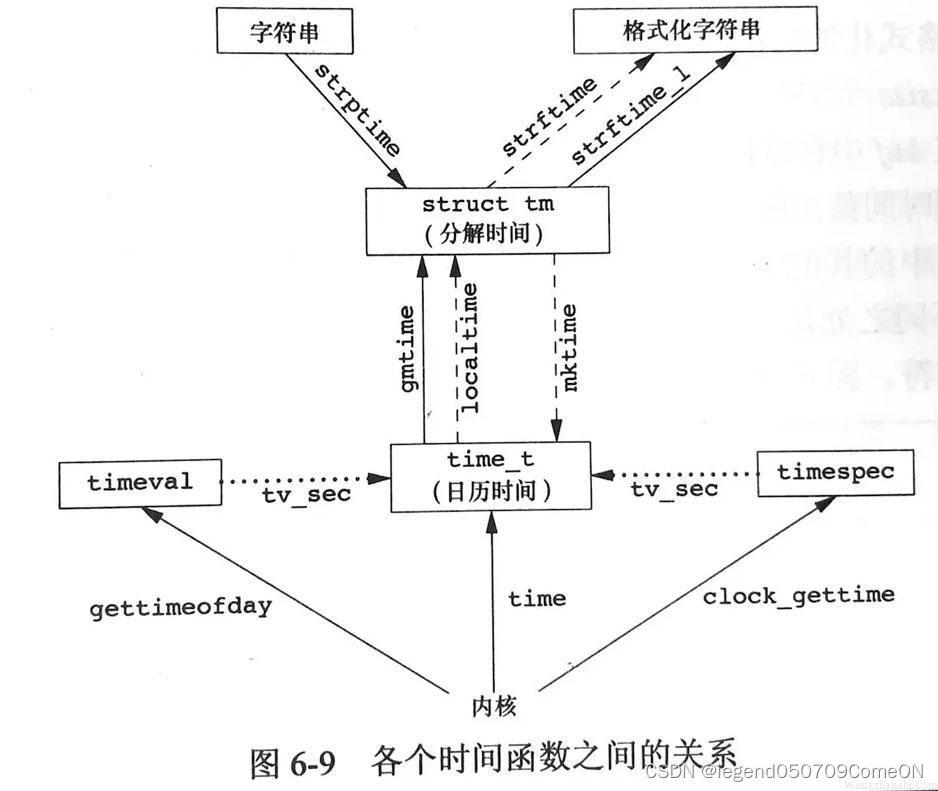
3> time_t转成tm:
gmtime 和localtime可以将time_t类型的时间戳转为tm结构体,用法如下:
struct tm* gmtime(const time_t *timep);
//将time_t表示的时间转换为没有经过时区转换的UTC时间,是一个struct tm结构指针
stuct tm* localtime(const time_t *timep);
//和gmtime功能类似,但是它是经过时区转换的时间,也就是可以转化为北京时间。
4>固定格式打印时间
得到tm结构体后,可以将其转为字符串格式的日常使用的时间,或者直接从time_t进行转换,分别可以使用以下两个函数达到目的。不过这两个函数只能打印固定格式的时间。
//这两个函数已经被标记为弃用,尽量使用后面将要介绍的函数
char *asctime(const struct tm* timeptr);
char *ctime(const time_t *timep);
上述两个函数因为可能出现缓冲区溢出的问题而被标记为弃用,因此更加安全的办法是采用strftime办法。
/*
** @buf:存储输出的时间
** @maxsize:缓存区的最大字节长度
** @format:指定输出时间的格式
** @tmptr:指向结构体tm的指针
*/
size_t strftime(char* buf, size_t maxsize, const char *format, const struct tm *tmptr);
6>进程时间
进程时间是进程被创建后使用CPU的时间 ,进程时间被分为以下两个部分:
用户CPU时间:在用户态模式下使用CPU的时间
内核CPU时间:在内核态模式下使用CPU的时间。这是执行内核调用或其他特殊任务所需要的时间。
clock函数提供了一个简单的接口用于取得进程时间,它返回一个值描述进程使用的总的CPU时间(包括用户时间和内核时间),该函数定义如下:
clock_t clock(void);
struct tms{
clock_t tms_utime;
clock_t tms_stime;
clock_t tms_cutime;
clock_t tms_cstime;
};
time+ localtime
特点
time函数返回的是1970年到现在的秒数,精确到秒。
localtime函数是根据这个秒数和本机的时区,解析出当期的年月日时分秒等信息。
注:localtime函数不是多线程安全的,localtime_r才是。
范例
#include <stdio.h>
#include <time.h>

// gcc -o time_1 time_1.c

int main()
{
    time_t tm_now;

    time(&tm_now);// 或者写成 tm_now = time(NULL);

    //1.直接打印:1970-1-1,00:00:00到现在的秒数
    printf("now time is %ld second\n", tm_now);

    //2.转换成本地时间,精确到秒
    struct tm *p_local_tm ;
    p_local_tm = localtime(&tm_now) ;
    printf("now datetime: %04d-%02d-%02d %02d:%02d:%02d\n",
        p_local_tm->tm_year+1900,
        p_local_tm->tm_mon+1,
        p_local_tm->tm_mday,
        p_local_tm->tm_hour,
        p_local_tm->tm_min,
        p_local_tm->tm_sec);

    return 0;
}
结果:

gettimeofday + localtime
特点
gettimeofday可以精确到微秒(us),还可以指定时区,性能也还可以,可以满足绝大多数场景,因此叫傻瓜版。
范例
#include <stdio.h>
#include <sys/time.h>
#include <time.h>

// gcc -o time_2 time_2.c

int main()
{
    struct timeval tm_now;

    //1.获取当前时间戳(tv_sec, tv_usec)
    gettimeofday(&tm_now,NULL); // 第二个参数是时区

    //2.转换成本地时间,精确到秒
    struct tm *p_local_tm;
    p_local_tm = localtime(&tm_now.tv_sec) ;
    printf("now datetime: %04d-%02d-%02d %02d:%02d:%02d.%06ld\n",
        p_local_tm->tm_year+1900,
        p_local_tm->tm_mon+1,
        p_local_tm->tm_mday,
        p_local_tm->tm_hour,
        p_local_tm->tm_min,
        p_local_tm->tm_sec,
        tm_now.tv_usec); // 有微秒时间戳了

    return 0;
}

clock_gettime + localtime
特点
int clock_gettime(clockid_t clk_id, struct timespec *tp);
clock_gettime 可以精确到纳秒(ns)函数精度不错,功能完备,但却存在一个突出缺点–慢。
clock_gettime的第一个参数可以指定一个clock_id参数:
常见的有两个:
- CLOCK_REALTIME
即普通的时间,跟其他时间函数取出来的时间并无区别。 - CLOCK_MONOTONIC
即单调时间,跟系统的启动时间有关,不受手动修改系统时间的影响。
范例
#include <stdio.h>
#include <unistd.h>
#include <time.h>

// gcc -o time_3 time_3.c

void print_timestamp(int use_monotonic)
{
    struct timespec tm_now;

    //1.获取当前时间戳(tv_sec, tv_usec)
    if(use_monotonic)
        clock_gettime(CLOCK_MONOTONIC, &tm_now); // 单调时间,屏蔽手动修改时间
    else
        clock_gettime(CLOCK_REALTIME, &tm_now); // 机器时间

    //2.转换成本地时间,精确到秒
    struct tm *p_local_tm;
    p_local_tm = localtime(&tm_now.tv_sec) ;
    printf("now datetime: %04d-%02d-%02d %02d:%02d:%02d.%09ld\n",
        p_local_tm->tm_year+1900,
        p_local_tm->tm_mon+1,
        p_local_tm->tm_mday,
        p_local_tm->tm_hour,
        p_local_tm->tm_min,
        p_local_tm->tm_sec,
        tm_now.tv_nsec); // 有纳秒时间戳了
}

int main(int argc, char **argv)
{
    int use_monotonic = 0;

    int optval  = 0;
    while ((optval = getopt(argc, argv, "Mm")) != EOF)
    {
		switch (optval)
        {
			case 'M':
			case 'm':
                use_monotonic = 1;
                break;
            default:
                break;
        }
    }

    while(1)
    {
        print_timestamp(use_monotonic);
        sleep(1);
    }

    return 0;
}
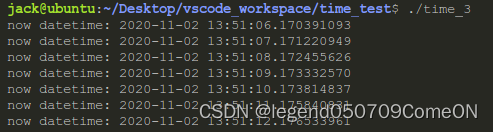
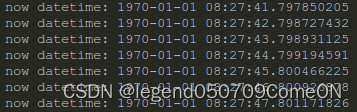
结果分析:

如上图,表示系统已经启动了24:09(8点是因为我们在东8区)。
我们用date命令将时间往回修改,观察两者的输出结果:
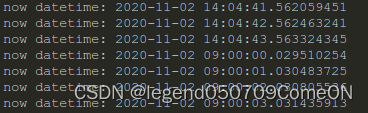
可以看到,指定为REAL_TIME的函数出现了时间回退(上图),指定为CLOCK_MONOTONIC的函数一直在单调流逝(下图):
rdtsc
Although vsyscalls implementation of gettimeofday() and clock_gettime() is faster than regular system calls, the perf cost of them is still too high to meet the latency measurement requirements for some perf sensitive application.
The TSC (time stamp counter) provided by x86 processors is a high-resolution counter that can be read with a single instruction (RDTSC). On Linux this instruction could be executed from user space directly, that means user applications could use one single instruction to get a fine-grained timestamp (nanosecond level) with a much faster way than vsyscalls.
tsc介绍
TSC的全称是Time Stamp Counter,它是一个64位的寄存器,每个Core有一个这样的寄存器,保存着CPU自开机启动以来的运转时钟周期数,在X86等平台下均有提供。通过专门的rdtsc汇编指令,即通过rdtsc指令,可绕过操作系统内核直接从寄存器中读取将TSC的数值存放在EDX:EAX中,示例代码如下:
uint64_t get_tsc()
{
    uint64_t a, d;
    __asm__ volatile("rdtsc" : "=a"(a), "=d"(d));
    return (d << 32) | a;
}
使用rstsc获取代码段的执行时间
The result of rdtsc is CPU cycle, that could be converted to nanoseconds by a simple calculation.
ns = CPU cycles * (ns_per_sec / CPU freq)
In Linux kernel, it uses more complex way to get a better results,
/*
 * Accelerators for sched_clock()
 * convert from cycles(64bits) => nanoseconds (64bits)
 *  basic equation:
 *              ns = cycles / (freq / ns_per_sec)
 *              ns = cycles * (ns_per_sec / freq)
 *              ns = cycles * (10^9 / (cpu_khz * 10^3))
 *              ns = cycles * (10^6 / cpu_khz)
 *
 *      Then we use scaling math (suggested by george@mvista.com) to get:
 *              ns = cycles * (10^6 * SC / cpu_khz) / SC
 *              ns = cycles * cyc2ns_scale / SC
 *
 *      And since SC is a constant power of two, we can convert the div
 *  into a shift.
 *
 *  We can use khz divisor instead of mhz to keep a better precision, since
 *  cyc2ns_scale is limited to 10^6 * 2^10, which fits in 32 bits.
 *  (mathieu.desnoyers@polymtl.ca)
 *
 *                      -johnstul@us.ibm.com "math is hard, lets go shopping!"
 */
Finally, the code of latency measurement could be,
start = rdtsc();

/* put code you want to measure here */

end = rdtsc();

cycle = end - start;

latency = cycle_2_ns(cycle)
In fact, above rdtsc implementation are problematic, and not encouraged by Linux kernel. The major reason is, TSC mechanism is rather unreliable, and even Linux kernel had the hard time to handle it.
That is why Linux kernel does not provide the rdtsc api to user application. However, Linux kernel does not limit the rdtsc instruction to be executed at privilege level, although x86 support the setup. That means, there is nothing stopping Linux application read TSC directly by above implementation, but these applications have to prepare to handle some strange TSC behaviors due to some known pitfalls.
rdtsc获取时间的优点
优点
性能高:绕过内核直接读寄存器,开销很小
精度高:时间测量的最小单位是1/CPU频率秒,可达0.3纳秒(假设CPU频率为3GHz)
rdtsc的缺陷
RDTSC 一般的用法是,先后执行两次,记下两个 64-bit 整数 start 和 end,那么 end-start 代表了这期间 CPU 的时钟周期数。这其中涉及到3个问题:
- 在多核下,这两次执行可能会在两个 CPU 上发生,而这两个 CPU 的计数器的初值不一定相同(由于完成上电复位的准确时机不同)。
- 对于计时这个用途,时间 = 周期数 / 频率,由于频率可能会变(比如我的笔记本的 CPU 通常半速运行在 800MHz,繁忙的时候全速运行在 1.6GHz),那么测得的时间也就不准确了。还有一个可能是掉电之后恢复(比如休眠),那么 TSC 会清零。 总之,用 RDTSC 来计时是不灵的。
- Intel的处理器自Pentium Pro开始,引入了乱序执行的功能,导致程序读取的TSC结果可能不准。如果编写测试程序的时候没有主动回避,也可能会掉到坑里。
总结起来,rdtsc的可能问题有:
- 不同core上TSC同步问题
不能保证同一块主板上每个核的 TSC 是同步的; - CPU降频问题
CPU 的时钟频率可能变化,例如笔记本电脑的节能功能; - 程序乱序执行问题
乱序执行导致 RDTSC 测得的周期数不准,这个问题从 Pentium Pro 时代就存在。
rdtsc的进化


CPU降频问题
第一代TSC的实现是Varient TSC,没有考虑到降频的问题,故在低功耗TSC计数会变慢,甚至停止;后来又有了Constant TSC,解决了降频的问题,但在DEEP-C状态下依然会发生停止计数的情况,所以又有了最新的Invariant TSC的特性。
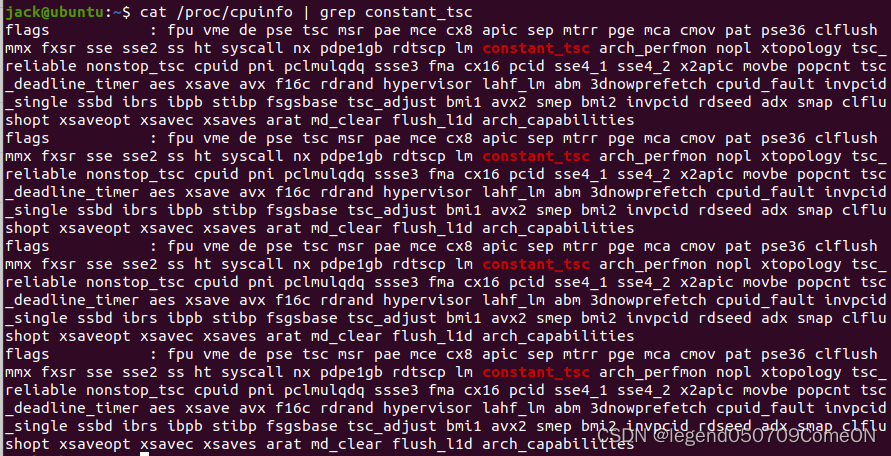
- 常量速率TSC(constant-tsc)
支持该特性的CPU,其TSC是按照其标称频率流逝的,与CPU的实际工作频率与状态无关。如果你的CPU也是支持constant_tsc特性的, 可以解决CPU 的时钟频率可能变化导致计时不准的问题。
可以通过如下命令查看你的CPU是否支持(我的机器有四个核,因此输出了四条):
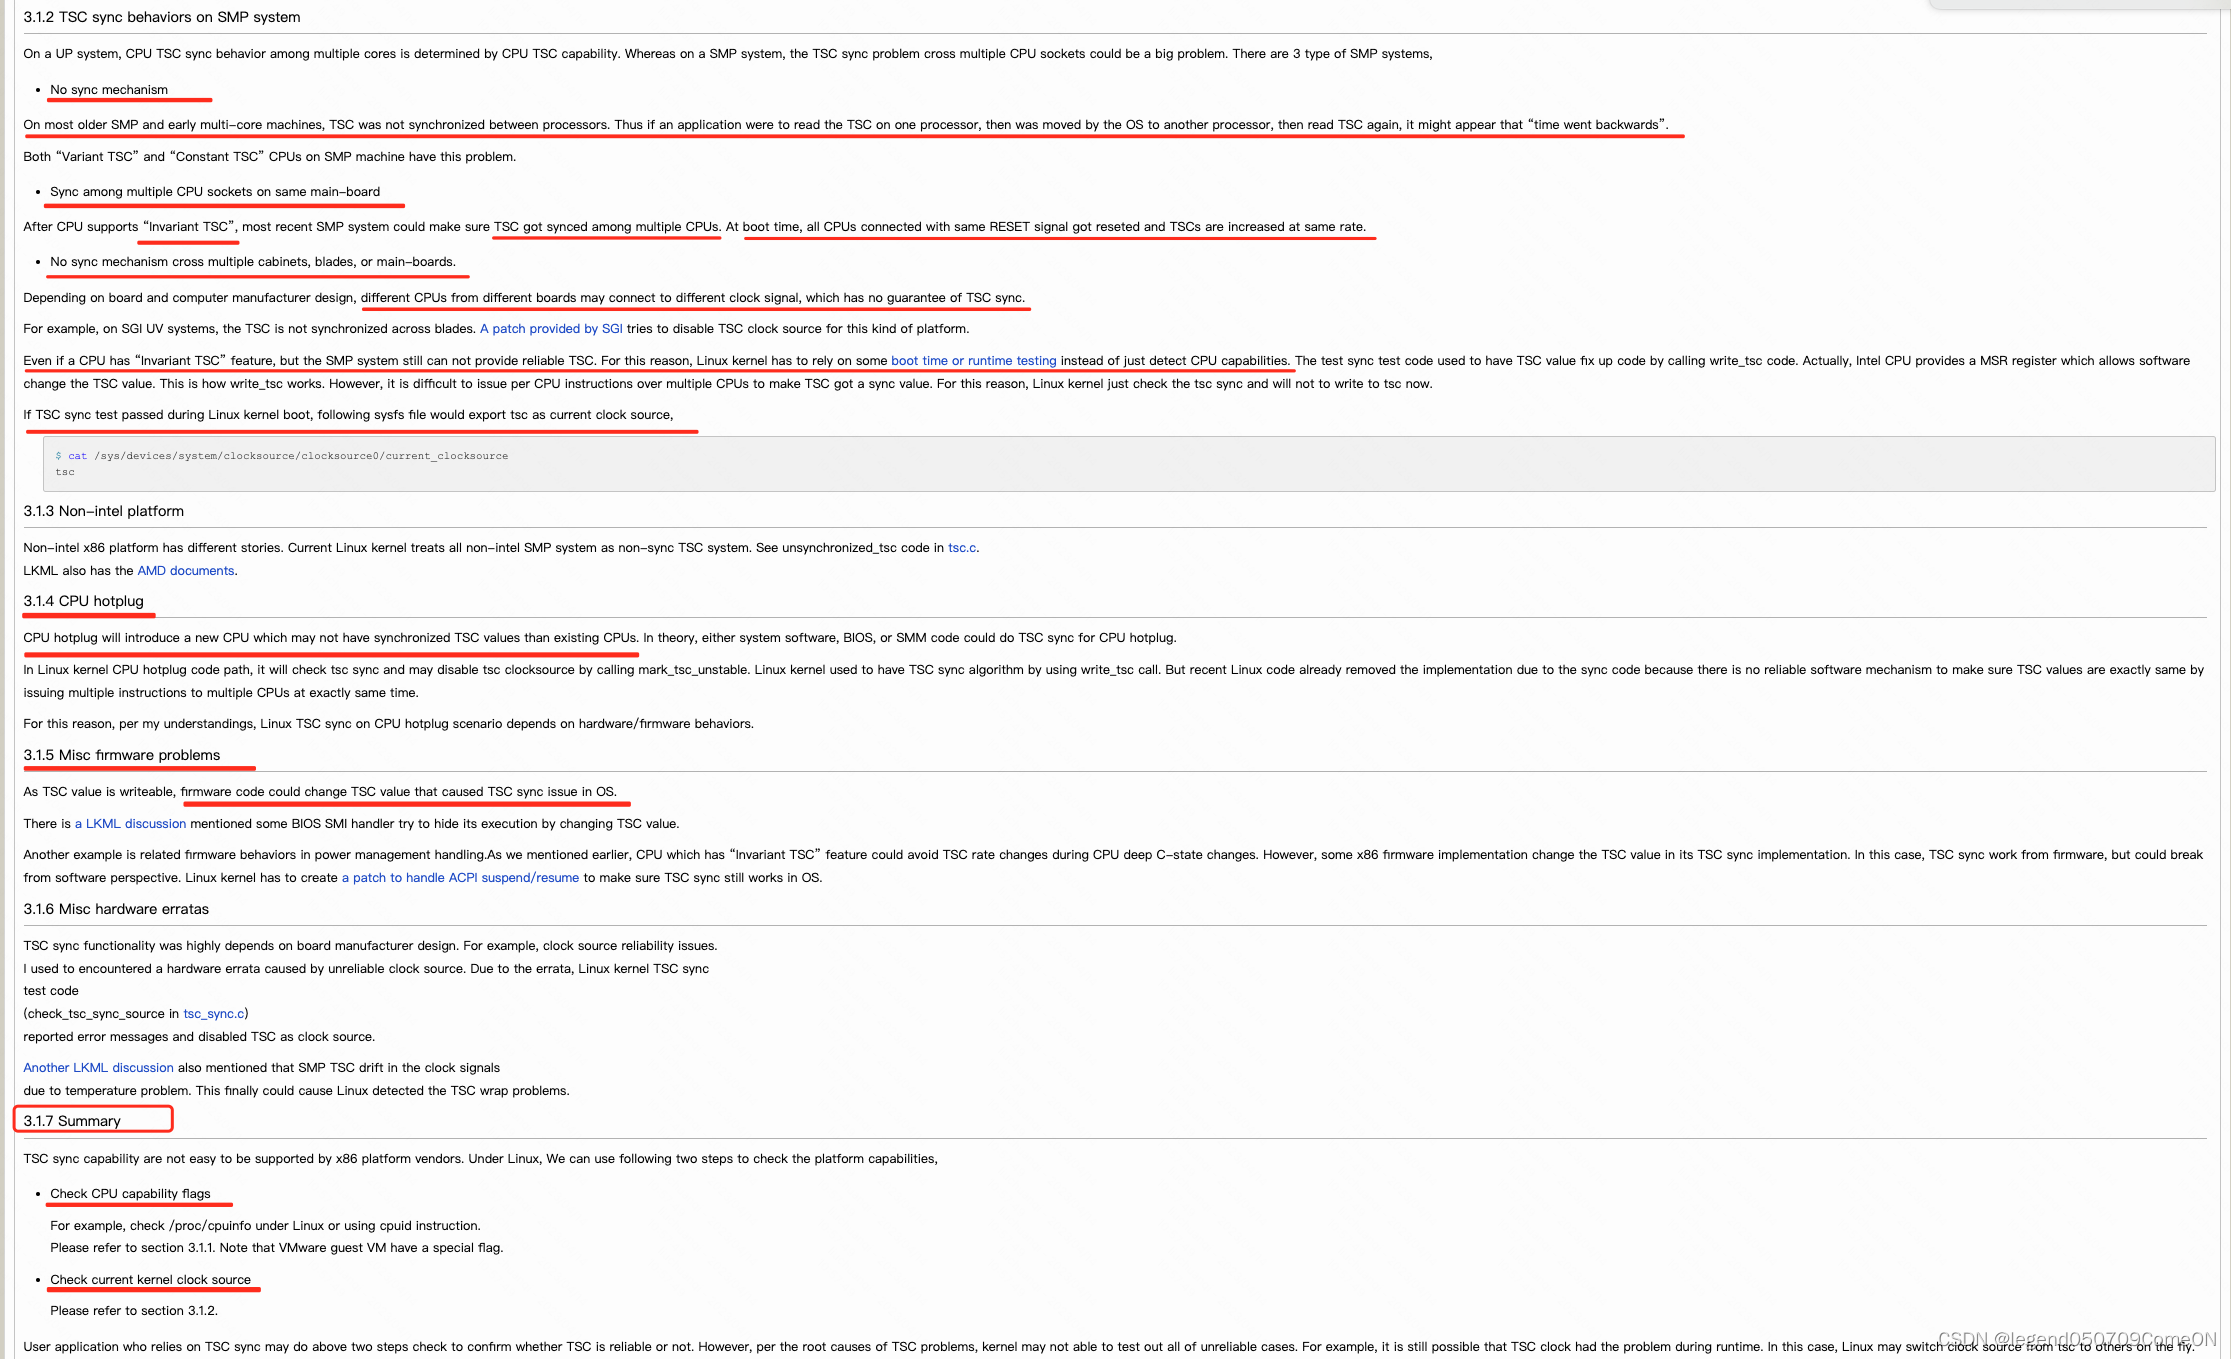
- Invariant TSC
The time stamp counter in newer processors may support an enhancement, referred to as invariant TSC. Processor’s support for invariant TSC is indicated by CPUID.80000007H:EDX[8]. The invariant TSC will run at a constant rate in all ACPI P-, C-. and T-states. This is the architectural behavior moving forward. On processors with invariant TSC support, the OS may use the TSC for wall clock timer services (instead of ACPI or HPET timers). TSC reads are much more efficient and do not incur the overhead associated with a ring transition or access to a platform resource.
不同Core的TSC同步问题
在Linux内核源码(Linux Source)linux/arch/x86/kernel/tsc_sync.c中,有一个unsynchronized_tsc()函数,用于判断系统的TSC是不是同步的,代码实现如下:
/*
 * Make an educated guess if the TSC is trustworthy and synchronized
 * over all CPUs.
 */
int unsynchronized_tsc(void)
{
	if (!boot_cpu_has(X86_FEATURE_TSC) || tsc_unstable)
		return 1;

#ifdef CONFIG_SMP
	if (apic_is_clustered_box())
		return 1;
#endif

	if (boot_cpu_has(X86_FEATURE_CONSTANT_TSC))
		return 0;

	if (tsc_clocksource_reliable)
		return 0;
	/*
	 * Intel systems are normally all synchronized.
	 * Exceptions must mark TSC as unstable:
	 */
	if (boot_cpu_data.x86_vendor != X86_VENDOR_INTEL) {
		/* assume multi socket systems are not synchronized: */
		if (num_possible_cpus() > 1)
			return 1;
	}

	return 0;
}
这里有几个有意思的点:
- 开头的注释说,“make an educated guess”,即有根据的猜测,即这里是不是TSC同步的判断依然是一个猜测
- 中间的代码判断了是否开启了CONSTANT TSC特性,如果开启就直接返回0,即TSC是同步的,也就是说,只要我们在cpuinfo里看到constant_tsc的flag,就证明我们的机器的TSC是同步的
- 后面还有一句注释“Intel systems are normally all synchronized.Exceptions must mark TSC as unstable:”,即Intel的系统,只要用户没有手动禁用TSC同步,一般都是同步的。
- 在Intel CPU下还有一个注释“assume multi socket systems are not synchronized”,即在多处理器系统上,不同CPU(处理器、socket、NUMA节点)之间的TSC是不同步的。
看到这里,我们基本上可以确定了,即:
- 如果你的cpuinfo里有constant_tsc的flag,那么无论在同一CPU不同核心之间,还是在不同CPU的不同核心之间,TSC都是同步的,可以随便用
- 如果你用的是Intel的CPU,但是cpuinfo里没有constant_tsc的flag,那么在同一处理器的不同核心之间,TSC仍然是同步的,但是不同CPU的不同核心之间不同步,尽量不要用.
程序乱序执行的问题
乱序执行问题,可以使用RDTSCP命令来代替RDTSC,前者开销虽然略高,但胜在稳定好用。另外,如果不想用这个指令,还可以用memory barrier技术或者CPUID指令来实现。
下面这个程序可以用来测试RDTSC和RDTSCP指令的性能:
#include <stdio.h>
#include <unistd.h>
#include <stdlib.h>
#include <stdint.h>
#include <time.h>
#include <sys/time.h>

// gcc -o time_6 time_6.c

uint64_t get_tsc()
{
    uint64_t a, d;
    __asm__ volatile("rdtsc" : "=a"(a), "=d"(d));
    return (d << 32) | a;
}

uint64_t get_tscp()
{
    uint64_t a, d;
    __asm__ volatile("rdtscp" : "=a"(a), "=d"(d));
    return (d << 32) | a;
}

#define LOOP_TIMES 1000000000

int main(int argc, char **argv)
{
    uint64_t beg_tsc, end_tsc;
    long loop;
    long sum;

    printf("-------------rdtsc-------------\n");
    loop = LOOP_TIMES;
    sum = 0;
    while(loop--)
    {
        beg_tsc = get_tsc();
        end_tsc = get_tsc();
        sum += (end_tsc - beg_tsc);
    }
    printf("AVG_CYCLE : %ld\n", sum / LOOP_TIMES);

    sleep(1);

    printf("-------------rdtscp-------------\n");
    loop = LOOP_TIMES;
    sum = 0;
    while(loop--)
    {
        beg_tsc = get_tscp();
        end_tsc = get_tscp();
        sum += (end_tsc - beg_tsc);
    }
    printf("AVG_CYCLE : %ld\n", sum / LOOP_TIMES);

    return 0;
}
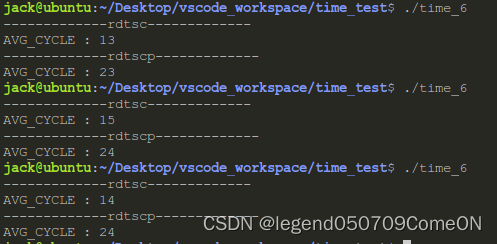
我一共跑了三次,每次差别都不大,RDTSCP指令比RDTSC多耗费10个指令周期左右,慢不到1倍。如果你能接受这点差别,建议还是用RDTSCP命令吧。
另外,RDTSCP指令也是需要平台支持的,是否支持可以使用cat /proc/cpuinfo | grep rdtscp命令查看。
TSC计数器溢出可能
计算器本身是64位的,即使是主频4G的CPU,也要100多年才会溢出,对于我们的测量来说可以不用考虑。
rdtsc 获取程序运行时间的范例
#include <stdio.h>
#include <unistd.h>
#include <stdlib.h> // for atof
#include <stdint.h> // for uint64_t

// gcc -o time_4 time_4.c

//获取CPU频率
uint64_t get_cpu_freq()
{
    FILE *fp=popen("lscpu | grep CPU | grep MHz | awk  {'print $3'}","r");
    if(fp == NULL)
        return 0;

    char cpu_mhz_str[200] = { 0 };
    fgets(cpu_mhz_str,80,fp);
    fclose(fp);

    return atof(cpu_mhz_str) * 1000 * 1000;
}

//读取时间戳寄存器
uint64_t get_tsc() // TSC == Time Stamp Counter寄存器
{
#ifdef __i386__
    uint64_t x;
    __asm__ volatile("rdtsc" : "=A"(x));
    return x;
#elif defined(__amd64__) || defined(__x86_64__)
    uint64_t a, d;
    __asm__ volatile("rdtsc" : "=a"(a), "=d"(d));
    return (d << 32) | a;
#else // ARM架构CPU
    uint32_t cc = 0;
    __asm__ volatile ("mrc p15, 0, %0, c9, c13, 0":"=r" (cc));
    return (uint64_t)cc;
#endif
}

int main(int argc, char **argv)
{
    uint64_t cpu_freq = get_cpu_freq();
    printf("cpu_freq is %lu\n", cpu_freq);

    uint64_t last_tsc = get_tsc();
    while(1)
    {
        sleep(1);
        uint64_t cur_tsc = get_tsc();
        printf("TICK(s)   : %lu\n", cur_tsc - last_tsc);
        printf("Second(s) : %.02lf\n", 1.0 * (cur_tsc - last_tsc) / cpu_freq);
        last_tsc = cur_tsc;
    }
    return 0;
}
性能对比
写了一个测试程序,跑10亿次,取平均时间,分别测试几个函数的性能:
#include <stdio.h>
#include <unistd.h>
#include <stdlib.h>
#include <stdint.h>
#include <time.h>
#include <sys/time.h>

// gcc -o time_5 time_5.c

uint64_t get_by_time()
{
    time_t tm_now;
    time(&tm_now);
    return tm_now;
}

uint64_t get_by_gettimeofday()
{
    struct timeval tm_now;
    gettimeofday(&tm_now,NULL);
    return tm_now.tv_sec;
}

uint64_t get_by_clock_gettime()
{
    struct timespec tm_now;
    clock_gettime(CLOCK_REALTIME, &tm_now);
    return tm_now.tv_sec;
}

uint64_t get_cpu_freq()
{
    FILE *fp=popen("lscpu | grep CPU | grep MHz | awk  {'print $3'}","r");
    if(fp == NULL)
        return 0;

    char cpu_mhz_str[200] = { 0 };
    fgets(cpu_mhz_str,80,fp);
    fclose(fp);

    return atof(cpu_mhz_str) * 1000 * 1000;
}

uint64_t get_by_tsc()
{
    uint64_t a, d;
    __asm__ volatile("rdtsc" : "=a"(a), "=d"(d));
    return (d << 32) | a;
}

void print_diff(uint64_t loop_times, uint64_t beg_tsc, uint64_t end_tsc)
{
    double tt_ns = (end_tsc - beg_tsc) * 1.0 * 1000 * 1000 * 1000 / get_cpu_freq();

    printf("Number Loop :   %lu\n", loop_times);
    printf("Total Time  :   %.02lf ns\n", tt_ns);
    printf("Avg Time    :   %.02lf ns\n", tt_ns / loop_times);
}

#define LOOP_TIMES 1000000000

int main(int argc, char **argv)
{
    uint64_t beg_tsc, end_tsc;
    long loop;

    printf("-------------time()-------------\n");
    loop = LOOP_TIMES;
    beg_tsc = get_by_tsc();
    while(loop--)
        get_by_time();
    end_tsc = get_by_tsc();
    print_diff(LOOP_TIMES, beg_tsc, end_tsc);

    printf("-------------gettimeofday()-------------\n");
    loop = LOOP_TIMES;
    beg_tsc = get_by_tsc();
    while(loop--)
        get_by_gettimeofday();
    end_tsc = get_by_tsc();
    print_diff(LOOP_TIMES, beg_tsc, end_tsc);

    printf("-------------clock_gettime()-------------\n");
    loop = LOOP_TIMES;
    beg_tsc = get_by_tsc();
    while(loop--)
        get_by_clock_gettime();
    end_tsc = get_by_tsc();
    print_diff(LOOP_TIMES, beg_tsc, end_tsc);

    printf("-------------rdtsc-------------\n");
    loop = LOOP_TIMES;
    beg_tsc = get_by_tsc();
    while(loop--)
        get_by_tsc();
    end_tsc = get_by_tsc();
    print_diff(LOOP_TIMES, beg_tsc, end_tsc);

    return 0;
}
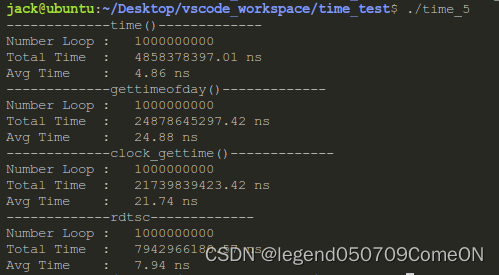
可以看到:
- time函数最快,但是精度太低
- gettimeofday和clock_gettime虽然精度高,但是都比较慢
- rdtsc精度和速度都十分优秀
另外需要注意一点的是,上述测试结果跟机器配置有很大关系,我测试所用的机器是一台ubuntu虚拟机,CPU只有1.8GHz。
关于这个测试结果,还有很多内容未明确,比如time为什么这么快,gettimeofday不是有缓存么?为啥还这么慢?clock_gettime按说应该比gettimeofday慢的,怎么测试结果并非如此呢?rdtsc在各个出错场景下究竟是怎样具体的现象?上述的测试方法是否科学等。这些问题留待后续补全。
linux下配置各个节点的的时间一致性
date 命令调整系统时间
date #查看当前系统时间和日期
date -s 02/21/2019 #设置日期,例如将系统日期设定成 2019 年 02 月 21 日
date -s 19:21:45 #设置时分秒,例如将系统时间设定成 19 点 21 分 45 秒
hwclock -w #将当前时间和日期写入 BIOS,即设置为硬件时间,避免重启后失效
ntp 调整系统时间
NTP(Network Time Protocol,网络时间协议),用来在分布式时间服务器和客户端之间进行时间同步。NTP基于UDP报文进行传输,使用的UDP端口号为123。它提供高精准度的时间校正(LAN 上与标准间差小于1毫秒,WAN 上几十毫秒),且可通过加密确认的方式来防止恶毒的协议攻击。
使用NTP的目的是对网络内所有具有时钟的设备进行时钟同步,使网络内所有设备的时钟保持一致,从而使设备能够提供基于统一时间的多种应用。对于运行NTP的本地系统,既可以接收来自其他时钟源的同步,又可以作为时钟源同步其他的时钟,并且可以和其他设备互相同步。
ntp 工作原理
NTP的基本工作原理如图所示。Device A和Device B通过网络相连,它们都有自己独立的系统时钟,需要通过NTP实现各自系统时钟的自动同步。为便于理解,作如下假设:
在Device A和Device B的系统时钟同步之前,Device A的时钟设定为10:00:00am,Device B的时钟设定为11:00:00am。NTP报文在Device A和Device B之间单向传输所需要的时间为1秒。
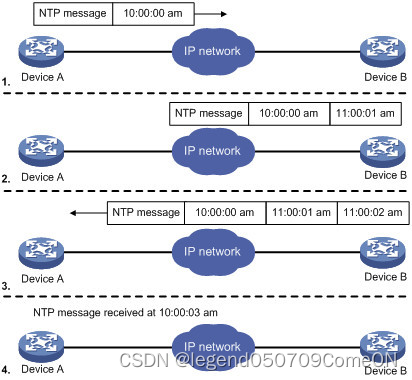
- Device A发送一个NTP报文给Device B,该报文带有它离开Device A时的时间戳,该时间戳为10:00:00am(T1)。
- 当此NTP报文到达Device B时,Device B加上自己的时间戳,该时间戳为11:00:01am(T2)。
- 当此NTP报文离开Device B时,Device B再加上自己的时间戳,该时间戳为11:00:02am(T3)。
- 当Device A接收到该响应报文时,Device A的本地时间为10:00:03am(T4)。
- 至此,Device A已经拥有足够的信息来计算两个重要的参数:
NTP报文的往返时延Delay=(T4-T1)-(T3-T2)=2秒。
Device A相对Device B的时间差offset=((T2-T1)+(T3-T4))/2=1小时。
ntp 报文

其中192.10.10.189为NTP的server端,192.10.10.32为client端。
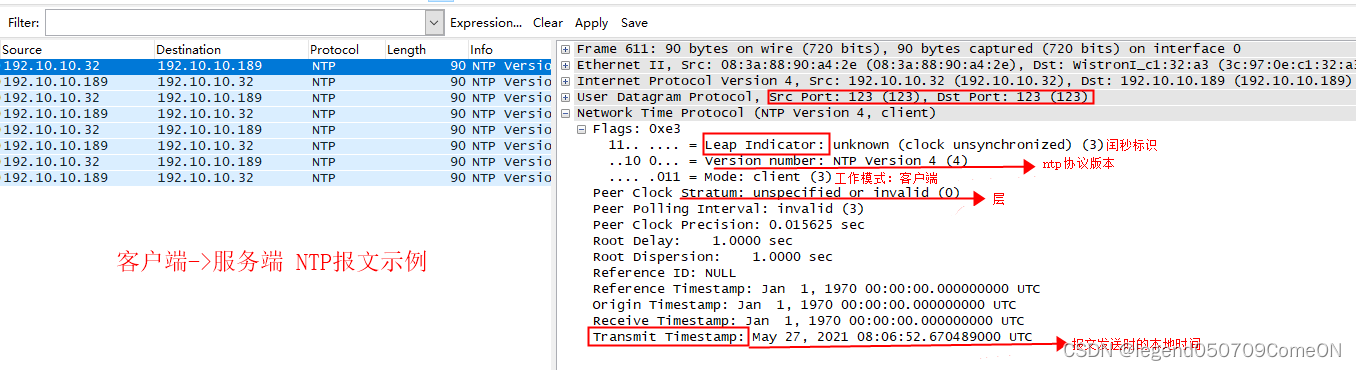
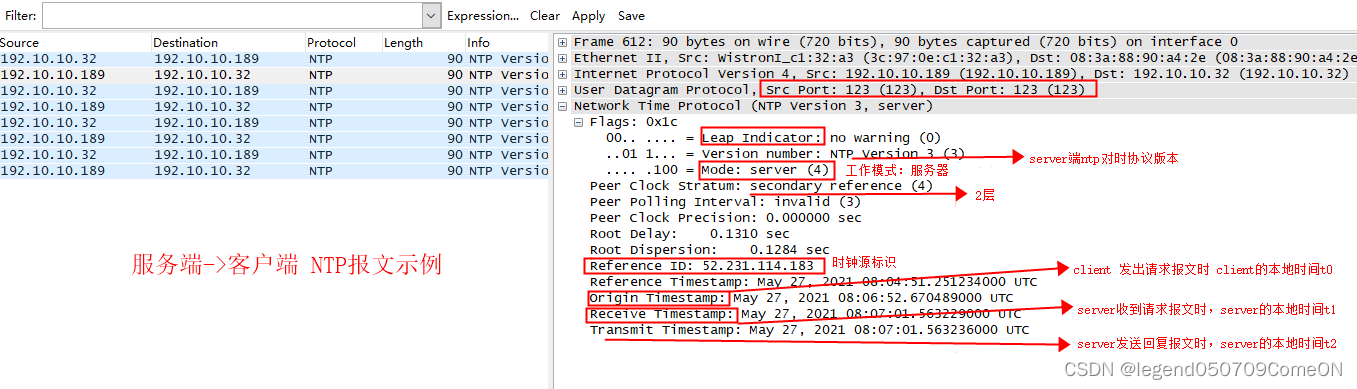
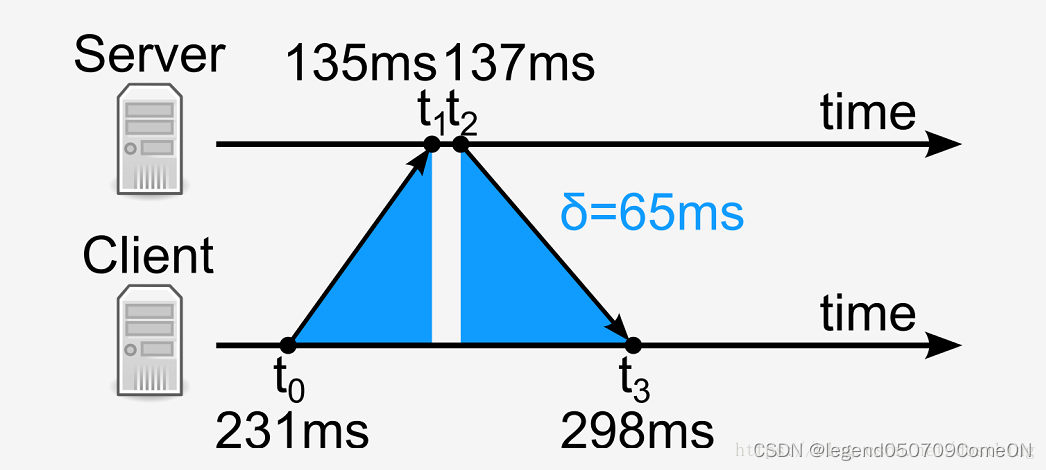
客户端和服务端都有一个时间轴,分别代表着各自系统的时间,当客户端想要同步服务端的时间时,客户端会构造一个NTP协议包发送到NTP服务端,客户端会记下此时发送的时间t0,经过一段网络延时传输后,服务器在t1时刻收到数据包,经过一段时间处理后在t2时刻向客户端返回数据包,再经过一段网络延时传输后客户端在t3时刻收到NTP服务器数据包。t0和t3是客户端时间系统的时间、t1和t2是NTP服务端时间系统的时间,它们是有区别的。
t0、t1、t2分别对应着server->cient NTP报文中的三个参数:
t0:origin timestamp
t1: receive timestamp
t2: transmit timestamp
t3为client收到回复报文时本地的时间。
-
延时和时间偏差计算
假设:客户端与服务端的时间系统的偏差定义为θ、网络的往/返延迟(单程延时)定义为δ。
推导过程:
1)根据交互原理,可以列出方程组:
t0+θ+δ=t1
t2-θ+δ=t3
2)求解方程组,得到以下结果:
θ=(t1-t0+t2-t3)/2
δ=(t1-t0+t3-t2)/2
记忆时可以采用极限法,分别假设延时和偏差为0. -
client时间校准:
对于时间要求不那么精准设备,client端可把server端的返回时间t2固化为本地时间。但是作为一个标准的通信协议,必须计算上网络的传输延时,需要把t2+δ 固化为本地时间。
ntp使用
检测 ntp 是否已安装
rpm -qa | grep ntp #检查命令

若只有 ntpdate 而未见 ntp,则需删除原有 ntpdate:
rpm -e ntpdate-4.2.6p5-22.el7.x86_64 #删除 ntpdate
用ntpdate自动更新系统时间
- 采用微软的校时服务器调整系统时间
yum install -y ntp #安装 ntp 服务器
ntpdate time.windows.com #采用微软的校时服务器调整系统时间
出现如下图所示内容,说明已经同步成功了。

- 设置自动同步,同步频率:每十分钟同步一次
crontab -e #编辑crontab
*/10 * * * * /usr/sbin/ntpdate time.windows.com >> /tmp/crontab.log
用 ntp 搭建自己的时间服务器
示例环境:主节点 IP-192.168.61.250,子节点 IP-192.168.61.251。
- 安装ntp
yum install -y ntp ntpdate
- 配置 ntp 服务器
vi /etc/ntp.conf
#注释掉 server 0 ~ n,并在 server 部分添加 server 和 fudge行
#server 0.centos.pool.ntp.org iburst
#server 1.centos.pool.ntp.org iburst
#server 2.centos.pool.ntp.org iburst
#server 3.centos.pool.ntp.org iburst
server 127.127.1.0 #使用本地时钟作为ntp服务器时间,这里的 127.127.1.0 在 ntp 中代表本机
fudge 127.127.1.0 stratum 10 #127.127.1.0 为第10层,ntp 和127.127.1.0同步完后,就变成了 11 层
- 配置ntp客户端
vi /etc/ntp.conf
#server 0.centos.pool.ntp.org iburst
#server 1.centos.pool.ntp.org iburst
#server 2.centos.pool.ntp.org iburst
#server 3.centos.pool.ntp.org iburst
server 192.168.61.250 #使用主节点 192.169.61.250 的时间作为基准更新时间
- ntp 启动命令
1)主节点启动命令
service ntpd start #打开 ntpd 服务
chkconfig ntpd on #设置开机启动
2)子节点启动命令
ntpdate 192.168.61.250 #向主节点发送请求,同步时间
service ntpd start #打开 ntpd 服务
chkconfig ntpd on #设置开机启动
3)查看 ntp 服务器有无和上层 ntp 连通
使用 ntpstat 行查询,结果一般如下:

4)查看 ntp 服务器与上层 ntp 的状态
使用 ntpq -p 进行查询,结果一般如下:

- 检查同步是否成功
查看与时间同步服务器的时间偏差,offset 偏差小,同步成功。

参考
https://www.cnblogs.com/ainima/p/6330783.html
http://www.wangkaixuan.tech/?p=840
http://www.wangkaixuan.tech/?p=901


 被折叠的 条评论
为什么被折叠?
被折叠的 条评论
为什么被折叠?
 到【灌水乐园】发言


