


文章目录
SpringBoot整合Mybatis 以及Druid 数据监控
本文主要介绍了mybatis 代码生成器 一键生成 实体类 mapper接口 和mapper 映射文件(xml)基础的crud where 标签使用 获取自增主键, 批量新增,删除 ,一对多,多对一映射文件写法, 以及Duird数据监控
本文整体项目结构

(一)Mybatis generator 的介绍以及使用
使用Mybatis generator可以帮助我们 一键生成实体类 mapper 接口以及 mapper.xml sql文件减少开发时间
生成的接口以及mapper.xml文件仅仅只是单表的CRUD
使用步骤:
1.pom.xml中添加build文件
<build>
        <plugins>
            <plugin>
                <groupId>org.springframework.boot</groupId>
                <artifactId>spring-boot-maven-plugin</artifactId>
            </plugin>
            <!--mybatis的generator插件-->
            <!--mybatis的generator插件-->
            <plugin>
                <groupId>org.mybatis.generator</groupId>
                <artifactId>mybatis-generator-maven-plugin</artifactId>
                <version>1.3.7</version>
                <configuration>
                    <verbose>true</verbose>
                    <!-- 代表mybatis generator生成的内容所需数据库驱动,注意不要覆盖已有的内容 -->
                    <overwrite>false</overwrite>
                </configuration>
                <dependencies>
                    <dependency>
                        <groupId>mysql</groupId>
                        <artifactId>mysql-connector-java</artifactId>
                        <version>${mysql.driver.version}</version>
                    </dependency>
                </dependencies>
            </plugin>
        </plugins>
    </build>
2.添加生成配置文件
在springboot的 resource 目录下 添加 名为generatorConfig.xml的配置文件
文件内容如下
一些注意事项我已在配置文件中注释了,未使用过代码生成的请注意仔细查看配置文件
<?xml version="1.0" encoding="UTF-8" ?>
<!DOCTYPE generatorConfiguration
        PUBLIC "-//mybatis.org//DTD MyBatis Generator Configuration 1.0//EN"
        "http://mybatis.org/dtd/mybatis-generator-config_1_0.dtd">
<!-- 自动生成器的配置(根目录,不做过多介绍)-->
<generatorConfiguration>
    <!--
    	classPathEntry:可以配置多个,也不配置
    	数据库驱动:这里找到相应的驱动jar包就可以了(注:不同数据库的jar不一样)
    		location:里面的是路径(也可以直接写绝对路径 -> 如:E:\mybatis\mysql-connector-java-5.1.26-bin.jar)
    -->
    <!--    <classPathEntry   location="D:/Program Files/repository/mysql/mysql-connector-java/5.1.26/mysql-connector-java-5.1.26.jar"/>-->
    <!--
    	context:用于生成一组对象的环境(至少配置1个,可以配置多个)
    	id:表达唯一的名称
    	targetRuntime:用于指定生成的代码的运行环境(MyBatis3/MyBatis3Simple)
    		MyBatis3:默认值
    		MyBatis3Simple:不会生成与Example(案例)相关的方法
    -->
    <context id="DB2Tables"   targetRuntime="MyBatis3Simple" >
        <!--
            用于配置如果生成注释信息(最多可以配置一下)
            suppressAllComments:阻止生成注释 ,默认为false
            suppressDate:阻止生成的注释 时间戳,默认为false
            addRemarkComments:注释是否添加数据库表的备注信息,默认为false
         -->
        <commentGenerator>
            <property name="suppressDate" value="true"/>
            <property name="suppressAllComments" value="true"/>
        </commentGenerator>
        <!--
        	这个应该比较清楚,配置连接数据库的基本信息
        -->
        <jdbcConnection driverClass="com.mysql.jdbc.Driver"
                        connectionURL="jdbc:mysql:///mybatis-one"
                        userId="root" password="root">
        </jdbcConnection>
        <!--
        	用于指定JDBC类型和Java类型如何转换,最多可以配置一个
        	forceBigDecimals:控制是否强制将DECIMAL和NUMERIC类型的JDBC字段转换成Java类型的 BigDecimal
        					 默认为false,一般不需要配置
        -->
        <javaTypeResolver>
            <property name="forceBigDecimals" value="false"/>
        </javaTypeResolver>

        <!--
        	javaModelGenerator:用来控制生成的实体类
	        	targetPackage:生成Model类存放位置(包名)
	        	targetProject:指定目标项目路径(根目录)
        		对应的子属性:
	        		trimStrings:判断是否对数据库查询结果进行trim操作(默认false)
        -->
        <javaModelGenerator targetPackage="com.leilei.entity" targetProject="src/main/java">
            <property name="trimStrings" value="true"/>
        </javaModelGenerator>
        <!--
        	sqlMapGenerator:生成映射文件存放位置(Mapper.xml文件)
        		targetPackage:生成SQL映射文件(XML文件)在哪个包中
        		targetProject:指定目标项目路径(根目录)
        -->
        <sqlMapGenerator targetPackage="com.leilei.mapper" targetProject="src/main/resources">
        </sqlMapGenerator>

        <!--
        	javaClientGenerator:Java客户端生成器(生成Dao/Mapper的接口)
        						该 标签可选(最多配置一个),如果不配置,就不会生成Mapper接口
        		type:选择客户端代码生成器
        			MyBatis3
        				ANNOTATEDMAPPER:基于注解的Mapper接口,不会有对应的XML映射文件
        				MIXEDMAPPER:XML和注解混合形式
        				XMLMAPPER:所有方法都在XML中(接口调用依赖XML)
        			MyBatis3Simple
        				ANNOTATEDMAPPER:基于注解的Mapper接口,不会有对应的XML映射文件
        				XMLMAPPER:所有方法都在XML中(接口调用依赖XML)
        		targetPackage:生成Mapper接口存放的包名
        		targetProject:指定目标项目路径
        -->
        <javaClientGenerator type="XMLMAPPER" targetPackage="com.leilei.mapper" targetProject="src/main/java">
            <property name="enableSubPackages" value="true"/>
        </javaClientGenerator>
        <!--
        	table:生成对应表及类名
	        	tableName:对应表名(注:%代表所有)
	        	domainObjectName:对应的类名
        		generatedKey:主键自增的id字段(针对当前 数据库配置MySQL)
        -->
        <table tableName="real_eseate" domainObjectName="RealEseate">
            <generatedKey column="id" sqlStatement="MySql" />
        </table>
        <table tableName="user" domainObjectName="User">
            <generatedKey column="id" sqlStatement="MySql" />
        </table>
    </context>
</generatorConfiguration>
设置好生成位置以及mysql 数据库连接后 在此位置一键生成
PNG:
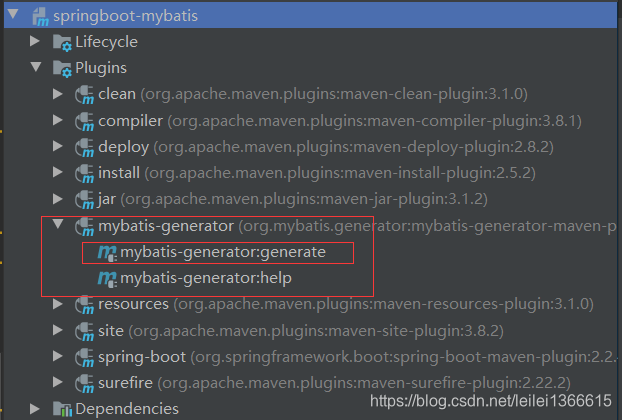
生成的接口
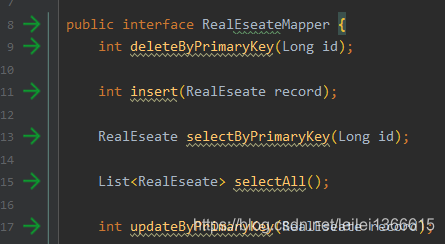
这里安利一个Mybatis好用的idea插件 Free Mybatis plugin 接口与Mybatis的 xml文件绑定在一起 ,点击接口中的箭头,即可跳转到对应xml文件
(二)SpringBoot中 Mybatis的使用
本文mysql 连接驱动所用的是5版本
所需依赖
        <!-- SpringBoot集成mybatis框架 -->
        <dependency>
            <groupId>org.mybatis.spring.boot</groupId>
            <artifactId>mybatis-spring-boot-starter</artifactId>
            <version>${mybatis.spring.boot.starter.version}</version>
        </dependency>

        <!-- pagehelper Mybatis分页插件 -->
        <dependency>
            <groupId>com.github.pagehelper</groupId>
            <artifactId>pagehelper-spring-boot-starter</artifactId>
            <version>${pagehelper.spring.boot.starter.version}</version>
        </dependency>
因为本文说了要继承Druid进行数据监控,所以还需要Druid依赖
        <!--阿里数据库连接池 -->
        <dependency>
            <groupId>com.alibaba</groupId>
            <artifactId>druid-spring-boot-starter</artifactId>
            <version>${druid.version}</version>
        </dependency>
注意版本对应问题
本文对版本进行了集中管理
    <properties>
        <project.build.sourceEncoding>UTF-8</project.build.sourceEncoding>
        <project.reporting.outputEncoding>UTF-8</project.reporting.outputEncoding>
        <java.version>1.8</java.version>
        <mybatis.spring.boot.starter.version>2.1.1</mybatis.spring.boot.starter.version>
        <pagehelper.spring.boot.starter.version>1.2.10</pagehelper.spring.boot.starter.version>
        <druid.version>1.1.14</druid.version>
        <mysql.driver.version>5.1.46</mysql.driver.version>
    </properties>
Springboot配置文件如下
# 数据源配置
spring:
  datasource:
    type: com.alibaba.druid.pool.DruidDataSource
    driver-class-name: com.mysql.jdbc.Driver
    url: jdbc:mysql://localhost:3306/mybatis-one?useUnicode=true&characterEncoding=utf8&zeroDateTimeBehavior=convertToNull&useSSL=true&serverTimezone=GMT%2B8
    username: root
    password: root
    druid:
      # 初始连接数
      initialSize: 5
      # 最小连接池数量
      minIdle: 10
      # 最大连接池数量
      maxActive: 20
      # 配置获取连接等待超时的时间
      maxWait: 60000
      # 配置间隔多久才进行一次检测,检测需要关闭的空闲连接,单位是毫秒
      timeBetweenEvictionRunsMillis: 60000
      # 配置一个连接在池中最小生存的时间,单位是毫秒
      minEvictableIdleTimeMillis: 300000
      # 配置一个连接在池中最大生存的时间,单位是毫秒
      maxEvictableIdleTimeMillis: 900000
      # 配置检测连接是否有效
      validationQuery: SELECT 1 FROM DUAL
      testWhileIdle: true
      testOnBorrow: false
      testOnReturn: false
      webStatFilter:
        enabled: true
      statViewServlet:
        enabled: true
        # 设置白名单,不填则允许所有访问
        allow:
        url-pattern: /druid/*
        # 控制台管理用户名和密码
        login-username:
        login-password:
      filter:
        stat:
          enabled: true
          # 慢SQL记录
          log-slow-sql: true
          slow-sql-millis: 1000
          merge-sql: true
        wall:
          config:
            multi-statement-allow: true

# MyBatis配置
mybatis:
  # 搜索指定包别名
  typeAliasesPackage: com.leilei.entity
  # 配置mapper的扫描,找到所有的mapper.xml映射文件
  mapperLocations: classpath*:com/leilei/mapper/*Mapper.xml
  # 加载mybatis的全局配置文件
  configLocation: classpath:mybatisconfig/mybatis-config.xml

# PageHelper分页插件
pagehelper:
  helperDialect: mysql
  reasonable: true
  supportMethodsArguments: true
  params: count=countSql
Mybatis的全局配置文件
<?xml version="1.0" encoding="UTF-8" ?>
<!DOCTYPE configuration
PUBLIC "-//mybatis.org//DTD Config 3.0//EN"
"http://mybatis.org/dtd/mybatis-3-config.dtd">
<configuration>

	<settings>
		<setting name="cacheEnabled"             value="false" />  <!-- 全局映射器启用缓存 -->
		<setting name="useGeneratedKeys"         value="true" />  <!-- 允许 JDBC 支持自动生成主键 -->
		<setting name="defaultExecutorType"      value="REUSE" /> <!-- 配置默认的执行器 -->
		<setting name="logImpl"                  value="SLF4J" /> <!-- 指定 MyBatis 所用日志的具体实现 -->
        <setting name="mapUnderscoreToCamelCase" value="true"/>  <!--驼峰式命名 -->
	</settings>

</configuration>
单表CRUD接口以及xml中sql的写法我这里就不演示了,如下查看详细请在下方下载本文源码
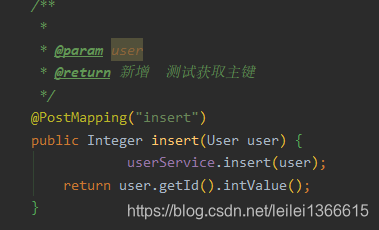
Mybatis 获取新增后的主键
在mybatis的xml 文件中 < insert>< /insert>标签表示新增语句 在上边添加 useGeneratedKeys=“true” 标示开启主键自增 搭配使用 keyColumn=“id” keyProperty=“id” 主键对应数据库中哪一列 主键对应实体的哪一个属性
    <insert id="insert" parameterType="com.leilei.entity.RealEseate" useGeneratedKeys="true" keyColumn="id" keyProperty="id">
        insert into real_eseate (id, project_name, address,
        house_type, area, build_time,
        user_id)
        values (#{id,jdbcType=BIGINT}, #{projectName,jdbcType=VARCHAR}, #{address,jdbcType=VARCHAR},
        #{houseType,jdbcType=VARCHAR}, #{area,jdbcType=INTEGER}, #{buildTime,jdbcType=TIMESTAMP},
        #{userId,jdbcType=BIGINT})
    </insert>
将对象Insert后 再获取对象的id属性 即可拿到新增后在数据库中的主键ID
Mybatis中< where>标签的使用
有这样的情况 一条查询语句中 可能有多个条件 比方where id=1 and name=‘张三’ or sex=false
在可能多条件查询的情况下 某次可能不使用id=1这个条件了 如果没有动态改变sql 那么原本的sql语句就变为了
where and nam=‘张三’ or sex=false 很明显 这是一条错误的sql语句
那么如何在多条件下 实现and or 条件的动态sql呢 ??
Mybatis中的where 标签可解决
Where 标签 可自动忽略where 语句后的第一个and 或者or 并且 where 标签中可以包含 < if> 标签 可根据传的查询参数是否有效选择 动态追加查询条件
        <where>
            <if test="projectName !=null and projectName !=''">
                AND re.project_name=#{projectName}
            </if>
            <if test="address !=null and address !=''">
                AND re.address=#{address}
            </if>
                OR re.area > 126
        </where>
那么上边where 标签 中 如果projectName ==null 那么sql 就会变为 where address=#{address} OR re.area > 126 ,当 projectName address 两个条件都不满足添加条件 sql 则会变为 where re.area > 126
Mybatis中的批量操作
< foreach> 有java 基础的看一眼便可以猜出 这个是一个循环标签 我的批量新增啊 删除啊 都会使用到这个标签
批量新增
接口 参数是一个User 泛型的List集合
Integer insertMore(List<User> list);
xml文件
foreach 则表示开始循环传入的参数(user类型的List) separator 表示遍历出的数据中间分隔 user1, user2,user3 item 则为遍历后每一个元素的名字 因为是新增操作 数据库中的字段需要值,因为我们传入的参数是一个User 泛型的List集合 那么 user.username 就拿到了其遍历这个对象的名字
    <!--批量新增-->
    <insert id="insertMore" useGeneratedKeys="true" keyProperty="id" keyColumn="id">
        insert into user(username, card_id) values
        <foreach collection="list" separator="," item="user">
            (#{user.username},#{user.cardId})
        </foreach>
    </insert>
测试:
    /**
     * 测试批量新增
     */
    @Test
    void contextLoads() {
        System.out.println(userService.insertMore(Arrays.asList(new User("张三", "111"), new User("李四", "222"))));
    }
批量删除
接口
参数为Long 泛型的list集合 (因为数据库主键我设为的Long类型 ,那么我删除根据每一对象的主键来删除)
Integer rmMore(List<Long> ids);
xml
    <!--批量删除数据-->
    <delete id="rmMore" parameterType="list">
    delete from user where id in
    <foreach collection="list" item="id" open="(" separator="," close=")">
        #{id}
    </foreach>
    </delete>
foreach 为循环标签 item 为循环后的每一个元素名 open 为循环后 ’开‘ 所用的符号 separator 为循环后 元素分隔符 close 为循环后 ’闭‘ 所用的符号 那么当传入一个Arrays.asList(11L,12L) 循环后的sql语句为 where id in (11L,12L)
测试
    /**
     * 测试批量删除
     */
    @Test
    public void test() {
        System.out.println(userService.rmMore(Arrays.asList(11L,12L)));
    }
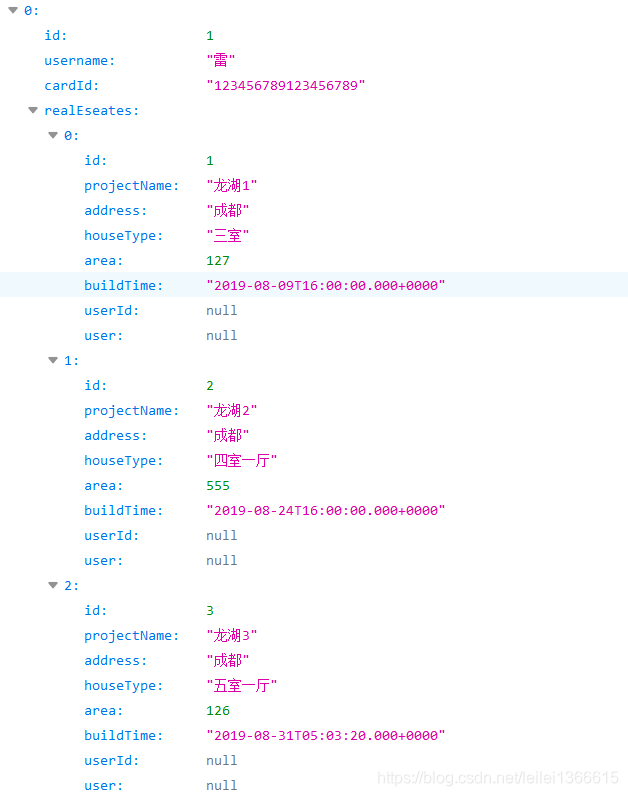
Mybatis 中的 一对多 多对一操作
在Mybatis 的 xml中resultMap 为映射结果图 里边写了哪些需要映射 那么返回时候也只会返回 resultMap 中的数据 ,如果不理解呢 请查看Mybatis 官网 补一补Mybatis 基础
一对多
例如我数据设计的 一个用户,对应多个房产
那么我们在查询用户的时候,怎么将其对应的房产信息也查询出来呢?
答:使用 resultMap 映射结果图
一对多操作
一方中添加一个字段
首先,我们需要在一方中添加一个字段 ,字段为多方的实体类泛型的List 集合 并提供Get set 方法
private List<RealEseate> realEseates;
因为是一对多嘛,单表肯定是完成不了,所以呢,我们需要进行链表查询 将连表查询的数据装进User 实体类中返回
修改sql语句 select 为查询标签 添加 resultMap 则会返其映射结果图
    <select id="selectAll" resultMap="BaseResultMap">
    select u.id, u.username, u.card_id,re.id rid,re.project_name rproname,re.house_type rhouse,re.address raddress,re.area rarea,re.build_time rtime
    from user u left join real_eseate re on u.id = re.user_id
  </select>
当然,映射结果图也需要修改 ,因为原本映射结果图根本只有用户啊 与 一对多 与房产没什么关系啊!!!
修改步骤:在原本的resultMap 中添加一个 collection 标签 此标签为一对多 多方的标签 ofType=“com.leilei.entity.RealEseate” 表明每一个多方单个实体的完全限定名 realEseates 则为一方中 多方实体类list 类型的字段名 即上方的 private List< RealEseate> realEseates;
    <resultMap id="BaseResultMap" type="com.leilei.entity.User">
        <id column="id" jdbcType="BIGINT" property="id"/>
        <result column="username" jdbcType="VARCHAR" property="username"/>
        <result column="card_id" jdbcType="VARCHAR" property="cardId"/>
        <!--一对多方式一-->
        <collection property="realEseates" ofType="com.leilei.entity.RealEseate">
            <id column="rid" jdbcType="BIGINT" property="id"/>
            <result column="rproname" jdbcType="VARCHAR" property="projectName"/>
            <result column="raddress" jdbcType="VARCHAR" property="address"/>
            <result column="rhouse" jdbcType="VARCHAR" property="houseType"/>
            <result column="rarea" jdbcType="INTEGER" property="area"/>
            <result column="rtime" jdbcType="TIMESTAMP" property="buildTime"/>
        </collection>
    </resultMap>
那么到这里呢 ,Mybatis一对多就配置完了
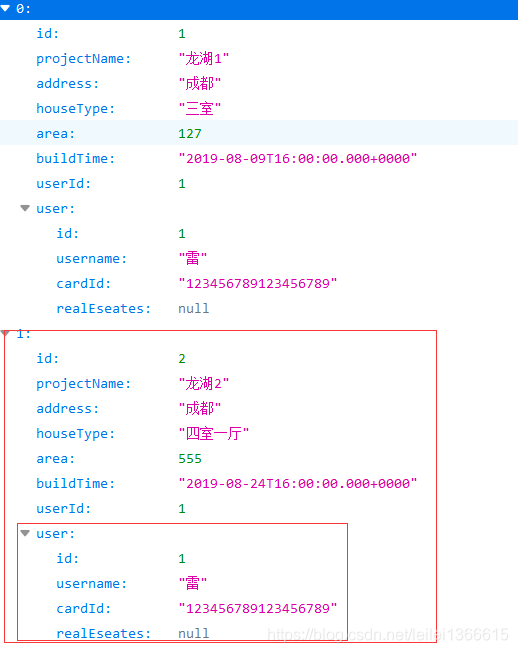
测试结果如下:User 一对多
多对一操作
与一对多的区别只是resultMap中写法的区别
具体操作
首先也是要在多方的实体类中 添加一方类型的字段 并提供Get set 方法
private User user;
修改查询sql语句为连表查询
    <select id="selectAllByQuery" resultMap="BaseResultMap">
        SELECT re.id,re.project_name,re.address,re.user_id,re.house_type,re.area,re.build_time,u.username
        uname,u.card_id ucard,u.id uid
        FROM real_eseate re
        LEFT JOIN user u ON re.user_id=u.id
    </select>
修改映射结果图
需要注意的是 多对一中 多方xml 结果集映射要展示一方需要使用 **association标签 ** javaType=“com.leilei.entity.User” 为一方完全限定名 property 为多方实体类中一方的字段名
结果集写法一
    <resultMap id="BaseResultMap" type="com.leilei.entity.RealEseate">
        <id column="id" jdbcType="BIGINT" property="id"/>
        <result column="project_name" jdbcType="VARCHAR" property="projectName"/>
        <result column="address" jdbcType="VARCHAR" property="address"/>
        <result column="house_type" jdbcType="VARCHAR" property="houseType"/>
        <result column="area" jdbcType="INTEGER" property="area"/>
        <result column="build_time" jdbcType="TIMESTAMP" property="buildTime"/>
        <result column="user_id" jdbcType="BIGINT" property="userId"/>
        <!--多对一方式一-->
        <association property="user" javaType="com.leilei.entity.User">
            <id column="user_id" property="id"/>
            <result column="uname" property="username"/>
            <result column="ucard" property="cardId"/>
        </association>
     </resultMap>
结果集写法二 忽略标签 association 面向对象 点点点 就完事了
    <resultMap id="BaseResultMap" type="com.leilei.entity.RealEseate">
        <id column="id" jdbcType="BIGINT" property="id"/>
        <result column="project_name" jdbcType="VARCHAR" property="projectName"/>
        <result column="address" jdbcType="VARCHAR" property="address"/>
        <result column="house_type" jdbcType="VARCHAR" property="houseType"/>
        <result column="area" jdbcType="INTEGER" property="area"/>
        <result column="build_time" jdbcType="TIMESTAMP" property="buildTime"/>
        <result column="user_id" jdbcType="BIGINT" property="userId"/>
        <!--多对一方式二-->
        <result column="uid" jdbcType="BIGINT" property="user.id"/>
        <result column="uname" jdbcType="VARCHAR" property="user.username"/>
        <result column="ucard" jdbcType="VARCHAR" property="user.cardId"/>
    </resultMap>
测试结果如下:RealEseate多对一
多对一, 一对多总结
1.实体类添加字段
2.单表查询改为连表 (sql修改)
3.resultMap 结果集映射修改
一方用 association property javaType 或者直接 result 用一方类型字段 点点点
多方用 collection property ofType
那么其余的 多对多 一样的 多方用 collection …
Mybatis中的分页 PageHelper的使用
PageHelper是一个开源的针对Mybatis的一款分页查看 他的使用也是十分简单 只要导入其依赖以及配置文件中配置对应的数据库类型即可使用
        <!-- pagehelper 分页插件 -->
        <dependency>
            <groupId>com.github.pagehelper</groupId>
            <artifactId>pagehelper-spring-boot-starter</artifactId>
            <version>${pagehelper.spring.boot.starter.version}</version>
        </dependency>
# PageHelper分页插件
pagehelper:
  helperDialect: mysql
  reasonable: true
  supportMethodsArguments: true
  params: count=countSql
用法:
在业务层中使用其jar中方法即可进行分页 传入 当前页数 以及每页展示长度即可 并且还可以根据数据库中的某个字段进行升降排序
    @Override
    public PageInfo<RealEseate> selectByPage(Integer page, Integer size) {
        //开启分页
        PageHelper.startPage(page, size);
        //pagehelper 排序功能
        PageHelper.orderBy("build_time desc");
        List<RealEseate> realEseates = realEseateMapper.selectAll();
        PageInfo<RealEseate> realEseatePageInfo = new PageInfo<>(realEseates);
        return realEseatePageInfo;
        //也可以直接返回 list 集合
    }
mapper中的接口以及 xml中查询方法不用改变 还是依照 查询所有的形式即可
List<RealEseate> selectAll();

    <select id="selectAll" resultMap="BaseResultMap">
   SELECT re.id,re.project_name,re.address,re.user_id,re.house_type,re.area,re.build_time,u.username uname,u.card_id ucard,u.id uid
        FROM real_eseate re LEFT JOIN user u ON re.user_id=u.id
  </select>
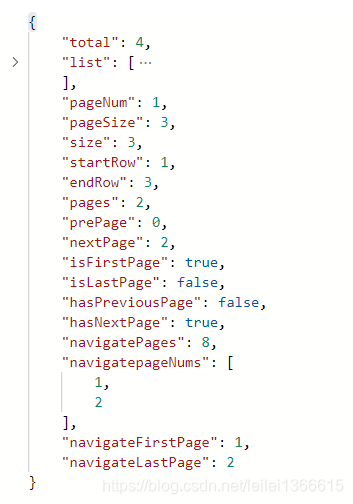
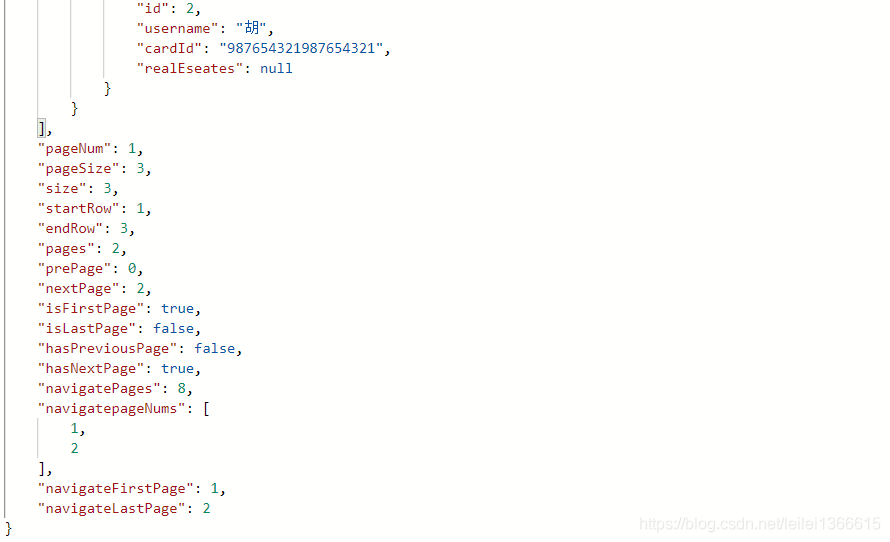
返回PageInfo 与返回 list 区别 如果要说拿到的内容,那么是一样的 无论返回什么都会根据PageHelper.startPage(page, size); 传入的当前页以及每页长度 返回此条件查询下的结果 ,不同的一点是 返回 list仅仅只是返回当前条件下的数据 不会有多余的什么 总条数啊 下一页为第几页 上一页为第几页的数据 , 返回PageInfo会将list 作为一个字段一并返回 ,那么前台取值呢,需要多用对象点一下
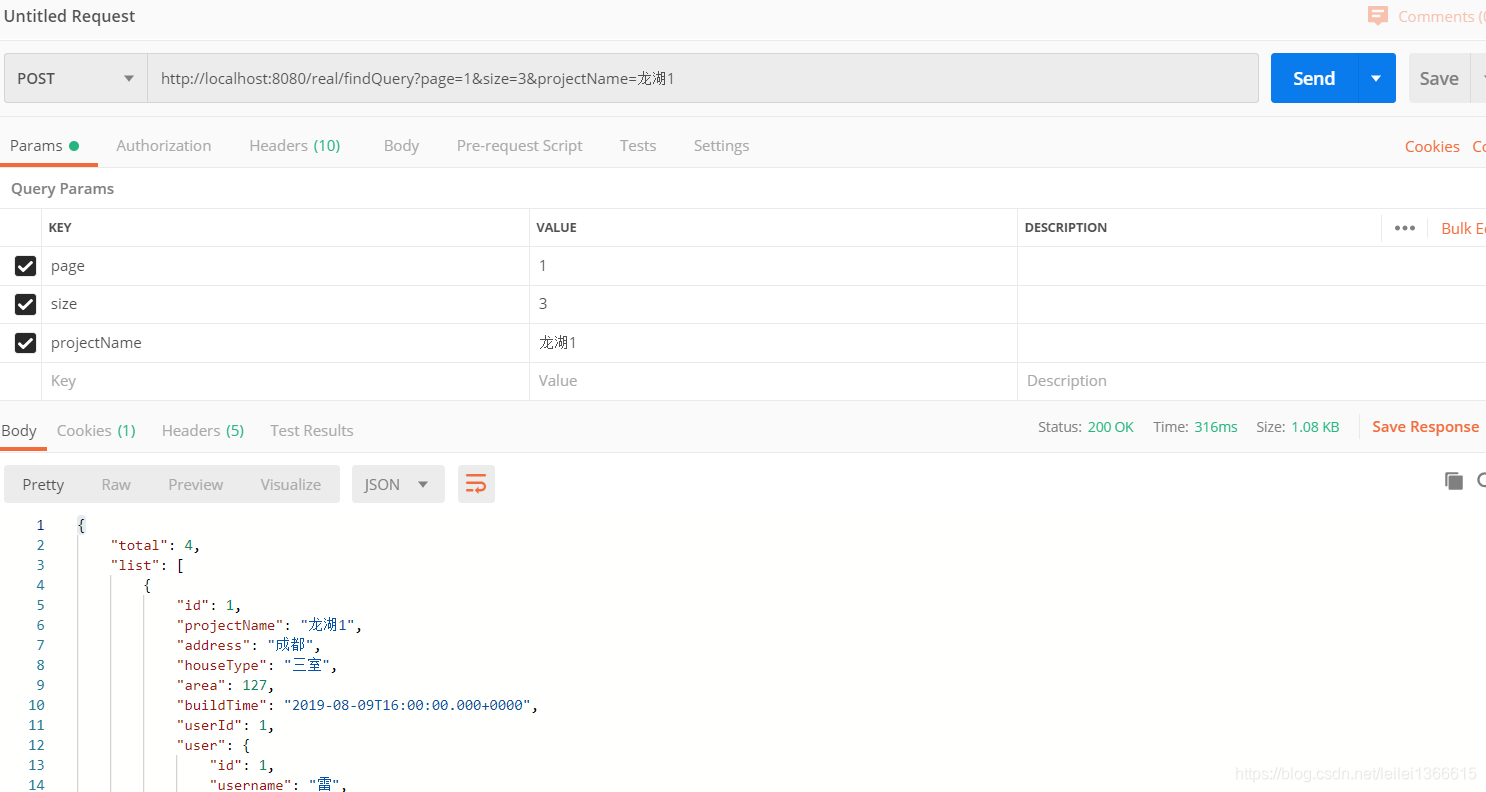
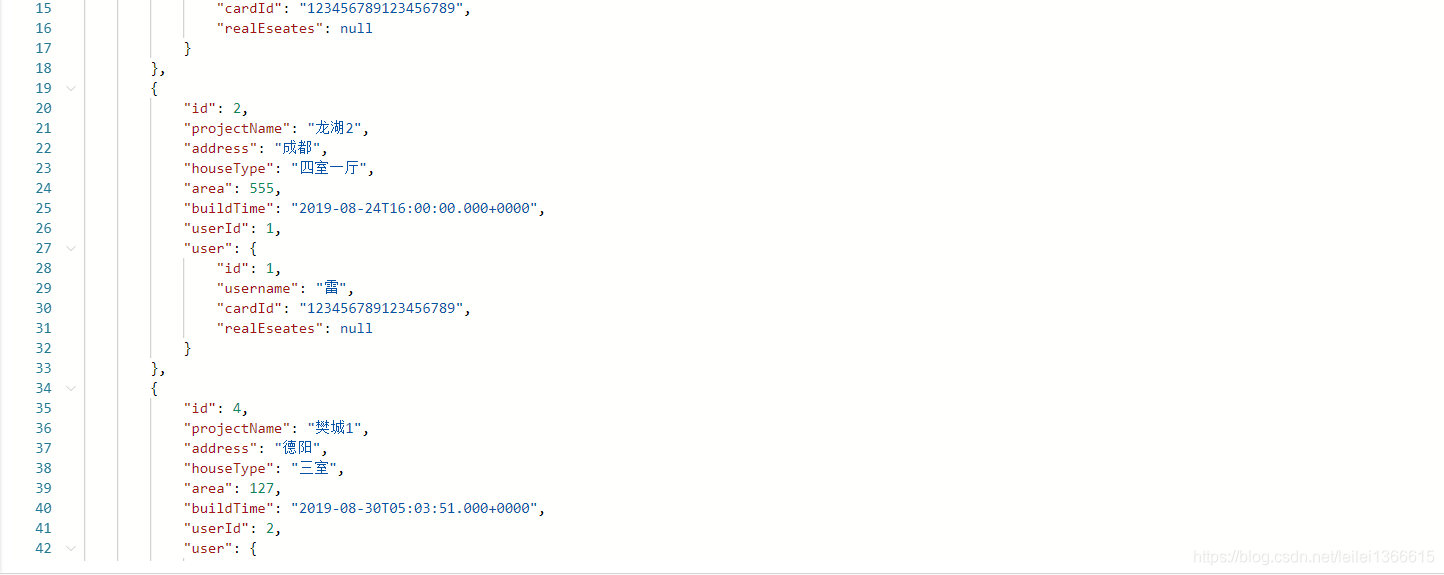
Mybatis 综合练习 ---- 动态条件 分页查询 多对一
接口
注意:多个查询参数时需要使用@Param 来绑定一个参数名 且参数名不可重复
List<RealEseate> selectAllByQuery(@Param("projectName") String projectName, @Param("address") String address);
xml
    <!--多条件分页查询-->
    <select id="selectAllByQuery" resultMap="BaseResultMap">
        SELECT re.id,re.project_name,re.address,re.user_id,re.house_type,re.area,re.build_time,u.username
        uname,u.card_id ucard,u.id uid
        FROM real_eseate re
        LEFT JOIN user u ON re.user_id=u.id
        <where>
            <if test="projectName !=null and projectName !=''">
                AND re.project_name=#{projectName}
            </if>
            <if test="address !=null and address !=''">
                AND re.address=#{address}
            </if>
                OR re.area > 126
        </where>
    </select>
控制层
    /** 灵活多条件分页查询
     * @param page 当前页
     * @param size 每页最多展示多少条数据
     * @param projectName 项目名
     * @param address 地址
     * @return
     */
    @PostMapping("findQuery")
    public PageInfo<RealEseate> findQuery(Integer page, Integer size, String projectName, String address) {
        return realEseateService.selectByQuery(page, size, projectName, address);
    }
服务层实现
 /**
     *  多条件分页查询
     * @param page
     * @param size
     * @param projectName
     * @param address
     * @return
     */
    @Override
    public PageInfo<RealEseate> selectByQuery(Integer page, Integer size, String projectName, String address) {
        PageHelper.startPage(page, size);
       List<RealEseate> realEseates= realEseateMapper.selectAllByQuery(projectName, address);
        return new PageInfo<RealEseate>(realEseates);
    }
展示效果
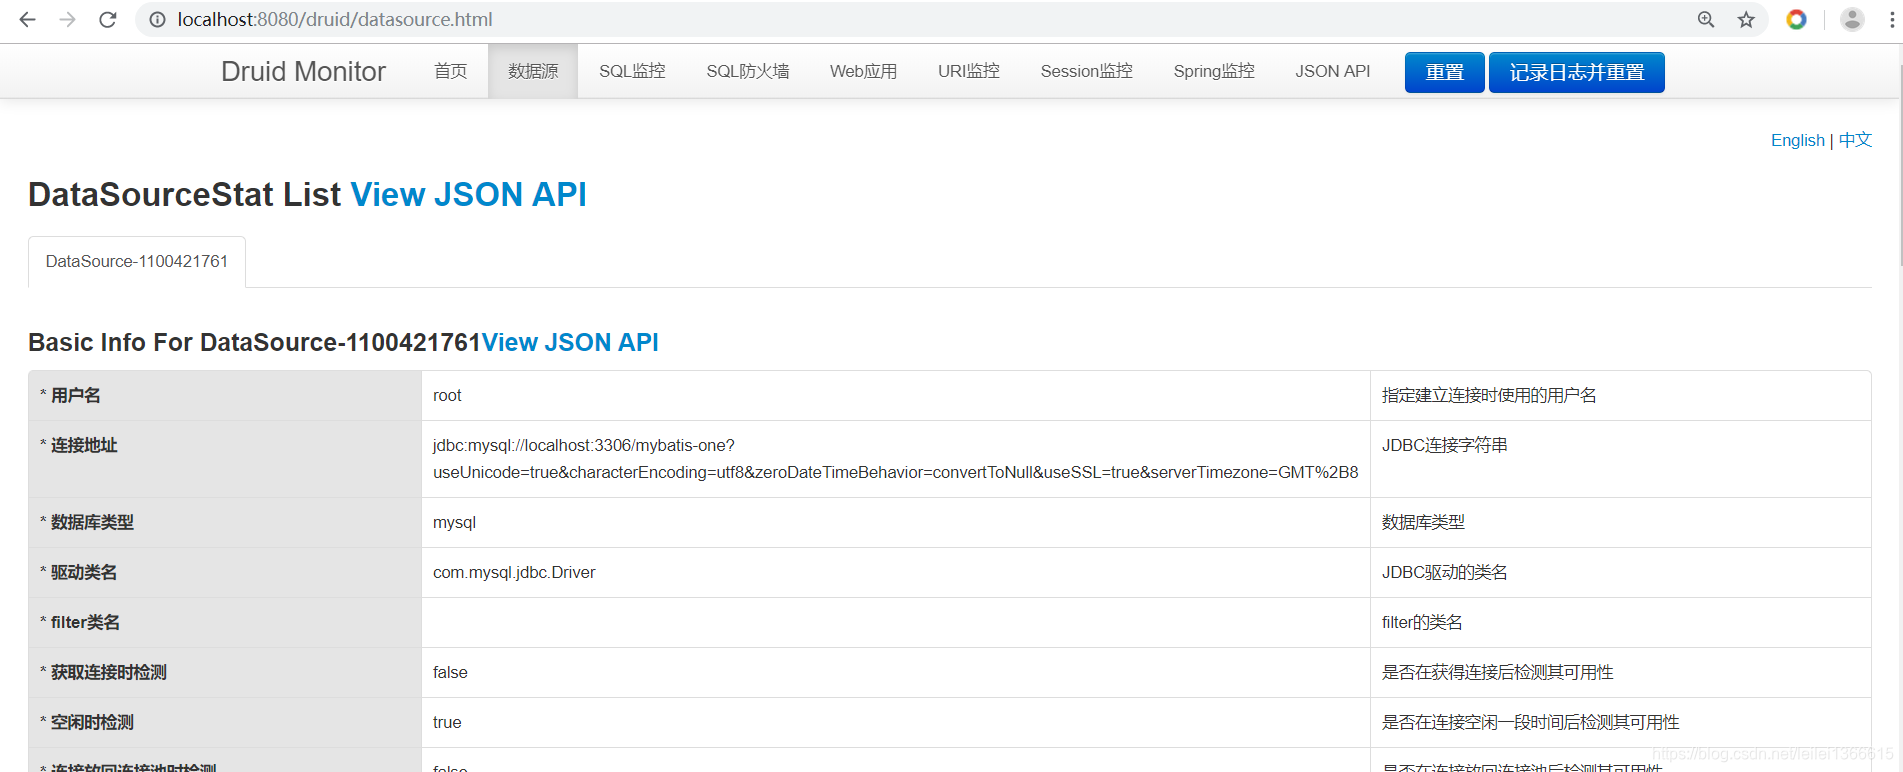
(三)Druid数据源监控
由于所需依赖以及配置文章上文已经写了,所以这里就不再重复了
贴出 Druid监控的配置文件
package com.leilei.duird;

import com.alibaba.druid.pool.DruidDataSource;
import com.alibaba.druid.support.http.StatViewServlet;
import com.alibaba.druid.support.http.WebStatFilter;
import org.springframework.boot.context.properties.ConfigurationProperties;
import org.springframework.boot.web.servlet.FilterRegistrationBean;
import org.springframework.boot.web.servlet.ServletRegistrationBean;
import org.springframework.context.annotation.Bean;
import org.springframework.context.annotation.Configuration;

import javax.sql.DataSource;
import java.util.Arrays;
import java.util.HashMap;
import java.util.Map;

/**
 * @author : leilei
 * @date : 23:14 2020/2/24
 * @desc : Druid 监控数据
 */
@Configuration
class DruidConfig {

    @ConfigurationProperties(prefix = "spring.datasource")
    @Bean
    public DataSource druid(){
        return  new DruidDataSource();
    }


    /**
     * 配置Druid的监控
     * 配置一个管理后台的Servlet
     * @return
     */
    @Bean
    public ServletRegistrationBean statViewServlet(){
        ServletRegistrationBean bean = new ServletRegistrationBean(new StatViewServlet(), "/druid/*");
        Map<String,String> initParams = new HashMap<>(4);
        //配置druid页面监控的账户密码
        initParams.put("loginUsername","leilei");
        initParams.put("loginPassword","123456");
        //默认就是允许所有访问
        initParams.put("allow","");
        //黑名单  注意 黑名单优先于 allow白名单加载 两个名单中不可重复
        initParams.put("deny","192.168.10.21");

        bean.setInitParameters(initParams);
        return bean;
    }


    //2、配置一个web监控的filter
    @Bean
    public FilterRegistrationBean webStatFilter(){
        FilterRegistrationBean bean = new FilterRegistrationBean();
        bean.setFilter(new WebStatFilter());

        Map<String,String> initParams = new HashMap<>();
        initParams.put("exclusions","*.js,*.css,/druid/*");

        bean.setInitParameters(initParams);

        bean.setUrlPatterns(Arrays.asList("/*"));

        return  bean;
    }
}
访问方式:http://localhost:8080/druid/login.html
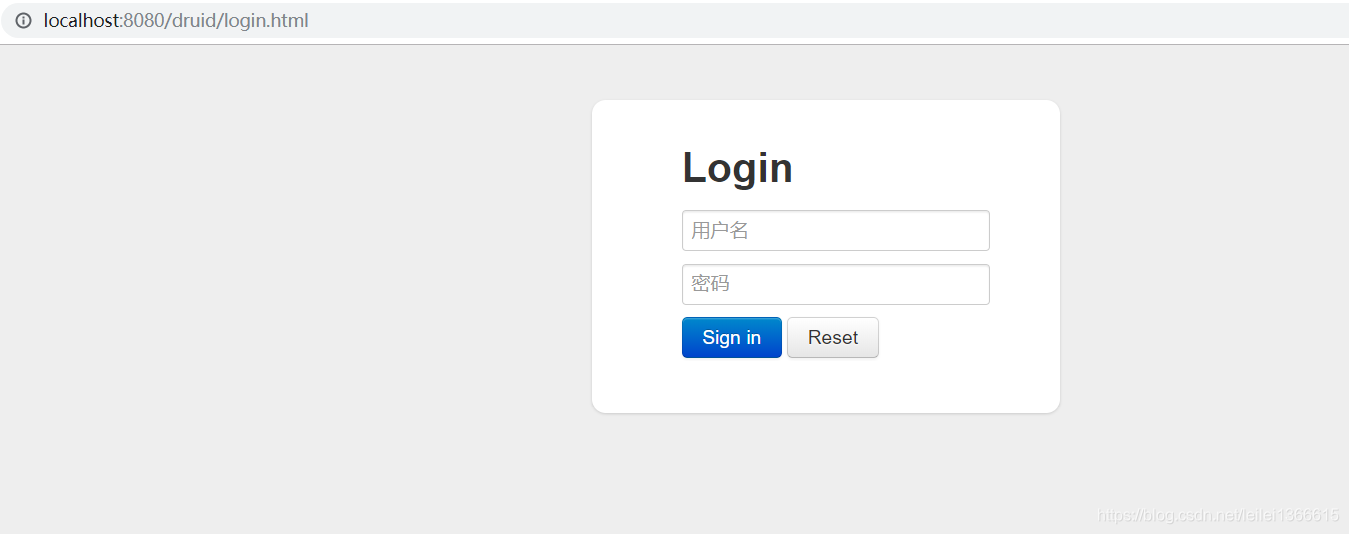
使用项目中配置的druid 账户密码进行登录后效果如下:
那么到这里 本文就结束了 项目源码:springboot-mybatis-onedatasource-druid


 1599
1599

 被折叠的 条评论
为什么被折叠?
被折叠的 条评论
为什么被折叠?
 到【灌水乐园】发言


