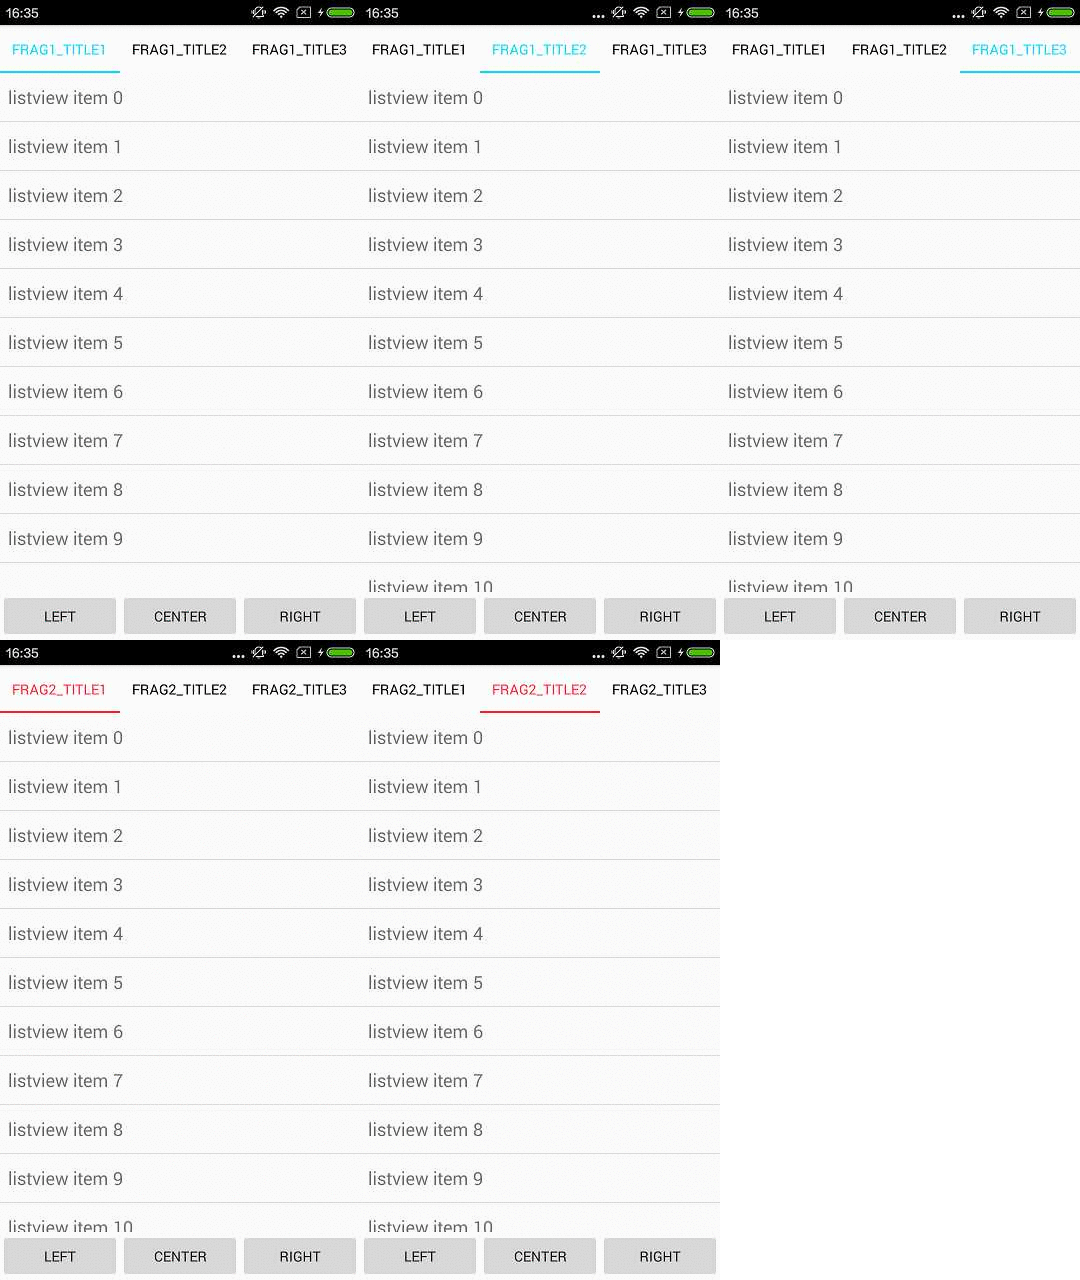
首先扯点别的:总是感觉自己学啥啥不会,吃啥啥没够。整日活在回忆和幻想之中,也是艰难啊。但是比我艰难的人多了,我算老几。(宋小宝这句话说得挺好)所以虽然艰难,还是要努力奋斗,别人或许比你更艰难,你比别人更能坚持那么你就是赢家。
今天讲得是Fragment里面使用ViewPager,ViewPager里面又有Fragment。来实现多界面切换的效果,ViewPager里面的Fragment的切换使用TabLayout来实现。先上效果图
接下来是实现的步骤
为了使用TabLayout,在你module的build.文件中加上这么一行(下面代码中的最后一行),算了,整个文件都贴出来吧
apply plugin: 'com.android.application'

android {
    compileSdkVersion 23
    buildToolsVersion "23.0.3"

    defaultConfig {
        applicationId "com.dmw.tablayoutviewpagerdemo"
        minSdkVersion 16
        targetSdkVersion 23
        versionCode 1
        versionName "1.0"
    }
    buildTypes {
        release {
            minifyEnabled false
            proguardFiles getDefaultProguardFile('proguard-android.txt'), 'proguard-rules.pro'
        }
    }
}

dependencies {
    compile fileTree(include: ['*.jar'], dir: 'libs')
    testCompile 'junit:junit:4.12'
    compile 'com.android.support:appcompat-v7:23.2.1'
    compile 'com.android.support:design:23.2.0'
}
接下来是 activity_main.xml
<?xml version="1.0" encoding="utf-8"?>
<LinearLayout xmlns:android="http://schemas.android.com/apk/res/android"
    android:layout_width="match_parent"
    android:layout_height="match_parent"
    android:orientation="vertical">
    <FrameLayout
        android:id="@+id/frameLayout"
        android:layout_width="match_parent"
        android:layout_height="0dp"
        android:layout_weight="1" />
    <LinearLayout
        android:layout_width="match_parent"
        android:layout_height="wrap_content"
        android:orientation="horizontal">
        <Button
            android:id="@+id/btnLeft"
            android:layout_width="0dp"
            android:layout_weight="1"
            android:layout_height="wrap_content"
            android:text="Left"
            />
        <Button
            android:id="@+id/btnCenter"
            android:layout_width="0dp"
            android:layout_weight="1"
            android:layout_height="wrap_content"
            android:text="center"

            />
        <Button
            android:id="@+id/btnRight"
            android:layout_width="0dp"
            android:layout_weight="1"
            android:layout_height="wrap_content"
            android:text="right"

            />
    </LinearLayout>
</LinearLayout>
布局中有一个FrameLayout控件,用来呈现不同的Fragment,三个Button,点击的时候会更换Fragment,这里并没有对button点击的时候进行颜色处理,效果不是很好。
再看 MainActivity.java
package com.dmw.tablayoutviewpagerdemo;

import android.os.Bundle;
import android.support.design.widget.TabLayout;
import android.support.v4.app.Fragment;
import android.support.v4.app.FragmentPagerAdapter;
import android.support.v4.app.FragmentTransaction;
import android.support.v4.view.ViewPager;
import android.support.v7.app.AppCompatActivity;
import android.view.View;
import android.widget.Button;

import java.util.ArrayList;
import java.util.List;

public class MainActivity extends AppCompatActivity implements View.OnClickListener {

    Button btnLeft,btnCenter,btnRight;
    Fragment fragment1,fragment2,fragment3;//进行切换的Fragment
    @Override
    protected void onCreate(Bundle savedInstanceState) {
        super.onCreate(savedInstanceState);
        setContentView(R.layout.activity_main);

//给button添加监听事件
        btnLeft= (Button) findViewById(R.id.btnLeft);
        btnLeft.setOnClickListener(this);

        btnCenter= (Button) findViewById(R.id.btnCenter);
        btnCenter.setOnClickListener(this);

        btnRight= (Button) findViewById(R.id.btnRight);
        btnRight.setOnClickListener(this);
//让btnLeft被点击
        btnLeft.performClick();
    }

//提供一个方法用来切换Fragment。
    private void addFragmentToStack(Fragment fragment) {
        FragmentTransaction ft = getSupportFragmentManager().beginTransaction();
        //        ft.setCustomAnimations(android.R.anim.slide_in_left, android.R.anim.slide_in_left);
        ft.replace(R.id.frameLayout, fragment);
        ft.commit();
    }

    @Override
    public void onClick(View v) {
        switch (v.getId()){
            case R.id.btnLeft:
                if (fragment1==null){
                    fragment1=new Fragment1();
                }
                addFragmentToStack(fragment1);
                break;
            case R.id.btnCenter:
                if (fragment2==null){
                    fragment2=new Fragment2();
                }
                addFragmentToStack(fragment2);
                break;
            case R.id.btnRight:
                if (fragment3==null){
                    fragment3=new Fragment3();
                }
                addFragmentToStack(fragment3);
                break;
        }
    }
}
* 然后是 Fragment1.java和对应的xml文件*
package com.dmw.tablayoutviewpagerdemo;

import android.graphics.Color;
import android.os.Bundle;
import android.support.annotation.Nullable;
import android.support.design.widget.TabLayout;
import android.support.v4.app.Fragment;
import android.support.v4.view.ViewPager;
import android.view.LayoutInflater;
import android.view.View;
import android.view.ViewGroup;

import java.util.ArrayList;
import java.util.List;

/**
 * Created by Administrator on 2016/4/11.
 */
public class Fragment1 extends Fragment{


    protected ViewPager viewPager;
    protected TabLayout tabLayout;
    protected View view;
    protected List<Fragment> fragmentList;
    protected List<String> titleList;

    @Override
    public void onCreate(@Nullable Bundle savedInstanceState) {
        super.onCreate(savedInstanceState);
        fragmentList = new ArrayList<>();
        titleList = new ArrayList<>();
        fragmentList.add(new Fragment4());
        fragmentList.add(new Fragment5());
        fragmentList.add(new Fragment6());
        titleList.add("frag1_title1");
        titleList.add("frag1_title2");
        titleList.add("frag1_title3");
    }

    @Nullable
    @Override
    public View onCreateView(LayoutInflater inflater, ViewGroup container, Bundle savedInstanceState) {
        view = inflater.inflate(R.layout.fragment1, container, false);
        tabLayout= (TabLayout) view.findViewById(R.id.tabLayout);
        tabLayout.setBackgroundColor(Color.parseColor("#ff3344"));
        //设置tabLayout的属性
        tabLayout.setTabGravity(TabLayout.GRAVITY_FILL);
        tabLayout.setTabMode(TabLayout.MODE_FIXED);
        tabLayout.setBackgroundColor(Color.parseColor("#ffffff"));
        tabLayout.setTabTextColors(Color.parseColor("#000000"), Color.parseColor("#0ddcff"));//设置tab上文字的颜色,第一个参数表示没有选中状态下的文字颜色,第二个参数表示选中后的文字颜色
        tabLayout.setSelectedTabIndicatorColor(Color.parseColor("#0ddcff"));//设置tab选中的底部的指示条的颜色

        viewPager = (ViewPager) view.findViewById(R.id.fg1viewPager);
//给Fragment1里面的ViewPager添加自定义的适配器。
        viewPager.setAdapter(new FragmentAdapter(getChildFragmentManager(),fragmentList,titleList));
        //然后让TabLayout和ViewPager关联,只需要一句话,简直也是没谁了.
         tabLayout.setupWithViewPager(viewPager);
        return view;
    }
}
自定义适配器 FragmentAdapter
package com.dmw.tablayoutviewpagerdemo;

import android.support.v4.app.Fragment;
import android.support.v4.app.FragmentManager;
import android.support.v4.app.FragmentPagerAdapter;

import java.util.List;

/**
 * Created by Administrator on 2016/4/7.
 */
public class FragmentAdapter extends FragmentPagerAdapter {

    private List<Fragment> list;
    private List<String> titleList;//用来存储每个Fragment的title
    public FragmentAdapter(FragmentManager fm, List<Fragment> list, List<String> titleList) {
        super(fm);
        this.list = list;
        this.titleList = titleList;
    }
    @Override
    public Fragment getItem(int position) {
        return list.get(position);
    }

    @Override
    public int getCount() {
        return list.size();
    }

//返回标题
    @Override
    public CharSequence getPageTitle(int position) {
       return titleList.get(position);
    }
}
fragment1.xml,fragment2,fragment3的都一样就是id不同,下面就补贴代码了。
<?xml version="1.0" encoding="utf-8"?>
<LinearLayout xmlns:android="http://schemas.android.com/apk/res/android"
    android:layout_width="match_parent"
    android:layout_height="match_parent"
    android:orientation="vertical">

    <android.support.design.widget.TabLayout
        android:id="@+id/tabLayout"
        android:layout_width="match_parent"
        android:layout_height="wrap_content" />

    <android.support.v4.view.ViewPager
        android:id="@+id/fg1viewPager"
        android:layout_width="match_parent"
        android:layout_height="0dp"
        android:layout_weight="1" />


</LinearLayout>
Fragment2.java和Fragment3.java文件就不贴了,和Fragment1.java几乎一样,我在末尾会把整个demo的下载链接贴上,有兴趣的可以下载下来看看。而且我创建Fragment的方法很随意,并不是android官方推荐的创建方式。
Fragment4,Fragment5,Fragment6.java 代码也是类似,就是一个ListView,只不过listView的item的项数不一样而已。
Fragment4.java
package com.dmw.tablayoutviewpagerdemo;

import android.os.Bundle;
import android.support.annotation.Nullable;
import android.support.v4.app.Fragment;
import android.view.LayoutInflater;
import android.view.View;
import android.view.ViewGroup;
import android.widget.AdapterView;
import android.widget.ArrayAdapter;
import android.widget.ListView;
import android.widget.Toast;

import java.util.ArrayList;
import java.util.List;

/**
 * Created by Administrator on 2016/4/7.
 */
public class Fragment4 extends Fragment {
    private View view;
    private ListView listView;
    private List<String> list;

    @Override
    public void onCreate(@Nullable Bundle savedInstanceState) {
        super.onCreate(savedInstanceState);
        list=new ArrayList<>();
        for(int i=0;i<10;i++){

            list.add("listview item "+i);
        }
    }

    @Nullable
    @Override
    public View onCreateView(LayoutInflater inflater, ViewGroup container, Bundle savedInstanceState) {
        view=inflater.inflate(R.layout.fragment_list,container,false);
        listView= (ListView) view.findViewById(R.id.listView);
        //给ListView设置适配器
        listView.setAdapter(new ArrayAdapter<String>(getActivity(),android.R.layout.simple_list_item_1,list));
//给listview设置item的点击事件
        listView.setOnItemClickListener(new AdapterView.OnItemClickListener() {
            @Override
            public void onItemClick(AdapterView<?> parent, View view, int position, long id) {
                Toast.makeText(getActivity(),list.get(position),Toast.LENGTH_SHORT).show();
            }
        });
        return view;
    }
}
上面的代码真的没什么好说的了,下面是Fragment4.java中用到的布局文件fragment_list.xml
<?xml version="1.0" encoding="utf-8"?>
<LinearLayout xmlns:android="http://schemas.android.com/apk/res/android"
    android:layout_width="match_parent"
    android:layout_height="match_parent"
    android:orientation="vertical">

    <ListView
        android:id="@+id/listView"
        android:layout_width="match_parent"
        android:layout_height="match_parent"></ListView>

</LinearLayout>
最后附上整个demo的下载地址
http://download.csdn.net/detail/leilifengxingmw/9487635
眼一睁一闭,一天又过去了,上床看会小说睡觉。工资还么发,房东就开始要钱了,也是艰难。今天下午去体育场跑步。回来买饭的路上发现兜里没带钱。跟我一起的哥们只带了十块钱。然后他去吃牛肉板面了,我就去买凉菜的地方佘了6块钱的凉菜,两个馒头。现在发现自己啥都没有了,难道以后真的得靠脸吃饭?


 888
888

 被折叠的 条评论
为什么被折叠?


