


一.hibernate简介
Hibernate是一个开放源代码的对象关系映射框架,它对JDBC进行了非常轻量级的对象封装,使得Java程序员可以随心所欲的使用对象编程思维来操纵数据库。 Hibernate可以应用在任何使用JDBC的场合,既可以在Java的客户端程序使用,也可以在Servlet/JSP的Web应用中使用,最具革命意义的是,Hibernate可以在应用EJB的J2EE架构中取代CMP,完成数据持久化的重任。
二.hibernate环境搭建
1.导入hibernate核心jar包
需要导入hibernate3.jar和lib/required文件下所有的jar包再加上一个hibernate-jpa-2.0-api-1.0.1.Final.jar即可。如图

2.添加hibernate核心配置文件hibernate.cfg.xml
<!DOCTYPE hibernate-configuration PUBLIC
    "-//Hibernate/Hibernate Configuration DTD 3.0//EN"
    "http://www.hibernate.org/dtd/hibernate-configuration-3.0.dtd">
<hibernate-configuration>
    <session-factory >
        <property name="hibernate.connection.driver_class">com.mysql.jdbc.Driver</property>
        <property name="hibernate.connection.url">jdbc:mysql://localhost:3306/hibernate</property>
        <property name="hibernate.connection.username">root</property>
        <property name="hibernate.connection.password">123456</property>
       <property name="hibernate.dialect">org.hibernate.dialect.MySQLDialect</property>
        <property name="hibernate.show_sql">true</property>
        <property name="hibernate.hbm2ddl.auto">update</property>
        <mapping resource="com/zhouxiang/model/User.hbm.xml"/>
    </session-factory>
</hibernate-configuration>
其中<hibernate-configuration>为配置文件的根,session-factory标签下
<property name="hibernate.connection.driver_class">com.mysql.jdbc.Driver</property>
<property name="hibernate.connection.url">jdbc:mysql://localhost:3306/hibernate</property>
<property name="hibernate.connection.username">root</property>
<property name="hibernate.connection.password">123456</property>是数据源的配置分别为驱动、url、用户名、密码
<property name="hibernate.dialect">org.hibernate.dialect.MySQLDialect</property>是配置数据库方言即对哪种数据库操作
<property name="hibernate.show_sql">true</property>是配置是否打印数据库操作语句
<property name="hibernate.hbm2ddl.auto">update</property>指定对数据库的默认操作
<mapping resource="com/zhouxiang/model/User.hbm.xml"/>指定要加载的表与实体间映射关系文件
3.添加表与实体间映射关系文件 xxx.hbm.xml
<?xml version="1.0"?>
<!DOCTYPE hibernate-mapping PUBLIC
        "-//Hibernate/Hibernate Mapping DTD 3.0//EN"
        "http://www.hibernate.org/dtd/hibernate-mapping-3.0.dtd">
<hibernate-mapping package="com.zhouxiang.model">
    <class name="User" polymorphism="explicit">
        <id name="id">
            <generator class="uuid" ></generator>
        </id>
        <property name="name" column="username"></property>
        <property name="password" column="password"></property>
    </class>
</hibernate-mapping>
三.使用hibernate的7个步骤
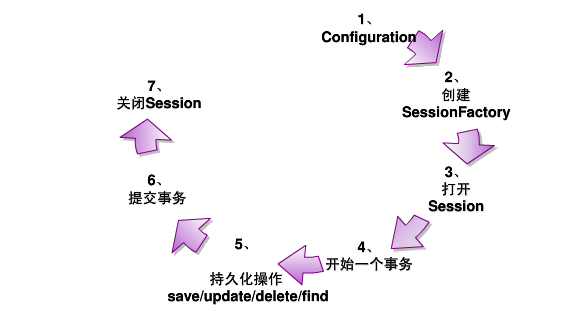
1.第一步:
创建Configuration读取配置信息
Configuration cfg = new Configuration().configure();
2.第二步:
创建sessionFactory
SessionFactory factory= cfg.buildSessionFactory();
3.第三步:打开session
Session session=factory.openSession();
4.第四步:开启事务Transaction
session.getTransaction().begin();
5.第五步:进行持久化操作,即增删查改等操作
User user=new User();
user.setName("aaa");
user.setPassword("123456");
session.save(user);
6.第六步:提交事务
session.getTransaction().commit();
7.关闭资源,也就是关闭session
session.close();
第一步通过创建Configuration对象读取hibernate.cfg.xml配置文件信息,为创建对应的session做准备。第二步根据读取的配置文件信息创建sessionfactory对象。在hibernate.cfg.xml文件中有sessionfactory的配置信息,在sessinofactory中配置了数据源及对数据库操作的一些信息,而sessionfactory根据这些信息去创建相应的session对象。session对象是hibernate操作数据库的一个句柄对象,用来将数据持久化或其他的操作,与HttpSession没有本质联系。总的来说hibernate.cfg.xml配置文件信息主要是在为创建数据持久化过程中使用的对象session对象做描述(配置),只不过在hibernate中又封装了configuration、sessionfactory,configuration用来读取配置文件,sessionfactory作为session工厂对象根据configuration提供的指定配置去创建相应的session,进而通过session对象去完成数据的持久化。
四.实例代码
hibernate.cfg.xml
<!DOCTYPE hibernate-configuration PUBLIC
	"-//Hibernate/Hibernate Configuration DTD 3.0//EN"
	"http://www.hibernate.org/dtd/hibernate-configuration-3.0.dtd">

<hibernate-configuration>
	<session-factory >
		<property name="hibernate.connection.driver_class">com.mysql.jdbc.Driver</property>
		<property name="hibernate.connection.url">jdbc:mysql://localhost:3306/hibernate</property>
		<property name="hibernate.connection.username">root</property>
		<property name="hibernate.connection.password">123456</property>
		<property name="hibernate.show_sql">true</property>
		<property name="hibernate.dialect">org.hibernate.dialect.MySQLDialect</property>
		<property name="hibernate.hbm2ddl.auto">update</property>
		<mapping resource="com/zhouxiang/model/User.hbm.xml"/>
	</session-factory>
</hibernate-configuration>
User.hbm.xml
<?xml version="1.0"?>
<!DOCTYPE hibernate-mapping PUBLIC
        "-//Hibernate/Hibernate Mapping DTD 3.0//EN"
        "http://www.hibernate.org/dtd/hibernate-mapping-3.0.dtd">
<hibernate-mapping package="com.zhouxiang.model">
    <class name="User" polymorphism="explicit">
        <id name="id">
            <generator class="uuid" ></generator>
        </id>
        <property name="name" column="username"></property>
        <property name="password" column="password"></property>
    </class>
</hibernate-mapping>
User类:
/**
 *
 */
package com.zhouxiang.model;

/**
 * @ClassName: User
 * @Description: TODO
 * @author zx
 * @date 2014年5月15日 上午10:40:43
 *
 */
public class User {
    private String id;
    private String name;
    private String password;
    public User()
    {}
	public String getId() {
		return id;
	}
	public void setId(String id) {
		this.id = id;
	}
	public String getName() {
		return name;
	}
	public void setName(String name) {
		this.name = name;
	}
	public String getPassword() {
		return password;
	}
	public void setPassword(String password) {
		this.password = password;
	}


}
测试类:
/**
 *
 */
package com.zhouxiang.test;

import org.hibernate.HibernateException;
import org.hibernate.Session;
import org.hibernate.SessionFactory;
import org.hibernate.cfg.Configuration;

import com.zhouxiang.model.User;

/**
 * @ClassName: Test1
 * @Description: TODO
 * @author zx
 * @date 2014年5月16日 上午10:09:55
 *
 */
public class Test1 {
	public static void main(String args[])
	{
		SessionFactory factory=null;
		Session session=null;
		try {
			Configuration cfg = new Configuration().configure();
                        factory=cfg.buildSessionFactory();
                        session=factory.openSession();
                        session.getTransaction().begin();
                        User user=new User();
                        user.setName("bbb");
                        user.setPassword("123456");
                        session.save(user);
                        session.getTransaction().commit();
		 } catch (HibernateException e) {
			// TODO Auto-generated catch block
			e.printStackTrace();
			session.getTransaction().rollback();
		}
		finally
		{
			if(session!=null)
			{
             if(session.isOpen())
             {
            	 session.close();
             }
			}
		}
	}
}
五.总结
其实简而言之hibernate只做了一件事,那就是将对象及对象关系持久化到关系型数据库中,而这种映射关系是直接使用面向对象编程思维来操作数据库,这样使得程序员在编程的过程中只需要关注如何处理对象与对象间的关系,而不需要去考虑对象是如何持久化到数据库中。hibernate使得编程人员在软件开发过程中将更多的精力集中在对象的处理上,简化了数据持久化的过程,加快了开发速度,增强了开发效率,降低了风险。


 6857
6857


 被折叠的 条评论
为什么被折叠?
被折叠的 条评论
为什么被折叠?
 到【灌水乐园】发言


