


AOP
概念
- 什么是 AOP?
AOP,面向切面编程,可以对业务逻辑的各个部分进行隔离,从而使得业务逻辑各部分之间的耦合度降低,提高程序的可重用性,同时提高了开发效率,即在不修改源代码的情况下,实现在主干功能中添加新的功能。
底层原理
AOP 的底层使用动态代理实现,分两种情况:
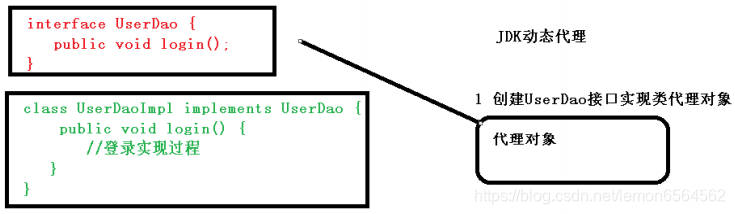
(1)有接口时,使用 JDK 动态代理,创建接口实现类的代理对象。
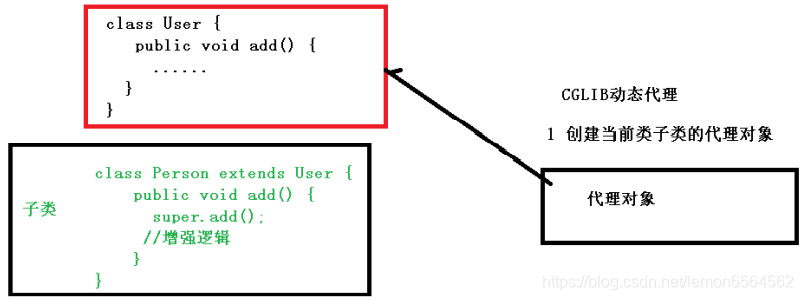
(2)没有接口时,使用 CGLIB 动态代理,创建当前类的子类的代理对象。
演示 JDK 动态代理
BaseInterface.java
package com.mcc.spring5.aop;

public interface BaseInterface {
	public void showInfo();
}
BaseDemo.java
package com.mcc.spring5.aop;

public class BaseDemo implements BaseInterface{
	//基本功能
	@Override
	public void showInfo() {
		System.out.println("BaseDemo 中提供的基本功能");
	}
}
实现动态代理 BaseDemoProxy.java、myProxyHandler.java
package com.mcc.spring5.aop;

import java.lang.reflect.InvocationHandler;
import java.lang.reflect.Method;
import java.lang.reflect.Proxy;

//BaseDemo的代理类,用来拓展BaseDemo实现的BaseInterface的功能
public class BaseDemoProxy {
	public static void main(String[] args) {
		Class<?>[] interfaces = {BaseInterface.class};
		//通过代理类 Proxy.newProxyInstance() 方法生成代理对象 bInter
		BaseInterface bInter =(BaseInterface) Proxy.newProxyInstance(BaseDemoProxy.class.getClassLoader(), interfaces, new myProxyHandler(new BaseDemo()));
		bInter.showInfo();
	}
}

//增强的功能类
class myProxyHandler implements InvocationHandler{
	private Object obj;
	//通过有参构造器传入要代理的类的对象
	myProxyHandler(Object obj){
		this.obj = obj;
	}
	/**
	 * proxy - 代理对象,相当于 BInter 对象
	 * method - 当前正在执行的方法
	 * args - 传入的参数
	 */
	@Override
	public Object invoke(Object proxy, Method method, Object[] args) throws Throwable {
		//获取当前正在执行的方法名
		String methodName = method.getName();
		//在 showInfo() 方法之前增加功能
		System.out.println(methodName + " 方法执行之前增加的功能");
		//执行当前方法,传入method方法所在类的对象,即被代理对象obj,以及参数
		method.invoke(obj, args);
		//在 showInfo() 方法之后增加功能
		System.out.println(methodName + " 方法执行之后增加的功能");
		return null;
	}
}
相关术语
- 连接点
类里面可以被增强的方法 - 切入点
类里面实际被增强的方法 - 通知(增强)
实际增强的逻辑部分
通知的分类:
(1)前置通知
(2)后置通知
(3)环绕通知
(4)异常通知
(5)最终通知 - 切面
是一个动作,指将通知加入到切入点的过程
AOP 操作的准备工作
- Spring 框架一般基于 AspectJ 实现 AOP 操作
AspectJ 不是 Spring 的组成部分,而是独立的 AOP 框架,常把 AspectJ 和 Spirng 框架一起使用,进行 AOP 操作 - 基于 AspectJ 实现 AOP 操作
(1)基于 xml 配置文件实现
(2)基于注解方式实现(常用) - 在项目工程里面引入 AOP 相关依赖

其中,前3个包是 AspectJ 依赖的包,后2个包是 Spring 依赖的包,aop 包在使用注解进行 IOC 操作时已经引入。
切入点表达式
- 切入点表达式作用:指定对某个类里面的某个方法进行增强
- 语法结构:
execution(权限修饰符 返回值类型 类的全路径 方法名称(参数列表)),
其中,返回值类型可以省略,可以用 * 代表任意,参数列表可以使用..表示所有参数 - 举例:
(1)对 com.mcc.spring5.aop.AOPDemo 类里面的 show() 方法进行增强
execution(* com.mcc.spring5.aop.AOPDemo.show(..))
(2)对 com.mcc.spring5.aop.AOPDemo 类里面的所有的方法进行增强
execution(* com.mcc.spring5.aop.AOPDemo.*(..))
(3)对 com.mcc.spring5.aop 包里面所有类,类里面的所有方法进行增强
execution(* com.mcc.spring5.aop.*.*(..))
AspectJ 注解
步骤:
- 创建(被增强)类 User,在类里面定义方法
- 创建增强类 UserProxy,编写增强逻辑的方法
- 在配置文件中进行配置:
(1)引入名称空间:context、aop
(2)开启组件扫描<context:component-scan base-package=""></context:component-scan>
(3)开启 AOP 生成代理对象,即扫描 @Aspect 注解<aop:aspectj-autoproxy></aop:aspectj-autoproxy> - 使用注解
@Component生成被增强类和增强类对象 - 在增强类上使用
@Aspect注解,表示该类为代理类 - 在代理类中的增强方法上使用注解表示通知的类型
| 注解(以下注解都需使用 value=“切入点表达式” 指定对哪个类中的哪个方法进行增强) | 类型 |
|---|---|
@Before(value="切入点表达式") | 前置通知 |
@AfterReturning | 后置通知 |
@Around | 环绕通知 |
@AfterThrowing | 异常通知 |
@After | 最终通知 |
- 在测试类中生成被增强类的对象,测试方法
注意: 在环绕通知 @Around 中,如果要调用原始方法,可以传入参数 ProceedingJoinPoint pjp,pjp 代表原始方法,pjp.proceed()、pjp.proceed(Object[] args) 分别代表执行无参或有参的原始方法。
代码:
Spring 配置文件 aopAspectJ.xml
<?xml version="1.0" encoding="UTF-8"?>
<beans xmlns="http://www.springframework.org/schema/beans"
	xmlns:xsi="http://www.w3.org/2001/XMLSchema-instance"
	xmlns:context="http://www.springframework.org/schema/context"
	xmlns:aop="http://www.springframework.org/schema/aop"
	xsi:schemaLocation="http://www.springframework.org/schema/beans http://www.springframework.org/schema/beans/spring-beans.xsd
						http://www.springframework.org/schema/context http://www.springframework.org/schema/context/spring-context.xsd
						http://www.springframework.org/schema/aop http://www.springframework.org/schema/aop/spring-aop.xsd">

	<!-- 开启组件扫描,创建被增强类(User)和增强类(UserProxy)对象 -->
	<context:component-scan base-package="com.mcc.spring5.aop.aspectj"></context:component-scan>

	<!-- 开启 AOP 生成代理对象,即扫描 @Aspect 注解 -->
	<aop:aspectj-autoproxy></aop:aspectj-autoproxy>
</beans>
被增强类 User.java
package com.mcc.spring5.aop.aspectj;

import org.springframework.stereotype.Component;

//User 类是原有类,当做被增强类
@Component//创建User对象
public class User {
	public void showInfo() {
		System.out.println("User 中的 showInfo 方法");
	}
}
增强类 UserProxy.java
package com.mcc.spring5.aop.aspectj;

import org.aspectj.lang.ProceedingJoinPoint;
import org.aspectj.lang.annotation.After;
import org.aspectj.lang.annotation.AfterReturning;
import org.aspectj.lang.annotation.AfterThrowing;
import org.aspectj.lang.annotation.Around;
import org.aspectj.lang.annotation.Aspect;
import org.aspectj.lang.annotation.Before;
import org.springframework.stereotype.Component;

//UserProxy 类是增强类,用来增强其他类代码逻辑
@Component//创建UserProxy对象
@Aspect//配置该类为代理类
public class UserProxy {
	//编写增强逻辑
	//前置通知
	@Before(value="execution(* com.mcc.spring5.aop.aspectj.User.showInfo(..))")//配置切入点表达式,指定对哪个类中的哪个方法进行增强
	public void beforeMethod() {
		System.out.println("Before 前置通知");
	}

	//后置通知
	@AfterReturning(value="execution(* com.mcc.spring5.aop.aspectj.User.showInfo(..))")
	public void afterReturnningMethod() {
		System.out.println("AfterReturning 后置通知");
	}

	//环绕通知
	@Around(value="execution(* com.mcc.spring5.aop.aspectj.User.showInfo(..))")
	public void aroundMethod(ProceedingJoinPoint proceedingJoinPoint) throws Throwable {//参数代表当前正在执行的方法
		System.out.println("Around 环绕通知——showInfo 方法之前");
		proceedingJoinPoint.proceed();//执行当前方法
		System.out.println("Around 环绕通知——showInfo 方法之后");
	}

	//异常通知
	@AfterThrowing(value="execution(* com.mcc.spring5.aop.aspectj.User.showInfo(..))")
	public void exceptionMethod() {
		System.out.println("AfterThrowing 异常通知");
	}

	//最终通知
	@After(value="execution(* com.mcc.spring5.aop.aspectj.User.showInfo(..))")
	public void finalMethod() {
		System.out.println("After 最终通知");
	}
}
测试类 TestAspectJ.java
package com.mcc.test;

import org.junit.Test;
import org.springframework.context.support.ClassPathXmlApplicationContext;

import com.mcc.spring5.aop.aspectj.User;

public class TestAspectJ {
	@Test
	public void testApsectJ() {
		ClassPathXmlApplicationContext context = new ClassPathXmlApplicationContext("aopAspectJ.xml");
		User user = context.getBean("user", User.class);
		user.showInfo();
		/*
		Around 环绕通知——showInfo 方法之前
		Before 前置通知
		User 中的 showInfo 方法
		Around 环绕通知——showInfo 方法之后
		After 最终通知
		AfterReturning 后置通知
		*/
		context.close();
	}
}
相同切入点的抽取
步骤:
- 定义一个方法 method()
- 在该方法上使用注解
@Pointcut(value="切入点表达式")抽取相同的切入点 - 在增强方法的通知注解中(以前置通知为例),传入参数
@Before(value="method()")
@Component//创建UserProxy对象
@Aspect//配置该类为代理类
public class UserProxy {

	//当多个增强逻辑的切入点相同时,可以将切入点抽取
	@Pointcut(value="execution(* com.mcc.spring5.aop.aspectj.User.showInfo(..))")//相同切入点的抽取
 	public void pointCut() {

	}

	//编写增强逻辑
	//前置通知
	@Before(value="pointCut()")//调用抽取的函数就相当于执行切入点表达式
	public void beforeMethod() {
		System.out.println("Before 前置通知");
	}

	//后置通知
	@AfterReturning(value="pointCut()")
	public void afterReturnningMethod() {
		System.out.println("AfterReturning 后置通知");
	}
}
设置代理类的优先级
当有多个代理类同时代理了某个相同类时,如 UserProxy 类和UserProxy2 类都代理了 User 类,此时可以通过在代理类上使用@Order(int i)注解,设置代理类的优先级,优先级高的类中的通知会先执行。
例:设置 UserProxy 类的优先级为 2,UserProxy2 类的优先级为 1
UserProxy.java
@Component//创建UserProxy对象
@Aspect//配置该类为代理类
@Order(2)//配置当前代理的优先级为2
public class UserProxy {
	...
}
UserProxy2.java
@Component
@Aspect
@Order(1)//配置当前代理的优先级为1
public class UserProxy2 {
	...
}
完全注解开发模式
使用代理类代替 xml 配置文件
实现方式:
(1)使用@Configuration声明配置类
(2)使用@ComponentScan(basePackages={""})开启组件扫描
(3)使用@EnableAspectJAutoProxy(proxyTargetClass=true)开启 AOP 生成代理对象,即扫描 @Aspect 注解
配置类 AoopConfig.java
package com.mcc.spring5.aop.aspectj;

import org.springframework.context.annotation.ComponentScan;
import org.springframework.context.annotation.Configuration;
import org.springframework.context.annotation.EnableAspectJAutoProxy;

//AOP 配置类,代替 xml 配置文件
@Configuration//声明配置类
@ComponentScan(basePackages={"com.mcc.spring5.aop.aspectj"})//开启组件扫描
@EnableAspectJAutoProxy(proxyTargetClass=true)//开启 AOP 生成代理对象
public class AopConfig {

}
测试
@Test
public void testAopConfig() {
	AnnotationConfigApplicationContext context = new AnnotationConfigApplicationContext(AopConfig.class);
	User user = context.getBean("user", User.class);
	user.showInfo();
	context.close();
}
使用 xml 配置文件实现 AspectJ 注解
步骤:
(1)使用<bean id="" class=""></bean>标签创建被增强类和增强类对象
(2)使用<aop:config></aop:config>标签配置 AOP
(3)在 AOP 配置标签内,使用<aop:pointcut expression="" id=""/>标签配置切入点
- expression 属性:切入点表达式
- id 属性:为该切入点取一个名称
(4)在 AOP 配置标签内,使用<aop:aspect ref=""><aop:before method="" pointcut-ref=""/></aop:aspect>标签配置切面
<aop:before/>标签可根据需要添加的通知类型,自行选择- ref 属性:代理类对象
- method 属性:要添加的新逻辑的方法名
- pointcut-ref 属性:切入点的 id
配置文件 aopAspectJXML.xml
<?xml version="1.0" encoding="UTF-8"?>
<beans xmlns="http://www.springframework.org/schema/beans"
	xmlns:xsi="http://www.w3.org/2001/XMLSchema-instance"
	xmlns:aop="http://www.springframework.org/schema/aop"
	xsi:schemaLocation="http://www.springframework.org/schema/beans http://www.springframework.org/schema/beans/spring-beans.xsd
						http://www.springframework.org/schema/aop http://www.springframework.org/schema/aop/spring-aop.xsd">

	<!-- 创建被增强类对象和增强类对象 -->
	<bean id="book" class="com.mcc.spring5.aop.aspectjXML.Book"></bean>
	<bean id="bookProxy" class="com.mcc.spring5.aop.aspectjXML.BookProxy"></bean>

	<!-- 配置 AOP 增强类、增强方法 -->
	<aop:config>
		<!-- 配置切入点 -->
		<aop:pointcut expression="execution(* com.mcc.spring5.aop.aspectjXML.Book.showInfo(..))" id="showInfo"/>
		<!-- 配置切面 -->
		<aop:aspect ref="bookProxy"><!-- ref:表示代理类对象 -->
			<!-- 前置通知,method:代理类中的方法名,pointcut-ref:切入点id -->
			<aop:before method="beforeMethod" pointcut-ref="showInfo"/>
		</aop:aspect>
	</aop:config>

</beans>
被增强类 Book.java
package com.mcc.spring5.aop.aspectjXML;

public class Book {
	public void showInfo() {
		System.out.println("Book 的 showInfo 方法");
	}
}
增强类 BookProxy.java
package com.mcc.spring5.aop.aspectjXML;

public class BookProxy {
	//增强的前置通知
	public void beforeMethod() {
		System.out.println("Before 方法");
	}
}
测试类 TestAspectJXML.java
package com.mcc.test;

import org.junit.Test;
import org.springframework.context.support.ClassPathXmlApplicationContext;

import com.mcc.spring5.aop.aspectjXML.Book;

public class TestAspectJXML {
	@Test
	public void testAopConfig() {
		ClassPathXmlApplicationContext context = new ClassPathXmlApplicationContext("aopAspectJXML.xml");
		Book book = context.getBean("book", Book.class);
		book.showInfo();
		/*
		Before 方法
		Book 的 showInfo 方法
		*/
		context.close();
	}
}


 169
169


 被折叠的 条评论
为什么被折叠?
被折叠的 条评论
为什么被折叠?
 到【灌水乐园】发言


