


Spring
1. Spring入门
- Spring Framework
- Spring Boot
- Spring Cloud (微服务,大项目拆分成若干子项目)
- Spring Cloud Data Flow(数据集成)
- 官网: https://spring.io
2. Spring Framework
- Spring Core
- IoC、AOP (管理对象的思想,spring管理的对象叫做Bean.)
- Spring Data Access
- Transactions(事务)、Spring MyBatis
- Web Servlet
- Spring MVC
- Integration(集成)
- Email、Scheduling(定时任务)、AMQP(消息队列)、Security(安全控制)
Spring IoC
- Inversion of Control
- 控制反转,是一种面向对象编程的设计思想。
- Dependency Injection
- 依赖注入,是IoC思想的实现方式。
- IoC Container
- IoC容器,是实现依赖注入的关键,本质上是一个工厂。
- 容器管理Bean的前提:提供Bean的类型,通过配置文件配置Bean之间的关系.
- 降低Bean之间的耦合度
3. 代码部分
主动获取
@SpringBootApplication
public class CommunityApplication {
        public static void main(String[] args) {
                SpringApplication.run(CommunityApplication.class, args);
        }
}
配置类,启动时自动扫描,扫描配置类所在的包以及子包下的Bean.
@Component @Repository @Service @Controller
测试代码要以其为配置类,需加上注解:
@ContextConfiguration(classes = CommunityApplication.class)
想要使用spring容器需要实现接口,ApplicationContextAware,实现接口中set方法.传入参数applicationContext(spring容器),他是一个接口,继承自BeanFactory.
获取Bean:applicationContext.getBean(test.class);
public class CommunityApplicationTests implements ApplicationContextAware {

        private ApplicationContext applicationContext;

        @Override
        public void setApplicationContext(ApplicationContext applicationContext) throws BeansException {
                this.applicationContext = applicationContext;
        }
}
给Bean自定义名字:@Component(“名字”)
初始化方法@PostConstruct,在构造器之后调用.销毁对象之前调用,@PreDestroy.
@Scope()指定单例多例
@Configuration配置类,用以装载使用第三方类.
自动注入:
- @Autowired
   @Autowired
  private AlphaService alphaService;

  @Autowired
  private SimpleDateFormat simpleDateFormat;

  @Autowired // 表示把Alphadao属性注入到alphaDao中 通常在属性前注入
  @Qualifier("alphaHibernate")
  private AlphaDao alphaDao;

  @Test
  public void testDI(){
     System.out.println(alphaDao);
     System.out.println(alphaService);
     System.out.println(simpleDateFormat);
  }
}
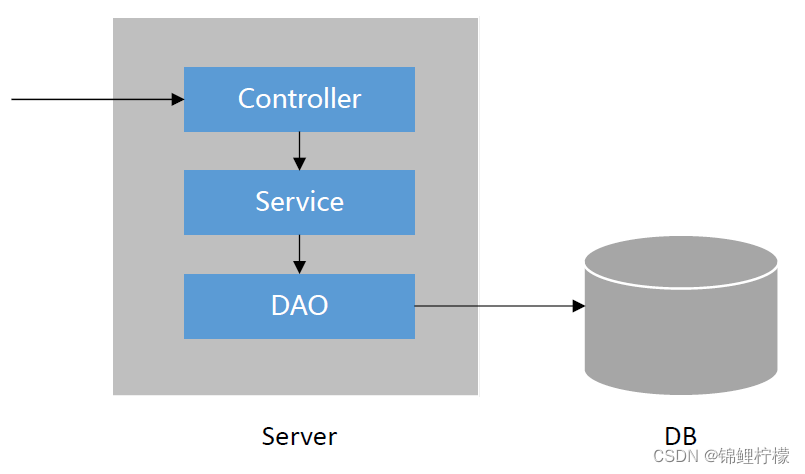
在service层调用dao,在controller层调用service
- service层
// 在service层调用dao(数据库)
@Autowired
private AlphaDao alphaDao;

public String find(){
    return alphaDao.select();
}
- controller层
@Autowired
private AlphaService alphaService;

@RequestMapping("/data")
@ResponseBody
public String getData(){
   return alphaService.find();
}
SpringMVC
1. HTTP
- HyperText Transfer Protocol 超文本传输协议
- 用于传输HTML等内容的应用层协议
- 规定了浏览器和服务器之间如何通信,以及通信时的数据格式。
- 学习网站:https://developer.mozilla.org/zh-CN
浏览器服务器通信步骤:
- 打开一个TCP连接
- 发生一个HTTP报文
- 读取服务器返回的报文信息
- 关闭连接或为后续请求重用连接
- 按下F12进入调试,在Network下看请求响应(Header和Response)
2. Spring MVC简介
- 三层架构
- 表现层(mvc)、业务层、数据访问层
- MVC(设计模式)
- Model:模型层
- View:视图层
- Controller:控制层
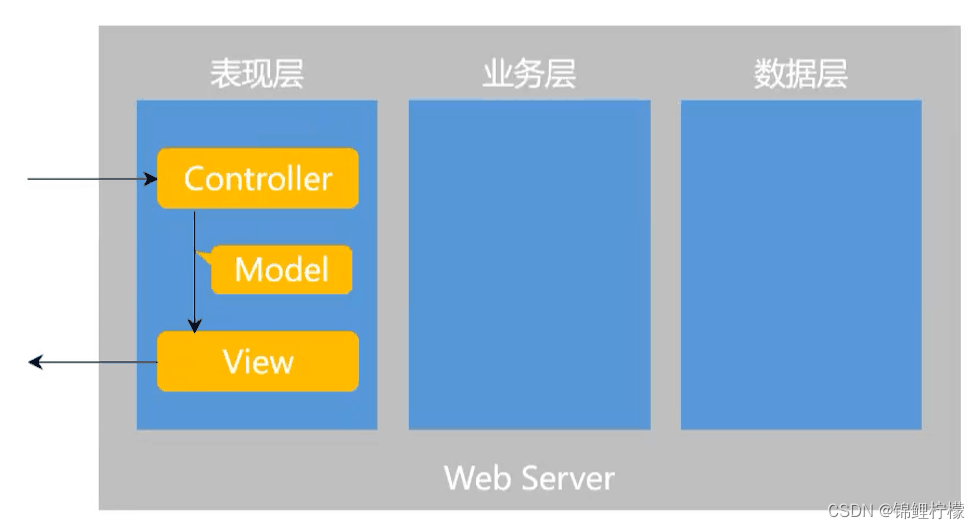
- 核心组件
- 前端控制器:DispatcherServlet
浏览器访问服务器,首先访问的时Controller控制层,Controller调用业务层处理,处理完后将得到的数据封装到Model,传给视图层。
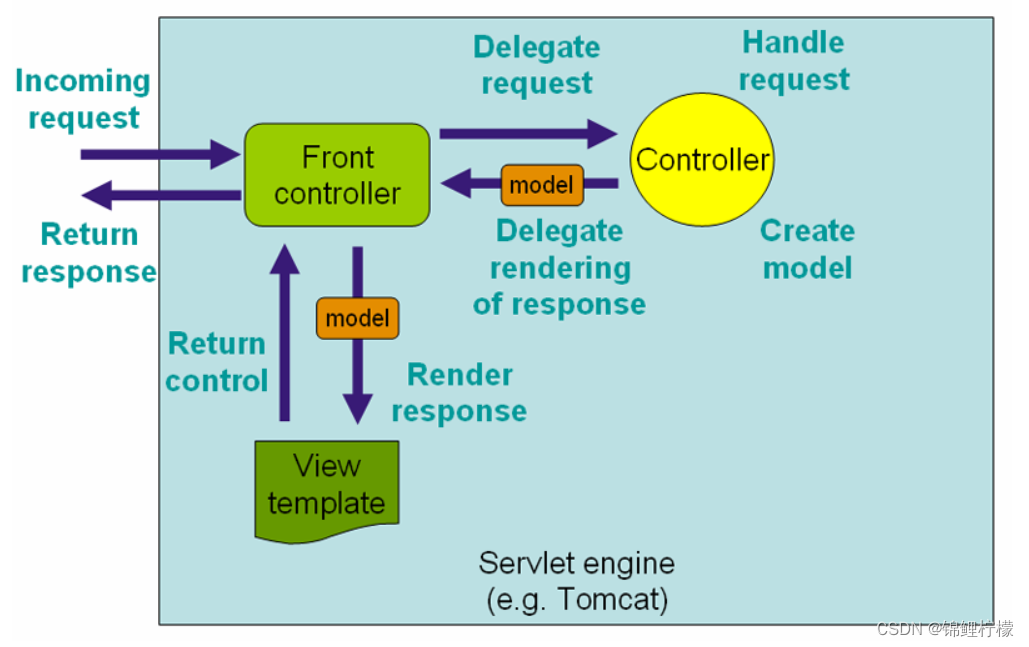
- 前端控制器:DispatcherServlet
3. Thymeleaf
- 模板引擎
- 生成动态的HTML。
- Thymeleaf
- 倡导自然模板,即以HTML文件为模板。
- 常用语法
- 标准表达式、判断与循环、模板的布局。
官网:https://www.thymeleaf.org/
- 标准表达式、判断与循环、模板的布局。
4. 代码部分
视图层的两部分代码一部分在controller里,一部分在resources.templates里
底层方法:模拟request请求和reponse请求
@RequestMapping("/http")
public void http(HttpServletRequest request, HttpServletResponse response) {
    // 通过request获取请求数据
    //请求方式
    System.out.println(request.getMethod());
    System.out.println(request.getServletPath());
    // 获取header的key值
    Enumeration<String> enumeration = request.getHeaderNames();
    while (enumeration.hasMoreElements()) {
        String name = enumeration.nextElement();
        String value = request.getHeader(name);
        System.out.println(name + ":" + value);
    }
    System.out.println(request.getParameter("code"));
    // 返回响应数据
    // 返回网页
    response.setContentType("text/html;charset=utf-8");
    // 获取输出流
    try (
            PrintWriter writer = response.getWriter();
            ){
        writer.write("<h1>牛客网</h1>");
    } catch (IOException e) {
        e.printStackTrace();
    }
}
使用get请求向浏览器获取数据
- // /students?current=1&limit=20 - 当前页为第一页,每一页有20条数据
// /students?current=1&limit=20 - 当前页为第一页,每一页有20条数据
@RequestMapping(path = "/students", method = RequestMethod.GET)
@ResponseBody
public String getStudents(
        // 表示Request中名为current的参数赋给current, 可以不传参数进来,如果不传,默认值为1
        @RequestParam(name = "current", required = false, defaultValue = "1") int current,
        @RequestParam(name = "limit", required = false,defaultValue = "1") int limit){
    System.out.println(current);
    System.out.println(limit);
    return "some students";
}
- // /student/123 - 参数成为路径的一部分
// /student/123 - 参数成为路径的一部分
@RequestMapping(path = "/student/{id}", method = RequestMethod.GET)
@ResponseBody
public String getStudent(@PathVariable("id") int id){
    System.out.println(id);
    return "a student";
}
使用post请求向浏览器上传数据
必须要有表单信息,通过提交表单信息向浏览器发送请求 静态资源放在static,动态资源放在templates里,保证函数的参数与表单的name一致
student.html
<form method="post" action="/community/alpha/student">
  <p>
      姓名:<input type="text" name="name">
  </p>
  <p>
      年龄:<input type="text" name="age">
  </p>
  <p>
      <input type="submit" value="保存">
  </p>
</form>
@RequestMapping(path = "/student", method = RequestMethod.POST)
@ResponseBody
public String saveStudent(String name, int age){
    System.out.println(name);
    System.out.println(age);
    return "success";
}
响应HTML数据
- 使用ModelAndView
返回model数据和视图数据,交给模板引擎进行渲染
@RequestMapping(path = "/teacher", method = RequestMethod.GET)
// 返回model数据和视图数据,交给模板引擎进行渲染
public ModelAndView getTeacher(){
   ModelAndView mav = new ModelAndView();
   mav.addObject("name", "张三");
   mav.addObject("age", 40);
   mav.setViewName("/demo/view");
   return mav;
}
- 使用Model
@RequestMapping(path = "/school", method = RequestMethod.GET)
// 实例化model对象,直接返回view
public String getSchool(Model model){
    model.addAttribute("name", "北京大学");
    model.addAttribute("age", 80);
    return "/demo/view";
}
- HTML使用thymeleaf模板
<!DOCTYPE html>
<!-- 声明当前页面是模板,模板引擎来源于thymeleaf官网-->
<html lang="en" xmlns:th="http://www.thymeleaf.org">
<head>
    <meta charset="UTF-8">
    <title>Teacher</title>
</head>
<body>
    <p th:text="${name}"></p>
    <p th:text="${age}"></p>
</body>
</html>
响应JSON对象
响应JSON数据,通常在异步请求中
异步请求:当前网页不刷新,但是访问服务器得到结果(客户端返回局部验证的结果:成功还是失败)
Java对象 -> JSON字符串 -> JS对象(JSON对象很常用,字符串的形式)
- 查询单个员工
@RequestMapping(path = "/emp", method = RequestMethod.GET)
@ResponseBody // 必须要加,不加的话返回html
public Map<String, Object> getEmp(){
    Map<String, Object> emp = new HashMap<>();
    emp.put("name", "张三");
    emp.put("age", 23);
    emp.put("salary", 8000.00);
    return emp;
}
查询结果 :

- 查询所有员工(使用List集合)
最外面是方括号[],每一个对象用大括号{}围起来
3
Mybatis
1. 核心组件
- SqlSessionFactory:用于创建SqlSession的工厂类。
- SqlSession:MyBatis的核心组件,用于向数据库执行SQL。
- 主配置文件:XML配置文件,可以对MyBatis的底层行为做出详细的配置。
- Mapper接口:就是DAO接口,在MyBatis中习惯性的称之为Mapper。
- Mapper映射器:用于编写SQL,并将SQL和实体类映射的组件,采用XML、注解均可实现。
https://mybatis.org/mybatis-3/
https://mybatis.org/spring/
2. 代码部分
- 使用MyBatis对用户表进行CRUD操作。
user表
salt:一个五位随机字符串,拼接在用户密码后面,防止用户密码过于简单而被破解
type:用户类型,0是普通用户,1是管理员,2是版主
status:用户状态,0是没有激活,1是已经激活
avtivation_code:激活码
header_url:用户头像的访问路径
create_time:用户数据的创建时间(注册时间)

配置pom.xml
<dependency>
   <groupId>mysql</groupId>
   <artifactId>mysql-connector-java</artifactId>
   <version>8.0.16</version>
</dependency>

<dependency>
   <groupId>org.mybatis.spring.boot</groupId>
   <artifactId>mybatis-spring-boot-starter</artifactId>
   <version>2.0.1</version>
</dependency>
在application.properties中配置数据库、Mybatis相关。
#DataSourceProperties 配置的是mysql数据库和连接池
#记得改自己的密码
spring.datasource.driver-class-name=com.mysql.cj.jdbc.Driver
spring.datasource.url=jdbc:mysql://localhost:3306/community?characterEncoding=utf-8&useSSL=false&serverTimezone=Hongkong
spring.datasource.username=root
spring.datasource.password=lihonghe
spring.datasource.type=com.zaxxer.hikari.HikariDataSource
spring.datasource.hikari.maximum-pool-size=15
spring.datasource.hikari.minimum-idle=5
spring.datasource.hikari.idle-timeout=30000
#MybatisProperties
mybatis.mapper-locations=classpath:mapper/*.xml
mybatis.type-aliases-package=com.nowcoder.community.entity
mybatis.configuration.useGeneratedKeys=true
mybatis.configuration.mapUnderscoreToCamelCase=true
#logger 把日志级别降低,设为debug,便于输出更多的信息找错
logging.level.com.nowcoder.community=debug
创建实体类
User.java
public class User {

    private int id;
    private String username;
    private String password;
    private String salt;
    private String email;
    private int type;
    private int status;
    private String activationCode;
    private String headerUrl;
    }
根据需求写Mapper接口
@Mapper // 标识为mapper接口
public interface UserMapper {

    /**
     * 根据需求写接口:
     * 1. 根据id、name、Email查询User
     * 2. 插入id,
     * 3. 根据id和xx更新Status、Header、password
     */

    User selectById(int id);

    User selectByName(String username);

    User selectByEmail(String email);

    int insertUser(User user);

    int updateStatus(int id, int status);

    int updateHeader(int id, String headerUrl);

    int updatePassword(int id, String password);


}
配置user-mapper.xml
在resources里的mapper包提供一个配置文件,为接口中的每一个方法提供一个sql语句
在https://mybatis.org/mybatis-3/ 里找
<?xml version="1.0" encoding="UTF-8" ?>
<!DOCTYPE mapper
        PUBLIC "-//mybatis.org//DTD Mapper 3.0//EN"
        "http://mybatis.org/dtd/mybatis-3-mapper.dtd">
<!--这一行要定位到自己的Mapper接口的位置-->
<mapper namespace="com.nowcoder.community.dao.UserMapper">
<!--    每一个标签对应一个接口和方法-->

    <!--实现sql语句的复用-->
    <sql id="selectFields">
        id, username, password, salt, email, type, status, activation_code, header_url, create_time
    </sql>

    <sql id="insertFields">
        username, password, salt, email, type, status, activation_code, header_url, create_time
    </sql>

    <select id="selectById" resultType="User">
        select <include refid="selectFields"></include>
        from user
        where id = #{id}
    </select>

    <select id="selectByName" resultType="User">
        select <include refid="selectFields"></include>
        from user
        where username = #{username}
    </select>

    <select id="selectByEmail" resultType="User">
        select <include refid="selectFields"></include>
        from user
        where email = #{email}
    </select>

    <insert id="insertUser" parameterType="User" keyProperty="id">
        insert into user (<include refid="insertFields"></include>)
        values (#{username}, #{password}, #{salt}, #{email}, #{type}, #{status}, #{activationCode}, #{headerUrl}, #{createTime})
    </insert>

    <update id="updateStatus">
        update user set status = #{status} where id = #{id}
    </update>

    <update id="updateHeader">
        update user set header_url = #{headerUrl} where id = #{id}
    </update>

    <update id="updatePassword">
        update user set password = #{password} where id = #{id}
    </update>
</mapper>
可以进行测试了
MapperTests.java
@RunWith(SpringRunner.class)
@SpringBootTest
// 在测试代码中启用CommunityApplication作为测试类
@ContextConfiguration(classes = CommunityApplication.class)
public class MapperTests {

    @Autowired
    private UserMapper userMapper;

    @Test
    public void testSelectUser(){
        User user = userMapper.selectById(101);
        System.out.println(user);

        user = userMapper.selectByName("liubei");
        System.out.println(user);

        user = userMapper.selectByEmail("nowcoder101@sina.com");
        System.out.println(user);
    }

    @Test
    public void testInsertUser() {
        User user = new User();
        user.setUsername("test");
        user.setPassword("123456");
        user.setSalt("abc");
        user.setEmail("test@qq.com");
        user.setHeaderUrl("http://www.nowcoder.com/101.png");
        user.setCreateTime(new Date());

        int rows = userMapper.insertUser(user);
        System.out.println(rows);
        System.out.println(user.getId());
    }

    @Test
    public void updateUser() {
        int rows = userMapper.updateStatus(150, 1);
        System.out.println(rows);

        rows = userMapper.updateHeader(150, "http://www.nowcoder.com/102.png");
        System.out.println(rows);

        rows = userMapper.updatePassword(150, "hello");
        System.out.println(rows);
    }
@ 后面是填写路径的, $ 后面是填写变量数据的,#是mapper的写法,表示获取传入的参数值
开发社区首页
1. 大概步骤
- 开发流程
- 1次请求的执行过程
- 分步实现
- 开发社区首页,显示前10个帖子
- 开发分页组件,分页显示所有的帖子
disscuss.post.sql
Id: 自增长
user_id: 帖子是由哪个用户发布的。可以关联user表
Title: 帖子标题
content:帖子内容(类型是text)
Type: 0 -普通 1-置顶
status:0 - 正常 1- 精华 2- 拉黑
create_time
comment_count: 评论数量,关联commnet表
Score: 帖子的分数,以进行排名

2. 代码实现
2.1 开发数据层
创建实体类DiscussPost
public class DiscussPost {

    private int id;
    private int userId;
    private String title;
    private String content;
    private int type;
    private int status;
    private Date createTime;
    private int commentCount;
    private double score;
 }
创建DiscussPostMapper接口
@Mapper
public interface DisscussPostMapper {

    // 将来会开发一个个人主页的功能,需要用到userid
    // 当userid==0,就不把这个条件拼到sql里;否则就把它拼到sql里(考虑个人主页的情况) --> 动态sql
    // 还需要考虑未来分页的可能: offset: 每页起始行的行号;limit: 每页最多多少条数据
    List<DiscussPost> selectDiscussPosts(int userId, int offset, int limit);

    // 查询表中一共有多少条数据,查询帖子的行数
    // param注解用来给参数起别名,如果这个方法中需要动态的参数,并且这个方法有且只有一个条件,这时候必须加@param注解,
    int selectDiscussPostRows(@Param("userId") int userId);
}
写sql,配置discusspost-mapper.xml
<?xml version="1.0" encoding="UTF-8" ?>
<!DOCTYPE mapper
        PUBLIC "-//mybatis.org//DTD Mapper 3.0//EN"
        "http://mybatis.org/dtd/mybatis-3-mapper.dtd">
<!--这一行要定位到自己的Mapper接口的位置-->
<mapper namespace="com.nowcoder.community.dao.DisscussPostMapper">

    <sql id="selectFields">
        id, user_id, title, content, type, status, create_time, comment_count, score
    </sql>

    <!--List<DiscussPost> selectDiscussPosts(int userId, int offset, int limit);-->
    <!--resultType表示的是返回的类型,只需要写自定义的类名DiscussPost,系统定义的List不用写-->
    <!--#{}里头是方法参数-->
    <select id="selectDiscussPosts" resultType="DiscussPost">
        select <include refid="selectFields"></include>
        from discuss_post
        <!--stauts=2为拉黑状态,当它拉黑了就不能查到-->
        where status != 2
        <if test="userId!=0">
            <!--user_id表示sql中的字段名,#{}中放传参-->
            and user_id = #{userId}
        </if>
        <!--desc表示倒序排列,type=2为置顶,所以倒倒序排列,在类型一样的前提下,新的帖子在前面-->
        order by type desc, create_time desc
        limit #{offset }, #{limit}
    </select>

    <!--int selectDiscussPostRows(@Param("userId") int userId);-->
    <!--查询discussPost的数量-->
    <select id="selectDiscussPostRows" resultType="int">
        select count(id)
        from discuss_post
        where status != 2
        <if test="userId!=0">
            and user_id = #{userId}
        </if>
    </select>

</mapper>
再对dao层测试一下
@Test
public void testSelectPosts(){
    List<DiscussPost> list = disscussPostMapper.selectDiscussPosts(0, 0, 10);
    for(DiscussPost discussPost : list){
        System.out.println(discussPost);
    }
    int rows = disscussPostMapper.selectDiscussPostRows(0);
    System.out.println(rows);
}
2.2 开发业务层service
DiscussPostService
- findDiscussPosts
- selectDiscussPostRows
@Service
public class DiscussPostService {

    // service层要调用mapper的方法,因此先要注入
    // 为了减少耦合性,必须严格地按照这样的方法调用,而不是直接用mapper的方法
    @Autowired
    private DisscussPostMapper discussPostMapper;

    public List<DiscussPost> findDiscussPosts(int userId, int offset, int limit){
        return discussPostMapper.selectDiscussPosts(userId, offset, limit);
    }

    public int findDiscussPostRows(int userId) {
        return discussPostMapper.selectDiscussPostRows(userId);
    }
UserService
- 通过userid查询User
@Service
public class UserService {

    @Autowired
    private UserMapper userMapper;

    /**
     * 查询到的结果返回的是userid,但是在页面上需要显示的是用户名
     * userid是一个外键,用来关联user表
     * 这个函数针对得到的每一个discusspost查询user,和discusspost组合在一起返回给页面
     */

    public User findUserById(int id){
        return userMapper.selectById(id);
    }
}
2.3 视图层controller
- 静态资源:css、img、js 粘贴到static中
- 动态资源site(首页)、index.html(其它的页面)、mail(收发邮件的邮件模板)粘贴到templates中
利用thymeleaf 修改index.html
HomeController:index.html的逻辑
@RequestMapping(path = "/index", method = RequestMethod.GET)
// 最终返回的是/index
public String getIndexPage(Model model, Page page) {
    // 方法调用前,SpringMVC会自动实例化Model和Page,并将Page注入Model.
    // 所以,在thymeleaf中可以直接访问Page对象中的数据.
    page.setRows(discussPostService.findDiscussPostRows(0));
    page.setPath("/index");

    List<DiscussPost> list = discussPostService.findDiscussPosts(0, page.getoffset(), page.getLimit());

    List<Map<String, Object>> discussPosts = new ArrayList<>();
    if(list != null){
        for(DiscussPost post : list){
            Map<String, Object> map = new HashMap<>();
            map.put("post", post);
            User user = userService.findUserById(post.getUserId());
            map.put("user", user);
            discussPosts.add(map);
        }
    }
    model.addAttribute("discussposts", discussPosts);
    return "/index";
}
封装分页相关的信息
注意:需要对方法做判断,需要添加新的方法:获得当前起始行、总页数、起始页码、结束页码
项目调试技巧
1. 响应状态码的含义
通过状态码大概判断出问题在服务端还是客户端,然后再进行下一步调试
常见的状态码:
- 200:成功
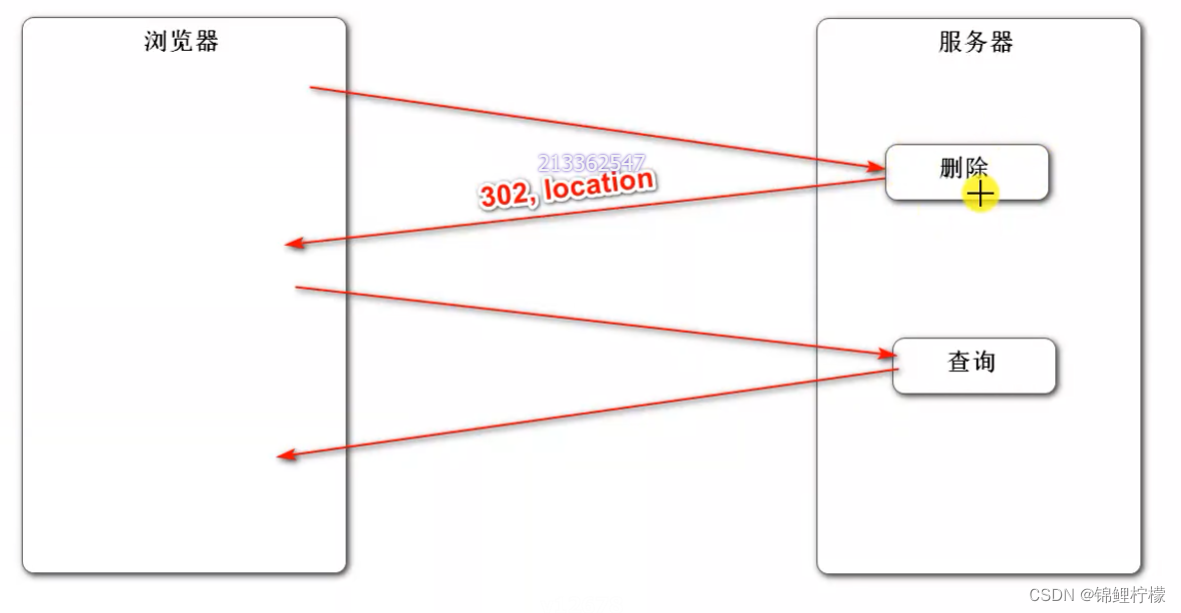
- 3开头的都是重定向
重定向 :比如浏览器向服务器发送删除请求,但是删除之后应该要返回查询页面,这时候就在服务器里重定向到查询页面
- 4:客户端响应
- 404:找不到资源
- 5:服务端响应
- 500:服务器不知道该如何处理
2. 服务端断点调试技巧
- F8(步过):向下执行一行
- F7(步入):进入当前方法的内部
- F9:程序向下执行到下一个断点,如果下面没有断点,就执行到程序结束的位置
- 管理断点:

3. 客户端断点调试技巧
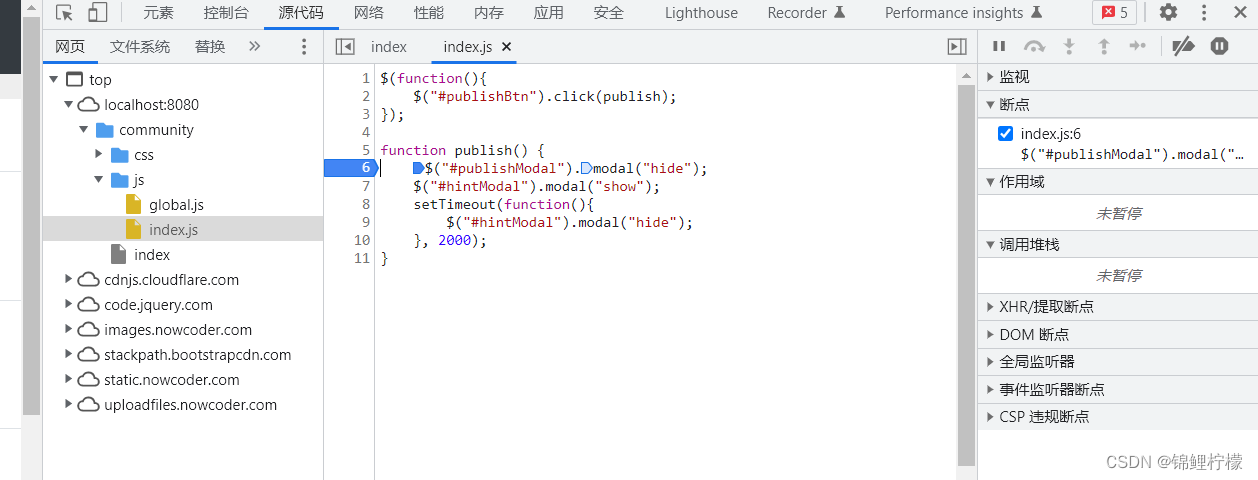
- F10:向下执行一行
- F11:进入到某个方法的内部
- F8:让程序执行到底
4. 设置日志级别,并将日志输出到不同的终端
Springboot默认使用的日志工具是logback

如果启动info级别后,比info级别更高的会被显示(warn、error),其它的会被忽视
在application.properties里配
#logger 把日志级别降低,设为debug,便于输出更多的信息找错
logging.level.com.nowcoder.community=debug
写测试类
// 实例化Logger接口,设为静态(所有地方都能用) final(不可改变)
private static final Logger logger = LoggerFactory.getLogger(LoggerTests.class);

@Test
public void testLogger() {
    System.out.println(logger.getName());

    logger.debug("debug log");
    logger.info("info log");
    logger.warn("warn log");
    logger.error("error log");
}
把日志存储在文件里
logging.file=d:/work/data/nowcoder/community.log
在实际开发时通常把不同级别的log存在不同的文件里,并且超过一定容量要建立新文件
配置logback-spring.xml
版本控制
1. 认识Git
- Git简介
- Git的安装与配置
2. Git常用命令
将代码提交至本地仓库
- cd到要提交的程序包下
- Git init
- Git status 查看状态
- Git add * 将所有的文件添加到待提交的列表里
- Git commit -m ‘test1’ 这一次操作的名字是test1,提交到本地仓库
将代码上传至远程仓库(项目里上传到牛客网仓库)
a. 创建密钥 ssh-keygen -t rsa -C “2635107271@qq.com”
这是密钥的位置
B. 在本地声明远程仓库


 772
772


 被折叠的 条评论
为什么被折叠?
被折叠的 条评论
为什么被折叠?
 到【灌水乐园】发言


