


1. Android 消息机制的概述
Android 的消息机制主要就是指的Handler 的运行机制及Handler 附带的Looper和MessageQueue的工作过程. Handler 的主要作用就是将一个操作切换到Handler对应的Looper所在进程来执行.
由于Android 要求对UI的访问要在main进程(UI进程)来做.实际中Handler的作用:就是主要用来在子进程中做完耗时的工作之后,再需要更新UI的时候可以把更新UI的操作切换main进程(UI进程)来执行.
如果直接在子进程访问UI会报异常.ViewRootImpl 的checkThread()是用来做这个验证的.
void checkThread() {if (mThread != Thread.currentThread()) {String errorMessage = "";if (IS_APR_BUILD) {int wrongTid = Process.myTid();String currentStack = Debug.getCallers(10, "... ") + " \n";String currentThreadName = Thread.currentThread().getName();errorMessage = "\n ctid= " + mCreationTid+ "\n cname = " + mCreationThreadName+ "\n wtid= " + wrongTid+ "\n wname = " + currentThreadName+ "\n wstack = \n" + currentStack+ "\n cstack = \n" + mCreationStack;}throw new CalledFromWrongThreadException("Only the original thread that created a view hierarchy can touch its views.\n" + errorMessage);}}
Handler 创建时需要用到当前线程的Looper 对象来创建内部的消息循环系统.如果当前线程没有Looper对象,就会报错.
public Handler(Callback callback, boolean async) {mLooper = Looper.myLooper();if (mLooper == null) {throw new RuntimeException("Can't create handler inside thread that has not called Looper.prepare()");}mQueue = mLooper.mQueue;mCallback = callback;mAsynchronous = async;}
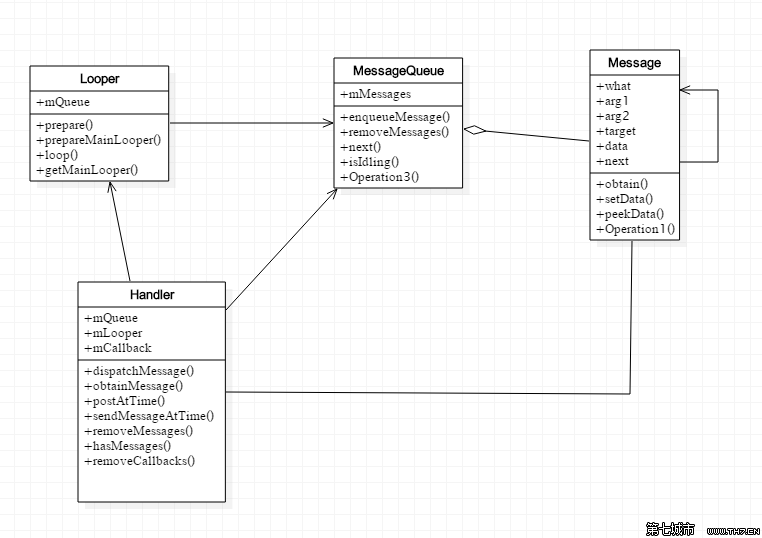
2. Android消息机制的分析
前面已经对Android 的消息机制组了一个简单的概述,下面会对相关的类做具体的分析.
关于Android 的消息机制主要涉及的类有:
Handler
Looper
MessageQueue
ThreadLocal
下面是在网上找的一个类图.
2.1 ThreadLocal 的工作原理
ThreadLocal 是一个线程内部的数据存储类,通过它可以在指定的线程中存储数据,同时也只能在指定的那个线程中获取之前存储的数据,其他线程是不能获取到这个数据的.
前面已经提到创建Handler 是需要获取当前线程的Looper对象,而Looper的作用域就是当前线程,不同的线程有不同的Looper.这种情况下使用ThreadLocal就可以实现Looper在线程中的存取.
为先具体理解一下上面的意思,看下面的demo和运行结果:
private static ThreadLocal<Boolean> mtThreadLocal = new ThreadLocal<Boolean>();mtThreadLocal.set(true);System.out.println("Thread#main mtThreadLocal=" +mtThreadLocal.get());new Thread("Thread#1"){public void run() {mtThreadLocal.set(false);System.out.println("Thread#1 mtThreadLocal=" +mtThreadLocal.get());};}.start();new Thread("Thread#2"){public void run() {System.out.println("Thread#2 mtThreadLocal=" +mtThreadLocal.get());};}.start();
运行结果:
Thread#main mtThreadLocal=true :这个很好理解,设置了为true,获取的结果也是如此.
Thread#1 mtThreadLocal=false :在Thread#1 中设置为false
Thread#2 mtThreadLocal=null :在Thread#2中没有设置值,所以获取的就是null.
上面的demo 就很好的解释了ThreadLocal可以在不同的线程中维护一套数据的不同的副本,并且彼此不干扰.
下面接着分析ThreadLocal的具体源码实现.ThreadLocal是一个泛型类,是属于java原生的类,只是在Android中有了一定的改动.
其中public的方法主要也就是是set() ,get(),remove().
先看set方法:
public void set(T value) {Thread currentThread = Thread.currentThread();Values values = values(currentThread);if (values == null) {values = initializeValues(currentThread);}values.put(this, value);}Values values(Thread current) {return current.localValues;}Values initializeValues(Thread current) {return current.localValues = new Values();}
private final Reference<ThreadLocal<T>> reference = new WeakReference<ThreadLocal<T>>(this);
上面的set()方法中,先是使用values()方法获取当前线程的ThreadLocal.Values localValues 对象.如果不存在就调用initializeValues()来初始化,并将
ThreadLocal的值存储到之前
初始化
的
ThreadLocal.Values中去.
具体是怎么保存
ThreadLocal 的值需要进一步看
ThreadLocal.Values 的put()方法.
void put(ThreadLocal<?> key, Object value) {cleanUp();// Keep track of first tombstone. That's where we want to go back// and add an entry if necessary.int firstTombstone = -1;for (int index = key.hash & mask;; index = next(index)) {Object k = table[index];if (k == key.reference) {// Replace existing entry.table[index + 1] = value;return;}if (k == null) {if (firstTombstone == -1) {// Fill in null slot.table[index] = key.reference;table[index + 1] = value;size++;return;}// Go back and replace first tombstone.table[firstTombstone] = key.reference;table[firstTombstone + 1] = value;tombstones--;size++;return;}// Remember first tombstone.if (firstTombstone == -1 && k == TOMBSTONE) {firstTombstone = index;}}}
上面的put()代码可以出,主要是将数据保存到
ThreadLocal.Values这个内部类的一个数组table[ ] 中的.其中具体的逻辑暂时不关注,主要先明白ThreadLocal 的值在table数组中的位置总是ThreadLocal的reference字段所标识的对应的位置的下一个位置.
下面继续看get方法的源码
public T get() {// Optimized for the fast path.Thread currentThread = Thread.currentThread();Values values = values(currentThread);if (values != null) {Object[] table = values.table;int index = hash & values.mask;if (this.reference == table[index]) {return (T) table[index + 1];}} else {values = initializeValues(currentThread);}return (T) values.getAfterMiss(this);}
上面的get()流程比较简单,如果之前有保存
ThreadLocal的值就从当前线程的Values对象的table数组中获取就可以了,如果没有保存就放回初始值,初始值就是用ThreadLocal的initialValue来获取的.默认是为null,我们自己也可以重写这个方法.
从上面的get 和set代码可以看出,在多个线程中访问ThreadLocal的get和set,其实它们所操作的对象就是当前线程的一个对象
localValues的里面的table数组.
也就是说对ThreadLocal的get和set操作仅局限于各个线程内部.这也就是为什么在多个线程中同一个ThreadLocal可以互不干扰的进行get和set操作.
2.2 MessageQueue 的工作原理
MessageQueue叫着消息队列,但是它本身的内部实现并不是用的队列的形式,而是一个单链表的形式.MessageQueue主要有2个操作:插入和读取.读取操作本身会伴随着删除操作.
插入和读取分别对应着enqueueMessage 和next.
下面看一下相关的源码:
boolean enqueueMessage(Message msg, long when) {if (msg.target == null) {throw new IllegalArgumentException("Message must have a target.");}if (msg.isInUse()) {throw new IllegalStateException(msg + " This message is already in use.");}/// M: Add message protect mechanism @{if (msg.hasRecycle) {Log.wtf("MessageQueue", "Warning: message has been recycled. msg=" + msg);return false;}/// Add message protect mechanism @}synchronized (this) {if (mQuitting) {IllegalStateException e = new IllegalStateException(msg.target + " sending message to a Handler on a dead thread");Log.w("MessageQueue", e.getMessage(), e);msg.recycle();return false;}msg.markInUse();msg.when = when;Message p = mMessages;boolean needWake;if (p == null || when == 0 || when < p.when) {// New head, wake up the event queue if blocked.msg.next = p;mMessages = msg;needWake = mBlocked;} else {// Inserted within the middle of the queue. Usually we don't have to wake// up the event queue unless there is a barrier at the head of the queue// and the message is the earliest asynchronous message in the queue.needWake = mBlocked && p.target == null && msg.isAsynchronous();Message prev;for (;;) {prev = p;p = p.next;if (p == null || when < p.when) {break;}if (needWake && p.isAsynchronous()) {needWake = false;}}msg.next = p; // invariant: p == prev.nextprev.next = msg;}// We can assume mPtr != 0 because mQuitting is false.if (needWake) {nativeWake(mPtr);}}return true;}
插入方法很简单就是一个单链表的操作操作.同时根据
needWake
来判断是否执行唤醒操作.
下面接着看读取方法next()
Message next() {// Return here if the message loop has already quit and been disposed.// This can happen if the application tries to restart a looper after quit// which is not supported.final long ptr = mPtr;if (ptr == 0) {return null;}int pendingIdleHandlerCount = -1; // -1 only during first iterationint nextPollTimeoutMillis = 0;for (;;) {if (nextPollTimeoutMillis != 0) {Binder.flushPendingCommands();}nativePollOnce(ptr, nextPollTimeoutMillis);synchronized (this) {// Try to retrieve the next message. Return if found.final long now = SystemClock.uptimeMillis();Message prevMsg = null;Message msg = mMessages;if (msg != null && msg.target == null) {// Stalled by a barrier. Find the next asynchronous message in the queue.do {prevMsg = msg;msg = msg.next;} while (msg != null && !msg.isAsynchronous());}if (msg != null) {if (now < msg.when) {// Next message is not ready. Set a timeout to wake up when it is ready.nextPollTimeoutMillis = (int) Math.min(msg.when - now, Integer.MAX_VALUE);} else {// Got a message.mBlocked = false;if (prevMsg != null) {prevMsg.next = msg.next;} else {mMessages = msg.next;}msg.next = null;if (false) Log.v("MessageQueue", "Returning message: " + msg);return msg;}} else {// No more messages.nextPollTimeoutMillis = -1;}// Process the quit message now that all pending messages have been handled.if (mQuitting) {//MessageQueue退出了dispose();return null;}// If first time idle, then get the number of idlers to run.// Idle handles only run if the queue is empty or if the first message// in the queue (possibly a barrier) is due to be handled in the future.if (pendingIdleHandlerCount < 0&& (mMessages == null || now < mMessages.when)) {pendingIdleHandlerCount = mIdleHandlers.size();}if (pendingIdleHandlerCount <= 0) {// No idle handlers to run. Loop and wait some more.mBlocked = true;continue;}if (mPendingIdleHandlers == null) {mPendingIdleHandlers = new IdleHandler[Math.max(pendingIdleHandlerCount, 4)];}mPendingIdleHandlers = mIdleHandlers.toArray(mPendingIdleHandlers);}// Run the idle handlers.// We only ever reach this code block during the first iteration.for (int i = 0; i < pendingIdleHandlerCount; i++) {final IdleHandler idler = mPendingIdleHandlers[i];mPendingIdleHandlers[i] = null; // release the reference to the handlerboolean keep = false;try {keep = idler.queueIdle();} catch (Throwable t) {Log.wtf("MessageQueue", "IdleHandler threw exception", t);}if (!keep) {synchronized (this) {mIdleHandlers.remove(idler);}}}// Reset the idle handler count to 0 so we do not run them again.pendingIdleHandlerCount = 0;// While calling an idle handler, a new message could have been delivered// so go back and look again for a pending message without waiting.nextPollTimeoutMillis = 0;}}
next方法就是一个for循环,如果消息队列中没有消息就一直堵塞在那里,如果队列中有消息就返回这个消息,并从队列中删除这个消息.上面的代码其实我们主要看中间那一部分就可以了.
其中如果MessageQueue被调用了quit()方法时会被标记为退出状态,这时next就是会返回null.其实MessageQueue的quit的调用,是因为Looper调用自己的quit()间接导致的.Looper会在后面分析.
2.3 Looper 的工作原理
Looper在Android消息机制中负责消息的循环处理.就是从MessageQueue这个消息队列中循环取出消息来处理.有新消息就处理,如果没有消息需要处理了就堵塞在那里.
下面从构造函数开始:
private Looper(boolean quitAllowed) {mQueue = new MessageQueue(quitAllowed);mThread = Thread.currentThread();}
Looper创建时会创建一个MessageQueue消息队列.并获取当前线程并保存起来.
Handler创建的时候是需要有一个Looper 的,否则就会报错.
new Thread(new Runnable() {@Overridepublic void run() {//Looper.prepare();mHandler = new MyHandler(Looper.getMainLooper());mHandler.post(new Runnable() {@Overridepublic void run() {Log.d(TAG,"Thread start mHandler post 2,thread:" + Thread.currentThread().getName());}});//Looper.loop();}}).start();
创建Handler 时可以使用带参数构造函数给Handler传递一个Looper对象.或者在创建Handler之前使用
Looper.prepare()
来创建,同时使用
Looper.loop()
启动消息循环.
Looper 还有一个
prepareMainLooper()主要是用来给主线程ActivityThread 来创建Looper对象的.
如果在子线程中为Handler超级了Looper对象,在消息处理完成之后应该调用quit()来终止消息的循环.否则这个子线程一直处理等待状态.而Looper退出了,子线程就会立刻终止,因此在需要的时候请终止Looper.
Looper的最主要的一个方法就是loop(),具体代码如下,其中mtk 添加的部分关于log相关的代码已经删除了,避免代码块太长.
/*** Run the message queue in this thread. Be sure to call* {@link #quit()} to end the loop.*/public static void loop() {final Looper me = myLooper();if (me == null) {throw new RuntimeException("No Looper; Looper.prepare() wasn't called on this thread.");}final MessageQueue queue = me.mQueue;// Make sure the identity of this thread is that of the local process,// and keep track of what that identity token actually is.Binder.clearCallingIdentity();final long ident = Binder.clearCallingIdentity();for (;;) {Message msg = queue.next(); // might blockif (msg == null) {// No message indicates that the message queue is quitting.return;}// This must be in a local variable, in case a UI event sets the loggerPrinter logging = me.mLogging;if (logging != null) {logging.println(">>>>> Dispatching to " + msg.target + " " +msg.callback + ": " + msg.what);}msg.target.dispatchMessage(msg);if (logging != null) {logging.println("<<<<< Finished to " + msg.target + " " + msg.callback);}// Make sure that during the course of dispatching the// identity of the thread wasn't corrupted.final long newIdent = Binder.clearCallingIdentity();if (ident != newIdent) {Log.wtf(TAG, "Thread identity changed from 0x"+ Long.toHexString(ident) + " to 0x"+ Long.toHexString(newIdent) + " while dispatching to "+ msg.target.getClass().getName() + " "+ msg.callback + " what=" + msg.what);}msg.recycleUnchecked();}}
loop方法就是一个死循环.唯一能退出这个死循环的条件就是MessageQueue的next()返回的是null.只有在Looper的quit 被调用回间接调用MessageQueue的quit()或quitSafley()时,才会将消息队列标记为退出状态,MessageQueue 的next才会返回null.
如果MessageQueue消息队列有新消息,就调用
MessageQueue的next()来获取新消息,并处理:
msg
.
target
.
dispatchMessage
(
msg
)
,
msg
.
target 其实就是Handler,也就是调用Handler的
dispatchMessage来处理.
如果一直有新消息就会这样一直循环处理.由于dispatchMessage()是在Looper中调用,所以
dispatchMessage就被切换到Looper所在的线程了.
如果
MessageQueue
没有新消息,Looper就堵塞在loop里面.
2.4 Handler的工作原理
Handler 在Android的消息机制中主要是用来发送消息和接受消息.
其中发送消息是用send和post 2个方法,但是post最终也是调用send.
public final boolean sendMessage(Message msg){return sendMessageDelayed(msg, 0);}public final boolean sendMessageDelayed(Message msg, long delayMillis){if (delayMillis < 0) {delayMillis = 0;}return sendMessageAtTime(msg, SystemClock.uptimeMillis() + delayMillis);}public boolean sendMessageAtTime(Message msg, long uptimeMillis) {MessageQueue queue = mQueue;if (queue == null) {RuntimeException e = new RuntimeException(this + " sendMessageAtTime() called with no mQueue");Log.w("Looper", e.getMessage(), e);return false;}return enqueueMessage(queue, msg, uptimeMillis);}private boolean enqueueMessage(MessageQueue queue, Message msg, long uptimeMillis) {msg.target = this;if (mAsynchronous) {msg.setAsynchronous(true);}return queue.enqueueMessage(msg, uptimeMillis);}
sendMessage 最终会调用MessageQueu的enqueueMessage()把消息放到MessageQueue这个消息队列中.MessageQueue的next()会获取这个消息,并将消息给Looper,Looper处理消息时最终会传递给Handler 来处理,也是就Handler的dispatchMessage().
dispatchMessage进是最新消息的处理的地方.
public void dispatchMessage(Message msg) {if (msg.callback != null) {handleCallback(msg);} else {if (mCallback != null) {if (mCallback.handleMessage(msg)) {return;}}handleMessage(msg);}}
在上面的代码中.
如果发送消息时是用用的post(Runnable) 这个方法,msg.callback就是post()传递的参数Runnable对象.handleCallback()就是执行
Runnable 的run方法.
如果在创建Handler 时是调用
Handler(Callback callback)这种构造函数,那边mCallback 就是构造函数传递过来的对象.这个写法有个好处就是不用创建一个继承了Handler的单独的类(也就是派生一个子类),直接在传递参数的时候实现
Callback 的
handleMessage方法就可以.
如果不是上面的2种情况就是调用的send来发送消息的,就是直接调用
handleMessage()
来处理.一般自定义的Handler 会重写这个方法.
那我们在创建Handler是自己并没有去创建Looper ,为什么没有报错呢.是因为系统已经默认给我们创建了.这个是在ActivityThread的main()里面做的.
public static void main(String[] args) {...Looper.prepareMainLooper();...Looper.loop();...}
3.总结
最好总结一下Android 的消息机制
Handler使用send和post相关的方法去发送消息,Handler调用
sendMessageAtTime()
和enqueueMessage()
将消息交给MessageQueue处理;
MessageQueue 接到消息之后将消息保存到一个链表中;
Looper 调用MessageQueue的next()方法来获取消息,再调用Handler的dispatchMessage来处理;
Handler 接收到消息之后根据msg.callback 和mCallBack也就是post传递的参数和构造函数传递的参数 来执行它们的相关的回调方法,如果都未null就执行handleMessage(这个方法我们一般会重写).
4. Android中使用Handler造成内存泄露的分析和解决
关于内存泄露这个部分是网上找的一个分析,感觉很好,先记录一下.便于后续研究和使用.
4.1 什么是内存泄露?
Java使用有向图机制,通过GC自动检查内存中的对象(什么时候检查由虚拟机决定),如果GC发现一个或一组对象为不可到达状态,则将该对象从内存中回收。也就是说,一个对象不被任何引用所指向,则该对象会在被GC发现的时候被回收;另外,如果一组对象中只包含互相的引用,而没有来自它们外部的引用(例如有两个对象A和B互相持有引用,但没有任何外部对象持有指向A或B的引用),这仍然属于不可到达,同样会被GC回收。
Android中使用Handler造成内存泄露的原因
Handler mHandler = new Handler() {
@Override
public void handleMessage(Message msg) {
mImageView.setImageBitmap(mBitmap);
}
}
上面是一段简单的Handler的使用。当使用内部类(包括匿名类)来创建Handler的时候,Handler对象会隐式地持有一个外部类对象(通常是一个Activity)的引用(不然你怎么可能通过Handler来操作Activity中的View?)。而Handler通常会伴随着一个耗时的后台线程(例如从网络拉取图片)一起出现,这个后台线程在任务执行完毕(例如图片下载完毕)之后,通过消息机制通知Handler,然后Handler把图片更新到界面。然而,如果用户在网络请求过程中关闭了Activity,正常情况下,Activity不再被使用,它就有可能在GC检查时被回收掉,但由于这时线程尚未执行完,而该线程持有Handler的引用(不然它怎么发消息给Handler?),这个Handler又持有Activity的引用,就导致该Activity无法被回收(即内存泄露),直到网络请求结束(例如图片下载完毕)。另外,如果你执行了Handler的postDelayed()方法,该方法会将你的Handler装入一个Message,并把这条Message推到MessageQueue中,那么在你设定的delay到达之前,会有一条MessageQueue -> Message -> Handler -> Activity的链,导致你的Activity被持有引用而无法被回收。
个,那就是虚拟机占用内存过高,导致OOM(内存溢出),程序出错。对于Android应用来说,就是你的用户打开一个Activity,使用完之后关闭它,内存泄露;又打开,又关闭,又泄露;几次之后,程序占用内存超过系统限制,FC。
4.2 使用Handler导致内存泄露的解决方法
方法一:通过程序逻辑来进行保护。
1.在关闭Activity的时候停掉你的后台线程。线程停掉了,就相当于切断了Handler和外部连接的线,Activity自然会在合适的时候被回收。
2.如果你的Handler是被delay的Message持有了引用,那么使用相应的Handler的removeCallbacks()方法,把消息对象从消息队列移除就行了。
方法二:将Handler声明为静态类。
静态类不持有外部类的对象,所以你的Activity可以随意被回收。代码如下:
static class MyHandler extends Handler {
@Override
public void handleMessage(Message msg) {
mImageView.setImageBitmap(mBitmap);
}
}
但其实没这么简单。使用了以上代码之后,你会发现,由于Handler不再持有外部类对象的引用,导致程序不允许你在Handler中操作Activity中的对象了。所以你需要在Handler中增加一个对Activity的弱引用(WeakReference):
static class MyHandler extends Handler {
WeakReference<Activity > mActivityReference;
MyHandler(Activity activity) {
mActivityReference= new WeakReference<Activity>(activity);
}
@Override
public void handleMessage(Message msg) {
final Activity activity = mActivityReference.get();
if (activity != null) {
mImageView.setImageBitmap(mBitmap);
}
}
}
将代码改为以上形式之后,就算完成了。
延伸:什么是WeakReference?
WeakReference弱引用,与强引用(即我们常说的引用)相对,它的特点是,GC在回收时会忽略掉弱引用,即就算有弱引用指向某对象,但只要该对象没有被强引用指向(实际上多数时候还要求没有软引用,但此处软引用的概念可以忽略),该对象就会在被GC检查到时回收掉。对于上面的代码,用户在关闭Activity之后,就算后台线程还没结束,但由于仅有一条来自Handler的弱引用指向Activity,所以GC仍然会在检查的时候把Activity回收掉。这样,内存泄露的问题就不会出现了。


 289
289


 被折叠的 条评论
为什么被折叠?
被折叠的 条评论
为什么被折叠?
 到【灌水乐园】发言


