


本次记录使用Centos7.x最小安装版操作
夜莺官网:http://n9e.flashcat.cloud/
服务端组件部署
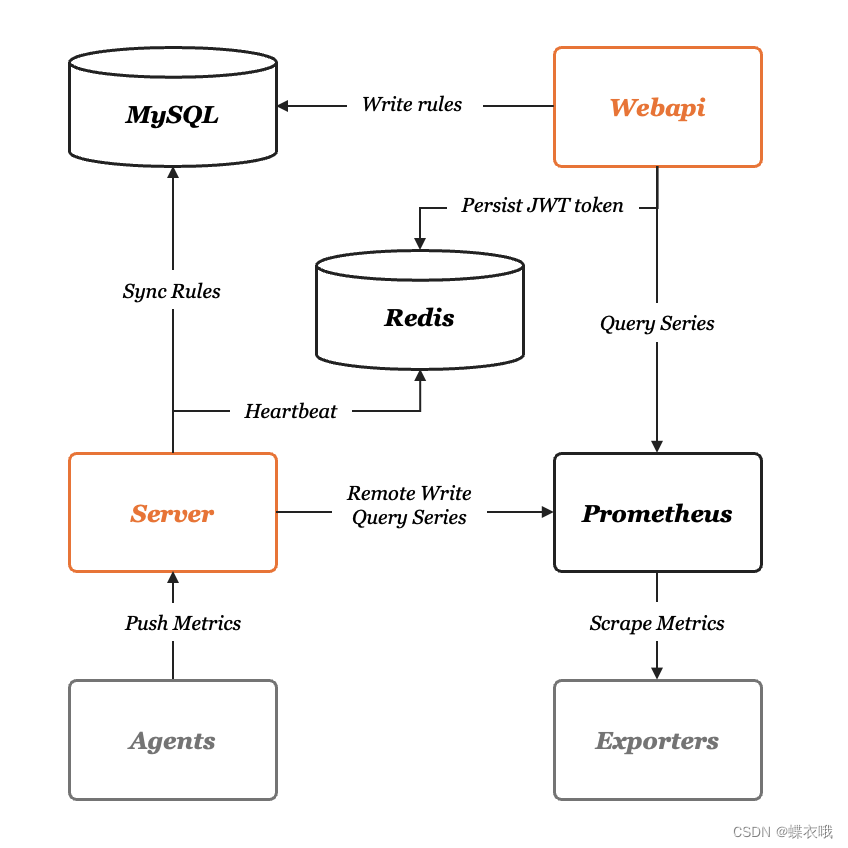
由此可见,我们需要安装MySQL、Redis、Prometheus。
MySQL安装:https://blog.csdn.net/li1244453393/article/details/128657284
Redis安装:https://blog.csdn.net/li1244453393/article/details/128672727
安装Prometheus
prometheus的github:https://github.com/prometheus/prometheus
我们可以下载一个适合自己系统的发布版
这里我使用 prometheus-2.37.4.linux-amd64.tar.gz
上传到服务器上并解压,这里我解压到 /home/prometheus-2.37.4.linux-amd64 后续操作都将使用这个目录
将该目录拷贝到/opt目录下并命名为prometheus
cp -far /home/prometheus-2.37.4.linux-amd64/* /opt/prometheus
在/etc/systemd/system目录下新建文件 prometheus.service ,文件内容如下
[Unit]
Description="prometheus"
Documentation=https://prometheus.io/
After=network.target

[Service]
Type=simple

ExecStart=/opt/prometheus/prometheus  --config.file=/opt/prometheus/prometheus.yml --storage.tsdb.path=/opt/prometheus/data --web.enable-lifecycle --enable-feature=remote-write-receiver --query.lookback-delta=2m

Restart=on-failure
SuccessExitStatus=0
LimitNOFILE=65536
StandardOutput=syslog
StandardError=syslog
SyslogIdentifier=prometheus

[Install]
WantedBy=multi-user.target
启动Prometheus
systemctl daemon-reload
systemctl enable prometheus
systemctl restart prometheus
systemctl status prometheus
状态

安装夜莺
夜莺的github:https://github.com/didi/nightingale
我们可以下载一个适合自己系统的发布版
这里我使用 n9e-v5.14.5-linux-amd64.tar.gz
上传到服务器上并解压,这里我解压到 /home/n9e 后续操作都将使用这个目录
导入夜莺的MySQL
使用mysql命令导入
./mysql -uroot -proot < /home/n9e/docker/initsql/a-n9e.sql
注意,密码请根据自己的实际调整
修改夜莺的配置
配置文件
注意:修改时两个一同修改
服务端:/home/n9e/etc/server.conf
Web端:/home/n9e/etc/webapi.conf
夜莺使用了Prometheus的默认端口,如果需要修改Prometheus的地址和端口,编辑配置文件,搜索 [Reader] 节点,找到该节点的 Url 配置项修改。注意:该配置仅server.conf中存在。
配置MySQL:搜索 [DB] 节点,找到该节点的 DSN 配置项修改
配置Redis:搜索 [Redis] 节点
启动夜莺
进入夜莺解压目录
cd /home/n9e
启动服务端
nohup ./n9e server > server.log & clear
启动Web端
nohup ./n9e webapi > webapi.log & clear


 5258
5258


 被折叠的 条评论
为什么被折叠?
被折叠的 条评论
为什么被折叠?
 到【灌水乐园】发言


