


 本文介绍了如何使用Spring框架配合JDBCTemplate和MyBatis进行数据库操作,包括模拟User和Student表的类结构,实现DAO和Service接口,以及编写单元测试和控制台交互功能。实验内容涉及用户登录、数据查询等,并提供了必要的Maven配置和开发工具环境说明。
实验目的:
- 掌握Spring和JDBCTemplate操作数据库
- 掌握Spring和MyBatis操作数据库
实验内容:
在计算机上实现模拟查询学生成绩的操作,要求如下:
(1)构建User类和Student类,模拟数据库中的两个表,类属性如下:
A.Student类,属性(sid,sname,sex,age,uid)
B.User,属性(uid,username,password)
(2)假设User类所对应的方法是login(username,password)和registry(username,password)完成该类中的这个方法在dao层的接口和实现类,以及service层的接口和实现类,注意,dao的实现类中,该登录方法的实现直接使用集合查询数据,注册方法直接往集合里面加入新用户即可,不用查询数据库,在service层的实现类则是直接调用dao层的方法即可;
(3)假设Student类所对应的方法是查询所有学生信息(List<Student> findStudent())以及根据id查询学生信息(Student findStudentById(int id))以及根据名字模糊查找学生信息(List<Student> findStudentByName(String name))这三个方法,完成这三个方法在dao和service层的构建以及调用关系,实际student数据不用查数据库,我们直接在dao里面构建一个student的集合并自己初始化数据即可;
(4)提供JUnit单元测试,使用Scanner类来完成控制台的输入指令:1.用户登录,2.退出,当用户登录成功之后,开始有新指令:1.查找所有学生、2.根据id查找学生、3.根据学生姓名查找学生;完成以上5个功能;
实验仪器设备(实验环境):
运行环境:Windows 10
开发工具:IntelliJ IDEA 或 Eclipse
运行环境:Java 21
实验步骤/实现代码:
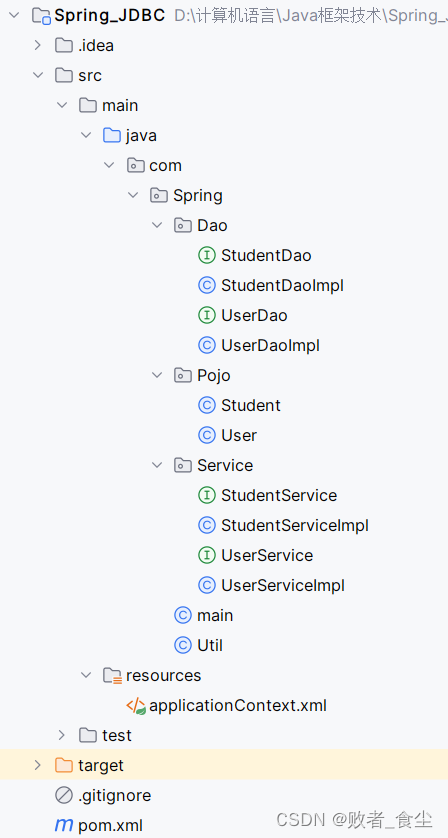
步骤1:环境搭建
1.1、创建一个Maven项目,目录如下:
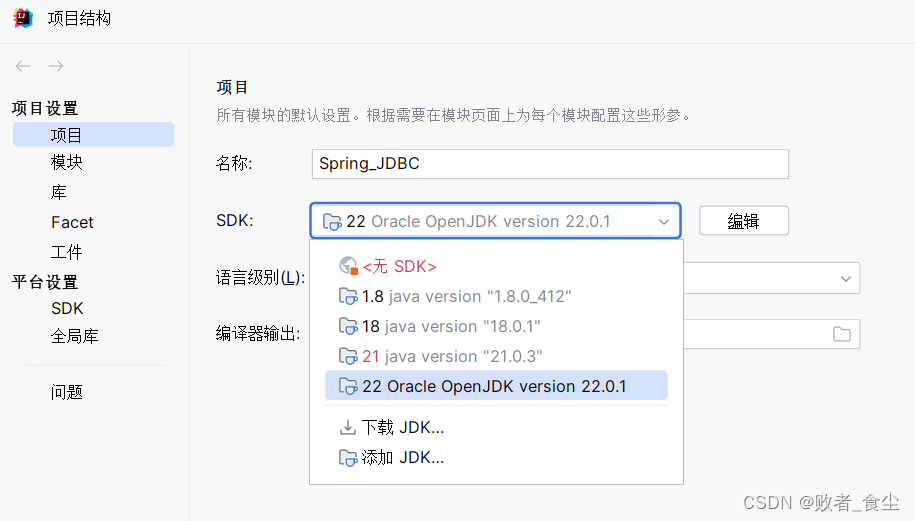
1.2、添加Spring和Spring JDBC Template的依赖,导入项目依赖在pom.xml 而且Java版本 为21。
Java22 和 Java21都可以,我这里使用的是Java22。系统默认自带JDK1.8,没有的可以去官网下载
将相关依赖写入 poml.xml 中:
<?xml version="1.0" encoding="UTF-8"?>
<project xmlns="http://maven.apache.org/POM/4.0.0"
xmlns:xsi="http://www.w3.org/2001/XMLSchema-instance"
xsi:schemaLocation="http://maven.apache.org/POM/4.0.0 http://maven.apache.org/xsd/maven-4.0.0.xsd">
<modelVersion>4.0.0</modelVersion>
<groupId>org.example</groupId>
<artifactId>Spring_jdbc</artifactId>
<version>1.0-SNAPSHOT</version>
<properties>
<maven.compiler.source>21</maven.compiler.source>
<maven.compiler.target>21</maven.compiler.target>
<project.build.sourceEncoding>UTF-8</project.build.sourceEncoding>
</properties>
<dependencies>
<dependency>
<groupId>org.springframework</groupId>
<artifactId>spring-core</artifactId>
<version>5.3.1</version>
</dependency>
<dependency>
<groupId>org.springframework</groupId>
<artifactId>spring-beans</artifactId>
<version>5.3.1</version>
</dependency>
<dependency>
<groupId>org.springframework</groupId>
<artifactId>spring-aop</artifactId>
<version>5.3.1</version>
</dependency>
<dependency>
<groupId>org.springframework</groupId>
<artifactId>spring-context</artifactId>
<version>5.3.1</version>
</dependency>
<dependency>
<groupId>org.springframework</groupId>
<artifactId>spring-expression</artifactId>
<version>5.3.1</version>
</dependency>
<dependency>
<groupId>org.springframework</groupId>
<artifactId>spring-jdbc</artifactId>
<version>5.3.1</version>
</dependency>
<dependency>
<groupId>org.springframework</groupId>
<artifactId>spring-tx</artifactId>
<version>5.3.1</version>
</dependency>
<dependency>
<groupId>mysql</groupId>
<artifactId>mysql-connector-java</artifactId>
<version>8.0.23</version>
</dependency>
<dependency>
<groupId>commons-logging</groupId>
<artifactId>commons-logging</artifactId>
<version>1.2</version>
</dependency>
</dependencies>
</project>步骤2:创建User类和Student类
2.1、创建User类,包含属性uid, username, password。
package com.Spring.Pojo;
public class User {
  private long uid;
  private String username;
  private String password;

  public long getUid() {
    return uid;
  }

  public void setUid(long uid) {
    this.uid = uid;
  }

  public String getUsername() {
    return username;
  }

  public void setUsername(String username) {
    this.username = username;
  }

  public String getPassword() {
    return password;
  }

  public void setPassword(String password) {
    this.password = password;
  }

  @Override
  public String toString() {
    return "User{" +
            "uid=" + uid +
            ", username='" + username + '\'' +
            ", password='" + password + '\'' +
            '}';
  }
}2.2、创建Student类,包含属性sid, sname, sex, age,suid。
package com.Spring.Pojo;

public class Student {
  private long sid;
  private String sname;
  private String sex;
  private long age;
  private long suid;

  public long getSid() {
    return sid;
  }

  public void setSid(long sid) {
    this.sid = sid;
  }

  public String getSname() {
    return sname;
  }

  public void setSname(String sname) {
    this.sname = sname;
  }

  public String getSex() {
    return sex;
  }

  public void setSex(String sex) {
    this.sex = sex;
  }

  public long getAge() {
    return age;
  }

  public void setAge(long age) {
    this.age = age;
  }

  public long getSuid() {
    return suid;
  }

  public void setSuid(long suid) {
    this.suid = suid;
  }

  @Override
  public String toString() {
    return "Student{" +
            "sid=" + sid +
            ", sname='" + sname + '\'' +
            ", sex='" + sex + '\'' +
            ", age=" + age +
            ", suid=" + suid +
            '}';
  }
}
步骤3:实现DAO层
3.1、创建UserDao和StudentDao接口,定义所需的方法。
UserDao接口类:(这里只是实现了登录方法 仅用于测试学习JDBCTemplate的用法)
package com.Spring.Dao;

import com.Spring.Pojo.User;

import java.util.List;

public interface UserDao {
    void login(String userName, String password);
}StudentDao接口类:
package com.Spring.Dao;

import com.Spring.Pojo.Student;
import java.util.List;
import java.util.Map;
public interface StudentDao {
    public List<Student> findStudent();
    public List<Student> findStudentById(int id);
    public List<Student> findStudentByName(String name);
}
3.2、创建UserDaoImpl和StudentDaoImpl实现类,使用JdbcTemplate实现接口方法。
UserDaoImpl实现类:
package com.Spring.Dao;

import com.Spring.Pojo.User;
import com.Spring.Util;
import org.springframework.jdbc.core.BeanPropertyRowMapper;
import org.springframework.jdbc.core.JdbcTemplate;
import org.springframework.jdbc.core.RowMapper;
import java.util.List;
public class UserDaoImpl implements UserDao {
    static JdbcTemplate jdbcTemplate = Util.getjdbcTemplate();
    @Override
    public void login(String userName, String password) {
        System.out.println("用户名:" + userName + "密码:" + password);
        String sql = "select * from user where username=? and password=?";
        RowMapper<User> rowMapper = new BeanPropertyRowMapper<User>(User.class);
        try {
            User user = jdbcTemplate.queryForObject(sql, rowMapper, userName, password);
            if (user != null) {
                System.out.println("登录成功");
            }
        } catch (Exception e) {
            System.out.println("登录失败");
        }
    }
}StudentDaoImpl实现类:
package com.Spring.Dao;

import com.Spring.Pojo.Student;
import com.Spring.Util;
import org.springframework.jdbc.core.BeanPropertyRowMapper;
import org.springframework.jdbc.core.JdbcTemplate;
import org.springframework.jdbc.core.RowMapper;
import java.util.List;
public class StudentDaoImpl implements StudentDao {
    static Student student = new Student();
    static JdbcTemplate jdbcTemplate = Util.getjdbcTemplate();
    @Override
    public List<Student> findStudent() {
        String sql = "select * from student";
        RowMapper<Student> rowMapper = new BeanPropertyRowMapper<Student>(Student.class);
        return jdbcTemplate.query(sql, rowMapper);
    }
    @Override
    public List<Student> findStudentById(int id) {
        String sql = "select s.* from student s ,user u where s.suid = u.uid and uid=?";
        RowMapper<Student> rowMapper = new BeanPropertyRowMapper<Student>(Student.class);
        return  jdbcTemplate.query(sql, rowMapper, id);
    }
    @Override
    public List<Student> findStudentByName(String name) {
        String sql = "select * from student where sname like concat('%',?,'%')";
        RowMapper<Student> rowMapper = new BeanPropertyRowMapper<Student>(Student.class);
        return jdbcTemplate.query(sql, rowMapper, name);
    }
}
步骤4:实现Service层
4.1、创建UserService和StudentService接口,定义用户相关操作的方法。
UserService接口类:
package com.Spring.Service;
public interface UserService {
    void login();
}StudentService接口类:
package com.Spring.Service;

import com.Spring.Pojo.Student;
import java.util.List;
public interface StudentService  {
    public List<Student> findStudent();
    public List<Student> findStudentById();
    public List<Student> findStudentByName();
}4.2、创建UserServiceImpl和StudentServiceImpl实现类,注入UserDao与StudentService,实现业务逻辑。
UserServiceImpl实现类:
package com.Spring.Service;

import com.Spring.Dao.UserDao;
import com.Spring.Dao.UserDaoImpl;
import java.util.Scanner;
public class UserServiceImpl implements UserService{
    static Scanner scanner = new Scanner(System.in);
    static UserDao userDao = new UserDaoImpl();
    @Override
    public void login() {
        String userName = null;
        String password = null;
        System.out.println("请输入用户名");
        userName = scanner.next();
        System.out.println("请输入密码");
        password = scanner.next();
        userDao.login(userName,password);
    }
}StudentServiceImpl实现类:
package com.Spring.Service;
import com.Spring.Dao.StudentDao;
import com.Spring.Dao.StudentDaoImpl;
import com.Spring.Pojo.Student;
import java.util.ArrayList;
import java.util.List;
import java.util.Scanner;
public class StudentServiceImpl implements StudentService {
List<Student> students = new ArrayList<>();
static Scanner scanner = new Scanner(System.in);
static StudentDao studentDao = new StudentDaoImpl();
@Override
public List<Student> findStudent() {
students = studentDao.findStudent();
for (Student student : students) {
System.out.println(student);
}
return null;
}
@Override
public List<Student> findStudentById() {
int id = 0;
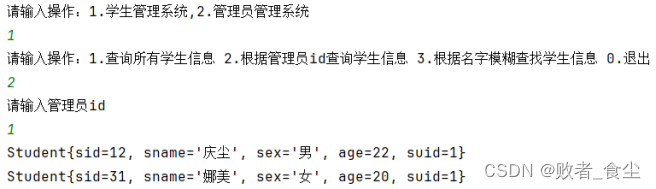
System.out.println("请输入管理员id");
id = scanner.nextInt();
students = studentDao.findStudentById(id);
for (Student student : students) {
System.out.println(student);
}
return null;
}
@Override
public List<Student> findStudentByName() {
String name = null;
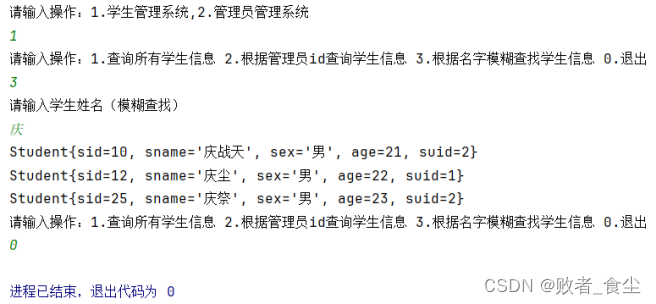
System.out.println("请输入学生姓名(模糊查找)");
name = scanner.next();
students = studentDao.findStudentByName(name);
for (Student student : students) {
System.out.println(student);
}
return null;
}
}步骤5:编写Unit单元测试
Util 类 :(这是用来接收 jdbcTemplate 方法的)
package com.Spring;

import org.springframework.context.ApplicationContext;
import org.springframework.context.support.ClassPathXmlApplicationContext;
import org.springframework.jdbc.core.JdbcTemplate;
public class Util {
    private static JdbcTemplate jdbcTemplate =null;
    static {
        ApplicationContext context = new ClassPathXmlApplicationContext("applicationContext.xml");
        jdbcTemplate = (JdbcTemplate) context.getBean("jdbcTemplate");
    }
    public static JdbcTemplate getjdbcTemplate(){
        return jdbcTemplate;
    }
}
最后用了 main 类 的主函数来测试
package com.Spring;
import com.Spring.Service.StudentService;
import com.Spring.Service.StudentServiceImpl;
import com.Spring.Service.UserService;
import com.Spring.Service.UserServiceImpl;
import com.sun.source.tree.ContinueTree;
import com.sun.tools.javac.Main;
import java.util.Scanner;
public class main {
static Scanner scanner = new Scanner(System.in);
static StudentService studentService = new StudentServiceImpl();
static UserService userService = new UserServiceImpl();
public static void main(String[] args) {
System.out.println("请输入操作:1.学生管理系统,2.管理员管理系统");
int a;
try {
a = scanner.nextInt();
if (a == 1) {
while (true) {
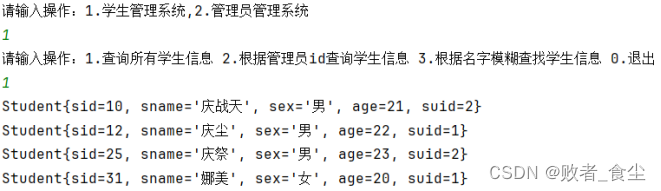
System.out.println("请输入操作:1.查询所有学生信息 2.根据管理员id查询学生信息 3.根据名字模糊查找学生信息 0.退出");
int i = scanner.nextInt();
switch (i) {
case 1:
studentService.findStudent();
break;
case 2:
studentService.findStudentById();
break;
case 3:
studentService.findStudentByName();
break;
case 0:
System.exit(0);
}
}
}
if (a == 2) {
while (true) {
System.out.println("请输入操作:1.登录 0.退出");
int i = scanner.nextInt();
switch (i) {
case 1:
userService.login();
break;
case 0:
System.exit(0);
default:
System.out.println("输入有误");
break;
}
}
}
} catch (Exception e) {
System.out.println("输入有误");
}
}
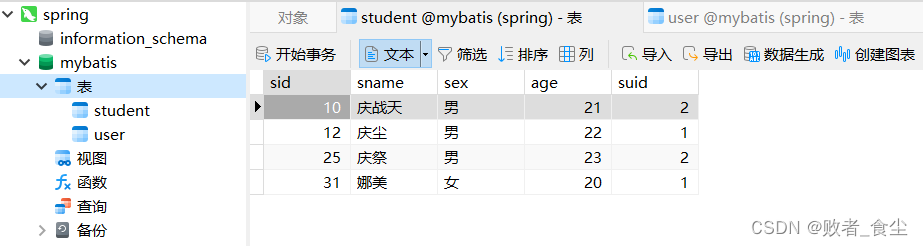
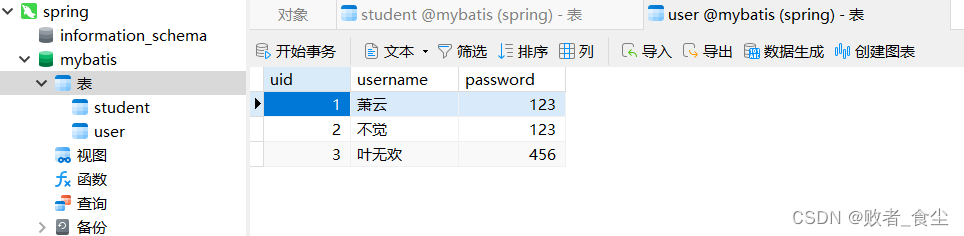
}我的数据库是 MySQL 5.7版本 数据库名字为mybatis
创建两个数据库表(student,user)
数据的相关操作可以看这个:数据库:数据库相关软件下载和使用-CSDN博客
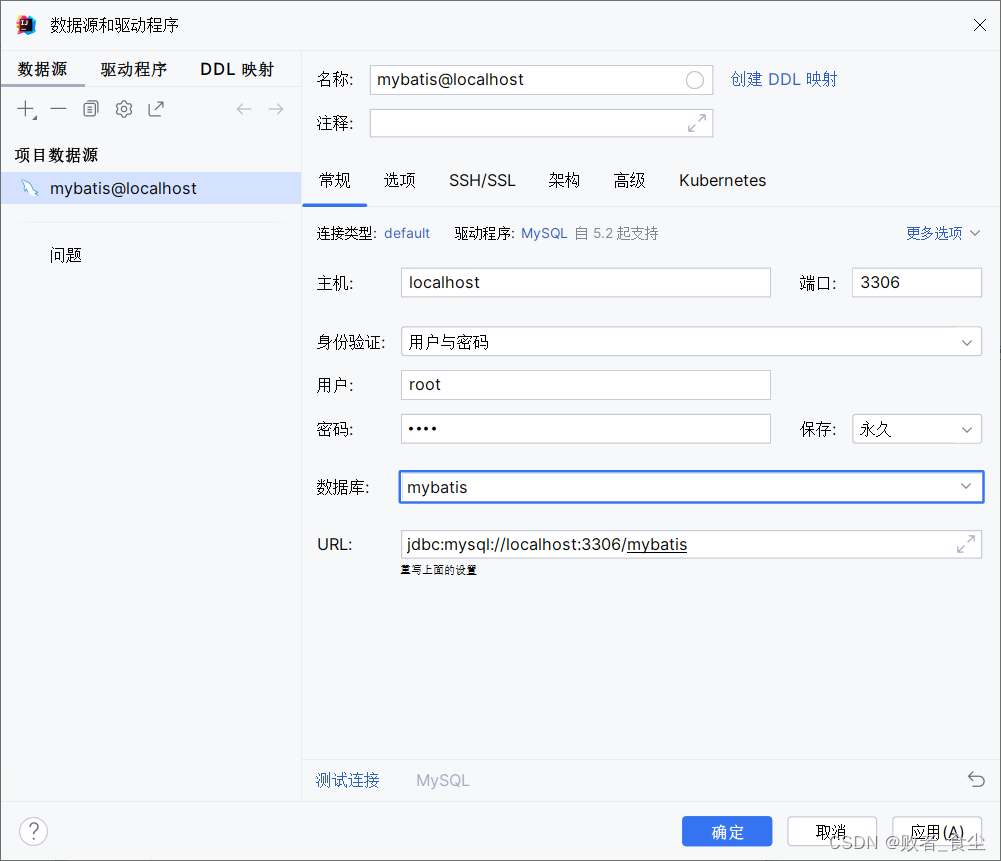
创建好数据库后需在IntelliJ IDEA中连接

用户和密码一般默认都是 root ,数据库名为你之前所创数据库的名字
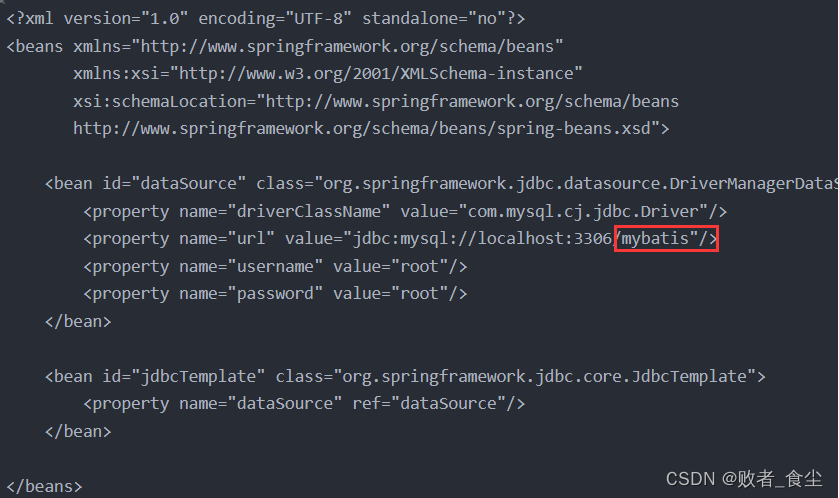
最后配置Spring的 applicationContext.xml 文件或使用注解配置
<?xml version="1.0" encoding="UTF-8" standalone="no"?>
<beans xmlns="http://www.springframework.org/schema/beans"
       xmlns:xsi="http://www.w3.org/2001/XMLSchema-instance"
       xsi:schemaLocation="http://www.springframework.org/schema/beans
       http://www.springframework.org/schema/beans/spring-beans.xsd">

    <bean id="dataSource" class="org.springframework.jdbc.datasource.DriverManagerDataSource">
        <property name="driverClassName" value="com.mysql.cj.jdbc.Driver"/>
        <property name="url" value="jdbc:mysql://localhost:3306/mybatis"/>
        <property name="username" value="root"/>
        <property name="password" value="root"/>
    </bean>

    <bean id="jdbcTemplate" class="org.springframework.jdbc.core.JdbcTemplate">
        <property name="dataSource" ref="dataSource"/>
    </bean>

</beans>
注意:此处为你所创数据库的名称
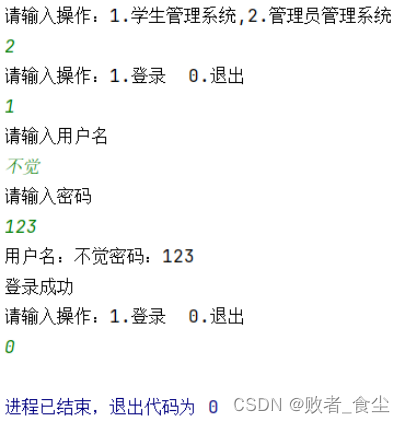
实验结果/运行图:
用户登录和退出:
查找所有学生信息:
根据id查找学生:
根据学生姓名查找学生:


 645
645


 被折叠的 条评论
为什么被折叠?
被折叠的 条评论
为什么被折叠?
 到【灌水乐园】发言


