


目录
3.编写RedissonConfig,配置RedissonClient的信息
5.编写定时器TimerService的实现子类,实现定时器
6.启动类加上@EnableScheduling注解并启动项目
1.加入maven依赖
<!-- https://mvnrepository.com/artifact/org.redisson/redisson -->
<dependency>
    <groupId>org.redisson</groupId>
    <artifactId>redisson</artifactId>
    <version>3.17.0</version>
</dependency>
2.编写application.yaml
spring:
  redis:
    host: localhost
    port: 6379
    password: 111
    database: 0
timer:
  auto-check: "0 0/1 * * * ?"
spring.redis.* : 配置redis
timer.auto-check : 使用cron表达式,设置定时器多久执行一次,key值可自定义
cron表达式生成网址 : 在线Cron表达式生成器
3.编写RedissonConfig,配置RedissonClient的信息
import org.redisson.Redisson;
import org.redisson.config.Config;
import org.springframework.beans.factory.annotation.Value;
import org.springframework.context.annotation.Bean;
import org.springframework.context.annotation.Configuration;
import org.redisson.api.RedissonClient;

/**
 * @author 59899
 */
@Configuration
public class RedissonConfig {

    @Value("${spring.redis.host}")
    private String host;

    @Value("${spring.redis.port}")
    private String port;

    @Value("${spring.redis.password}")
    private String password;

    @Value("${spring.redis.database}")
    private int database;

    @Bean
    public RedissonClient redissonClient() {
        Config config = new Config();
        config.useSingleServer().setAddress("redis://" + host + ":" + port)
                .setPassword(password).setDatabase(database);
        config.useSingleServer().setConnectionMinimumIdleSize(5);
        return Redisson.create(config);
    }
}
读取编写好的application.yaml文件,
并取得redis的配置信息,添加到Config中
4.编写定时器TimerService接口
/**
 * @author 59899
 */
public interface TimerService {

    /**
     * 定时器
     */
    void timer();

}
5.编写定时器TimerService的实现子类,实现定时器
import lombok.extern.slf4j.Slf4j;
import org.redisson.api.RLock;
import org.redisson.api.RedissonClient;
import org.springframework.beans.factory.annotation.Autowired;
import org.springframework.scheduling.annotation.Scheduled;
import org.springframework.stereotype.Service;

import java.util.Date;
import java.util.concurrent.TimeUnit;

/**
 * @author 59899
 */
@Slf4j
@Service
public class TimerServiceImpl implements TimerService {

    @Autowired
    RedissonClient redissonClient;

    private final String schedule_lock = "timer:auto_check_lock";

    @Scheduled(cron = "${timer.auto-check: 0 0/1 * * * ?}")
    @Override
    public void timer() {
        log.info("trigger scheduled auto check");
        RLock lock = redissonClient.getLock(schedule_lock);
        try {
            //设置最长锁占用时间,避免服务挂掉导致锁无法释放
            if (lock.tryLock(0, 10, TimeUnit.MINUTES)) {
                // 写入需要定时执行的代码
                System.out.println(new Date()+": 定时器执行任务");
            } else {
                log.info("checkAndAutoReplay ignore,maybe another instance is running!");
            }
        } catch (InterruptedException e) {
            log.error("triggerRawReplyJob exception!", e);
        } finally {
            lock.unlock();
        }
    }
}
使用配置好的RedissonClient,并获取锁,
使用@Scheduled()并读取application.yaml中自定义的cron表达式设置定时器多久执行一次
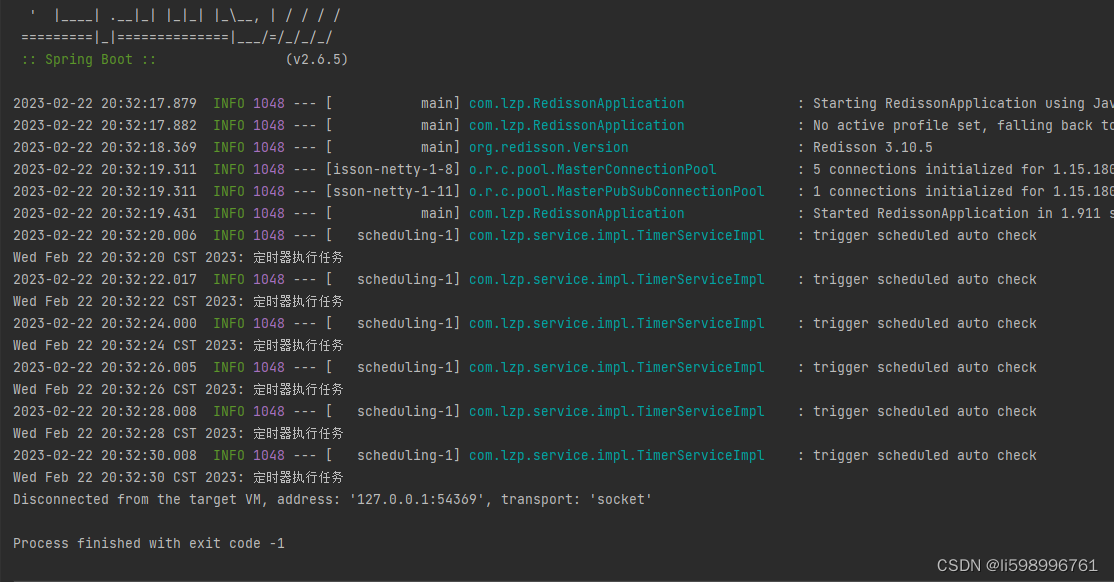
6.启动类加上@EnableScheduling注解并启动项目
import org.springframework.boot.SpringApplication;
import org.springframework.boot.autoconfigure.SpringBootApplication;
import org.springframework.scheduling.annotation.EnableScheduling;

/**
 * @author 59899
 */
@SpringBootApplication
@EnableScheduling
public class RedissonApplication {
    public static void main(String[] args) {
        SpringApplication.run(RedissonApplication.class, args);
    }
}
定时器启动成功
7.编写缓存LocalCacheUtils,实现缓存
import lombok.extern.slf4j.Slf4j;
import org.redisson.api.RBucket;
import org.redisson.api.RedissonClient;
import org.springframework.beans.factory.annotation.Autowired;
import org.springframework.stereotype.Component;

import java.util.concurrent.TimeUnit;

/**
 * @author 59899
 */
@Slf4j
@Component
public class LocalCacheUtils {

    @Autowired
    RedissonClient redissonClient;

    /**
     * 添加缓存
     * @param key key
     * @param value value
     */
    public void add(String key, String value) {
        //根据key获取bucket桶对象
        RBucket<Object> bucket = redissonClient.getBucket(key);
        //判读是否存在,并打印日志信息
        if (!bucket.isExists()) {
            log.info("add data");
        }else {
            log.info("update data");
        }
        //添加缓存,若已存在,则替换,设置缓存超时时间
        bucket.set(value, 60, TimeUnit.SECONDS);
    }


    /**
     * 在缓存中获取信息
     * @param key key
     * @return 信息结果
     */
    public Object get(String key) {
        //根据key获取bucket桶对象
        RBucket<Object> bucket = redissonClient.getBucket(key);
        //判读是否存在,并打印日志信息
        if (!bucket.isExists()) {
            log.info("error");
        }
        log.info("cache is {}", bucket.get());
        return bucket.get();
    }

    /**
     * 删除缓存信息
     * @param key key
     */
    public void delete(String key) {
        //根据key获取bucket桶对象
        RBucket<Object> bucket = redissonClient.getBucket(key);
        //判读是否存在,并打印日志信息
        if (!bucket.isExists()) {
            log.info("error");
        }
        bucket.delete();
    }

}
使用Bucket桶概念操作redis缓存
本篇文章分享到这里就结束啦!
点个赞再走吧~


 9902
9902


 被折叠的 条评论
为什么被折叠?
被折叠的 条评论
为什么被折叠?
 到【灌水乐园】发言


