


环境
- 硬件:HLK_MTK7628n
- 系统:官方Openwrt
- 分支:master
海凌科提供的OpenWrt 系统太老,是14年的版本,于是下载最新版本进行编译。编译步骤参考L大的lede项目说明。(ps:最先是使用lede进行的开发,后来发现mosquitto不能正常使用,折腾了好几天没有找到解决方案,于是回归到原版Openwrt)
硬件连接
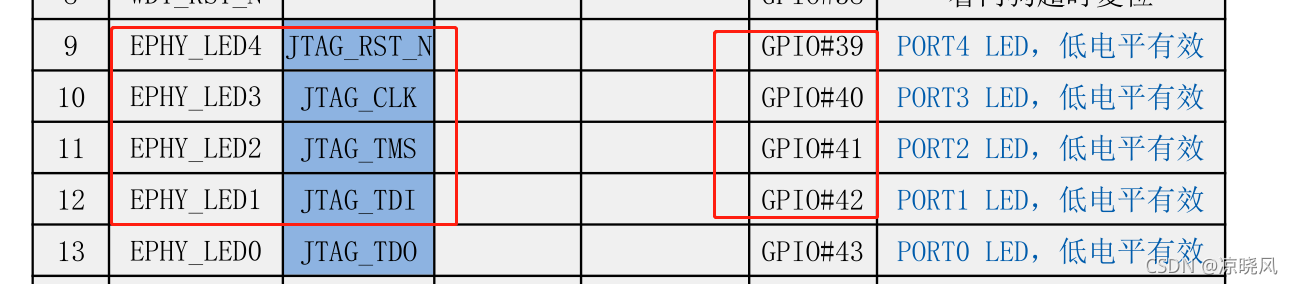
将 4个网口的led释放,用于单独控制。
操作步骤
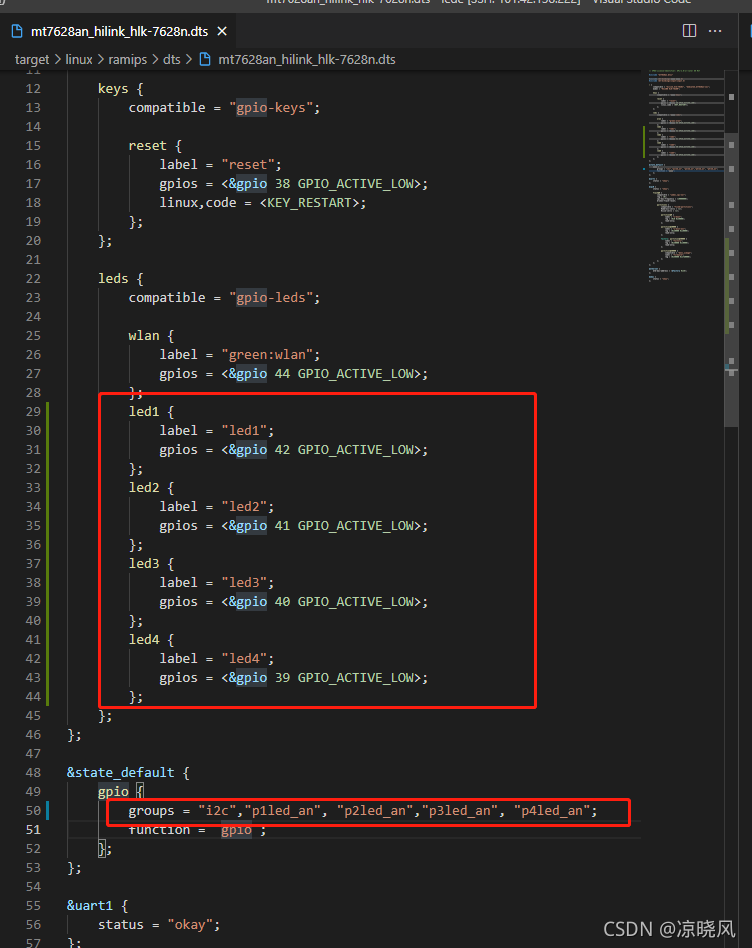
1.修改dts文件
打开target/linux/ramips/dts/mt7628an_hilink_hlk-7628n.dts修改如下:
// SPDX-License-Identifier: GPL-2.0-or-later OR MIT
#include "mt7628an.dtsi"
#include <dt-bindings/gpio/gpio.h>
#include <dt-bindings/input/input.h>
/ {
compatible = "hilink,hlk-7628n", "mediatek,mt7628an-soc";
model = "HILINK HLK-7628N";
keys {
compatible = "gpio-keys";
reset {
label = "reset";
gpios = <&gpio 38 GPIO_ACTIVE_LOW>;
linux,code = <KEY_RESTART>;
};
};
leds {
compatible = "gpio-leds";
wlan {
label = "green:wlan";
gpios = <&gpio 44 GPIO_ACTIVE_LOW>;
};
led1 {
label = "led1";
gpios = <&gpio 42 GPIO_ACTIVE_LOW>;
};
led2 {
label = "led2";
gpios = <&gpio 41 GPIO_ACTIVE_LOW>;
};
led3 {
label = "led3";
gpios = <&gpio 40 GPIO_ACTIVE_LOW>;
};
led4 {
label = "led4";
gpios = <&gpio 39 GPIO_ACTIVE_LOW>;
};
};
};
&state_default {
gpio {
groups = "i2c","p1led_an", "p2led_an","p3led_an", "p4led_an";
function = "gpio";
};
};
&uart1 {
status = "okay";
};
&spi0 {
status = "okay";
flash@0 {
compatible = "jedec,spi-nor";
reg = <0>;
spi-max-frequency = <10000000>;
broken-flash-reset;
partitions {
compatible = "fixed-partitions";
#address-cells = <1>;
#size-cells = <1>;
partition@0 {
label = "u-boot";
reg = <0x0 0x30000>;
read-only;
};
partition@30000 {
label = "u-boot-env";
reg = <0x30000 0x10000>;
read-only;
};
factory: partition@40000 {
label = "factory";
reg = <0x40000 0x10000>;
read-only;
};
partition@50000 {
compatible = "denx,uimage";
label = "firmware";
reg = <0x50000 0x1fb0000>;
};
};
};
};
ðernet {
mtd-mac-address = <&factory 0x28>;
};
&wmac {
status = "okay";
};
重点观察 leds 和 state_default部分
2.重新编译
make clean
make
生成镜像后通过web或者uboot烧录到板子中,进入系统进行测试
3.测试
系统启动后,串口控制台进入路径
cd /sys/devices/platform/leds/leds/
查看支持的led
ls

操作某一个led,注意操作某一个led就得进入该文件夹
cd led1
ls

各个含义如下:
- brightness 控制亮度
- todo 补充
点灯操作
 echo 1 > brightness
 echo 0 > brightness
有效果:可以点亮、关闭网络指示灯
原理
dts文件中 p2led_an对应的io是在哪里定义的呢,是在驱动文件中,如下
驱动文件所在位置
/home/luke/openwrt/lede/build_dir/toolchain-mipsel_24kc_gcc-8.4.0_musl/linux-5.4.158/arch/mips/ralink/mt7620.c
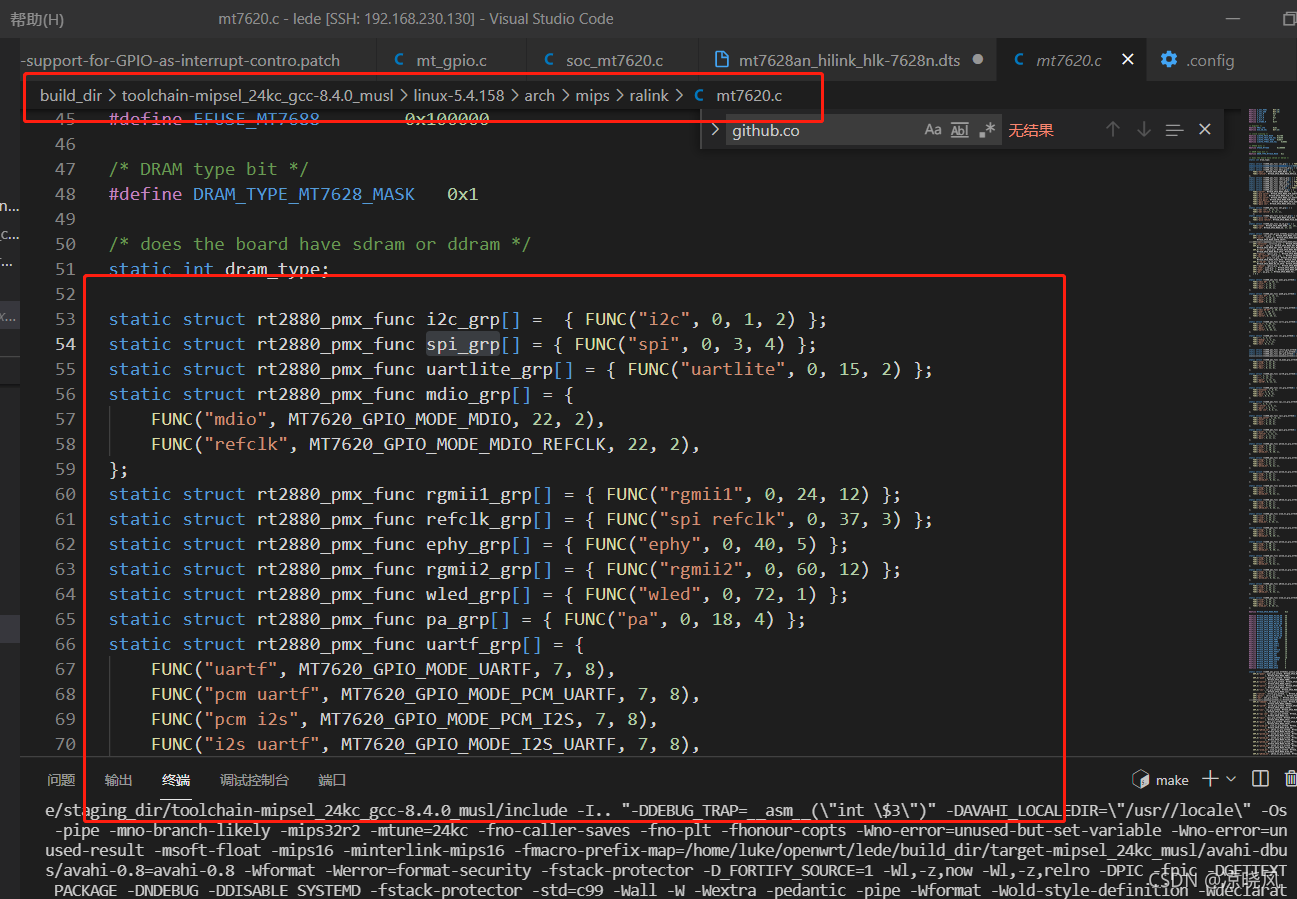
驱动和dts一一对应。


 被折叠的 条评论
为什么被折叠?
被折叠的 条评论
为什么被折叠?
 到【灌水乐园】发言


