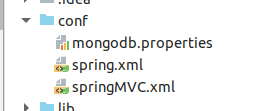
最近老师叫我们写一个项目练练MongoDB的使用, 我想着就用spring + springMVC + Mongodb来写. 这简直就是给自己挖坑往里面跳 哎哎哎!!!
下面就分享下我的经历
1.新建一个spring +web 的项目 (我用的是idea) , 开始项目部署
第一步 添加Exploded到项目中
 第二步配置tomcat(这就不演示了,基本配置)
第三步 添加tomcat到项目中(这一步很重要)

点击右面的 + 号 添加tomcat
第四步添加MongoDB所需要的jar包


上面那几个对勾一定要和我的一样, 第二对勾是添加MongoDB 所依赖的库.
由于我们在新建项目的时候idea就帮我们添加了spring5 最新版的jar包. 所以我们要选
spring-data-mongodb-2.2.4.RELEASE.jar 也是最新版jar包 然后他就自动帮你添加整合MongoDB所有的jar包 包括驱动包

要是springMVC的jar 没导进来 在这可以添加

到此jar包依赖完成
下面sping 整合MongoDB配置

spring.xml配置
<?xml version="1.0" encoding="UTF-8"?>
<beans xmlns="http://www.springframework.org/schema/beans"
       xmlns:xsi="http://www.w3.org/2001/XMLSchema-instance"
       xmlns:context="http://www.springframework.org/schema/context"
       xmlns:mongo="http://www.springframework.org/schema/data/mongo"
       xsi:schemaLocation="http://www.springframework.org/schema/context http://www.springframework.org/schema/context/spring-context.xsd
          http://www.springframework.org/schema/data/mongo http://www.springframework.org/schema/data/mongo/spring-mongo.xsd
          http://www.springframework.org/schema/beans
          http://www.springframework.org/schema/beans/spring-beans.xsd">


    <!--<aop:aspectj-autoproxy proxy-target-class="true"/>-->


    <!--================controller不归spring管==================-->
    <context:component-scan base-package="com.liang">
        <context:exclude-filter type="annotation" expression="org.springframework.stereotype.Controller"/>
        <context:exclude-filter type="annotation"
                                expression="org.springframework.web.bind.annotation.ControllerAdvice"/>
    </context:component-scan>


    <!--使用注解管理bean  -->
    <context:annotation-config/>

    <!-- 加载mongodb的属性配置文件 -->
    <context:property-placeholder location="classpath:mongodb.properties"/>


    <mongo:mongo-client id="mongoClient" host="${mongo.host}" port="${mongo.port}">
        <mongo:client-options
                connections-per-host="${mongo.connectionsPerHost}"
                min-connections-per-host="${mongo.minConnectionsPerHost}"
                threads-allowed-to-block-for-connection-multiplier="${mongo.threadsAllowedToBlockForConnectionMultiplier}"
                connect-timeout="${mongo.connectTimeout}"
                max-wait-time="${mongo.maxWaitTime}"
                socket-keep-alive="${mongo.socketKeepAlive}"
                socket-timeout="${mongo.socketTimeout}"
                description="${mongo.description}"
                max-connection-idle-time="${mongo.maxConnectionIdleTime}"
                max-connection-life-time="${mongo.maxConnectionLifeTime}"
                heartbeat-socket-timeout="${mongo.heartbeatSocketTimeout}"
                heartbeat-connect-timeout="${mongo.heartbeatConnectTimeout}"
                min-heartbeat-frequency="${mongo.minHeartbeatFrequency}"
                heartbeat-frequency="${mongo.heartbeatFrequency}"

        />
    </mongo:mongo-client>


    <mongo:db-factory id="mongoDbFactory" dbname="${mongo.defaultDbName}" mongo-ref="mongoClient"/>
    <mongo:template id="mongoTemplate" db-factory-ref="mongoDbFactory" write-concern="NORMAL"/>

    <!--激活注解-->
    <bean class="org.springframework.context.annotation.CommonAnnotationBeanPostProcessor"/>


</beans>
springMVC配置
<?xml version="1.0" encoding="UTF-8"?>
<beans xmlns="http://www.springframework.org/schema/beans"
       xmlns:xsi="http://www.w3.org/2001/XMLSchema-instance"
       xmlns:context="http://www.springframework.org/schema/context"
       xmlns:mvc="http://www.springframework.org/schema/mvc"
       xsi:schemaLocation="http://www.springframework.org/schema/mvc http://www.springframework.org/schema/mvc/spring-mvc-4.0.xsd
		http://www.springframework.org/schema/beans http://www.springframework.org/schema/beans/spring-beans.xsd
		http://www.springframework.org/schema/context http://www.springframework.org/schema/context/spring-context-4.0.xsd">
    <!-- ================扫包controller==================== -->
    <context:component-scan base-package="com.liang" use-default-filters="false">
        <context:include-filter type="annotation" expression="org.springframework.stereotype.Controller"/>
        <context:include-filter type="annotation" expression="org.springframework.web.bind.annotation.ControllerAdvice"/>
    </context:component-scan>

    <!-- =================视图解析器======================= -->
    <bean class="org.springframework.web.servlet.view.InternalResourceViewResolver">
        <property name="prefix" value="jsp/"></property>
        <property name="suffix" value=".jsp"></property>
    </bean>
    <!--
       自己映射的就自己处理,不能处理的就交给tomcat。(例如js , css)
     -->
    <mvc:default-servlet-handler/>

    <!-- ========springMVC保证动静态资源都能被访问到========= -->
    <mvc:annotation-driven></mvc:annotation-driven>
</beans>
mongodb.properties配置
mongo.host=127.0.0.1
mongo.port=27017
mongo.defaultDbName=ems
#mongo.user=joyven
#mongo.pwd=123456
mongo.connectionsPerHost=10
mongo.threadsAllowedToBlockForConnectionMultiplier=5
mongo.minConnectionsPerHost=5
#连接超时时间
mongo.connectTimeout=10000
#等待时间
mongo.maxWaitTime=120000
#Socket超时时间
mongo.socketTimeout=0
mongo.socketKeepAlive=true

mongo.description=ems test mongodb database
mongo.maxConnectionIdleTime=1500
mongo.maxConnectionLifeTime=0
#mongo slave
mongo.heartbeatSocketTimeout=1000
mongo.heartbeatConnectTimeout=1500
mongo.minHeartbeatFrequency=5
mongo.heartbeatFrequency=10
web.xml 配置
<?xml version="1.0" encoding="UTF-8"?>
<web-app xmlns="http://xmlns.jcp.org/xml/ns/javaee"
         xmlns:xsi="http://www.w3.org/2001/XMLSchema-instance"
         xsi:schemaLocation="http://xmlns.jcp.org/xml/ns/javaee http://xmlns.jcp.org/xml/ns/javaee/web-app_4_0.xsd"
         version="4.0">
<display-name>ems</display-name>
<welcome-file-list>
    <welcome-file>default.html</welcome-file>
    <welcome-file>default.htm</welcome-file>
    <welcome-file>default.jsp</welcome-file>
</welcome-file-list>

<!-- =========加载spring配置文件========== -->
<context-param>
    <param-name>contextConfigLocation</param-name>
    <param-value>classpath:spring.xml</param-value>
</context-param>
<!-- =========监听器 加载spring ioc容器 实现自动装配ApplicationContext========= -->
<listener>
    <listener-class>org.springframework.web.context.ContextLoaderListener</listener-class>
</listener>

<!-- ==========加载springMVC配置文件=========== -->
<servlet>
    <servlet-name>springDispatcherServlet</servlet-name>
    <servlet-class>org.springframework.web.servlet.DispatcherServlet</servlet-class>
    <init-param>
        <param-name>contextConfigLocation</param-name>
        <param-value>classpath:springMVC.xml</param-value>
    </init-param>
    <load-on-startup>1</load-on-startup>
</servlet>
<servlet-mapping>
    <servlet-name>springDispatcherServlet</servlet-name>
    <url-pattern>/</url-pattern>
</servlet-mapping>

<!-- =======过滤器设置复编码========= -->

<filter>
    <filter-name>CharacterEncodingFilter</filter-name>
    <filter-class>org.springframework.web.filter.CharacterEncodingFilter</filter-class>
    <init-param>
        <param-name>encoding</param-name>
        <param-value>utf-8</param-value>
    </init-param>
    <init-param>
        <!-- =======响应体编码设置========= -->
        <param-name>forceEncoding</param-name>
        <param-value>true</param-value>
    </init-param>
</filter>
<filter-mapping>
    <filter-name>CharacterEncodingFilter</filter-name>
    <url-pattern>/*</url-pattern>
</filter-mapping>

<!-- ========国际化字符编码设置========= -->
<filter>
    <filter-name>HiddenHttpMethodFilter</filter-name>
    <filter-class>org.springframework.web.filter.HiddenHttpMethodFilter</filter-class>
</filter>
<filter-mapping>
    <filter-name>HiddenHttpMethodFilter</filter-name>
    <url-pattern>/*</url-pattern>
</filter-mapping>

</web-app>


 926
926


 被折叠的 条评论
为什么被折叠?


