


WPF 中的模板用于自定义 UI。我们可以操作控件和数据。
WPF 中的每个控件都有与之关联的默认模板。默认模板定义了一种外观和感觉,基本上是一种控制风格。
这就是为什么默认情况下 Button 或 TextBox 形状是矩形的,因为它是在其默认模板中定义的。现在我们可以更新该模板并添加我们自己的实现。
在 WPF 中有两种类型的模板,
- 控制模板:自定义外观
- 数据模板:自定义功能。
ContentTemplate
我们可以在 App.xaml 或资源文件中定义这些模板,以便在应用程序中重用它们。
所以默认情况下,这是 Button 的外观。
<Button x:Name="SubmitButton"
             Content="Submit"
             Height="20"
             Width="100"/>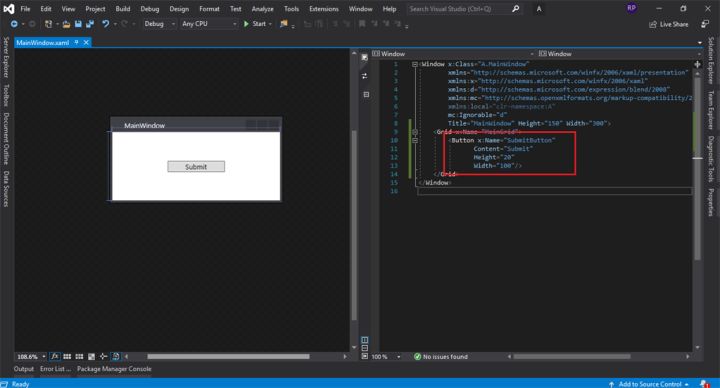
让我们创建一个自定义控件来更改此按钮的形状。
让我们在 Button 中添加一个 ControlTemplate 来实现这一点。但是您可能会收到以下错误。
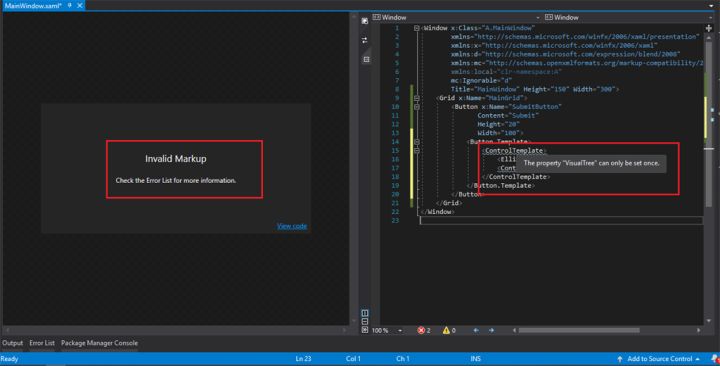
您所见.net framework 给我们编译时间错误,指定Visual tree 只能设置一次,这意味着ControlTemplate 只能有
一个孩子。但是我们在 ControlTemplate 中有几个标签。
<Button x:Name="SubmitButton"
             Content="Submit"
             Height="20"
             Width="100">
          <Button.Template>
              <ControlTemplate>
                  <Ellipse Fill="Gray"/>
                  <ContentPresenter/>
              </ControlTemplate>
          </Button.Template>
</Button>
所以为了克服这个问题,我们可以在 ControlTemplate 中添加 Panel 并在该网格中添加任意数量的标签,因为网格可以有多个子级。
<Window x:Class="A.MainWindow"
        xmlns="http://schemas.microsoft.com/winfx/2006/xaml/presentation"
        xmlns:x="http://schemas.microsoft.com/winfx/2006/xaml"
        xmlns:d="http://schemas.microsoft.com/expression/blend/2008"
        xmlns:mc="http://schemas.openxmlformats.org/markup-compatibility/2006"
        xmlns:local="clr-namespace:A"
        mc:Ignorable="d"
        Title="MainWindow" Height="150" Width="300">
    <Grid x:Name="MainGrid">
        <Button x:Name="SubmitButton"
               Foreground="White"
               Height="20"
               Width="100">
            <Button.Template>
                <ControlTemplate x:Name="ButtonElipse">
                    <Grid>
                        <Ellipse Fill="Gray"/>
                        <ContentPresenter
                            Content="Submit"
                            VerticalAlignment="Center"
                            HorizontalAlignment="Center"/>
                    </Grid>
                </ControlTemplate>
            </Button.Template>
        </Button>
    </Grid>
</Window> 
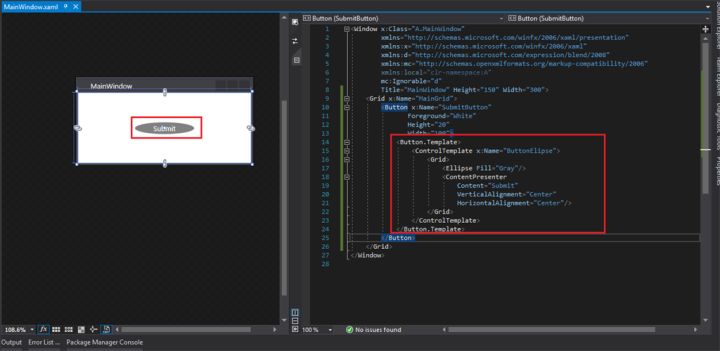

新的ControlTemplat 已分配给Button。
现在让我们在ResourceDictionary中加载我们的ControlTemplate并从那里获取它。
ResourceDictionaryTemplate.xaml
<ResourceDictionary xmlns="http://schemas.microsoft.com/winfx/2006/xaml/presentation"
                    xmlns:x="http://schemas.microsoft.com/winfx/2006/xaml"
                    xmlns:local="clr-namespace:A">
        <Thickness x:Key="MarginTR">0 5 5 0</Thickness>
    <ControlTemplate x:Key="EllipseButton">
        <Grid>
            <Ellipse Fill="Gray"/>
            <ContentPresenter
                            Content="Submit"
                            VerticalAlignment="Center"
                            HorizontalAlignment="Center"/>
        </Grid>
    </ControlTemplate>
</ResourceDictionary>
MainWindow.xaml
首先,您需要添加Window.Resources。
其次使用Tag Template绑定EllipseButton ControlTemplate。
<Window x:Class="A.MainWindow"
        xmlns="http://schemas.microsoft.com/winfx/2006/xaml/presentation"
        xmlns:x="http://schemas.microsoft.com/winfx/2006/xaml"
        xmlns:d="http://schemas.microsoft.com/expression/blend/2008"
        xmlns:mc="http://schemas.openxmlformats.org/markup-compatibility/2006"
        xmlns:local="clr-namespace:A"
        mc:Ignorable="d"
        Title="MainWindow" Height="150" Width="300">
    <Window.Resources>
        <ResourceDictionary Source="ResourceDictionaryTemplate.xaml"/>
    </Window.Resources>
    <Grid x:Name="MainGrid">
        <Button x:Name="SubmitButton"
               Foreground="White"
               Template="{StaticResource EllipseButton}"
               Height="20"
               Width="100"/>
    </Grid>
</Window>
ContentPresenter
让我们在 UI 中显示员工信息。
为此,我们将需要员工类:Employee.cs
public class Employee
{
       public int EmpId { get; set; }
       public string EmpName { get; set; }
       public string Designation { get; set; }
}
MainWindowViewModel:当我使用MVVM时,我正在更新ViewModel。
但是你可以在后面的代码中做同样的事情。
using A.Entities;
using Prism.Mvvm;
using System;
using System.Collections.Generic;
using System.Linq;
using System.Text;
using System.Threading.Tasks;

namespace A
{
    class MainWindowViewModel : BindableBase
    {
        #region Properties
        private Employee _empDetails;

        public Employee EmpDetails
        {
            get { return _empDetails; }
            set { _empDetails = value; }
        }

        #endregion

        #region Constructor
        public MainWindowViewModel()
        {
            EmpDetails = new Employee()
            {
                EmpId = 1,
                EmpName = "Rikam",
                Designation = "Software Eng."
            };
        }
        #endregion
    }
}
最后MainWindow.xaml:
<Window x:Class="A.MainWindow"
        xmlns="http://schemas.microsoft.com/winfx/2006/xaml/presentation"
        xmlns:x="http://schemas.microsoft.com/winfx/2006/xaml"
        xmlns:d="http://schemas.microsoft.com/expression/blend/2008"
        xmlns:mc="http://schemas.openxmlformats.org/markup-compatibility/2006"
        xmlns:local="clr-namespace:A"
        mc:Ignorable="d"
        Title="MainWindow" Height="150" Width="300">
    <Window.Resources>
        <ResourceDictionary>
            <ResourceDictionary.MergedDictionaries>
                <ResourceDictionary Source="ResourceDictionaryTemplate.xaml"/>
            </ResourceDictionary.MergedDictionaries>
        </ResourceDictionary>
    </Window.Resources>
    <Grid x:Name="MainGrid">
        <ContentPresenter x:Name="EmployeeDetails" Content="{Binding EmpDetails}">
            <ContentPresenter.ContentTemplate>
                <DataTemplate>
                    <Grid>
                        <Grid.RowDefinitions>
                            <RowDefinition Height="Auto"/>
                            <RowDefinition Height="Auto"/>
                            <RowDefinition Height="Auto"/>
                        </Grid.RowDefinitions>
                        <Grid.ColumnDefinitions>
                            <ColumnDefinition/>
                            <ColumnDefinition/>
                        </Grid.ColumnDefinitions>
                        <Label Content="Employee Id:"/>
                        <Label Content="{Binding EmpId}"
                               Grid.Column="1"/>
                        <Label Content="Employee Name:"
                               Grid.Row="1"/>
                        <Label Content="{Binding EmpName}"
                               Grid.Row="1"
                               Grid.Column="1"/>
                        <Label Content="Employee Designation:"
                               Grid.Row="2"/>
                        <Label Content="{Binding Designation}"
                               Grid.Column="1"
                               Grid.Row="2"/>
                    </Grid>
                </DataTemplate>
            </ContentPresenter.ContentTemplate>
        </ContentPresenter>
        <Button x:Name="SubmitButton"
               Template="{StaticResource EllipseButton}"
               VerticalAlignment="Bottom"
               Margin="0 0 0 10"
               Foreground="White"
               Height="20"
               Width="100"/>
    </Grid>
</Window> 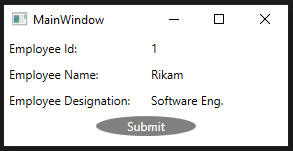
当我们要使用 DataTemplate 时,我们需要使用 ContentPresenter。
然后你必须指定它的内容,以及我们的内部控件应该从哪里获取它的数据的源。
然后根据需要绑定每个属性。


 被折叠的 条评论
为什么被折叠?
被折叠的 条评论
为什么被折叠?
 到【灌水乐园】发言


