


背景:
学员在学习Input专题时候,自己分析源码学习有个问题如下:
 疑问代码就是InputDispatcher类中的
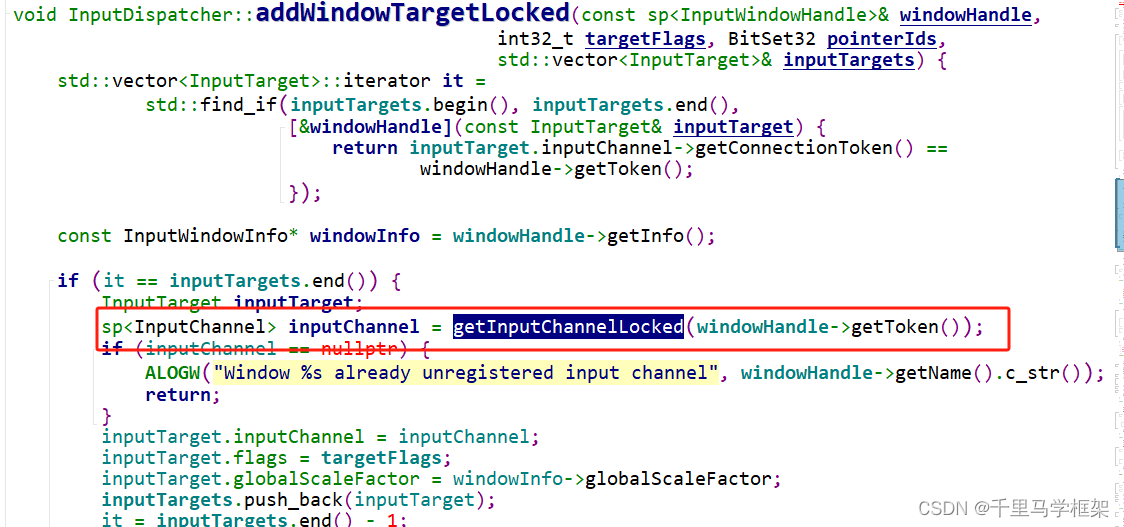
其实一开始我也没有很好get他的意思,但是结合他的代码截图标注,再看看getInputChannelLocked方法
std::shared_ptr<InputChannel> InputDispatcher::getInputChannelLocked(
        const sp<IBinder>& token) const {
    auto connectionIt = mConnectionsByToken.find(token);
    if (connectionIt == mConnectionsByToken.end()) {
        return nullptr;
    }
    return connectionIt->second->inputChannel;
}
mConnectionsByToken是InputDispatcher的集合保存了所有的connection。
大概明白他的疑问,他的疑问就是InputDispatcher的getInputChannelLocked方法只需要传递一个token既可以获取到InputChannel,请问这里的windowhandle的token是哪里来的,在哪里设置的,本来这些只在InputDispatcher中
疑问解答分析:
解答这个问题其实只需要认真分析以下几个流程:
1、mConnectionsByToken是什么时候塞入数据的
2、传递过来的InputWindowHandle是哪里来的,最开始谁创建的
上面两个问题搞清楚了其实基本上问题也就解答了
Result<std::unique_ptr<InputChannel>> InputDispatcher::createInputChannel(const std::string& name) {

    std::unique_ptr<InputChannel> serverChannel;
    std::unique_ptr<InputChannel> clientChannel;
    status_t result = InputChannel::openInputChannelPair(name, serverChannel, clientChannel);


        const sp<IBinder>& token = serverChannel->getConnectionToken();
        int fd = serverChannel->getFd();
        //
        std::shared_ptr<Connection> connection =
                std::make_shared<Connection>(std::move(serverChannel), /*monitor=*/false,
                                             mIdGenerator);


        mConnectionsByToken.emplace(token, connection);
    mLooper->wake();
    return clientChannel;
}
可以看出来createInputChannel时候会来创建一对InputChannel,即openInputChannelPair方法:
}

status_t InputChannel::openInputChannelPair(const std::string& name,
                                            std::unique_ptr<InputChannel>& outServerChannel,
                                            std::unique_ptr<InputChannel>& outClientChannel) {
    int sockets[2];
    if (socketpair(AF_UNIX, SOCK_SEQPACKET, 0, sockets)) {
        status_t result = -errno;
        ALOGE("channel '%s' ~ Could not create socket pair.  errno=%s(%d)", name.c_str(),
              strerror(errno), errno);
        outServerChannel.reset();
        outClientChannel.reset();
        return result;
    }

    int bufferSize = SOCKET_BUFFER_SIZE;
    setsockopt(sockets[0], SOL_SOCKET, SO_SNDBUF, &bufferSize, sizeof(bufferSize));
    setsockopt(sockets[0], SOL_SOCKET, SO_RCVBUF, &bufferSize, sizeof(bufferSize));
    setsockopt(sockets[1], SOL_SOCKET, SO_SNDBUF, &bufferSize, sizeof(bufferSize));
    setsockopt(sockets[1], SOL_SOCKET, SO_RCVBUF, &bufferSize, sizeof(bufferSize));

    sp<IBinder> token = new BBinder();//这里创建出来的BBinder就是token
    std::string serverChannelName = name + " (server)";
    android::base::unique_fd serverFd(sockets[0]);
    outServerChannel = InputChannel::create(serverChannelName, std::move(serverFd), token);

    std::string clientChannelName = name + " (client)";
    android::base::unique_fd clientFd(sockets[1]);
    outClientChannel = InputChannel::create(clientChannelName, std::move(clientFd), token);
    return OK;
}
这里token最后会传递给InputChannel构造
InputChannel::InputChannel(const std::string name, android::base::unique_fd fd, sp<IBinder> token)
      : mName(std::move(name)), mFd(std::move(fd)), mToken(std::move(token)) {
    ALOGD_IF(DEBUG_CHANNEL_LIFECYCLE, "Input channel constructed: name='%s', fd=%d",
             getName().c_str(), getFd().get());
}
后续通过getConnectionToken就是上面的token
sp<IBinder> InputChannel::getConnectionToken() const {
    return mToken;
}
再回到开始createInputChannel方法有Connection的构造,这里主要传递了serverChannel
 std::shared_ptr<Connection> connection =
                std::make_shared<Connection>(std::move(serverChannel), /*monitor=*/false,mIdGenerator);
然后再是
mConnectionsByToken.emplace(token, connection);
这里把token作为key,connection为value
接下来再看看InputWindowHandle部分的token,其实对于InputDispatcher部分的windowInfo等,前面学习SurfaceFlinger也有相关讲解,是来自sf,sf的windowinfo也是来自wms,下面按照从wms开始说起:
frameworks/base/services/core/java/com/android/server/wm/WindowState.java
void openInputChannel(@NonNull InputChannel outInputChannel) {
    if (mInputChannel != null) {
        throw new IllegalStateException("Window already has an input channel.");
    }
    String name = getName();
    //这里就是调用到了上面说的InputDispatcher
    mInputChannel = mWmService.mInputManager.createInputChannel(name);
    mInputChannelToken = mInputChannel.getToken();//这里token就是前面的说的inputchannel的
    mInputWindowHandle.setToken(mInputChannelToken);
    mWmService.mInputToWindowMap.put(mInputChannelToken, this);
    mInputChannel.copyTo(outInputChannel);
}
可以看到这里有个mInputWindowHandle,这里会进行setToken,这里就是关键点,设置了底层返回的token。
接下来再看看这里的mInputWindowHandle会被怎么用:
final InputWindowHandleWrapper mInputWindowHandle;
 可以看到这里在InputMonitor有使用
frameworks/base/services/core/java/com/android/server/wm/InputMonitor.java
 public void accept(WindowState w) {
            final InputWindowHandleWrapper inputWindowHandle = w.mInputWindowHandle;
//省略
            if (w.mWinAnimator.hasSurface()) {
                populateInputWindowHandle(inputWindowHandle, w);
                setInputWindowInfoIfNeeded(mInputTransaction,
                        w.mWinAnimator.mSurfaceController.mSurfaceControl, inputWindowHandle);
            }
        }
//Transaction传递sf
    static void setInputWindowInfoIfNeeded(SurfaceControl.Transaction t, SurfaceControl sc,
            InputWindowHandleWrapper inputWindowHandle) {
        if (DEBUG_INPUT) {
            Slog.d(TAG_WM, "Update InputWindowHandle: " + inputWindowHandle);
        }
        if (inputWindowHandle.isChanged()) {
            inputWindowHandle.applyChangesToSurface(t, sc);
        }
    }
可以看到这里的调用了setInputWindowInfoIfNeeded传递给sf,然后sf又通过如下方法通知给InputDispatcher
void SurfaceFlinger::updateInputFlinger(VsyncId vsyncId, TimePoint frameTime) {
    if (mUpdateInputInfo) {
        mUpdateInputInfo = false;
        updateWindowInfo = true;
        buildWindowInfos(windowInfos, displayInfos);
    }

        if (updateWindowInfo) {
            mWindowInfosListenerInvoker
                    ->windowInfosChanged(gui::WindowInfosUpdate{std::move(windowInfos),
                                                                std::move(displayInfos),
                                                                ftl::to_underlying(vsyncId),
                                                                frameTime.ns()},
                                         std::move(
                                                 inputWindowCommands.windowInfosReportedListeners),
                                         /* forceImmediateCall= */ visibleWindowsChanged ||
                                                 !inputWindowCommands.focusRequests.empty());

}
接下来看看windowInfosChanged
void WindowInfosListenerInvoker::windowInfosChanged(
        gui::WindowInfosUpdate update, WindowInfosReportedListenerSet reportedListeners,
        bool forceImmediateCall) {

    for (auto& pair : mWindowInfosListeners) {
        auto& [listenerId, listener] = pair.second;
        auto status = listener->onWindowInfosChanged(update);

    }
}
调用到了onWindowInfosChanged方法:
void InputDispatcher::onWindowInfosChanged(const gui::WindowInfosUpdate& update) {

    for (const auto& info : update.windowInfos) {
        handlesPerDisplay.emplace(info.displayId, std::vector<sp<WindowInfoHandle>>());
        handlesPerDisplay[info.displayId].push_back(sp<WindowInfoHandle>::make(info));
    }

        for (const auto& [displayId, handles] : handlesPerDisplay) {
            setInputWindowsLocked(handles, displayId);
        }


    mLooper->wake();
}
到此整个流程即清楚了
总结:
token是在InputChannel创建时候就有构造
----》传递给WindowState的InputWindowHandleWrapper中
------》InputMonitor遍历传递给Sf
---------》Sf传递给InputDispatcher
本文章更多详细代码和资料需要购买课程获取
hal+perfetto+surfaceflinger
https://mp.weixin.qq.com/s/LbVLnu1udqExHVKxd74ILg

私聊作者+v(androidframework007)
其他课程七件套专题:
点击这里
https://mp.weixin.qq.com/s/Qv8zjgQ0CkalKmvi8tMGaw


 被折叠的 条评论
为什么被折叠?
被折叠的 条评论
为什么被折叠?
 到【灌水乐园】发言


