


MySQL 主从配置。
环境说明: 在windows10 系统上,用VMware创建了两个虚拟机(一主一从),采用的Linux操作系统是CentOS 6.5 32位,MySQL 服务器的版本是5.6。
- 在VMware上创建两个CentOS 6.5的服务器。在VMware上创建虚拟机需要注意网络模式为桥接模式,并且创建的两台服务器在同一网段,否则两台CentOS服务器无法相互访问。
- 采用CentOS 自带的yum源安装MySQL。由于要安装定制版本,所以需要在yum上做一些修改。
a:进入CentOS 命令行,vim /etc/yum.repos.d/mysql-community.repo,
b:编辑
[mysql56-community]
name=MySQL 5.6 Community Server
baseurl=http://repo.mysql.com/yum/mysql-5.6-community/el/6/$basearch/
enabled=1
gpgcheck=0
,
c: 查看可用yum源 yum repolist enabled | grep mysql。
d: yum install mysql-community-server。然后就会下载并执行安装。
3. 在另一台服务器上执行相同的操作。
4. 修改两台服务器的root密码,并且允许远程登录。
5. 在主服务器上配置MySQl 。
a: vim /etc/my.cnf
b:
[mysqld]
 log-bin=mysql-bin
server-id为一个int类型的数字,只要和从服务器的server-id不同即可
6. 在从服务器上配置MySQL[mysqld]
server-id=2
7. 在主服务器上创建一个用户,用于从服务器读取主服务器的log文件。mysql> CREATE USER 'repl'@'host_ip' IDENTIFIED BY 'slavepass';
mysql> GRANT REPLICATION SLAVE ON *.* TO 'repl'@'host_ip';
8. 在主服务器上执行mysql> FLUSH TABLES WITH READ LOCK;mysql > SHOW MASTER STATUS;
+——————+———-+————–+——————+
| File | Position | Binlog_Do_DB | Binlog_Ignore_DB |
+——————+———-+————–+——————+
| mysql-bin.000003 | 73 | test | manual,mysql |
+——————+———-+————–+——————+
记住File 列和Position列的值,将会在从服务器上配置时使用。
9. 在从服务器上mysql> CHANGE MASTER TO
MASTER_HOST='master_ip',
MASTER_USER='userName',
MASTER_PASSWORD='password',
MASTER_LOG_FILE='log_file',
MASTER_LOG_POS= position;
这里的LOG_FILE就是上面的File列的值,LOG_POS就是上面Position列的值。
- 在从服务器上执行
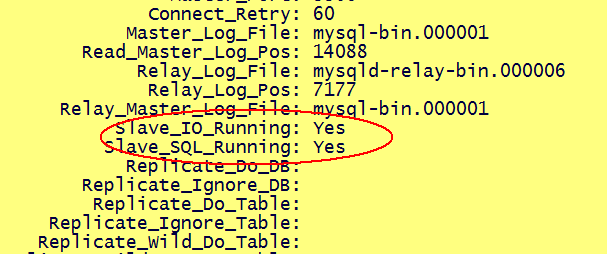
mysql> start slave - 在从服务器上执行
show slave status \G;,查看到两个yes就表示主从配置已经成功
至此就已经在两台CentOS上安装了相同版本的MySQL服务器并且完成了主从配置。
Spring读写分离
github源代码
本文描述的是使用基于Spring AOP 实现应用层的读写分离。数据库查询,尤其是多表关联的复杂查询对服务器的性能损耗远远大于数据库的插入操作,且日常生产环境中查询的频率远大于增删改。因此为了缓解数据库压力,将对数据库的读压力分流到从服务器,让主数据库专注于增删改更加适合于高并发。普通的WEB应用分Controller,Service,Dao三层。事务控制一般在Service层。在Service层的代码中,基于方法级别的读写分离是最理想的一种状态。在Service层的代码中,如果某个方法只涉及到查询,那么则分流到从数据库中,如果涉及到增,删,改则分流到主数据库中。
1. 创建Maven Web工程。pom.xml
<project xmlns="http://maven.apache.org/POM/4.0.0" xmlns:xsi="http://www.w3.org/2001/XMLSchema-instance"
    xsi:schemaLocation="http://maven.apache.org/POM/4.0.0 http://maven.apache.org/xsd/maven-4.0.0.xsd">
    <modelVersion>4.0.0</modelVersion>

    <groupId>com.tianxingshuke</groupId>
    <artifactId>MySQLReadAndWrite</artifactId>
    <version>0.0.1-SNAPSHOT</version>
    <packaging>jar</packaging>

    <name>MySQLReadAndWrite</name>
    <url>http://maven.apache.org</url>

    <properties>
        <project.build.sourceEncoding>UTF-8</project.build.sourceEncoding>
        <spring.version>4.1.6.RELEASE</spring.version>
    </properties>

    <dependencies>
        <dependency>
            <groupId>junit</groupId>
            <artifactId>junit</artifactId>
            <version>4.11</version>
            <scope>test</scope>
        </dependency>
        <dependency>
        <groupId>org.springframework</groupId>
        <artifactId>spring-aspects</artifactId>
        <version>${spring.version}</version>
    </dependency>
        <!-- https://mvnrepository.com/artifact/com.jolbox/bonecp -->
        <dependency>
            <groupId>com.jolbox</groupId>
            <artifactId>bonecp</artifactId>
            <version>0.8.0.RELEASE</version>
最低0.47元/天 解锁文章


 529
529


 被折叠的 条评论
为什么被折叠?
被折叠的 条评论
为什么被折叠?
 到【灌水乐园】发言


