


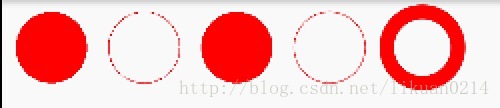
paint的方法分为两类:
负责图形绘制、路径相关
setStrokeWidth(float width)设置画笔宽度
setStyle(Paint.Style style)设置画笔样式
- Style有三类:
- Paint.Style.FILL :填充内部
- Paint.Style.FILL_AND_STROKE :填充内部和描边
- Paint.Style.STROKE :仅描边、
- 注意STROKE、FILL_OR_STROKE与FILL模式下外轮廓的位置会扩大。
例子:
    private void PaintStyle(Canvas canvas) {
        float Y = 70;
        float X = 70;
        float R = 50;
        float DX = 130;
        Paint paint = new Paint();
        paint.setColor(Color.RED);//设置颜色
        paint.setStyle(Paint.Style.FILL);//填充内部
        canvas.drawCircle(X, Y, R, paint);

        paint.setStyle(Paint.Style.STROKE);//描边
        canvas.drawCircle(X + DX, Y, R, paint);

        paint.setStyle(Paint.Style.FILL_AND_STROKE);//填充内部和描边
        canvas.drawCircle(X + DX * 2, Y, R, paint);

        paint.setAntiAlias(true);
        paint.setStyle(Paint.Style.STROKE);//描边
        canvas.drawCircle(X + DX * 3, Y, R, paint);

        paint.setStrokeWidth(20);//设置画笔宽度
        paint.setStyle(Paint.Style.STROKE);//填充内部和描边
        canvas.drawCircle(X + DX * 4, Y, R, paint);
    }
运行结果:
setStrokeCap(Paint.Cap cap)设置线冒样式
- Cap取值有
- Cap.ROUND(圆形线冒)
- Cap.SQUARE(方形线冒)
- Paint.Cap.BUTT(无线冒)
- 注:冒多出来的那块区域就是线帽!就相当于给原来的直线加上一个帽子一样,所以叫线帽
例子:
    private void PaintCap(Canvas canvas) {
        float SX = 50;
        float SY = 200;
        float EX = 500;
        float EY = 200;
        float DY = 50;
        Paint paint_line = new Paint();
        paint_line.setColor(Color.RED);
        paint_line.setStrokeWidth(30);

        paint_line.setStrokeCap(Paint.Cap.ROUND);//圆形线帽
        canvas.drawLine(SX, SY, EX, EY, paint_line);

        paint_line.setStrokeCap(Paint.Cap.BUTT);//无线帽
        canvas.drawLine(SX, SY + DY, EX, EY + DY, paint_line);

        paint_line.setStrokeCap(Paint.Cap.SQUARE);//方形线帽
        canvas.drawLine(SX, SY + DY * 2, EX, EY + DY * 2, paint_line);
    }
运行结果:

setStrokeJoin(Paint.Join join)设置线段连接处样式
取值有:Join.MITER(结合处为锐角)、Join.Round(结合处为圆弧)、Join.BEVEL(结合处为直线)
例子:
    private void drawStrokeJoin(Canvas canvas) {
        Paint paint_line = new Paint();
        paint_line.setColor(Color.RED);
        paint_line.setStyle(Paint.Style.STROKE);
        paint_line.setStrokeWidth(30);
        paint_line.setAntiAlias(true);
        float SX = 50;
        float SY = 400;
        float DY = 50;

        Path path = new Path();
        path.moveTo(SX , SY);
        path.lineTo(SX + DY, SY + DY);
        path.lineTo(SX + DY * 2, SY - DY);
        paint_line.setStrokeJoin(Paint.Join.MITER);//结合处为锐角
        canvas.drawPath(path, paint_line);

        path.reset();
        SX = SX + DY * 3;
        path.moveTo(SX , SY);
        path.lineTo(SX + DY, SY + DY);
        path.lineTo(SX + DY * 2, SY - DY);
        paint_line.setStrokeJoin(Paint.Join.ROUND);//结合处为圆弧
        canvas.drawPath(path, paint_line);

        path.reset();
        SX = SX + DY * 3;
        path.moveTo(SX , SY);
        path.lineTo(SX + DY, SY + DY);
        path.lineTo(SX + DY * 2, SY - DY);
        paint_line.setStrokeJoin(Paint.Join.BEVEL);//结合处为直线
        canvas.drawPath(path, paint_line);

    }
运行结果:

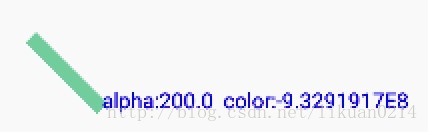
set(Paint paint)方法设置一个外部画笔
例子:
    private void paintSet(Canvas canvas) {
        Paint paintA = new Paint();
        paintA.setColor(Color.BLUE);
        Paint paintB = new Paint();
        paintB.setStrokeWidth(20);
        paintB.setColor(Color.GREEN);
        paintB.setARGB(200, 100, 200, 150);
        paintA.set(paintB);
        float alpha = paintA.getAlpha();
        float color = paintA.getColor();
        canvas.drawLine(100, 600, 200, 700, paintA);
        paintA.setColor(Color.BLUE);
        paintA.setAntiAlias(true);//获取与设置是否使用抗锯齿功能,会消耗较大资源,绘制图形速度会变慢,一般会开启。设置后会平滑一些;
        paintA.setTextSize(30);
        canvas.drawText("alpha:" + alpha + "  color:" + color, 200, 700, paintA);
    }
运行结果:
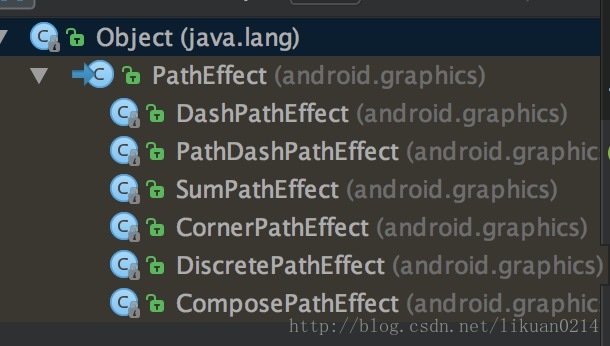
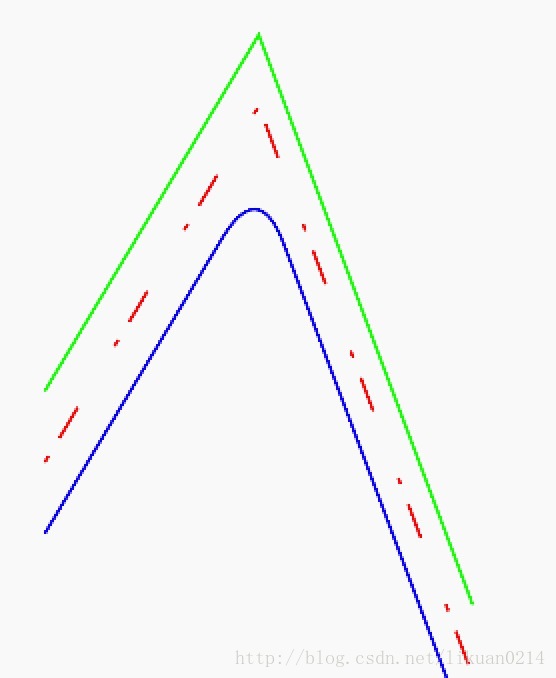
setPathEffect(PathEffect effect)设置绘制路径的效果
继承关系:
CornerPathEffect——圆形拐角效果
paint.setPathEffect(new CornerPathEffect(100));
利用半径R=50的圆来代替原来两条直线间的夹角
DashPathEffect——虚线效果
比如,我们定义new float[] {20,10};那这个虚线段就是由两段线段组成的,第一个可见的线段长为20,每二个线段不可见,长度为10;- phase:开始绘制的偏移值
 比如:画同一条线段,偏移值为15
 paint.setPathEffect(new DashPathEffect(new float[]{20,10,50,100},15));
PathDashPathEffect
利用以另一个路径为单位,延着路径盖章.相当于PS的印章工具
Style有三种:
TRANSLATE
ROTATE
MORPH
SumPathEffect
- SumPathEffect(PathEffect first, PathEffect second)
- first特效和second特效分别对原始路径进行影响,最终对两种特效的结果进行合并
ComposePathEffect
- ComposePathEffect(PathEffect outerpe, PathEffect innerpe)
- 先应用innerpe特效,然后在此基础上,应用outerpe特效,两个特效的顺序执行。
DiscretePathEffect
- public DiscretePathEffect(float segmentLength, float deviation)
- 把原有的路线,在指定的间距处插入一个突刺
- 第一个这些突出的“杂点”的间距,值越小间距越短,越密集
- 第二个是突出距离
例子PathDashPathEffect:
    private Path getPath(){
        Path path = new Path();
        // 定义路径的起点
        path.moveTo(0, 0);

        // 定义路径的各个点
        for (int i = 0; i <= 40; i++) {
            path.lineTo(i*35, (float) (Math.random() * 150));
        }
        return path;
    }

    private Paint getPaint(){
        Paint paint = new Paint();
        paint.setStrokeWidth(4);
        paint.setColor(Color.GREEN);
        paint.setStyle(Paint.Style.STROKE);
        paint.setAntiAlias(true);
        return paint;
    }
    private void drawPathDashPathEffect(Canvas canvas){
        Paint paint = getPaint();

        Path path  = new Path();
        path.moveTo(100,600);
        path.lineTo(400,150);
        path.lineTo(700,900);
        canvas.drawPath(path,paint);
        canvas.drawPath(path,paint);

        canvas.translate(0,200);

        /**
         * 利用以另一个路径为单位,延着路径盖章.相当于PS的印章工具
         */
        paint.setPathEffect(new PathDashPathEffect(getStampPath(),35,0, PathDashPathEffect.Style.MORPH));
        canvas.drawPath(path,paint);
    }
private Path getStampPath(){
        Path path  = new Path();
        path.moveTo(0,20);
        path.lineTo(10,0);
        path.lineTo(20,20);
        path.close();

        path.addCircle(0,0,3, Path.Direction.CCW);

        return path;
    }
    private void drawPathDashPathEffectDemo(Canvas canvas){
        Paint paint = getPaint();

        Path path = getPath();
        canvas.drawPath(path,paint);

        canvas.translate(0,200);

        paint.setPathEffect(new PathDashPathEffect(getStampPath(),35,0, PathDashPathEffect.Style.MORPH));
        canvas.drawPath(path,paint);

        canvas.translate(0,200);
        paint.setPathEffect(new PathDashPathEffect(getStampPath(),35,0, PathDashPathEffect.Style.ROTATE));
        canvas.drawPath(path,paint);

        canvas.translate(0,200);
        paint.setPathEffect(new PathDashPathEffect(getStampPath(),35,0, PathDashPathEffect.Style.TRANSLATE));
        canvas.drawPath(path,paint);
    }
例子DiscretePathEffect:
private Path getPath(){
Path path = new Path();
// 定义路径的起点
path.moveTo(0, 0);
// 定义路径的各个点
for (int i = 0; i <= 40; i++) {
path.lineTo(i*35, (float) (Math.random() * 150));
}
return path;
}
private Paint getPaint(){
Paint paint = new Paint();
paint.setStrokeWidth(4);
paint.setColor(Color.GREEN);
paint.setStyle(Paint.Style.STROKE);
paint.setAntiAlias(true);
return paint;
}
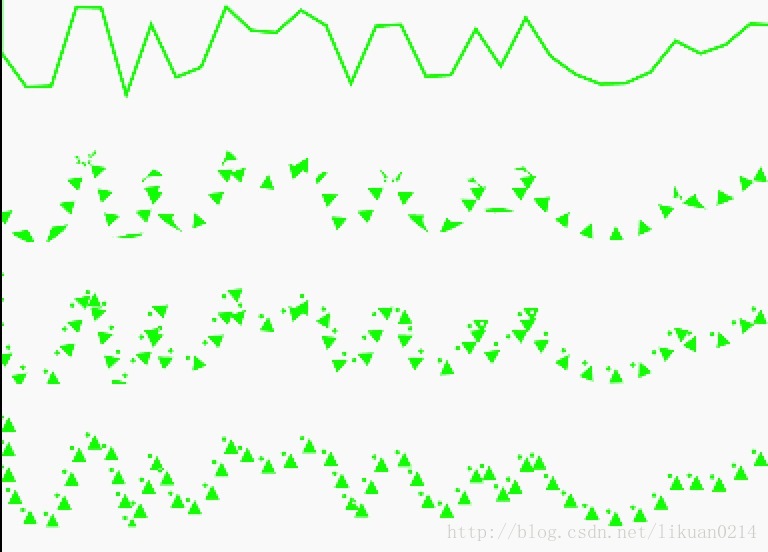
private void drawDiscretePathEffectDemo(Canvas canvas){
Paint paint = getPaint();
Path path = getPath();
canvas.drawPath(path,paint);
/**
* 把原有的路线,在指定的间距处插入一个突刺
* 第一个这些突出的“杂点”的间距,值越小间距越短,越密集
* 第二个是突出距离
*/
canvas.translate(0,200);
paint.setPathEffect(new DiscretePathEffect(2,5));
canvas.drawPath(path,paint);
canvas.translate(0,200);
paint.setPathEffect(new DiscretePathEffect(6,5));
canvas.drawPath(path,paint);
canvas.translate(0,200);
paint.setPathEffect(new DiscretePathEffect(6,15));
canvas.drawPath(path,paint);
}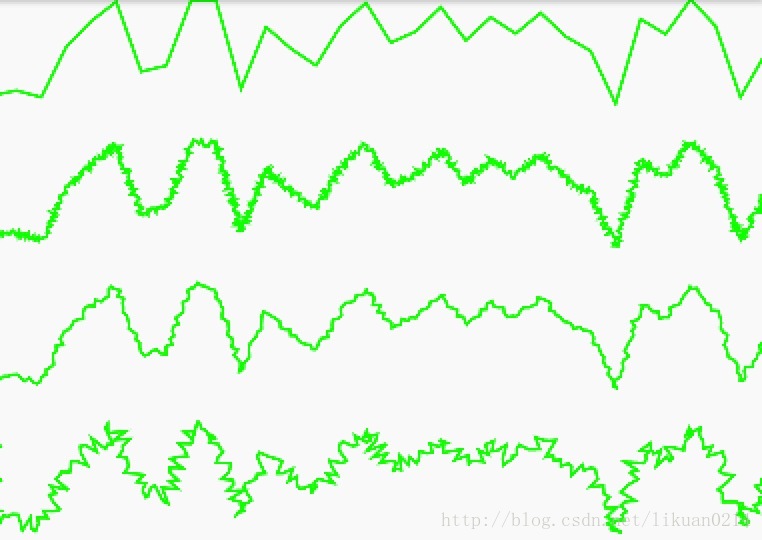
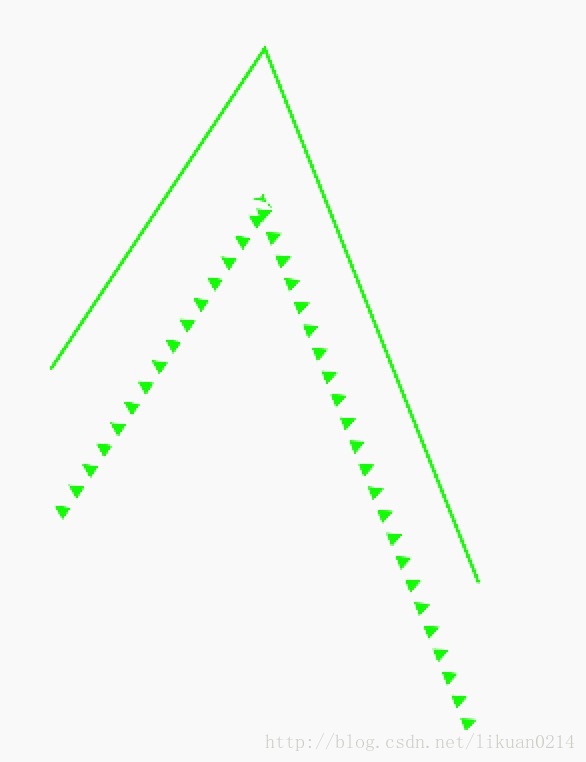
例子CornerPathEffect、DashPathEffect:
    private void drawDashPathEffect(Canvas canvas){
        Paint paint = new Paint();
        paint.setStrokeWidth(4);
        paint.setColor(Color.GREEN);
        paint.setStyle(Paint.Style.STROKE);
        paint.setAntiAlias(true);
        Path path = new Path();
        path.moveTo(100,600);
        path.lineTo(400,100);
        path.lineTo(700,900);

        canvas.drawPath(path,paint);
        paint.setColor(Color.RED);

        //使用DashPathEffect画线段
        paint.setPathEffect(new DashPathEffect(new float[]{10,30,50,100},0));
        canvas.translate(0,100);
        canvas.drawPath(path,paint);

        //画同一条线段,偏移值为15
        paint.setPathEffect(new CornerPathEffect(100));
        paint.setColor(Color.BLUE);
        canvas.translate(0,100);
        canvas.drawPath(path,paint);
    }
运行结果:
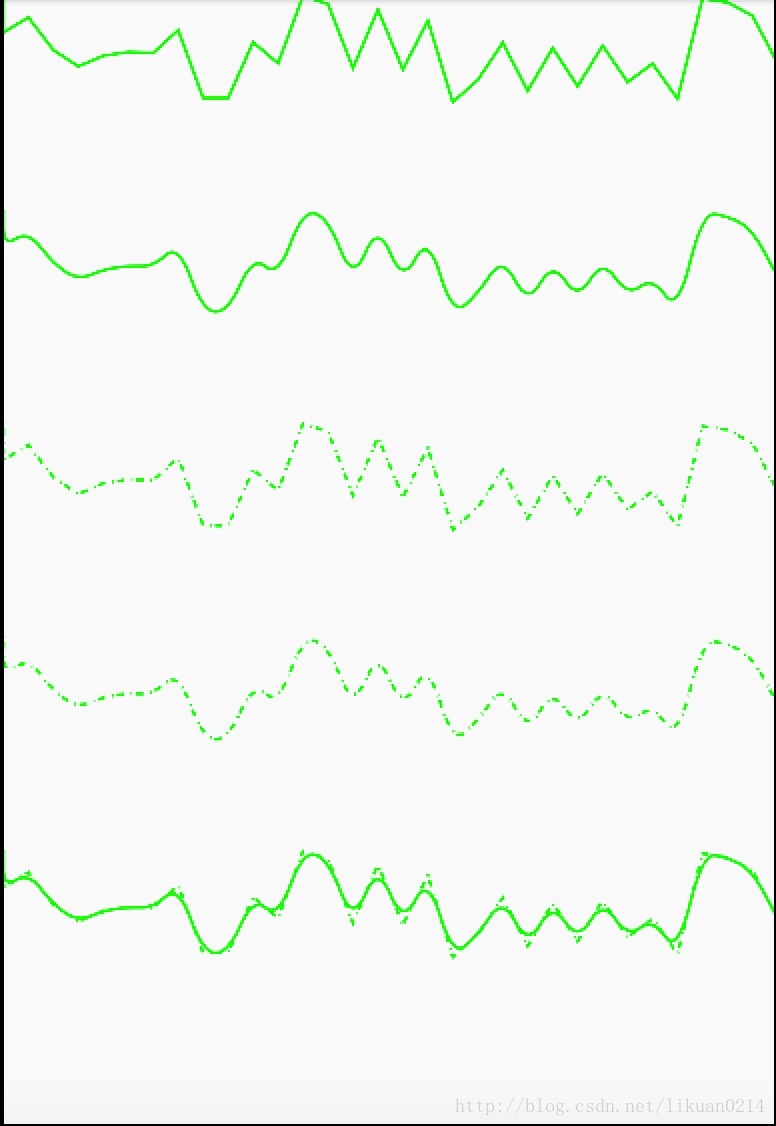
例子SumPathEffect、ComposePathEffect:
    private Path getPath(){
        Path path = new Path();
        // 定义路径的起点
        path.moveTo(0, 0);

        // 定义路径的各个点
        for (int i = 0; i <= 40; i++) {
            path.lineTo(i*35, (float) (Math.random() * 150));
        }
        return path;
    }

    private Paint getPaint(){
        Paint paint = new Paint();
        paint.setStrokeWidth(4);
        paint.setColor(Color.GREEN);
        paint.setStyle(Paint.Style.STROKE);
        paint.setAntiAlias(true);
        return paint;
    }
    private void drawComposePathEffectDemo(Canvas canvas){
        //画原始路径
        Paint paint = getPaint();
        Path path = getPath();
        canvas.drawPath(path,paint);

        //仅应用圆角特效的路径
        canvas.translate(0,300);
        CornerPathEffect cornerPathEffect = new CornerPathEffect(100);
        paint.setPathEffect(cornerPathEffect);
        canvas.drawPath(path,paint);

        //仅应用虚线特效的路径
        canvas.translate(0,300);
        DashPathEffect dashPathEffect = new DashPathEffect(new float[]{2,5,10,10},0);
        paint.setPathEffect(dashPathEffect);
        canvas.drawPath(path,paint);

        //利用ComposePathEffect先应用圆角特效,再应用虚线特效
        canvas.translate(0,300);
        ComposePathEffect composePathEffect = new ComposePathEffect(dashPathEffect,cornerPathEffect);
        paint.setPathEffect(composePathEffect);
        canvas.drawPath(path,paint);

        //利用SumPathEffect,分别将圆角特效应用于原始路径,然后将生成的两条特效路径合并
        canvas.translate(0,300);
        paint.setStyle(Paint.Style.STROKE);
        SumPathEffect sumPathEffect = new SumPathEffect(cornerPathEffect,dashPathEffect);
        paint.setPathEffect(sumPathEffect);
        canvas.drawPath(path,paint);

    }
运行结果:
setAntiAlias(boolean aa) 设置画笔是否抗锯齿

左边是没有设置抗锯齿,右边设置了抗锯齿,边界明显变模糊了。
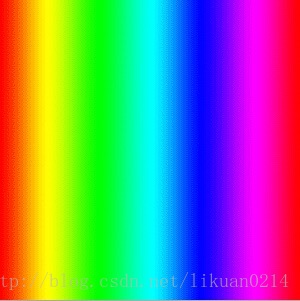
void setDither(boolean dither) 设定是否使用图像抖动处理
会使绘制出来的图片颜色更加平滑和饱满、图像更加清晰。
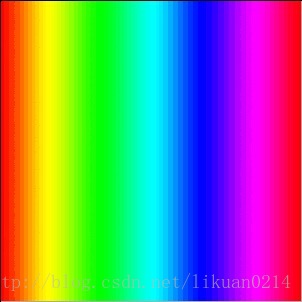
我们先看下没有设置防抖动的绘制出来的图
然后我们看下设置了防抖动的绘制出来的图
void reset() 清空画笔复位。
获取与设置alpha值、颜色、ARGB等
void setARGB(int a, int r, int g, int b)
int getAlpha()
void setAlpha(int a)
int getColor()
void setColor(int color)
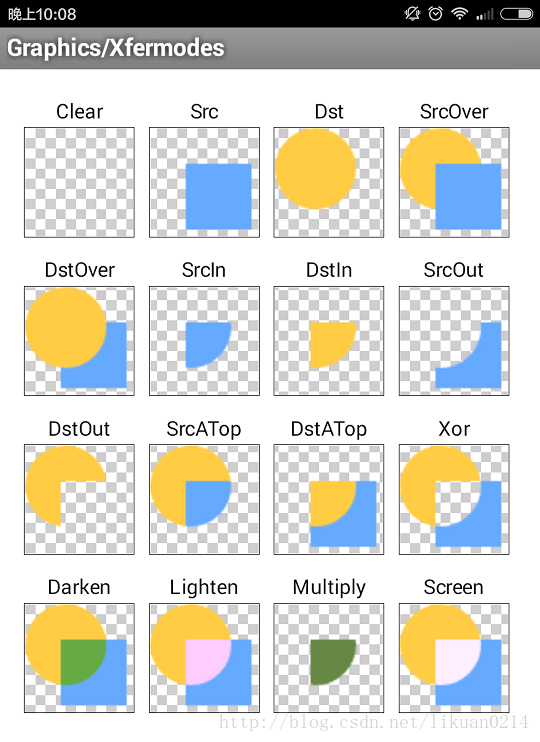
setXfermode(Xfermode xfermode)设置图形重叠时的处理方式
如合并,取交集或并集,经常用来制作橡皮的擦除效果
不同模式下的结果如图:
例子1:使用PorterDuff.Mode.SRC_IN做一个圆形头像
public class RoundImageView extends View {

    private Paint mBitMapPaint;
    private Bitmap mBitMapSRC;

    public RoundImageView(Context context) {
        this(context, null);
    }

    public RoundImageView(Context context, @Nullable AttributeSet attrs) {
        super(context, attrs);
        //去掉硬件加速
        setLayerType(View.LAYER_TYPE_SOFTWARE, null);
        //画笔
        mBitMapPaint = new Paint();
        mBitMapPaint.setAntiAlias(true);
        //Src图片
        mBitMapSRC = BitmapFactory.decodeResource(getResources(), R.drawable.xyjy6);
    }

    @Override
    protected void onDraw(Canvas canvas) {
        super.onDraw(canvas);

        //首先绘制一个半径150的圆
        mBitMapPaint.setColor(Color.RED);
        mBitMapPaint.setStyle(Paint.Style.FILL);
        canvas.drawCircle(mBitMapSRC.getWidth() / 2 , mBitMapSRC.getHeight() / 2 , 150, mBitMapPaint);
        //设置画笔模式SRC_IN
        mBitMapPaint.setXfermode(new PorterDuffXfermode(PorterDuff.Mode.SRC_IN));
        //绘制Src图片
        canvas.drawBitmap(mBitMapSRC, 0, 0, mBitMapPaint);

        mBitMapPaint.setXfermode(null);

    }
}
例子2:刮刮卡
public class ScratchCard extends View {
    private static final String TAG = "ScratchCard";
    private final Bitmap mBitMapDst;
    private final Paint mPaint;
    private final  int paintWidth = 30;
    private final Path mPath;

    public ScratchCard(Context context) {
        this(context, null);
    }

    public ScratchCard(Context context, @Nullable AttributeSet attrs) {
        super(context, attrs);
        mPaint = new Paint();
        mBitMapDst = BitmapFactory.decodeResource(getResources(), R.drawable.guaguaka);
        mPath = new Path();
    }

    @Override
    protected void onDraw(Canvas canvas) {
        super.onDraw(canvas);

        //先绘制刮刮卡背景图片
        canvas.drawBitmap(mBitMapDst, 0, 0, mPaint);
        //保存图层
        int layerId = canvas.saveLayer(0, 0, mBitMapDst.getWidth(), mBitMapDst.getHeight(), mPaint, Canvas.ALL_SAVE_FLAG);
        //透明图层
        //首先绘制一个矩形灰色区域
        mPaint.setColor(Color.GRAY);
        mPaint.setStyle(Paint.Style.FILL);
        canvas.drawRect(0, 0, mBitMapDst.getWidth(), mBitMapDst.getHeight(), mPaint);
        //设置叠加模式XOR
        mPaint.setXfermode(new PorterDuffXfermode(PorterDuff.Mode.XOR));
        //绘制刮开的path路径
        mPaint.setColor(Color.BLUE);
        mPaint.setStrokeWidth(paintWidth);
        mPaint.setStyle(Paint.Style.STROKE);
        canvas.drawPath(mPath, mPaint);

        mPaint.setXfermode(null);

    }

    @Override
    public boolean onTouchEvent(MotionEvent event) {
        switch (event.getAction()){
            case MotionEvent.ACTION_DOWN:
                //移动路径
                mPath.moveTo(event.getX(), event.getY());
                return true;
            case MotionEvent.ACTION_MOVE:
                //连线
                mPath.lineTo(event.getX(), event.getY());
                postInvalidate();
                return true;
            case MotionEvent.ACTION_UP:
                //连线
                mPath.lineTo(event.getX(), event.getY());
                postInvalidate();
                return false;
        }
        return super.onTouchEvent(event);
    }
}
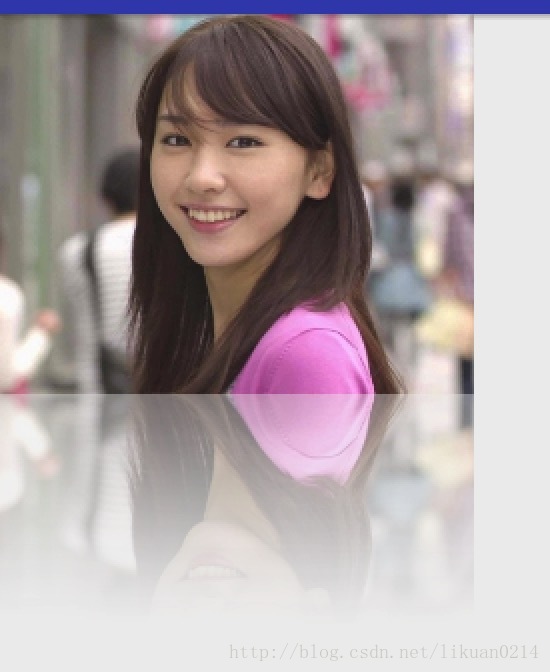
例子3:倒影
public class InvertedImage extends View {
    private final Paint mPaint;
    private final Bitmap mBitMapDST, mBitMapSrc;
    private final Bitmap mBitMapRevert;

    public InvertedImage(Context context) {
        this(context, null);
    }

    public InvertedImage(Context context, @Nullable AttributeSet attrs) {
        super(context, attrs);
        setLayerType(View.LAYER_TYPE_SOFTWARE, null);
        mPaint = new Paint();
        mBitMapDST = BitmapFactory.decodeResource(getResources(), R.drawable.xyjy6,null);
        mBitMapSrc = BitmapFactory.decodeResource(getResources(),R.drawable.invert_shade,null);

        Matrix matrix = new Matrix();
        matrix.setScale(1F, -1F);
        // 生成倒影图
        mBitMapRevert = Bitmap.createBitmap(mBitMapDST, 0, 0, mBitMapDST.getWidth(), mBitMapDST.getHeight(), matrix, true);
    }

    @Override
    protected void onDraw(Canvas canvas) {
        super.onDraw(canvas);

        //先画图片
        canvas.drawBitmap(mBitMapDST, 0, 0, mPaint);

        //保存图层
        int layerId = canvas.saveLayer(0, 0, getWidth(), getHeight(), mPaint);

        //在新的图层进行绘制
        //画布移动
        canvas.translate(0, mBitMapDST.getHeight());

        //画倒图Dst
        canvas.drawBitmap(mBitMapRevert, 0, 0, mPaint);
        //DST_IN模式
        mPaint.setXfermode(new PorterDuffXfermode(PorterDuff.Mode.DST_IN));
        //画Src图
        canvas.drawBitmap(mBitMapSrc, 0, 0, mPaint);

        mPaint.setXfermode(null);

        //回到原图层
        canvas.restoreToCount(layerId);


    }
}
例子4:心电图
public class HeartMapView extends View {

    private final Paint mBitMapPaint;
    private final Bitmap mBitMapDST;
    private float distance;
    private static final String TAG = "HeartMapView";
    public HeartMapView(Context context) {
        super(context);
        setLayerType(LAYER_TYPE_SOFTWARE, null);
        mBitMapPaint = new Paint();

        mBitMapDST = BitmapFactory.decodeResource(getResources(), R.drawable.heartmap);

        startAnimation();
    }

    private void startAnimation() {
        ValueAnimator animator = ValueAnimator.ofFloat(0, mBitMapDST.getWidth());
        animator.setDuration(6000);
        animator.setRepeatCount(ValueAnimator.INFINITE);
        animator.setInterpolator(new LinearInterpolator());
        animator.addUpdateListener(new ValueAnimator.AnimatorUpdateListener() {
            @Override
            public void onAnimationUpdate(ValueAnimator animation) {
               distance = (float) animation.getAnimatedValue();
                postInvalidate();
            }
        });
        animator.start();
    }


    @Override
    protected void onDraw(Canvas canvas) {
        super.onDraw(canvas);
        canvas.drawRect(distance, 0, mBitMapDST.getWidth(), mBitMapDST.getHeight(), mBitMapPaint);
        mBitMapPaint.setXfermode(new PorterDuffXfermode(PorterDuff.Mode.SRC_OUT));//相交区域透明
        canvas.drawBitmap(mBitMapDST, 0, 0, mBitMapPaint);
        mBitMapPaint.setXfermode(null);
    }
}
setMaskFilter(MaskFilter maskfilter)可以用不同的MaskFilter实现滤镜的效果
如滤化,立体等
继承关系:

BlurMaskFilter 模糊
例子:
private void BlurMaskFilter(Canvas canvas) {
Paint mPaint = new Paint();
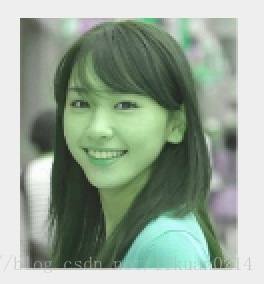
Bitmap bitmap = BitmapFactory.decodeResource(getResources(), R.drawable.xyjy2);
RectF rectF = new RectF(100,100,bitmap.getWidth() + 100,bitmap.getHeight() + 100);
/**
* Create a blur maskfilter.
*
* @param radius 阴影的半径
* @param style NORMOL -- 整个图像都被模糊掉
* SOLID -- 图像边界外产生一层与Paint颜色一致阴影效果,不影响图像的本身
* OUTER -- 图像边界外产生一层阴影,并且将图像变成透明效果
* INNER -- 在图像内部边沿产生模糊效果
* @return
*/
mPaint.setMaskFilter(new BlurMaskFilter(50, BlurMaskFilter.Blur.NORMAL));
canvas.drawBitmap(bitmap,null, rectF,mPaint);
}BlurMaskFilter.Blur.NORMAL

BlurMaskFilter.Blur.SOLID

BlurMaskFilter.Blur.OUTER

BlurMaskFilter.Blur.INNER

EmbossMaskFilter 浮雕
例子:
    private void EmbossMaskFilter(Canvas canvas) {
        Paint mPaint = new Paint();
        mPaint.setColor(Color.RED);

        RectF rectF = new RectF(100, 100, 300, 300);
        /**
         * Create an emboss maskfilter
         *
         * @param direction  指定光源的位置,长度为xxx的数组标量[x,y,z]
         * @param ambient    环境光的因子 (0~1),越接近0,环境光越暗
         * @param specular   镜面反射系数 越接近0,镜面反射越强
         * @param blurRadius 模糊半径 值越大,模糊效果越明显
         */
        mPaint.setMaskFilter(new EmbossMaskFilter(new float[]{1,1,1},0.1f,1,10));
        canvas.drawRect(rectF, mPaint);
    }
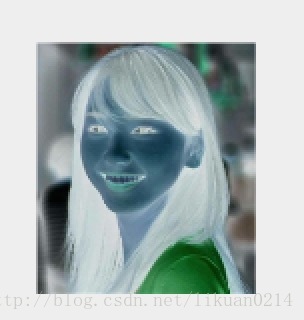
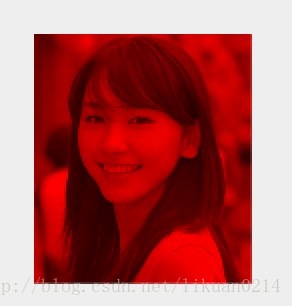
setColorFilter(ColorFilter colorfilter)设置颜色过滤器
可以在绘制颜色时实现不用颜色的变换效果
继承关系:
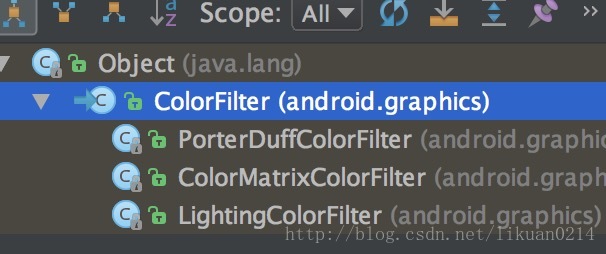
ColorMatrixColorFilter
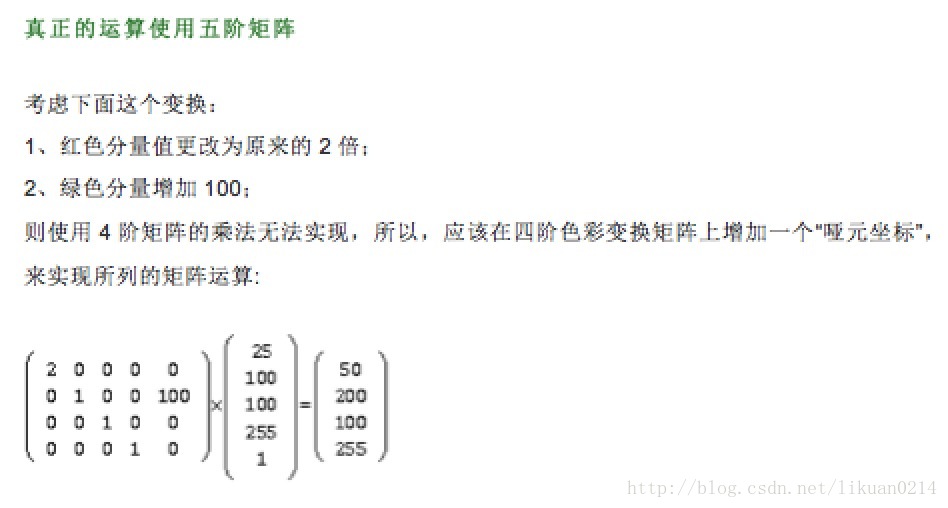
颜色矩阵表示:

例子:
        // 平移运算---加法
//        ColorMatrix colorMartrix = new ColorMatrix(new float[]{
//                1,0,0,0,100,
//                0,1,0,0,0,
//                0,0,1,0,0,
//                0,0,0,1,0,
//        });


        // 反相效果 -- 底片效果
//       ColorMatrix colorMartrix = new ColorMatrix(new float[]{
//                -1,0,0,0,255,
//                0,-1,0,0,255,
//                0,0,-1,0,255,
//                0,0,0,1,0,
//        });


        // 缩放运算---乘法 -- 颜色增强
//        ColorMatrix colorMartrix = new ColorMatrix(new float[]{
//                1.5f, 0,0,0,0,
//                0,1.5f,0,0,0,
//                0,0,1.5f,0,0,
//                0,0,0,1.5f,0,
//        });

        // 黑白照片
        // 去色原理:只要把R G B 三通道的色彩信息设置成一样,那么图像就会变成灰色,
        // 同时为了保证图像亮度不变,同一个通道里的R+G+B =1

//        ColorMatrix colorMartrix = new ColorMatrix(new float[]{
//                1f, 0,0,0,0,
//                1f, 0,0,0,0,
//                1f, 0,0,0,0,
//                0,0,0,1,0,
//        });
//        ColorMatrix colorMartrix = new ColorMatrix(new float[]{
//                0.213f, 0.715f,0.072f,0,0,
//                0.213f, 0.715f,0.072f,0,0,
//                0.213f, 0.715f,0.072f,0,0,
//                0,0,0,1,0,
//        });

        // 发色效果---(比如红色和绿色交换)
//        ColorMatrix colorMartrix = new ColorMatrix(new float[]{
//                0,1,0,0,0,
//                1, 0,0,0,0,
//                0,0,1,0,0,
//                0,0,0,1,0,
//        });

        // 复古效果
//        ColorMatrix colorMartrix = new ColorMatrix(new float[]{
//                1/2f,1/2f,1/2f,0,0,
//                1/3f, 1/3f,1/3f,0,0,
//                1/4f,1/4f,1/4f,0,0,
//                0,0,0,1,0,
//        });

        // 颜色通道过滤
        ColorMatrix colorMartrix = new ColorMatrix(new float[]{
                1, 0,0,0,0,
                0,0,0,0,0,
                0,0,0,0,0,
                0,0,0,1,0,
        });


        RectF rectF2 = new RectF(100, 100, bitmap.getWidth() + 100, bitmap.getHeight() + 100);
        paint.setColorFilter(new ColorMatrixColorFilter(colorMartrix));
        canvas.drawBitmap(bitmap,null, rectF2,paint);
平移运算—加法:
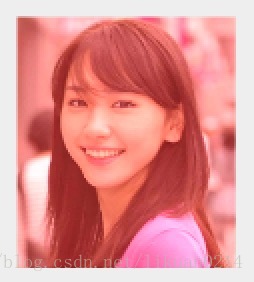
反相效果 – 底片效果:
缩放运算—乘法 – 颜色增强

黑白照片

发色效果—(比如红色和绿色交换)
复古效果

颜色通道过滤
setShader(Shader shader)设置图像效果
使用Shader可以绘制出各种渐变效果
先看一下Shader的子类
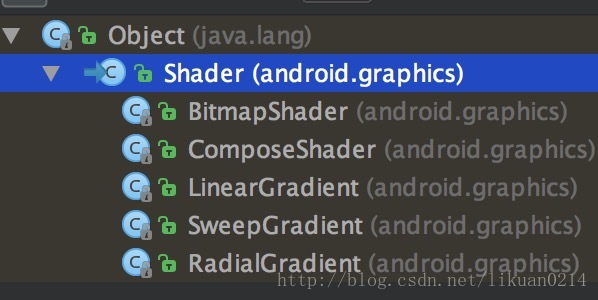
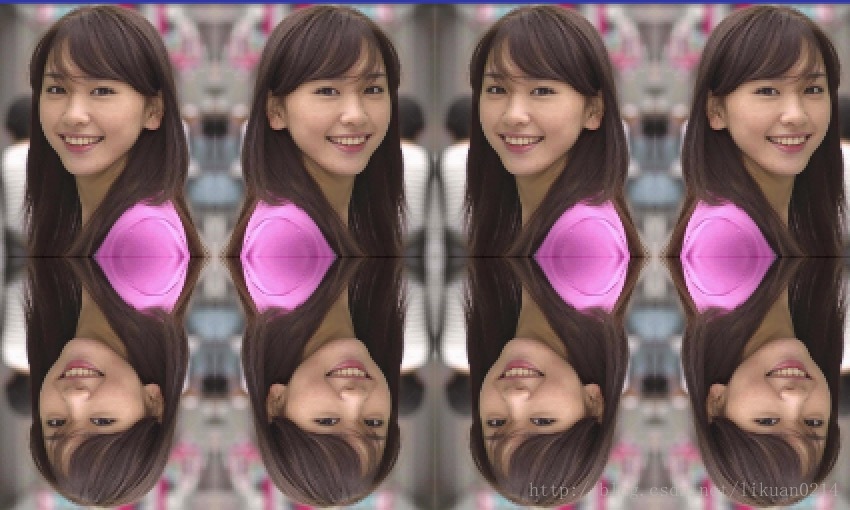
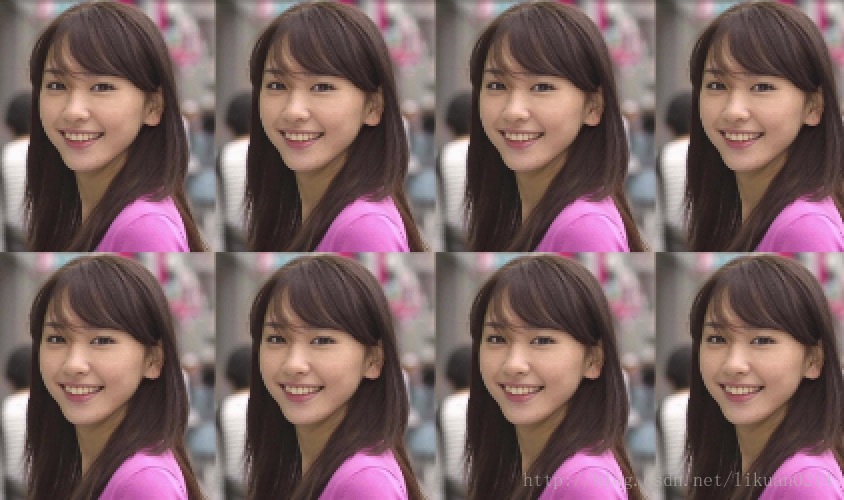
BitmapShader 可以用来画重复、拉伸或镜像的位图
例子1
    private void BitmapShader(Canvas canvas) {
        /**
         * TileMode.CLAMP 拉伸最后一个像素去铺满剩下的地方
         * TileMode.MIRROR 通过镜像翻转铺满剩下的地方。
         * TileMode.REPEAT 重复图片平铺整个画面(电脑设置壁纸)
         */
        BitmapShader bitMapShader = new BitmapShader(mBitMap, Shader.TileMode.MIRROR,
                 Shader.TileMode.MIRROR);
        mPaint.setShader(bitMapShader);
        mPaint.setAntiAlias(true);

//        canvas.drawCircle(mHeight / 2,mHeight / 2, mHeight / 2 ,mPaint);
//        canvas.drawOval(new RectF(0 , 0, mWidth, mHeight),mPaint);

        canvas.drawRect(new Rect(0,0 , getWidth(), getHeight()),mPaint);
    }
Shader.TileMode.MIRROR:
Shader.TileMode.CLAMP:
Shader.TileMode.REPEAT:
例子2:
public class ZoomImageView extends View {
    //放大倍数
    private static final int FACTOR = 2;
    //放大镜的半径
    private static final int RADIUS  = 100;
    // 原图
    private Bitmap mBitmap;
    // 放大后的图
    private Bitmap mBitmapScale;
    // 制作的圆形的图片(放大的局部),盖在Canvas上面
    private ShapeDrawable mShapeDrawable;

    private Matrix mMatrix;

    public ZoomImageView(Context context) {
        this(context, null);
    }

    public ZoomImageView(Context context, @Nullable AttributeSet attrs) {
        super(context, attrs);
        mBitmap = BitmapFactory.decodeResource(getResources(), R.drawable.xyjy3);
        mBitmapScale = mBitmap;
        //放大后的整个图片
        mBitmapScale = Bitmap.createScaledBitmap(mBitmapScale, mBitmapScale.getWidth() * FACTOR,
                mBitmapScale.getHeight() * FACTOR, true);
        BitmapShader bitmapShader = new BitmapShader(mBitmapScale, Shader.TileMode.CLAMP, Shader.TileMode.CLAMP);
        mShapeDrawable = new ShapeDrawable(new OvalShape());
        mShapeDrawable.getPaint().setShader(bitmapShader);
        //切出矩形区域,用来画圆
        mShapeDrawable.setBounds(0, 0, RADIUS * 2, RADIUS * 2);

        mMatrix = new Matrix();
    }


    @Override
    protected void onDraw(Canvas canvas) {
        super.onDraw(canvas);
        //1.画原图
        canvas.drawBitmap(mBitmap, 0, 0, null);
        //2.画放大镜的图
        mShapeDrawable.draw(canvas);
    }


    @Override
    public boolean onTouchEvent(MotionEvent event) {
        int x = (int) event.getX();
        int y = (int) event.getY();

        if(x > mBitmap.getWidth() - RADIUS) x = mBitmap.getWidth() - RADIUS;
        if(y > mBitmap.getHeight() - RADIUS) y = mBitmap.getHeight() - RADIUS;
        // 将放大的图片往相反的方向挪动
        mMatrix.setTranslate(RADIUS - x * FACTOR, RADIUS - y *FACTOR);
        mShapeDrawable.getPaint().getShader().setLocalMatrix(mMatrix);
        // 切出手势区域点位置的圆
        mShapeDrawable.setBounds(x-RADIUS,y - RADIUS, x + RADIUS, y + RADIUS);
        invalidate();
        return true;
    }
}
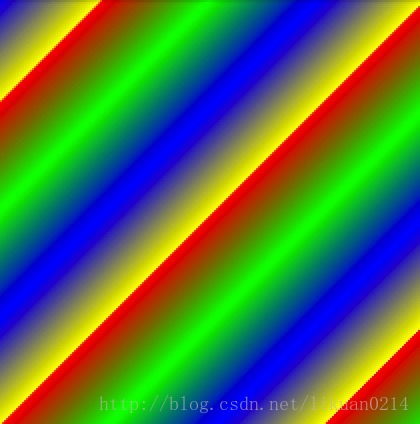
LinearGradient 线性渐变
例子1:
    private void LinearGradient(Canvas canvas) {
        /**线性渐变
         * x0, y0, 起始点
         *  x1, y1, 结束点
         * int[]  mColors, 中间依次要出现的几个颜色
         * float[] positions,数组大小跟colors数组一样大,中间依次摆放的几个颜色分别放置在那个位置上(参考比例从左往右)
         *    tile
         */
        LinearGradient linearGradient = new LinearGradient(50, 50, 200, 200, mColors, null, Shader.TileMode.REPEAT);
        mPaint.setShader(linearGradient);
        canvas.drawRect(0, 0, 400, 400, mPaint);
    }
Shader.TileMode.MIRROR:

Shader.TileMode.REPEAT:

Shader.TileMode.CLAMP:
例子2:
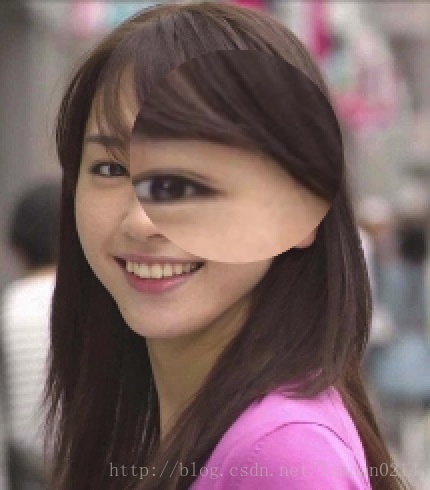
    private void ShapeDrawable(Canvas canvas) {
        //通过shapeDrawable也可以实现
        BitmapShader bitMapShader = new BitmapShader(mBitMap, Shader.TileMode.MIRROR,
                Shader.TileMode.MIRROR);
        ShapeDrawable shapeDrawble = new ShapeDrawable(new OvalShape());//画椭圆
        shapeDrawble.setShape(new ArcShape(180, 180));//画扇形
        shapeDrawble.getPaint().setShader(bitMapShader);
        shapeDrawble.setBounds(0,0,mWidth,mWidth);
        shapeDrawble.draw(canvas);
    }
注意:
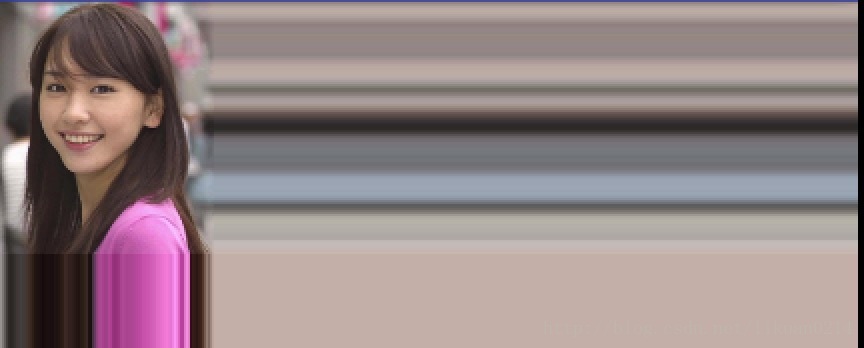
对于Shader.TileMode的三种状态,只有画布比图片大时,才有效果.
利用ShapeDrawable可以对图片进行各种剪裁,比如圆形头像,椭圆头像等等。
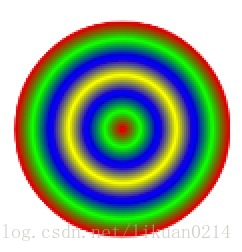
RadialGradient 圆形渐变填充
例子1
    private void RadialGradient(Canvas canvas) {
        RadialGradient mRadialGradient = new RadialGradient(getWidth()/2, getHeight()/2, 50, mColors, null, Shader.TileMode.MIRROR);
        mPaint.setShader(mRadialGradient);
        canvas.drawCircle(getWidth()/2, getHeight()/2, 100, mPaint);
//        canvas.drawRect(getWidth()/2 - 100, getHeight()/2 - 100, getWidth()/2 + 100, getHeight()/2 + 100, mPaint);
    }
例子2 水波纹扩散效果
public class RippleView extends Button {
// 点击位置
private int mX, mY;
private ObjectAnimator mAnimator;
// 默认半径
private int DEFAULT_RADIUS = 50;
private int mCurRadius = 0;
private RadialGradient mRadialGradient;
private Paint mPaint;
public RippleView(Context context) {
super(context);
init();
}
public RippleView(Context context, AttributeSet attrs) {
super(context, attrs);
init();
}
private void init() {
// 禁用硬件加速
setLayerType(LAYER_TYPE_SOFTWARE,null);
mPaint = new Paint();
}
@Override
public boolean onTouchEvent(MotionEvent event) {
if (mX != event.getX() || mY != mY) {
mX = (int) event.getX();
mY = (int) event.getY();
setRadius(DEFAULT_RADIUS);
}
switch (event.getAction()){
case MotionEvent.ACTION_DOWN:
return true;
case MotionEvent.ACTION_UP:
{
if (mAnimator != null && mAnimator.isRunning()) {
mAnimator.cancel();
}
if (mAnimator == null) {
mAnimator = ObjectAnimator.ofInt(this,"radius",DEFAULT_RADIUS, getWidth());
}
mAnimator.setInterpolator(new AccelerateInterpolator());
mAnimator.addListener(new Animator.AnimatorListener() {
@Override
public void onAnimationStart(Animator animation) {
}
@Override
public void onAnimationEnd(Animator animation) {
setRadius(0);
}
@Override
public void onAnimationCancel(Animator animation) {
}
@Override
public void onAnimationRepeat(Animator animation) {
}
});
mAnimator.setDuration(1000);
mAnimator.start();
}
}
return super.onTouchEvent(event);
}
public void setRadius(final int radius) {
mCurRadius = radius;
if (mCurRadius > 0) {
mRadialGradient = new RadialGradient(mX, mY, mCurRadius, 0x00FFFFFF, 0xFF58FAAC, Shader.TileMode.CLAMP);
mPaint.setShader(mRadialGradient);
}
postInvalidate();
}
@Override
protected void onDraw(Canvas canvas) {
super.onDraw(canvas);
canvas.drawCircle(mX, mY, mCurRadius, mPaint);
}
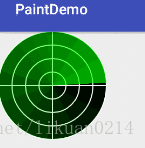
}SweepGradient 梯度/扫描渲染
可以做雷达扫描等
雷达扫描例子
public class RadarView extends View {
    private final String TAG = "RadarView";

    private static final int MSG_WHAT = 1;

    private static final int DELAY_TIME = 20;

    //设置默认宽高,雷达一般都是圆形,所以我们下面取宽高会去Math.min(宽,高)
    private final int DEFAULT_WIDTH = 200;

    private final int DEFAULT_HEIGHT = 200;
    //雷达的半径
    private int mRadarRadius;
    //雷达画笔
    private Paint mRadarPaint;
    //雷达底色画笔
    private Paint mRadarBg;
    //雷达圆圈的个数,默认4个
    private int mCircleNum = 4;
    //雷达线条的颜色,默认为白色
    private int mCircleColor = Color.WHITE;
    //雷达圆圈背景色
    private int mRadarBgColor = Color.BLACK;
    //paintShader
    private Shader mRadarShader;

    //雷达扫描时候的起始和终止颜色
    private int mStartColor = 0x0000ff00;

    private int mMiddleColor = 0xd6ff0000;

    private int mEndColor = 0xaa00ff00;


    private Matrix mMatrix;

    //旋转的角度
    private int mRotate = 0;

    private Handler mHandler = new Handler() {
        @Override
        public void handleMessage(Message msg) {
            super.handleMessage(msg);

            mRotate += 3;
            postInvalidate();

            mMatrix.reset();
            mMatrix.preRotate(mRotate, 0, 0);
            mHandler.sendEmptyMessageDelayed(MSG_WHAT, DELAY_TIME);
        }
    };

    public RadarView(Context context) {
        this(context, null);
    }

    public RadarView(Context context, AttributeSet attrs) {
        this(context, attrs, 0);
    }

    public RadarView(Context context, AttributeSet attrs, int defStyleAttr) {
        super(context, attrs, defStyleAttr);
        init(context, attrs);


        mRadarBg = new Paint(Paint.ANTI_ALIAS_FLAG);     //设置抗锯齿
        mRadarBg.setColor(mRadarBgColor);                  //画笔颜色
        mRadarBg.setStyle(Paint.Style.FILL);           //画实心圆

        mRadarPaint = new Paint(Paint.ANTI_ALIAS_FLAG);     //设置抗锯齿
        mRadarPaint.setColor(mCircleColor);                  //画笔颜色
        mRadarPaint.setStyle(Paint.Style.STROKE);           //设置空心的画笔,只画圆边
        mRadarPaint.setStrokeWidth(2);                      //画笔宽度

        mRadarShader = new SweepGradient(0, 0, mStartColor, mEndColor);
        mRadarShader = new SweepGradient(0, 0, new int[]{mStartColor, mEndColor}, null);

        mMatrix = new Matrix();
    }


    //初始化,拓展可设置参数供布局使用
    private void init(Context context, AttributeSet attrs) {
//        if (attrs != null) {
//            TypedArray ta = context.obtainStyledAttributes(attrs, R.styleable.RadarView);
//            mStartColor = ta.getColor(R.styleable.RadarView_startColor, mStartColor);
//            mEndColor = ta.getColor(R.styleable.RadarView_endColor, mEndColor);
//            mRadarBgColor = ta.getColor(R.styleable.RadarView_backgroundColor, mRadarBgColor);
//            mCircleColor = ta.getColor(R.styleable.RadarView_lineColor, mCircleColor);
//            mCircleNum = ta.getInteger(R.styleable.RadarView_circleNum, mCircleNum);
//            ta.recycle();
//        }
    }


    @Override
    protected void onSizeChanged(int w, int h, int oldw, int oldh) {
        super.onSizeChanged(w, h, oldw, oldh);
        mRadarRadius = Math.min(w / 2, h / 2);

        //Log.d(TAG, "onSizeChanged");
    }

    @Override
    protected void onMeasure(int widthMeasureSpec, int heightMeasureSpec) {
        super.onMeasure(widthMeasureSpec, heightMeasureSpec);
        int width = measureSize(1, DEFAULT_WIDTH, widthMeasureSpec);
        int height = measureSize(0, DEFAULT_HEIGHT, heightMeasureSpec);

        //取最大的 宽|高
        int measureSize = Math.min(width, height);
//        setMeasuredDimension(measureSize, measureSize);
        setMeasuredDimension(200, 200);
    }


    /**
     * 测绘measure
     *
     * @param specType    1为宽, 其他为高
     * @param contentSize 默认值
     */
    private int measureSize(int specType, int contentSize, int measureSpec) {
        int result;
        //获取测量的模式和Size
        int specMode = MeasureSpec.getMode(measureSpec);
        int specSize = MeasureSpec.getSize(measureSpec);

        if (specMode == MeasureSpec.EXACTLY) {
            result = Math.max(contentSize, specSize);
        } else {
            result = contentSize;

            if (specType == 1) {
                // 根据传人方式计算宽
                result += (getPaddingLeft() + getPaddingRight());
            } else {
                // 根据传人方式计算高
                result += (getPaddingTop() + getPaddingBottom());
            }
        }

        return result;

    }


    @Override
    protected void onDraw(Canvas canvas) {
        super.onDraw(canvas);

        Log.d(TAG, "onDraw   " + mRotate);

        mRadarBg.setShader(null);

        //将画板移动到屏幕的中心点
        canvas.translate(mRadarRadius, getHeight()/2);
        //绘制底色,让雷达的线看起来更清晰
        canvas.drawCircle(0, 0, mRadarRadius, mRadarBg);
        //画圆圈
        for (int i = 1; i <= mCircleNum; i++) {
            canvas.drawCircle(0, 0, (float) (i * 1.0 / mCircleNum * mRadarRadius), mRadarPaint);
        }
        //绘制雷达基线 x轴
        canvas.drawLine(-mRadarRadius, 0, mRadarRadius, 0, mRadarPaint);
        //绘制雷达基线 y轴
        canvas.drawLine(0, mRadarRadius, 0, -mRadarRadius, mRadarPaint);

//        canvas.rotate(mRotate,0,0);
        //设置颜色渐变从透明到不透明
        mRadarBg.setShader(mRadarShader);
        mRadarShader.setLocalMatrix(mMatrix);
//        canvas.concat(mMatrix);
        canvas.drawCircle(0, 0, mRadarRadius, mRadarBg);
    }


    public void startScan() {
        mHandler.removeMessages(MSG_WHAT);
        mHandler.sendEmptyMessage(MSG_WHAT);
    }

    public void stopScan() {
        mHandler.removeMessages(MSG_WHAT);
    }
}
ComposeShader 组合渲染
setShadowLayer(float radius ,float dx,float dy,int color)在图形下面设置阴影层,产生阴影效果
radius为阴影的角度,dx和dy为阴影在x轴和y轴上的距离,color为阴影的颜色
负责设置获取文字相关
float getFontSpacing()获取字符行间距
float getLetterSpacing()获取字符间距
float setLetterSpacing()设置字符间距
final boolean isUnderlineText()是否有下划线
void setUnderlineText(boolean underlineText)设置下划线
final boolean isStrikeThruText()获取是否有文本删除线
void setStrikeThruText(boolean strikeThruText)设置文本删除线
float getTextSize()获取文字大小
void setTextSize(float textSize)设置文字大小
注意:Paint.setTextSize传入的单位是px,TextView.setTextSize传入的单位是sp,注意使用时不同分辨率处理问题。
Typeface getTypeface()获取字体类型
Typeface setTypeface()设置字体类型
Android˙中默认有四种字体样式:BOLD(加粗)、BOLD_ITALIC(加粗并倾斜)、ITALIC(倾斜)、NORMAL(正常),我们也可以通过Typeface类来自定义个性化字体。
float getTextSkewX()获取文字倾斜
void setTextSkewX(float skewx)设置文字倾斜
参数没有具体范围,官方推荐值为-0.25,值为负则右倾,为正则左倾,默认值为0
Paint.Align getTextAlign()获取文本对齐方式
voie setTextAlign(Paint.Align align)设置文本对齐方式
Align有CENTER、LEFT、RIGHT,也就是文字绘制是居中、左对齐还是右对齐的。
setSubpixelText(boolean subpixelText)
固定的几个范围:320*480,480*800,720*1280,1080*1920等等;那么如何在同样的分辨率的显示器中增强显示清晰度呢?
亚像素的概念就油然而生了,亚像素就是把两个相邻的两个像素之间的距离再细分,再插入一些像素,这些通过程序加入的像素就是亚像素。在两个像素间插入的像素个数是通过程序计算出来的,一般是插入两个、三个或四个。
所以打开亚像素显示,是可以在增强文本显示清晰度的,但由于插入亚像素是通过程序计算而来的,所以会耗费一定的计算机性能。
breakText
- int breakText(String text, boolean measureForwards, float maxWidth, float[] measuredWidth)
比如文本阅读器的翻页效果,我们需要在翻页的时候动态折断或生成一行字符串,这就派上用场了~
getTextBounds获取文本的宽高,通过boudns的Rect拿到整型
- void getTextBounds(char[] text, int index, int count, Rect bounds)
- void getTextBounds(String text, int start, int end, Rect bounds)
measureText粗略获取文本的宽度,和上面的getTextBounds比较类似,返回浮点数
- float measureText(String text)
- float measureText(CharSequence text, int start, int end)
- float measureText(String text, int start, int end)
- float measureText(char[] text, int index, int count)
getTextWidths精确计算文字宽度,与上面两个类似。
- int getTextWidths(String text, int start, int end, float[] widths) - - int getTextWidths(String text, float[] widths)
- int getTextWidths(CharSequence text, int start, int end, float[] widths)
- int getTextWidths(char[] text, int index, int count, float[] widths)
FontMetrics,FontMetricsInt
先上一张图:

图中横线:
- 绿色线表示baseline
- 黑色线表示top
- FontMetrics.top = topY - baselineY < 0
- 黄色线表示descent
- FontMetrics.descent = descentY - baselineY > 0
- 红色线表示bottom
- FontMetrics.bottom = bottomY - baselineY > 0
图中竖线:
- 红色长度表示center距离top的距离:A
- 蓝色长度表示center距离bottom的距离:B
- 绿色长度表示center距离basiline的距离:C
求baselineY坐标:
     计算baseline的Y坐标:
     1.
     图中横线:
     绿色线表示baseline
     黑色线表示top         FontMetrics.top = topY - baselineY < 0
     黄色线表示descent     FontMetrics.descent = descentY - baselineY > 0
     红色线表示bottom      FontMetrics.bottom = bottomY - baselineY > 0


     2.
     图中竖线:
     红色长度表示center距离top的距离:A
     蓝色长度表示center距离bottom的距离:B
     绿色长度表示center距离basiline的距离:C
     中心点坐标为:centX, centY
     3.计算过程
     由图可知:A = B = (bottomY - topY) / 2;
     bottomY = baselineY + FontMetrics.bottom;
     topY = baselineY + FontMetrics.top;
     => A = B = (FontMetrics.bottom - FontMetrics.top)/2;
     由图可知:C = B - FontMetrics.bottom;
     又由于: C = baselineY - center;
     => baselineY - centerY = B - FontMetrics.bottom
     => baselineY = B - FontMetrics.bottom + centerY
     => baselineY = (FontMetrics.bottom - FontMetrics.top)/2 - FontMetrics.bottom + centerY
     4.结论
     baselineY = centerY - (FontMetrics.bottom + FontMetrics.top)/2
绘制上面的各种线:
    private void drawTextLines(Canvas canvas) {
        String text = "画笔文字Texti";
        int centerX = getWidth() / 2;
        int centerY = getHeight() / 2;
        Paint paint = new Paint();
        paint.setAntiAlias(true);
        paint.setTextSize(150);
        paint.setColor(Color.GRAY);

        Rect rect = new Rect();
        paint.getTextBounds(text, 0, text.length(), rect);

        Paint.FontMetricsInt fm = paint.getFontMetricsInt();
        //计算baseline的y坐标
        int baseLineY = (int) (centerY - (fm.bottom + fm.top) / 2f);
        //计算文字最左边x坐标
        float textLeftX = centerX - paint.measureText(text) / 2f;
        //绘制文字
        canvas.drawText(text, textLeftX, baseLineY, paint);


        paint.setStrokeWidth(3);
        //绘制屏幕中心线
        paint.setColor(Color.BLUE);
        canvas.drawLine(textLeftX, centerY, getWidth() - textLeftX, centerY, paint);
        //绘制baseline
        paint.setColor(Color.GREEN);
        canvas.drawLine(textLeftX, baseLineY, getWidth() - textLeftX, baseLineY, paint);
        //绘制bottom
        paint.setColor(Color.RED);
        canvas.drawLine(textLeftX, baseLineY + fm.bottom, getWidth() - textLeftX, baseLineY + fm.bottom, paint);
        //绘制top
        paint.setColor(Color.BLACK);
        canvas.drawLine(textLeftX, baseLineY + fm.top, getWidth() - textLeftX, baseLineY + fm.top, paint);
        //绘制descent
        paint.setColor(Color.YELLOW);
        canvas.drawLine(textLeftX, baseLineY + fm.descent, getWidth() - textLeftX, baseLineY + fm.descent, paint);

        int DS = 50;
        //绘制A
        paint.setColor(Color.RED);
        canvas.drawLine(getWidth() - textLeftX, centerY, getWidth() - textLeftX, baseLineY + fm.top, paint);
        //绘制B
        paint.setColor(Color.BLUE);
        canvas.drawLine(getWidth() - textLeftX - DS, centerY, getWidth() - textLeftX - DS, baseLineY + fm.bottom, paint);
        //绘制C
        paint.setColor(Color.GREEN);
        canvas.drawLine(getWidth() - textLeftX - DS * 2, centerY, getWidth() - textLeftX - DS * 2, baseLineY, paint);
    }
运行结果:
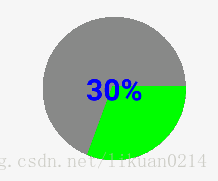
例子:圆形进度条
public class CircleProgressBar extends View {
    private float max;//进度条最大值
    private int roundColor;//初始圆环的颜色
    private int roundProgressColor;//进度条增加时的圆环颜色
    private int textColor;//文字颜色
    private float textSize;//文字大小
    private float roundWidth;//圆环宽度
    private boolean textShow;//是否显示文字进度
    private float progress;//进度值
    private Paint paint;//画笔
    public static final int STROKE = 0;
    public static final int FILL = 1;
    private int centerX, centerY;
    private static final String TAG = "CircleProgressBar";
    public CircleProgressBar(Context context) {
        this(context, null);
    }

    public CircleProgressBar(Context context, AttributeSet attrs){
        super(context, attrs);
        paint = new Paint();

        max = 100f;
        roundColor = Color.GRAY;
        roundProgressColor = Color.GREEN;
        textColor = Color.BLUE;
        textSize = 55;
        roundWidth = 10;
        textShow = true;
    }

    @Override
    protected void onMeasure(int widthMeasureSpec, int heightMeasureSpec) {
//        super.onMeasure(widthMeasureSpec, heightMeasureSpec);
        int widthMode = MeasureSpec.getMode(widthMeasureSpec);
        int heightMode = MeasureSpec.getMode(heightMeasureSpec);
        int widthSize = MeasureSpec.getSize(widthMeasureSpec);
        int heightSize = MeasureSpec.getSize(heightMeasureSpec);
        switch (widthMode){
            case MeasureSpec.EXACTLY:
                Log.i(TAG, "onMeasure: exactly");
                setMeasuredDimension(widthSize, heightSize);
                break;
            case MeasureSpec.AT_MOST:
            case MeasureSpec.UNSPECIFIED:
                Log.i(TAG, "onMeasure: at_most");
                setMeasuredDimension(200, 200);
                break;
        }
    }

    @Override
    protected void onSizeChanged(int w, int h, int oldw, int oldh) {
        super.onSizeChanged(w, h, oldw, oldh);
        centerX = w / 2;
        centerY = h / 2;
    }

    @Override
    protected void onDraw(Canvas canvas) {
        super.onDraw(canvas);
        //画圆环背景
        float radius = centerX < centerY ? centerX - roundWidth / 2 : centerY - roundWidth / 2;
        paint.setColor(roundColor);
        paint.setStyle(Paint.Style.FILL_AND_STROKE);
        paint.setStrokeWidth(roundWidth);
        paint.setAntiAlias(true);
        canvas.drawCircle(centerX, centerY, radius, paint);

        //画圆弧
        RectF oval = new RectF(centerX - radius, centerY - radius, centerX + radius, centerY + radius);
        paint.setColor(roundProgressColor);
        paint.setStrokeWidth(roundWidth);
        paint.setStyle(Paint.Style.FILL_AND_STROKE);
        canvas.drawArc(oval, 0, 360 * progress / max, true, paint);

        //画进度百分比
        paint.setColor(textColor);
        paint.setStrokeWidth(0);
        paint.setTextSize(textSize);
        paint.setTypeface(Typeface.DEFAULT_BOLD);

        int percent = (int) (progress / max * 100);
        String strPercent = percent + "%";
        Paint.FontMetricsInt fm = paint.getFontMetricsInt();
        if(percent != 0){
            canvas.drawText(strPercent, centerX - paint.measureText(strPercent) / 2,
                    centerY - (fm.bottom + fm.top)/2, paint
            );
        }


        if(progress > max){
            progress = max;
        }
        if(progress < max){
            progress += 0.1;
            invalidate();
            if(progress >= max){
                progress = 0;
            }
        }

    }
}


 603
603


 被折叠的 条评论
为什么被折叠?
被折叠的 条评论
为什么被折叠?
 到【灌水乐园】发言


