


OKHTTP介绍
在前一篇文章中已经初步介绍了OKHTTP框架以及基本的使用,不熟悉的读者可以看我的上一篇文章OKHTTP基本使用,下面从OKHTTP的源码出发,分析整个请求的过程。笔者这里分析的OKHTTP版本是3.8.1
官方请求案例
OkHttpClient client = new OkHttpClient();

String run(String url) throws IOException {
  Request request = new Request.Builder()
      .url(url)
      .build();

  try (Response response = client.newCall(request).execute()) {
    return response.body().string();
  }
}
可以看出分为以下几步,
- 创建OkHttpClient
- 创建Request
- 创建Call
- 执行Call
- 读取Response
分析第一步创建OkHttpClient,OkHttpClient的类注释告诉我们,OkHttpClient最佳使用是单例模式,即应用所有的请求使用一OkHttpClient实例即可,通过该实例构造出所有的请求Call,原因是每一个OkHttpClient实例都有一个独立的连接池和线程池,这样可以实现复用,从而减少资源的浪费,提高程序的性能。创建OkHttpClient的方式官方也提供了三种,第一种直接new OkHttpClient(),使用默认的配置,第二种通过OkHttpClient.Builder使用自定义配置,第三种扩展已有的OkHttpClient,通过newBuilder的方式复写部分参数设置。
分析第二步创建Request,构造出请求参数,这个没啥好说的,通过Builder的方式实现多样化的参数配置
分析第三步创建Call,通过OkHttpClient构造出Call对象,请求的实际发起者
分析第四步执行Call,这里分析同步执行和异步执行,其实同步和异步内部的请求流程是完全一致的,区别在与同步请求直接在当前线程执行网络请求,异步请求是将当前请求加入到任务队列,由线程池来调度执行。
分析第五步读取Response,OkHttpClient提供了多种响应的数据格式,比如String,byte[],Stream等
以上五步核心就是Call的执行,我们接下来就分析同步请求Call.execute的具体实现
@Override public Response execute() throws IOException {
    // 这里使用同步锁+executed标记,所以一个Call只可以执行一次!
    synchronized (this) {
      if (executed) throw new IllegalStateException("Already Executed");
      executed = true;// 标记该Call已经执行了
    }
    captureCallStackTrace();
    try {
      client.dispatcher().executed(this);// 将该Call加入同步请求队列
      Response result = getResponseWithInterceptorChain();// 这里执行真正的请求
      if (result == null) throw new IOException("Canceled");
      return result;
    } finally {
      client.dispatcher().finished(this);// 请求完成,从同步请求队列中移除该Call
    }
  }
接下来重点分析getResponseWithInterceptorChain()真正的请求流程,从方法名可以得知是从拦截器链中获取Response
Response getResponseWithInterceptorChain() throws IOException {
    // Build a full stack of interceptors.
    List<Interceptor> interceptors = new ArrayList<>();
    interceptors.addAll(client.interceptors());// 应用拦截器
    interceptors.add(retryAndFollowUpInterceptor);// 请求重试拦截器
    interceptors.add(new BridgeInterceptor(client.cookieJar()));// 桥接拦截器
    interceptors.add(new CacheInterceptor(client.internalCache()));// 缓存拦截器
    interceptors.add(new ConnectInterceptor(client));// 连接拦截器
    if (!forWebSocket) {
      interceptors.addAll(client.networkInterceptors());// 网络拦截器
    }
    interceptors.add(new CallServerInterceptor(forWebSocket));// server数据交互拦截器
    // 拦截器链
    Interceptor.Chain chain = new RealInterceptorChain(
        interceptors, null, null, null, 0, originalRequest);
    return chain.proceed(originalRequest); // 处理请求
  }

可以看到内部内置了多个拦截器,并且用户可以自定义应用拦截器,网络拦截器,然后按顺序组成一条拦截器链,请求在链中传递,最终完成请求任务。
其实OkHttp的核心设计就是拦截器,责任链设计。它将一个复杂的网络请求流程进行分解,分解成多个步骤,每一个步骤设计成一个拦截器,从而多个拦截器组装成一条链,每个拦截器各司其责,最终各自分工完成整个网络请求任务。比如RetryAndFollowupInterceptor拦截器,用于处理请求失败的重试,CacheInterceptor拦截器用于处理网络请求的缓存,ConnectInterceptor拦截器负责处理网络链接等。所以分析OkHttp的源码主要是看它内部几大拦截器的设计。
分析OKHTTP内置拦截器
1.RetryAndFollowUpInterceptor
这个拦截器用来负责okhttp的请求失败的恢复和重定向。我们先分析和请求重试相关的逻辑代码:
@Override public Response intercept(Chain chain) throws IOException {
    Request request = chain.request();

    streamAllocation = new StreamAllocation(
        client.connectionPool(), createAddress(request.url()), callStackTrace);

    int followUpCount = 0;
    Response priorResponse = null;
    while (true) {
      if (canceled) {
        streamAllocation.release();
        throw new IOException("Canceled");
      }

      Response response = null;
      boolean releaseConnection = true;
      try {
        response = ((RealInterceptorChain) chain).proceed(request, streamAllocation, null, null);
        releaseConnection = false;
      } catch (RouteException e) {
        // 如果是RouteException是否需要重新请求
        if (!recover(e.getLastConnectException(), false, request)) {
          throw e.getLastConnectException();
        }
        releaseConnection = false;
        continue;
      } catch (IOException e) {
        boolean requestSendStarted = !(e instanceof ConnectionShutdownException);
        // 如果是IOException是否需要重新请求
        if (!recover(e, requestSendStarted, request)) throw e;
        releaseConnection = false;
        continue;
      } finally {
        // 如果发生了异常,并且需要重试的情况下,releaseConnection为false,不会执行这个操作,否则,不需要再进行重试请求了,此时可以释放连接了
        if (releaseConnection) {
          // 释放连接
          streamAllocation.streamFailed(null);
          streamAllocation.release();
        }
      }
      //...省略相关代码逻辑
    }
  }
可以看出,在请求发生了RouteException或者IOException时,经过recover()方法判断,如果符合重试的条件,就不继续往下执行而是continue在while循环中执行下一次请求(也就是重试)。那么什么情况下需要重试呢?这就需要看recover方法里面具体怎么操作的了。
private boolean recover(IOException e, boolean requestSendStarted, Request userRequest) {
    streamAllocation.streamFailed(e);

    // 应用层是否允许重试,客户端可以配置
    if (!client.retryOnConnectionFailure()) return false;

    // 如果请求已经发送并且请求体属于不可重复请求的
    if (requestSendStarted && userRequest.body() instanceof UnrepeatableRequestBody) return false;

    // 是否是可恢复的
    if (!isRecoverable(e, requestSendStarted)) return false;

    // 是否还有其他路由(这里也说明了如果一直发生routeException的情况,还需要查看是否有路由,并不会无限的循环下去)
    if (!streamAllocation.hasMoreRoutes()) return false;

    // For failure recovery, use the same route selector with a new connection.
    return true;
  }
不可以进行重试的异常一共有四种:
- 在调用okhttp请求的时候,设置为不可重试
- 不属于路由异常(即连接成功了),但是请求体属于不可重复的请求
- !isRecoverable(e, routeException),这里调用了isRecoverable()方法来判断。isRecoverable方法的代码如下:
private boolean isRecoverable(IOException e, boolean requestSendStarted) {
    // If there was a protocol problem, don't recover.
    if (e instanceof ProtocolException) {
      return false;
    }

    // If there was an interruption don't recover, but if there was a timeout connecting to a route
    // we should try the next route (if there is one).
    if (e instanceof InterruptedIOException) {
      return e instanceof SocketTimeoutException && !requestSendStarted;
    }

    // Look for known client-side or negotiation errors that are unlikely to be fixed by trying
    // again with a different route.
    if (e instanceof SSLHandshakeException) {
      // If the problem was a CertificateException from the X509TrustManager,
      // do not retry.
      if (e.getCause() instanceof CertificateException) {
        return false;
      }
    }
    if (e instanceof SSLPeerUnverifiedException) {
      // e.g. a certificate pinning error.
      return false;
    }

    // An example of one we might want to retry with a different route is a problem connecting to a
    // proxy and would manifest as a standard IOException. Unless it is one we know we should not
    // retry, we return true and try a new route.
    return true;
  }
这里面判断了在连接过程中发生的情况:
(1)属于ProtocolException异常的情况,不进行重连
(2)属于中断异常(如果是socket连接超时除外)不进行重连
(3)证书导致的异常不进行重连
(4)访问网站的证书不在你可以信任的证书列表中 不进行重连
- 是否还有其他路由来进行重试。由于每次重试都要切换一个路由,当没有更多的路由时,就不进行重试了。关于判断是否重试的代码就到这里结束了。下面开始看关于重定向的代码:
   // ...省略上面的代码
   // Attach the prior response if it exists. Such responses never have a body.
      if (priorResponse != null) {
        response = response.newBuilder()
            .priorResponse(priorResponse.newBuilder()
                    .body(null)
                    .build())
            .build();
      }
      // 获取重定向的请求
      Request followUp = followUpRequest(response);
      // 重定向的请求为空,说明不需要进行重定向
      if (followUp == null) {
        if (!forWebSocket) {
          streamAllocation.release();
        }
        return response;
      }

      closeQuietly(response.body());
      // 超过一定次数的重定向后,抛出异常
      if (++followUpCount > MAX_FOLLOW_UPS) {
        streamAllocation.release();
        throw new ProtocolException("Too many follow-up requests: " + followUpCount);
      }

      if (followUp.body() instanceof UnrepeatableRequestBody) {
        streamAllocation.release();
        throw new HttpRetryException("Cannot retry streamed HTTP body", response.code());
      }
      // 如果请求的地址发生了变化,重新创建streamAllocation
      if (!sameConnection(response, followUp.url())) {
        streamAllocation.release();
        streamAllocation = new StreamAllocation(
            client.connectionPool(), createAddress(followUp.url()), callStackTrace);
      } else if (streamAllocation.codec() != null) {
        throw new IllegalStateException("Closing the body of " + response
            + " didn't close its backing stream. Bad interceptor?");
      }

      request = followUp;
      priorResponse = response;
    }
要进行重定向首先需要根据上次的response获取到重定向的请求,这一步是在followUpRequest(response)方法中实现的,这个方法后面再进行分析。先看获取到重定向请求后做了什么操作。
一、判断followUp (根据上次请求返回的response获取到的重定向请求)是否为空,如果为空,说明不需要重定向,那么直接返回response,就不往下执行第二步了。
二、到这一步,说明需要执行重定向请求。那么判断已经执行的重定向请求的次数是否大于一定的数量,如果大于,抛出异常,否则继续往下执行
三、如果followUp.body() instanceof UnrepeatableRequestBody,说明不希望这个请求重复进行提交,那么也抛出异常,不往下执行了
四、到了这一步,基本上就可以进行重定向了。判断要重定向的地址是否和之前的地址相同,如果不同需要重新进行新的连接。执行完这一步,就可以循环开始下一次的请求了。
接下来看一下是如何根据response获取重定向的请求的,这就要看Request followUp = followUpRequest(response)这个方法了。这里面生成的request主要是根据返回的状态吗code和请求方式,逻辑如下:
private Request followUpRequest(Response userResponse) throws IOException {
    if (userResponse == null) throw new IllegalStateException();
    Connection connection = streamAllocation.connection();
    Route route = connection != null? connection.route(): null;
    int responseCode = userResponse.code();

    final String method = userResponse.request().method();
    switch (responseCode) {
      case HTTP_PROXY_AUTH:
        Proxy selectedProxy = route != null
            ? route.proxy()
            : client.proxy();
        if (selectedProxy.type() != Proxy.Type.HTTP) {
          throw new ProtocolException("Received HTTP_PROXY_AUTH (407) code while not using proxy");
        }
        return client.proxyAuthenticator().authenticate(route, userResponse);

      case HTTP_UNAUTHORIZED:
        return client.authenticator().authenticate(route, userResponse);

      case HTTP_PERM_REDIRECT:
      case HTTP_TEMP_REDIRECT:
        // "If the 307 or 308 status code is received in response to a request other than GET
        // or HEAD, the user agent MUST NOT automatically redirect the request"
        if (!method.equals("GET") && !method.equals("HEAD")) {
          return null;
        }
        // fall-through
      case HTTP_MULT_CHOICE:
      case HTTP_MOVED_PERM:
      case HTTP_MOVED_TEMP:
      case HTTP_SEE_OTHER:
        // 判断客户端是否允许重定向
        if (!client.followRedirects()) return null;
        // 取出Location值
        String location = userResponse.header("Location");
        if (location == null) return null;
        // 拼接HttpUrl
        HttpUrl url = userResponse.request().url().resolve(location);

        // Don't follow redirects to unsupported protocols.
        if (url == null) return null;

        // If configured, don't follow redirects between SSL and non-SSL.
        boolean sameScheme = url.scheme().equals(userResponse.request().url().scheme());
        if (!sameScheme && !client.followSslRedirects()) return null;

        // Most redirects don't include a request body.
        Request.Builder requestBuilder = userResponse.request().newBuilder();
        if (HttpMethod.permitsRequestBody(method)) {
          final boolean maintainBody = HttpMethod.redirectsWithBody(method);
          if (HttpMethod.redirectsToGet(method)) {
            requestBuilder.method("GET", null);
          } else {
            RequestBody requestBody = maintainBody ? userResponse.request().body() : null;
            requestBuilder.method(method, requestBody);
          }
          if (!maintainBody) {
            requestBuilder.removeHeader("Transfer-Encoding");
            requestBuilder.removeHeader("Content-Length");
            requestBuilder.removeHeader("Content-Type");
          }
        }

        // When redirecting across hosts, drop all authentication headers. This
        // is potentially annoying to the application layer since they have no
        // way to retain them.
        if (!sameConnection(userResponse, url)) {
          requestBuilder.removeHeader("Authorization");
        }

        return requestBuilder.url(url).build();

      case HTTP_CLIENT_TIMEOUT:
        // 408's are rare in practice, but some servers like HAProxy use this response code. The
        // spec says that we may repeat the request without modifications. Modern browsers also
        // repeat the request (even non-idempotent ones.)
        if (userResponse.request().body() instanceof UnrepeatableRequestBody) {
          return null;
        }

        return userResponse.request();

      default:
        return null;
    }
  }
该方法会取到状态码,然后进行switch判断,当status code为307即HTTP_TEMP_REDIRECT时,okhttp会从相应体中,获取Location值(重定向地址)从源码中可以看出,还有好多种状态码的判断。这里只介绍重定向307的情况:
String location = userResponse.header("Location");
然后重新创建和拼接请求新的Request, 即:
HttpUrl url = userResponse.request().url().resolve(location);
然后将原请求的相关Header信息进行拼装,最后创建一个新的Request返回回去,即:
 HttpUrl url = userResponse.request().url().resolve(location);
 Request.Builder requestBuilder = userResponse.request().newBuilder();
 requestBuilder.url(url).build();
重新将拼接好的request对象,重新进行网络请求
2.BridgeInterceptor
这个拦截器比较简单, 一个实现应用层和网络层直接的数据格式编码的桥。
- 第一:把应用层客户端传过来的请求对象转换为 HTTP 网络协议所需字段的请求对象。
- 第二:把下游网络请求结果转换为应用层客户所需要的响应对象。
可以理解为一种适配器的设计思想,逻辑如下:
@Override public Response intercept(Chain chain) throws IOException {
    Request userRequest = chain.request();
    Request.Builder requestBuilder = userRequest.newBuilder();

    RequestBody body = userRequest.body();
    // 对请求头的补充
    if (body != null) {
      MediaType contentType = body.contentType();
      if (contentType != null) {
        requestBuilder.header("Content-Type", contentType.toString());
      }

      long contentLength = body.contentLength();
      if (contentLength != -1) {
        requestBuilder.header("Content-Length", Long.toString(contentLength));
        requestBuilder.removeHeader("Transfer-Encoding");
      } else {
        requestBuilder.header("Transfer-Encoding", "chunked");
        requestBuilder.removeHeader("Content-Length");
      }
    }

    if (userRequest.header("Host") == null) {
      requestBuilder.header("Host", hostHeader(userRequest.url(), false));
    }
    // 默认是保持连接的 Keep-Alive
    if (userRequest.header("Connection") == null) {
      requestBuilder.header("Connection", "Keep-Alive");
    }

    // 默认是GZIP压缩的
    // Accept-Encoding : 就是告诉服务器客户端能够接受的数据编码类型,OKHTTP 默认就是 GZIP 类型
    // If we add an "Accept-Encoding: gzip" header field we're responsible for also decompressing
    // the transfer stream.
    boolean transparentGzip = false;
    if (userRequest.header("Accept-Encoding") == null && userRequest.header("Range") == null) {
      // 标记请求支持 GZIP 压缩
      transparentGzip = true;
      requestBuilder.header("Accept-Encoding", "gzip");
    }
    // cookie 头的添加
    List<Cookie> cookies = cookieJar.loadForRequest(userRequest.url());
    if (!cookies.isEmpty()) {
      requestBuilder.header("Cookie", cookieHeader(cookies));
    }
    // User-Agent
    if (userRequest.header("User-Agent") == null) {
      requestBuilder.header("User-Agent", Version.userAgent());
    }
    // 发送网络请求
    Response networkResponse = chain.proceed(requestBuilder.build());
    // 接受服务器返回的 Cookie
    HttpHeaders.receiveHeaders(cookieJar, userRequest.url(), networkResponse.headers());

    Response.Builder responseBuilder = networkResponse.newBuilder()
        .request(userRequest);

    if (transparentGzip
        && "gzip".equalsIgnoreCase(networkResponse.header("Content-Encoding"))
        && HttpHeaders.hasBody(networkResponse)) {
      // 当服务器返回的数据是 GZIP 压缩的,那么客户端就有责任去进行解压操作
      GzipSource responseBody = new GzipSource(networkResponse.body().source());
      Headers strippedHeaders = networkResponse.headers().newBuilder()
          .removeAll("Content-Encoding")
          .removeAll("Content-Length")
          .build();
      // 构建一个Response
      responseBuilder.headers(strippedHeaders);
      responseBuilder.body(new RealResponseBody(strippedHeaders, Okio.buffer(responseBody)));
    }

    return responseBuilder.build();
  }
1.用户 Request 到 网络 Request 的转换
如何对用户 Request 到 网络 Request 的转换呢?从上面的代码中可以看出它在原来 request
的基础上添加了很多请求头,下面列举的是添加的头信息。
Content-Type 定义网络文件的类型和网页的编码,如果未指定ContentType,默认为[TEXT]/[HTML],具体的类型,参考这个文档 HTTP Content-type
Content-Length 表示的是请求体内容的长度。它和 Transfer-Encoding 是互斥的,主要根据 Content-Length 是否为 -1 进行判读使用哪一个请求头。
Transfer-Encoding 值为 chunked 表示请求体的内容大小是未知的。
Host 请求的 url 的主机
Connection 默认就是 “Keep-Alive”,就是一个 TCP 连接之后不会关闭,保持连接状态。
Accept-Encoding 默认是 “gzip” 告诉服务器客户端支持 gzip 编码的响应。
Cookie 当请求设置了 Cookie 那么就是添加 Cookie 这个请求头。
User-Agent “okhttp/3.4.1” 这个值根据 OKHTTP 的版本不一样而不一样,它表示客户端 的信息。
上面就是将一个普通的 Request 添加很多头信息,让其成为可以发送网络请求的 Request 。
2.将网络请求回来的响应 Response 转化为用户可用的 Response
这句话怎么理解呢?例如 OKHTTP 默认就是支持 GZIP 压缩的,若服务器返回的响应体是经过 GZIP 压缩的,那么 BridgeInterceptor 就有责任将其进行解压,那么调用者无需关系这个过程了,只要得到最终的 Response 即可。
3.CacheInterceptor
这个拦截器用于处理HTTP缓存的,HTTP缓存简单总结分为两种,一种强制缓存,一种对比缓存,强制缓存生效时直接使用以前的请求结果,无需发起网络请求。对比缓存生效时,无论怎样都会发起网络请求,如果请求结果未改变,服务端会返回304,但不会返回数据,数据从缓存中取,如果改变了会返回数据。具体细节可以看http缓存相关的文章,这里就不在展开了。我们开始分析CacheInterceptor的核心逻辑
@Override public Response intercept(Chain chain) throws IOException {
    // 默认cache为null,可以配置cache,不为空尝试获取缓存中的response
    Response cacheCandidate = cache != null
        ? cache.get(chain.request())
        : null;

    long now = System.currentTimeMillis();
    // 根据response,time,request创建一个缓存策略,用于判断怎样使用缓存
    CacheStrategy strategy = new CacheStrategy.Factory(now, chain.request(), cacheCandidate).get();
    Request networkRequest = strategy.networkRequest;
    Response cacheResponse = strategy.cacheResponse;

    if (cache != null) {
      cache.trackResponse(strategy);
    }

    if (cacheCandidate != null && cacheResponse == null) {
      closeQuietly(cacheCandidate.body()); // The cache candidate wasn't applicable. Close it.
    }

    // 如果缓存策略禁止使用网络请求并且缓存的response为null, 则返回一个504的空response.
    if (networkRequest == null && cacheResponse == null) {
      return new Response.Builder()
          .request(chain.request())
          .protocol(Protocol.HTTP_1_1)
          .code(504)
          .message("Unsatisfiable Request (only-if-cached)")
          .body(Util.EMPTY_RESPONSE)
          .sentRequestAtMillis(-1L)
          .receivedResponseAtMillis(System.currentTimeMillis())
          .build();
    }

    // 如果缓存策略禁止使用网络请求但是缓存的response不为null, 返回cacheResponse
    if (networkRequest == null) {
      return cacheResponse.newBuilder()
          .cacheResponse(stripBody(cacheResponse))
          .build();
    }

    Response networkResponse = null;
    try {
      // 到达这里表示没有可用的缓存, 继续责任链的下一个结点, 继续请求网络
      networkResponse = chain.proceed(networkRequest);
    } finally {
      // If we're crashing on I/O or otherwise, don't leak the cache body.
      if (networkResponse == null && cacheCandidate != null) {
        closeQuietly(cacheCandidate.body());
      }
    }

    // 当缓存响应和网络响应同时存在的时候,选择用哪个
    if (cacheResponse != null) {
      if (networkResponse.code() == HTTP_NOT_MODIFIED) {
        // 如果返回码是304,客户端有缓冲的文档并发出了一个条件性的请求
        // (一般是提供If-Modified-Since头表示客户只想比指定日期更新的文档).
        // 服务器告诉客户,原来缓冲的文档还可以继续使用。则使用缓存的响应
        Response response = cacheResponse.newBuilder()
            .headers(combine(cacheResponse.headers(), networkResponse.headers()))
            .sentRequestAtMillis(networkResponse.sentRequestAtMillis())
            .receivedResponseAtMillis(networkResponse.receivedResponseAtMillis())
            .cacheResponse(stripBody(cacheResponse))
            .networkResponse(stripBody(networkResponse))
            .build();
        networkResponse.body().close();

        // Update the cache after combining headers but before stripping the
        // Content-Encoding header (as performed by initContentStream()).
        cache.trackConditionalCacheHit();
        cache.update(cacheResponse, response);
        return response;
      } else {
        closeQuietly(cacheResponse.body());
      }
    }
    // 使用网络响应
    Response response = networkResponse.newBuilder()
        .cacheResponse(stripBody(cacheResponse))
        .networkResponse(stripBody(networkResponse))
        .build();

    // 默认创建的OkHttpClient是没有缓存的
    if (cache != null) {
      if (HttpHeaders.hasBody(response) && CacheStrategy.isCacheable(response, networkRequest)) {
        // 缓存Resposne的Header信息
        CacheRequest cacheRequest = cache.put(response);
        // 缓存body
        return cacheWritingResponse(cacheRequest, response);
      }
      // 只能okhttp3只能缓存GET请求....不然从cache中移除request
      if (HttpMethod.invalidatesCache(networkRequest.method())) {
        try {
          cache.remove(networkRequest);
        } catch (IOException ignored) {
          // The cache cannot be written.
        }
      }
    }

    return response;
  }
分析完大致源码之后,我们总结下核心流程
- networkRequest == null && cacheResponse == null
这种情况说明从缓存策略上来说强制缓存生效,应该直接取上次缓存结果,但由于未知原因缓存的结果没有了或者上次返回就没有,这里直接返回了失败的Response - networkRequest == null
这种情况下,强制缓存生效,按道理来说我们直接返回上次的cacheResponse就可以了 - networkRequest != null
强制缓存不生效,说明此时应该使用对比缓存,需要从服务端取数据:
按照对比缓存规则,取完之后应该判断是否返回304,如果是应该使用缓存结果:
可以看到确实是通过cacheResponse来构造Response的,而不是通过刚才请求的networkResponse来构造Response。当然,更新了一些必要数据而已。 - 缓存失效
剩下的情况就是缓存完全失效了,这个时候应该利用刚才网络请求的结果,然后存入缓存
缓存策略判断
上面分析了缓存的使用方式,其实就是根据是否使用强制缓存(networkRequest为null),是否使用过对比缓存(networkRequest不为null,且cacheResponse不为null),那么具体使用哪种策略是怎么决定的呢,我们继续看源码:
@Override public Response intercept(Chain chain) throws IOException {
    Response cacheCandidate = cache != null
        ? cache.get(chain.request())
        : null;

    long now = System.currentTimeMillis();

    CacheStrategy strategy = new CacheStrategy.Factory(now, chain.request(), cacheCandidate).get();
    Request networkRequest = strategy.networkRequest;
    Response cacheResponse = strategy.cacheResponse;

    if (cache != null) {
      cache.trackResponse(strategy);
    }
   //省略代码
}
这段代码我们之前没有分析,这里有个CacheStrategy,就是由它来决定采用何种缓存规则的。okhttp为每一个请求都记录了一个Strategy。我们来看下这个get()方法:
public CacheStrategy get() {
      CacheStrategy candidate = getCandidate();

      if (candidate.networkRequest != null && request.cacheControl().onlyIfCached()) {
        // We're forbidden from using the network and the cache is insufficient.
        return new CacheStrategy(null, null);
      }
      return candidate;
    }
继续跟到getCandidate()中去:
private CacheStrategy getCandidate() {
      // No cached response.
      if (cacheResponse == null) {
        return new CacheStrategy(request, null);
      }
      // Drop the cached response if it's missing a required handshake.
      if (request.isHttps() && cacheResponse.handshake() == null) {
        return new CacheStrategy(request, null);
      }
      // If this response shouldn't have been stored, it should never be used
      // as a response source. This check should be redundant as long as the
      // persistence store is well-behaved and the rules are constant.
      if (!isCacheable(cacheResponse, request)) {
        return new CacheStrategy(request, null);
      }
      CacheControl requestCaching = request.cacheControl();
     //省略代码
}
所谓的决定策略,其实就是决定是否要重新发起网络请求,上面的几种情况都是要发起请求的,包括:没有对应的缓存结果;https请求却没有握手信息;不允许缓存的请求(包括一些特殊状态码以及Header中明确禁止缓存)。
上述的几种情况其实都没有涉及到具体的缓存策略,没有通过Header中一些字段来判断,下面的几种情况就都是靠Header中的字段来决定的了,主要借助了一个类CacheControl,我们看下它是干什么的:
public final class CacheControl {
  private final boolean noCache;
  private final boolean noStore;
  private final int maxAgeSeconds;
  private final int sMaxAgeSeconds;
  private final boolean isPrivate;
  private final boolean isPublic;
  private final boolean mustRevalidate;
  private final int maxStaleSeconds;
  private final int minFreshSeconds;
  private final boolean onlyIfCached;
  private final boolean noTransform;
  private final boolean immutable;
}
我们看下成员变量,很明显,这里都是记录的http协议中的一些和缓存有关的字段,我们可以通过这些字段判断一个requeset是否允许缓存,一个Response采用何种缓存策略。
这个时候我们继续回到getCandidate()方法:
CacheControl requestCaching = request.cacheControl();
      if (requestCaching.noCache() || hasConditions(request)) {
        return new CacheStrategy(request, null);
      }

      CacheControl responseCaching = cacheResponse.cacheControl();
      if (responseCaching.immutable()) {
        return new CacheStrategy(null, cacheResponse);
}
可以看到这里分别获取了request的和Response的CacheControl,下面的代码就是按照标准的http缓存协议,从CacheControl中判断一些Header中的关键字决定缓存策略,这里就不再继续深入。
缓存的具体实现
上面讨论了是否使用缓存,什么时候采用何种策略,这节我们讨论下使用缓存时,缓存具体如何存的,如何获取的:
@Override public Response intercept(Chain chain) throws IOException {
    //缓存的获取
    Response cacheCandidate = cache != null
        ? cache.get(chain.request())
        : null;
    //省略代码
 if (cache != null) {
      if (HttpHeaders.hasBody(response) && CacheStrategy.isCacheable(response, networkRequest)) {
        // 存入到缓存中去
        CacheRequest cacheRequest = cache.put(response);
      }
      if (HttpMethod.invalidatesCache(networkRequest.method())) {
        try {
          //从缓存中删除
          cache.remove(networkRequest);
        } catch (IOException ignored) {
          // The cache cannot be written.
        }
      }
    }
从上面可以看到,所有的缓存处理都是来自cache类:
final InternalCache cache;
最终传进来的是在OkHttpClient中设置的Cache类
先看下成员变量:
public final class Cache implements Closeable, Flushable {
  private static final int VERSION = 201105;
  private static final int ENTRY_METADATA = 0;
  private static final int ENTRY_BODY = 1;
  private static final int ENTRY_COUNT = 2;

  final InternalCache internalCache = new InternalCache() {
    @Override public Response get(Request request) throws IOException {
      return Cache.this.get(request);
    }

    @Override public CacheRequest put(Response response) throws IOException {
      return Cache.this.put(response);
    }

    @Override public void remove(Request request) throws IOException {
      Cache.this.remove(request);
    }

    @Override public void update(Response cached, Response network) {
      Cache.this.update(cached, network);
    }

    @Override public void trackConditionalCacheHit() {
      Cache.this.trackConditionalCacheHit();
    }

    @Override public void trackResponse(CacheStrategy cacheStrategy) {
      Cache.this.trackResponse(cacheStrategy);
    }
  };

  final DiskLruCache cache;

  /* read and write statistics, all guarded by 'this' */
  int writeSuccessCount;
  int writeAbortCount;
  private int networkCount;
  private int hitCount;
  private int requestCount;
}
从成员变量中可以猜测缓存应该是借助DiskLruCache实现的
缓存的put
@Nullable CacheRequest put(Response response) {
    String requestMethod = response.request().method();
    if (HttpMethod.invalidatesCache(response.request().method())) {
      try {
        remove(response.request());
      } catch (IOException ignored) {
        // The cache cannot be written.
      }
      return null;
    }
    if (!requestMethod.equals("GET")) {
      // Don't cache non-GET responses. We're technically allowed to cache
      // HEAD requests and some POST requests, but the complexity of doing
      // so is high and the benefit is low.
      return null;
    }
    if (HttpHeaders.hasVaryAll(response)) {
      return null;
    }
    Entry entry = new Entry(response);
    DiskLruCache.Editor editor = null;
    try {
      editor = cache.edit(key(response.request().url()));
      if (editor == null) {
        return null;
      }
      entry.writeTo(editor);
      return new CacheRequestImpl(editor);
    } catch (IOException e) {
      abortQuietly(editor);
      return null;
    }
  }
总体逻辑很简单,首先做了个保险的判断,对方法是POST,PATCH,PUT,DELETE,MOVE的请求,将缓存清除掉,这些是不应该被缓存的。然后明确了一点,只有GET方法才会被缓存。
而真正的缓存写入到文件是通过一个叫Entry的辅助类来的,我们简单的看下writeTo()方法:
public void writeTo(DiskLruCache.Editor editor) throws IOException {
      BufferedSink sink = Okio.buffer(editor.newSink(ENTRY_METADATA));

      sink.writeUtf8(url)
          .writeByte('\n');
      sink.writeUtf8(requestMethod)
          .writeByte('\n');
      sink.writeDecimalLong(varyHeaders.size())
          .writeByte('\n');
    //省略类似代码


      sink.close();
    }
其实就是将请求信息按顺序写入到DiskLruCache中,最终由DiskLruCache写入到磁盘中。
缓存的get
@Nullable Response get(Request request) {
    String key = key(request.url());
    DiskLruCache.Snapshot snapshot;
    Entry entry;
    try {
      snapshot = cache.get(key);
      if (snapshot == null) {
        return null;
      }
    } catch (IOException e) {
      // Give up because the cache cannot be read.
      return null;
    }
    try {
      entry = new Entry(snapshot.getSource(ENTRY_METADATA));
    } catch (IOException e) {
      Util.closeQuietly(snapshot);
      return null;
    }
    Response response = entry.response(snapshot);
    if (!entry.matches(request, response)) {
      Util.closeQuietly(response.body());
      return null;
    }
    return response;
  }
获取Response的结果没有任何复杂逻辑,先获取一个DiskLruCache.Snashot,然后构造一个Entry,最后借助这个Entry构造一个Response。
4.ConnectInterceptor
连接拦截器,主要负责网连链接(Socket连接)的打开,逻辑如下:
// 打开一个和目标服务器的连接,并把处理交给下一个拦截器
public final class ConnectInterceptor implements Interceptor {
  public final OkHttpClient client;

  public ConnectInterceptor(OkHttpClient client) {
    this.client = client;
  }

  @Override public Response intercept(Chain chain) throws IOException {
    RealInterceptorChain realChain = (RealInterceptorChain) chain;
    Request request = realChain.request();
    StreamAllocation streamAllocation = realChain.streamAllocation();

    // We need the network to satisfy this request. Possibly for validating a conditional GET.
    boolean doExtensiveHealthChecks = !request.method().equals("GET");
    // 打开连接
    HttpCodec httpCodec = streamAllocation.newStream(client, doExtensiveHealthChecks);
    RealConnection connection = streamAllocation.connection();
    // 将处理交给下一个拦截器
    return realChain.proceed(request, streamAllocation, httpCodec, connection);
  }
}
单独看 ConnectInterceptor 的代码很简单,不过连接正在打开的过程需要看看 streamAllocation.newStream(client,doExtensiveHealthChecks),内部执行过程。还是先整体上了看看 StreamAllocation 这个类的作用。
StreamAllocation
StreamAllocation类似中介者模式,协调Connections、Stream和Call三者之间的关系。每个Call在Application层RetryAndFollowUpInterceptor实例化一个StreamAllocation。相同Address(相同的Host与端口)可以共用相同的连接RealConnection。StreamAllocation通过Address,从连接池ConnectionPools中取出有效的RealConnection,与远程服务器建立Socket连接。在处理响应结束后或出现网络异常时,释放Socket连接。每个RealConnection都持有对StreamAllocation的弱引用,用于连接闲置状态的判断。
StreamAllocation 对象在哪里创建的?RetryAndFollowUpInterceptor,这是核心拦截器链上的顶层拦截器其中源码:
// RetryAndFollowUpInterceptor.java
@Override public Response intercept(Chain chain) throws IOException {
    Request request = chain.request();

    streamAllocation = new StreamAllocation(
        client.connectionPool(), createAddress(request.url()), callStackTrace);
这里,每一次请求创建了一个 StreamAllocation 对象, 那么问题来了? 之前我们说过每一个 OkHttpClient 对象只有一个对应的连接池, 刚刚又说到 StreamAllocation 打开连接, 那么 StreamAllocation 是如何创建连接池的呢?连接池创建的地方在 OkHttpClient 中:
public Builder() {
      dispatcher = new Dispatcher();
      protocols = DEFAULT_PROTOCOLS;
      connectionSpecs = DEFAULT_CONNECTION_SPECS;
      eventListenerFactory = EventListener.factory(EventListener.NONE);
      proxySelector = ProxySelector.getDefault();
      cookieJar = CookieJar.NO_COOKIES;
      socketFactory = SocketFactory.getDefault();
      hostnameVerifier = OkHostnameVerifier.INSTANCE;
      certificatePinner = CertificatePinner.DEFAULT;
      proxyAuthenticator = Authenticator.NONE;
      authenticator = Authenticator.NONE;
      // 创建连接池
      connectionPool = new ConnectionPool();
      dns = Dns.SYSTEM;
      followSslRedirects = true;
      followRedirects = true;
      retryOnConnectionFailure = true;
      connectTimeout = 10_000;
      readTimeout = 10_000;
      writeTimeout = 10_000;
      pingInterval = 0;
    }
OkHttpClient 默认构造函数的 Builder , 在这里创建了连接池。所以这里我们也可以看到, 如果我们对默认连接池不满,我们是可以直通过 builder 接指定的。搞懂了 StreamAllocation 和 ConnectionPool 的创建 , 我们再来看看 StreamAllocation 是怎么打开连接的?直接兜源码可能有点绕 ,先给一个粗略流程图,然后逐点分析。

连接池实现
HTTP 的下层协议是 TCP。TCP 连接的创建和断开是有性能开销的,在 Http1.0 中,每一次请求就打开一个连接,在一些老的旧的浏览器上,如果还是基于Http1.0,体验会非常差; Http1.1 以后支持长连接, 运行一个请求打开连接完成请求后,连接可以不关闭, 下次请求时复用此连接,从而提高连接的利用率。当然并不是连接打开后一直开着不关,这样又会造成连接浪费,怎么管理?在OKHttp3的默认实现中,使用一个双向队列来缓存所有连接, 这些连接中最多只能存在 5 个空闲连接,空闲连接最多只能存活 5 分钟。
连接池定期清理实现
public final class ConnectionPool {
// 用于定期清理的线程池
private static final Executor executor = new ThreadPoolExecutor(0 /* corePoolSize */,
Integer.MAX_VALUE /* maximumPoolSize */, 60L /* keepAliveTime */, TimeUnit.SECONDS,
new SynchronousQueue<Runnable>(), Util.threadFactory("OkHttp ConnectionPool", true));
/** The maximum number of idle connections for each address. */
private final int maxIdleConnections;
private final long keepAliveDurationNs;
// 后期定期清理连接的任务
private final Runnable cleanupRunnable = new Runnable() {
@Override public void run() {
while (true) {
// cleanup执行清理
long waitNanos = cleanup(System.nanoTime());
if (waitNanos == -1) return;
if (waitNanos > 0) {
long waitMillis = waitNanos / 1000000L;
waitNanos -= (waitMillis * 1000000L);
synchronized (ConnectionPool.this) {
try {
ConnectionPool.this.wait(waitMillis, (int) waitNanos);
} catch (InterruptedException ignored) {
}
}
}
}
}
};
// 存储连接的双向队列
private final Deque<RealConnection> connections = new ArrayDeque<>();
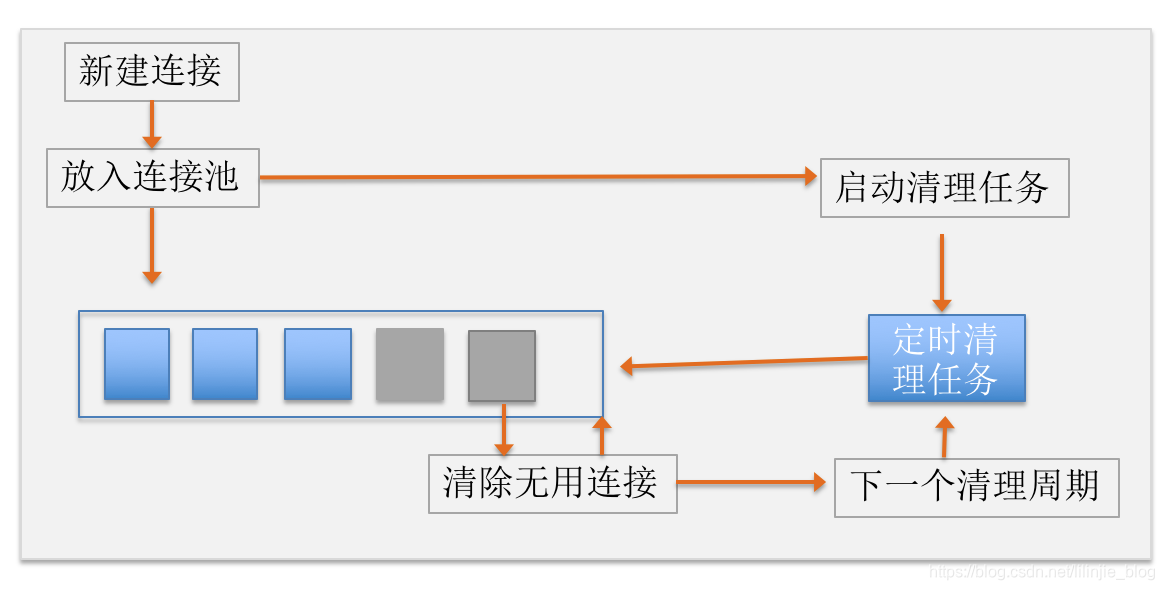
- 放入连接
void put(RealConnection connection) {
    assert (Thread.holdsLock(this));
    if (!cleanupRunning) {
      cleanupRunning = true;
      // 开始清理任务
      executor.execute(cleanupRunnable);
    }
    // 存储连接
    connections.add(connection);
  }
- 获取连接
@Nullable RealConnection get(Address address, StreamAllocation streamAllocation, Route route) {
    assert (Thread.holdsLock(this));
    for (RealConnection connection : connections) {
      if (connection.isEligible(address, route)) {
        streamAllocation.acquire(connection);
        return connection;
      }
    }
    return null;
  }
StreamAllocation 连接创建和复用
ConnectionPool 的源码逻辑还是相当比较简单, 主要提供一个双向列表来存取连接, 使用一个定时任务定期清理无用连接。 而连接的创建和复用逻辑主要在 StreamAllocation 中。
寻找连接
private RealConnection findHealthyConnection(int connectTimeout, int readTimeout,
      int writeTimeout, boolean connectionRetryEnabled, boolean doExtensiveHealthChecks)
      throws IOException {
    while (true) {
      RealConnection candidate = findConnection(connectTimeout, readTimeout, writeTimeout,
          connectionRetryEnabled);

      // If this is a brand new connection, we can skip the extensive health checks.
      synchronized (connectionPool) {
        if (candidate.successCount == 0) {
          return candidate;
        }
      }

      // Do a (potentially slow) check to confirm that the pooled connection is still good. If it
      // isn't, take it out of the pool and start again.
      if (!candidate.isHealthy(doExtensiveHealthChecks)) {
        noNewStreams();
        continue;
      }

      return candidate;
    }
  }

  // 主要逻辑在这里
  private RealConnection findConnection(int connectTimeout, int readTimeout, int writeTimeout,
      boolean connectionRetryEnabled) throws IOException {
    Route selectedRoute;
    synchronized (connectionPool) {
       // prediction check
      ...
      // 尝试使用已分配的连接
      ...
      // 尝试从连接池获取
      Internal.instance.get(connectionPool, address, this, null);
      if (connection != null) {
        return connection;
      }

      selectedRoute = route;
    }

    // 未路由寻址时,查找可用路由
    ...

    RealConnection result;
    // 立即创建RealConnection
    synchronized (connectionPool) {
      //...省略部分代码,
      result = new RealConnection(connectionPool, selectedRoute);
      acquire(result);
    }

    // 进行TCP和TLS握手,建立与服务器连接通道
    result.connect(connectTimeout, readTimeout, writeTimeout, connectionRetryEnabled);
    // 路由可用,从失败路由表中移除
    routeDatabase().connected(result.route());

    Socket socket = null;
    synchronized (connectionPool) {
      // 添加到连接池,如果其他并发线程已创建同个多路复用的连接,则丢弃当前的连接
      // 并释放Socket资源
      Internal.instance.put(connectionPool, result);

      // If another multiplexed connection to the same address was created concurrently, then
      // release this connection and acquire that one.
      if (result.isMultiplexed()) {
        socket = Internal.instance.deduplicate(connectionPool, address, this);
        result = connection;
      }
    }
    closeQuietly(socket);

    return result;
  }
StreamAllocation 主要是为上层提供一个连接, 如果连接池中有复用的连接则复用连接, 如果没有则创建新的。无论是拿到可复用的还是创建新的, 都要为此连接计算一下引用计数。
public void acquire(RealConnection connection) {
    assert (Thread.holdsLock(connectionPool));
    if (this.connection != null) throw new IllegalStateException();

    this.connection = connection;
    connection.allocations.add(new StreamAllocationReference(this, callStackTrace));
  }
Realconnection
Realconnection 封装了底层 socket 连接, 同时使用 OKio 来进行数据高效读写, OKio 是 square 公司的另一个独立的开源项目, 感兴趣可以去深入读下 OKio 源码。
 /** Does all the work necessary to build a full HTTP or HTTPS connection on a raw socket. */
  private void connectSocket(int connectTimeout, int readTimeout) throws IOException {
    Proxy proxy = route.proxy();
    Address address = route.address();

    rawSocket = proxy.type() == Proxy.Type.DIRECT || proxy.type() == Proxy.Type.HTTP
        ? address.socketFactory().createSocket()
        : new Socket(proxy);

    rawSocket.setSoTimeout(readTimeout);
    try {
      // 打开 socket 连接
      Platform.get().connectSocket(rawSocket, route.socketAddress(), connectTimeout);
    } catch (ConnectException e) {
      ConnectException ce = new ConnectException("Failed to connect to " + route.socketAddress());
      ce.initCause(e);
      throw ce;
    }

    // The following try/catch block is a pseudo hacky way to get around a crash on Android 7.0
    // More details:
    // https://github.com/square/okhttp/issues/3245
    // https://android-review.googlesource.com/#/c/271775/
    try {
      // Okio进行后续的读写
      source = Okio.buffer(Okio.source(rawSocket));
      sink = Okio.buffer(Okio.sink(rawSocket));
    } catch (NullPointerException npe) {
      if (NPE_THROW_WITH_NULL.equals(npe.getMessage())) {
        throw new IOException(npe);
      }
    }
  }
5.CallServerInterceptor
此拦截器和拦截器链中的最后一个拦截器,负责从当前连接中写入和读取数据,逻辑如下:
@Override public Response intercept(Chain chain) throws IOException {
    RealInterceptorChain realChain = (RealInterceptorChain) chain;
    HttpCodec httpCodec = realChain.httpStream();
    StreamAllocation streamAllocation = realChain.streamAllocation();
    RealConnection connection = (RealConnection) realChain.connection();
    Request request = realChain.request();

    long sentRequestMillis = System.currentTimeMillis();
    // 写入请求头信息
    httpCodec.writeRequestHeaders(request);
    // 紧接着会判断一下是否有请求体,有的话同样也会将请求体也写入服务器
    Response.Builder responseBuilder = null;
    if (HttpMethod.permitsRequestBody(request.method()) && request.body() != null) {
      // If there's a "Expect: 100-continue" header on the request, wait for a "HTTP/1.1 100
      // Continue" response before transmitting the request body. If we don't get that, return what
      // we did get (such as a 4xx response) without ever transmitting the request body.
      if ("100-continue".equalsIgnoreCase(request.header("Expect"))) {
        httpCodec.flushRequest();
        // 读取服务器头部信息
        responseBuilder = httpCodec.readResponseHeaders(true);
      }

      if (responseBuilder == null) {
        // 写入请求体
        // Write the request body if the "Expect: 100-continue" expectation was met.
        Sink requestBodyOut = httpCodec.createRequestBody(request, request.body().contentLength());
        BufferedSink bufferedRequestBody = Okio.buffer(requestBodyOut);
        request.body().writeTo(bufferedRequestBody);
        bufferedRequestBody.close();
      } else if (!connection.isMultiplexed()) {
        // If the "Expect: 100-continue" expectation wasn't met, prevent the HTTP/1 connection from
        // being reused. Otherwise we're still obligated to transmit the request body to leave the
        // connection in a consistent state.
        streamAllocation.noNewStreams();
      }
    }
    // 结束请求
    httpCodec.finishRequest();

    if (responseBuilder == null) {
      // 读取响应头
      responseBuilder = httpCodec.readResponseHeaders(false);
    }
    // 构造Response对象 数据交换操作都在 HttpCodec 中的 Source 和 Sink 中进行
    Response response = responseBuilder
        .request(request)
        .handshake(streamAllocation.connection().handshake())
        .sentRequestAtMillis(sentRequestMillis)
        .receivedResponseAtMillis(System.currentTimeMillis())
        .build();

    int code = response.code();
    if (forWebSocket && code == 101) {
      // Connection is upgrading, but we need to ensure interceptors see a non-null response body.
      response = response.newBuilder()
          .body(Util.EMPTY_RESPONSE)
          .build();
    } else {
      response = response.newBuilder()
          .body(httpCodec.openResponseBody(response))
          .build();
    }

    if ("close".equalsIgnoreCase(response.request().header("Connection"))
        || "close".equalsIgnoreCase(response.header("Connection"))) {
      streamAllocation.noNewStreams();
    }

    if ((code == 204 || code == 205) && response.body().contentLength() > 0) {
      throw new ProtocolException(
          "HTTP " + code + " had non-zero Content-Length: " + response.body().contentLength());
    }

    return response;
  }
分析下Call.enqueue流程
前面分析过,无论同步请求还是异步请求,其核心都是通过getResponseWithInterceptorChain执行真正的请求,获取结果,同步是在当前线程直接执行,异步请求则是将当前任务添加到任务队列,由线程池调度执行,下面具体分析enqueue的具体流程
Call#enqueue
@Override public void enqueue(Callback responseCallback) {
    synchronized (this) {
      if (executed) throw new IllegalStateException("Already Executed");
      executed = true;// 标记请求已经执行
    }
    captureCallStackTrace();
    // Dispatcher进行调度
    client.dispatcher().enqueue(new AsyncCall(responseCallback));
  }
Dispatcher#enqueue
 synchronized void enqueue(AsyncCall call) {
    if (runningAsyncCalls.size() < maxRequests && runningCallsForHost(call) < maxRequestsPerHost) {
      runningAsyncCalls.add(call);
      executorService().execute(call);
    } else {
      readyAsyncCalls.add(call);
    }
  }
enqueue的具体逻辑为:当前正在运行的异步Call的个数小于最大请求数并且每台主机正在运行的异步Call的个数小于每台主机的最大请求数。满足这两个条件,将Call加入执行队列(runningAsyncCalls),由线程池执行。不满足条件则加入准备队列(readyAsyncCalls)。上面分析同步请求finish时,直接将该Call从同步请求队列(runningSyncCalls)移除即可,我们看下异步请求完成的处理逻辑。
final class AsyncCall extends NamedRunnable {

    @Override protected void execute() {
      boolean signalledCallback = false;
      try {
        Response response = getResponseWithInterceptorChain();
        if (retryAndFollowUpInterceptor.isCanceled()) {
          signalledCallback = true;
          responseCallback.onFailure(RealCall.this, new IOException("Canceled"));
        } else {
          signalledCallback = true;
          responseCallback.onResponse(RealCall.this, response);
        }
      } catch (IOException e) {
        if (signalledCallback) {
          // Do not signal the callback twice!
          Platform.get().log(INFO, "Callback failure for " + toLoggableString(), e);
        } else {
          responseCallback.onFailure(RealCall.this, e);
        }
      } finally {
        // 异步请求完成
        client.dispatcher().finished(this);
      }
    }
  }
client.dispatcher().finished(this);接着调用了client.dispatcher().finished(this);
private <T> void finished(Deque<T> calls, T call, boolean promoteCalls) {
    int runningCallsCount;
    Runnable idleCallback;
    synchronized (this) {
      if (!calls.remove(call)) throw new AssertionError("Call wasn't in-flight!");
      if (promoteCalls) promoteCalls();
      runningCallsCount = runningCallsCount();
      idleCallback = this.idleCallback;
    }

    if (runningCallsCount == 0 && idleCallback != null) {
      idleCallback.run();
    }
  }
同步请求promoteCalls为false,异步请求为true,接着分析promoteCalls()方法
private void promoteCalls() {
    if (runningAsyncCalls.size() >= maxRequests) return; // Already running max capacity.
    if (readyAsyncCalls.isEmpty()) return; // No ready calls to promote.

    for (Iterator<AsyncCall> i = readyAsyncCalls.iterator(); i.hasNext(); ) {
      AsyncCall call = i.next();

      if (runningCallsForHost(call) < maxRequestsPerHost) {
        i.remove();
        runningAsyncCalls.add(call);
        executorService().execute(call);
      }

      if (runningAsyncCalls.size() >= maxRequests) return; // Reached max capacity.
    }
  }
分析当前的请求数是否满足两个条件(该条件上面已经分析过),符合条件则从准备队列(readyAsyncCalls)取出Call加入到执行队列(runningAsyncCalls),由线程池调度执行。到这里同步和异步流程也就清晰了。
进阶配置
阅读OkHttpClient的类注释,了解到如果线程和连接保持空闲状态,它们将被自动释放。
但如果我们的应用程序需要主动释放未使用的资源,我们可以这样做:
- 关闭线程池
okHttpClient.dispatcher().executorService().shutdown();
- 关闭连接池
client.connectionPool().evictAll();
- 清楚缓存
client.cache().close();
当然OkHttpClient中开放了很多自定义的配置,我们都可以根据我们的业务场景进行配置。比如配置maxRequests、maxRequestsPerHost等,读者自己翻阅阅读即可。
思考与感悟
OkHttp整体架构
-
客户层 OkHttpClient
-
执行层 Call Dispatcher 拦截器链 线程池 DNS Cache
-
连接层 StreamAllocation ConnectionPool Okio
OkHttp的整体设计
-
底层网络通信是对Socket的封装,Okio实现的IO流数据的高效读写。
-
同步请求,直接在当前线程执行,维护一个任务队列 syncRunningCalls
-
异步请求,利用了线程池进行任务的调度,维护了两个队列,一个是readyAsyncCalls,一个是runningAsyncCalls
-
请求的核心流程就是通过拦截器链,链中每个对象各司其职,完成请求流程。
-
拦截器链(应用拦截器,请求重试拦截器,桥接拦截器,缓存拦截器,连接拦截器,网络拦截器,读写IO拦截器)
OkHttp的设计亮点
-
Builder设计模式,支持自定义配置OkHttpClient请求客户端
-
责任链设计模式,请求在链中传递。责任划分明确清晰
-
享元设计模式,连接池的设计
-
Okio高效读取IO数据


 1556
1556


 被折叠的 条评论
为什么被折叠?
被折叠的 条评论
为什么被折叠?
 到【灌水乐园】发言


