


vue-flow 是一个基于 Vue.js 的强大且灵活的可视化流程图库,它允许开发者轻松创建交互式的流程图、工作流图、节点图等。
主要特点
- 易于使用 :提供了简洁的 API 和组件,开发者可以快速上手并创建复杂的流程图。
- 高度可定制 :支持自定义节点、边、连接点等元素的样式和行为,能够满足不同项目的设计需求。
- 交互功能丰富 :内置了节点拖拽、连接、缩放、平移等交互功能,增强用户体验。
- 响应式设计 :能够自适应不同的屏幕尺寸和容器大小,保证在各种设备上都有良好的显示效果。
- 性能优化 :采用了高效的渲染机制,即使在处理大量节点和边时也能保持流畅的性能。
组件
- VueFlow :主组件,用于包裹整个流程图区域,负责管理流程图的状态和交互。
- Node :表示流程图中的节点,可以自定义节点的内容和样式。
- Edge :表示节点之间的连接边,支持不同的连接类型和样式。
- Handle :连接点组件,用于定义节点上的输入和输出点,用户可以通过拖拽连接点来创建边。
- @vue-flow/background 用于在流程图的背景添加网格或图案,增强流程图的视觉效果,方便用户更直观地定位节点和边。
- @vue-flow/controls 用于控制流程图视图的工具按钮,包含缩放、平移等常用操作。
- @vue-flow/minimap 用于显示流程图的缩略图,方便用户在处理大型复杂流程图时快速导航到指定区域。
安装
# 创建vue项目
yarn create vue@latest
cd <your-project-name>

# 安装依赖
yarn
yarn add @vue-flow/core
yarn add @vue-flow/minimap
yarn add @vue-flow/controls
yarn add @vue-flow/background

# 运行
yarn dev
使用示例
index.html
<!DOCTYPE html>
<html lang="en">
  <head>
    <meta charset="UTF-8" />
    <link rel="icon" href="/favicon.ico" />
    <meta name="viewport" content="width=device-width, initial-scale=1.0" />
    <title>Vite App</title>
  </head>
  <body>
    <div id="app"></div>
    <script type="module" src="/src/main.js"></script>
  </body>
</html>
main.js
import { createApp } from "vue";
import "./assets/index.css";
import App from "./App.vue";

createApp(App).mount("#app");
index.css
/* import the required styles */
@import '@vue-flow/core/dist/style.css';

/* import the default theme (optional) */
@import '@vue-flow/core/dist/theme-default.css';

@import '@vue-flow/controls/dist/style.css';
@import '@vue-flow/minimap/dist/style.css';

body {
  color: #111;
  padding: 5px;
}

#app {
  text-transform: uppercase;
  font-weight: 600;
  font-family: 'JetBrains Mono', monospace;
  -webkit-font-smoothing: antialiased;
  -moz-osx-font-smoothing: grayscale;
  text-align: center;
  color: #2c3e50;
}

html,
body,
#app {
  margin: 0;
  height: 100%;
}
App.vue
<script setup>
import { h, ref } from 'vue'
import { Background } from '@vue-flow/background'
import { Controls } from '@vue-flow/controls'
import { MiniMap } from '@vue-flow/minimap'
import { VueFlow, useVueFlow } from '@vue-flow/core'
import CustomNode from './CustomNode.vue'
import CustomEdge from './CustomEdge.vue'
const { onConnect, addEdges } = useVueFlow()
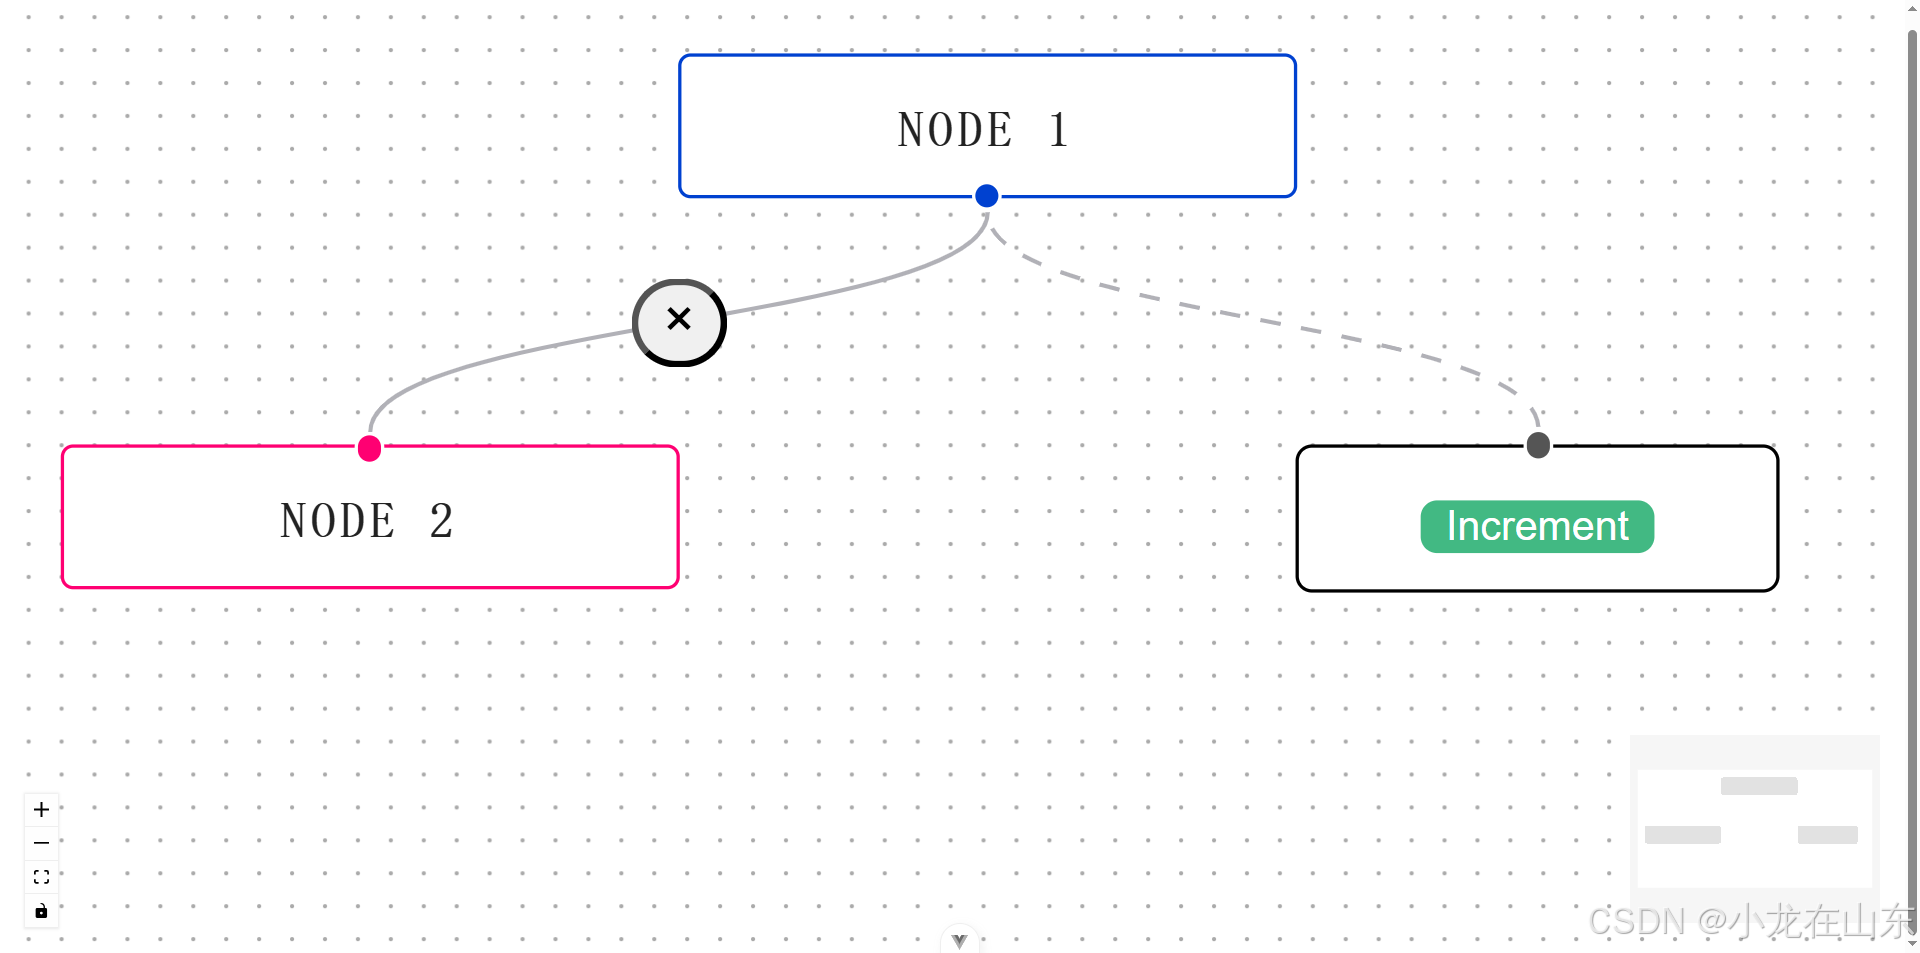
const nodes = ref([
{ id: '1', type: 'input', label: 'Node 1', position: { x: 250, y: 5 } },
{ id: '2', type: 'output', label: 'Node 2', position: { x: 100, y: 100 } },
{ id: '3', type: 'custom', label: 'Node 3', position: { x: 400, y: 100 } },
])
const edges = ref([
{ id: 'e1-2', source: '1', target: '2', type: 'custom' },
{ id: 'e1-3', source: '1', target: '3', animated: true },
])
onConnect((params) => {
addEdges([params])
})
</script>
<template>
<div style="height: 100vh">
<VueFlow
v-model:nodes="nodes"
v-model:edges="edges"
fit-view-on-init
class="vue-flow-basic-example"
:default-zoom="1.5"
:min-zoom="0.2"
:max-zoom="4"
>
<Background pattern-color="#aaa" :gap="8" />
<MiniMap />
<Controls />
<template #node-custom="nodeProps">
<CustomNode v-bind="nodeProps" />
</template>
<template #edge-custom="edgeProps">
<CustomEdge v-bind="edgeProps" />
</template>
</VueFlow>
</div>
</template>
CustomNode.vue
<script setup>
import { Handle, Position } from '@vue-flow/core'
import { ref } from 'vue'

const counter = ref(0)
</script>

<template>
  <div class="custom-node">
    <Handle type="target" :position="Position.Top" />
    <button class="increment nodrag" @click="counter++">Increment</button>

    <div v-if="counter > 0" class="counter">
      <div class="count" v-for="count of counter" :key="`count-${count}`">{{ count }}</div>
    </div>
  </div>
</template>

<style>
.custom-node {
  min-width: 100px;
  gap: 4px;
  padding: 8px;
  background: white;
  border: 1px solid black;
  border-radius: 4px;
}

.increment {
  border-radius: 4px;
  background: #42b983;
  font-size: 10px;
  color: #fff;
  cursor: pointer;
  border: none;
}

.increment:hover {
  box-shadow: 0 10px 15px -3px rgb(0 0 0 / 0.1), 0 4px 6px -4px rgb(0 0 0 / 0.1);
}

.counter {
  margin-top: 8px;
  display: grid;
  grid-template-columns: repeat(4, minmax(0, 1fr));
  gap: 4px;
}

.count {
  font-size: 6px;
  color: #ff0072;
  border: 1px solid rgba(0, 0, 0, 0.3);
  border-radius: 8px;
}
</style>
CustomEdge.vue
<script setup>
import { computed } from 'vue'
import { BaseEdge, EdgeLabelRenderer, getBezierPath, useVueFlow } from '@vue-flow/core'

const props = defineProps({
  id: {
    type: String,
    required: true,
  },
  sourceX: {
    type: Number,
    required: true,
  },
  sourceY: {
    type: Number,
    required: true,
  },
  targetX: {
    type: Number,
    required: true,
  },
  targetY: {
    type: Number,
    required: true,
  },
  sourcePosition: {
    type: String,
    required: true,
  },
  targetPosition: {
    type: String,
    required: true,
  },
  data: {
    type: Object,
    required: false,
  },
  markerEnd: {
    type: String,
    required: false,
  },
  style: {
    type: Object,
    required: false,
  },
})

const { removeEdges } = useVueFlow()

const path = computed(() => getBezierPath(props))
</script>

<script>
export default {
  inheritAttrs: false,
}
</script>

<template>
  <BaseEdge :path="path[0]" />

  <EdgeLabelRenderer>
    <div
      :style="{
        pointerEvents: 'all',
        position: 'absolute',
        transform: `translate(-50%, -50%) translate(${path[1]}px,${path[2]}px)`,
      }"
      class="nodrag nopan"
    >
      <button class="edgebutton" @click="removeEdges(id)">×</button>
    </div>
  </EdgeLabelRenderer>
</template>

<style>
.edgebutton {
  border-radius: 999px;
  cursor: pointer;
}

.edgebutton:hover {
  box-shadow: 0 0 0 2px pink, 0 0 0 4px #f05f75;
}
</style>
效果图


 5173
5173

 被折叠的 条评论
为什么被折叠?
被折叠的 条评论
为什么被折叠?
 到【灌水乐园】发言


