


android studio问题
1.android studio导入依赖类库
(1)导入*.jar包
新建好了Android项目,添加一个第三方已经打包好的jar文件进你项目中libs文件夹下(没有可自己创建)
直接通过COPY/PAST 把你下载的jar文件添加到libs文件夹下,然后在libs文件夹和添加的*.jar文件下鼠标右击菜单 点add as library
(2)导入第三方java类库含源代码包
下面演示如何在本项目中导入第三方的源代码类库,这里例子是导入Httpzoid一个json http client类库
先从github上下载zip包解压后把Httpzoid目录copy到你项目的目录下

添加后android studio的项目下会自动出现这个目录

接下来需要手工修改项目跟目录下settings.gadle 添加
include ':App',':Httpzoid'
这里必须手工修改没有其他方法
然后在打开App/build.gradle这个文件,添加
dependencies{
compile project(':Httpzoid')
}
这是你在打开Open Module Settings就可以看到,已经导入httpzoid的类库

2.项目发布到JCenter
大家在很多时候都希望让自己的开源项目可以更方便的让用户去使用,那么对于Android平台,一个很好的方式就是上传到jcenter,然后使用时通过添加compile引用即可。
对于上传到jcenter,也不算技术类的文章,而且已经有很多较好的文章可以参考,写之前我也大致百度了一下。
目前很多文章都是以gradle-bintray-plugin这个插件做上传,多数文章的介绍都是针对普通的开源项目的(即不包含编译时注解相关)。那么对于用到编译时注解,因为涉及到多个module,上传可能会比较麻烦。
本文准备采用bintray-release这个插件,个人感觉比gradle-bintray-plugin要方便很多。
对于使用gradle-bintray-plugin的,我百度了下,可以参考这篇http://www.cnblogs.com/qianxudetianxia/p/4322331.html
So,本文的主要内容是:
-
使用
bintray-release发布一般项目到jcenter -
使用
bintray-release发布编译时注解项目到jcenter
一、普通项目上传到jcenter
ok,首先你应该有一个待上传的项目。
那么我们这里模拟一个简单的项目。
可以看到我们的userUtil是个Android library,主要用来存放一些工具,我们现在要将其上传到jcenter。
那么,对于你,应该已经有了这样一个Android library,处于待上传的状态。
(1)注册bintray.com账号
为什么要注册这个账号呢,因为jcenter()属于bintray旗下的一个仓库。
并且我们上传到jcenter的流程其实就类似封面图上描述的,先从你的Android Studio到你的Bintray,然后再同步到jcenter。
所以~你需要一个bintray的账号~
-
进入https://bintray.com/,注册账号。
-
注册完成后,需要邮箱激活;也可以选择第三方登录。
注册完成后,登录,这两步属于非职业玩家都能搞定的。
登录后,你可以点击Your Profile->Edit->Repositories然后就能看到下图的界面。


点击Your Profile->Edit然后就能看到下图的界面。
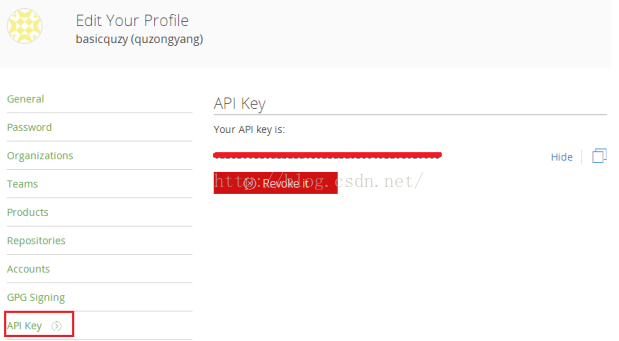
点击API Key,就可以看到你一段key字符串,把这个copy下放一边,一会上传要用。
(2)引入bintray-release
项目的build.gralde
在你的项目的build.gradle添加bintray-release的classpath,注意是项目的build.gradle,不是module的,针对文章开始的图即JCenterDemo/build.gradle。
buildscript {
    repositories {
        jcenter()
    }
    dependencies {
        classpath 'com.android.tools.build:gradle:2.1.0'
        classpath 'com.novoda:bintray-release:0.3.4'
    }
}
待上传moudle的build.gralde
来到你想要上传的module,针对文章开始的图即JCenterDemo/userUtil/build.gradle。
apply plugin: 'com.android.library'
apply plugin: 'com.novoda.bintray-release'//添加

android {
  //保持不变
}
dependencies {
    //保持不变
}
//添加
publish {
    userOrg = 'hyman'//bintray.com用户名
    groupId = 'com.basicquzy'//jcenter上的路径
    artifactId = 'userutil'//项目名称
    publishVersion = '1.0.0'//版本号
    desc = 'Oh hi, this is a nice description for a project, right?'//描述,不重要
    website = 'https://github.com/43081438'//网站,不重要
}
按照上面编写即可,细节有标识注释了,假设按照上述的编写,最终引入的方式为:
com.basicquzy:userutil:1.0.0
完成上面的配置后,就准备上传了。
上传
上传很简单,执行下面的代码即可
 ./gradlew clean build bintrayUpload
 -PbintrayUser=basicquzy
 -PbintrayKey=xxxxxxxxxxxxxxxxxxxxxx
 -PdryRun=false
user就是用户名,key就是我们刚才的让你保存的key,dryRun是一个配置参数,当为true的时候,会运行所有的环节,但是不会上传。
ok,下面整理好上面的这段代码,运行即可。关于运行,你可以选择在Android Studio的Terminal面板进行,如下图。
JCenterDemo/userUtil/build.gradle
allprojects {
    tasks.withType(Javadoc) {
        options{
            encoding "UTF-8"
            charSet 'UTF-8'
        }
    }
}然后就是等待,当运行完成,看到BUILD SUCCESSFUL就没问题了,如果有什么问题呢,根据log排查下。
到此就上传完成了~~~
你可以访问https://bintray.com/你的用户名/maven,即可看到:
看到我们上传的项目了,你可以点击进去看该库的一些信息,但是注意此时还不能够直接被引用。
点击进去该库,按照下图,点击Add To jcenter
然后随便写一下对你该库的描述,然后点击发送就可以了。
ok,到此就结束了,不过目前还是不能直接引用的,你需要等待bintray的工作人员审核,审核通过会给你发送站内Message,并且Add to Jcenter那个按钮就小时了,此外你还可以根据你上传的groupId,访问该网站https://jcenter.bintray.com/你的groupId例如https://jcenter.bintray.com/com/basicquzy/
如果可以引用,则能看到如下:
最后总结下整个过程,其实非常简单:
- 申请账号
- 引入bintray-release,在需要上传的module里面填写相关publish的信息
- 调用上传的命令
Add to Jcenter提交审核
基本都是步骤化的东西,真正需要我们填写的也就publish里面几个信息。
安卓控件
1.Notification通知栏图标显示为白板或白色的问题
android5.0的notification,在状态栏的图标显示一个白块,而在5.0之前的版本就不会出现这个问题,是由于android5.0之后的图标就不能够随便用一张色彩丰富的图片了,只能够有白色和透明两个颜色出现。在5.0上,谷歌设计指南上是icon要使用白色。
/**
     * 构建一条通知
     */
    public void createNotifaction(){
        NotificationCompat.Builder mBuilder =
                new NotificationCompat.Builder(LocationUploadService.this)
                        .setSmallIcon(R.drawable.ic_launcher)//显示的白图
                        .setContentTitle("XXX")
                        .setContentText("有新订单,您可以去订单页面查看")
                        .setLargeIcon(BitmapFactory.decodeResource(getResources(), R.drawable.ic_launcher))
                        .setWhen(System.currentTimeMillis())
                        .setDefaults(NotificationCompat.DEFAULT_ALL)
                        .setAutoCancel(true);
        // 创建意图
        Intent resultIntent = new Intent(LocationUploadService.this, MainActivity.class);
        long notifiTime = System.currentTimeMillis();
        resultIntent.putExtra("notifiContent", "XXX");
        resultIntent.putExtra("notifiTime", notifiTime);
        // 通过TaskStackBuilder创建PendingIntent对象
        TaskStackBuilder stackBuilder = TaskStackBuilder.create(LocationUploadService.this);
        stackBuilder.addParentStack(MainActivity.class);
        stackBuilder.addNextIntent(resultIntent);
        PendingIntent resultPendingIntent =
                stackBuilder.getPendingIntent(
                        1,
                        PendingIntent.FLAG_UPDATE_CURRENT
                );
        mBuilder.setContentIntent(resultPendingIntent);
        //获取通知管理器
        NotificationManager mNotificationManager =
                (NotificationManager) getSystemService(Context.NOTIFICATION_SERVICE);
        //发送通知
        mNotificationManager.notify(1, mBuilder.build());
    }
解决方法1:
是修改manifest.xml的版本,降低到21之下就能够显示原来的图片,当然这种方法不好。
解决方法2:
切图时选择只有白色和透明背景颜色图片,然后再设置一个背景颜色。
当然也可以在5.0之前的版本用一个图片,在之后的版本用另一张只有白色和透明的颜色,然后再设置一个背景颜色。
if (android.os.Build.VERSION.SDK_INT < 21)
    nf.icon = R.drawable.ic_launcher;
else {
    nf.icon = R.drawable.ic_launcher_notification;
    Class<?> clazz = nf.getClass();
    Field field = clazz.getDeclaredField("color");
    field.setAccessible(true);
    field.set(nf, context.getResources().getColor(R.color.red_launcher));
} 2.EditText
限制EditText只输入数字且小数保留2位
- <EditText
- android:id="@+id/num_et"
- android:layout_width="fill_parent"
- android:layout_height="wrap_content"
- android:numeric="decimal"/>
- <EditText
- android:id="@+id/num_et2"
- android:layout_below="@id/num_et"
- android:layout_width="fill_parent"
- android:layout_height="wrap_content"
- android:numeric="decimal"/>
- /**
- * 限定EditText只能输入最多两位小数
- * @author Administrator
- *
- */
- public class MainActivity extends ActionBarActivity {
- private EditText num_et;
- private EditText num_et2;
- @Override
- protected void onCreate(Bundle savedInstanceState) {
- super.onCreate(savedInstanceState);
- setContentView(R.layout.activity_main);
- num_et = (EditText) findViewById(R.id.num_et);
- num_et2 = (EditText) findViewById(R.id.num_et2);
- /**
- * 第一种方法
- */
- num_et.addTextChangedListener(new TextWatcher() {
- @Override
- public void onTextChanged(CharSequence s, int start, int before,
- int count) {
- if (s.toString().contains(".")) {
- if (s.length() - 1 - s.toString().indexOf(".") > 2) {
- s = s.toString().subSequence(0,
- s.toString().indexOf(".") + 3);
- num_et.setText(s);
- num_et.setSelection(s.length());
- }
- }
- if (s.toString().trim().substring(0).equals(".")) {
- s = "0" + s;
- num_et.setText(s);
- num_et.setSelection(2);
- }
- if (s.toString().startsWith("0")
- && s.toString().trim().length() > 1) {
- if (!s.toString().substring(1, 2).equals(".")) {
- num_et.setText(s.subSequence(0, 1));
- num_et.setSelection(1);
- return;
- }
- }
- }
- @Override
- public void beforeTextChanged(CharSequence s, int start, int count,
- int after) {
- }
- @Override
- public void afterTextChanged(Editable s) {
- // TODO Auto-generated method stub
- }
- });
- /**
- * 第二种方法
- */
- num_et2.addTextChangedListener(new TextWatcher()
- {
- public void afterTextChanged(Editable edt)
- {
- String temp = edt.toString();
- int posDot = temp.indexOf(".");
- if (posDot <= 0) return;
- if (temp.length() - posDot - 1 > 2)
- {
- edt.delete(posDot + 3, posDot + 4);
- }
- }
- public void beforeTextChanged(CharSequence arg0, int arg1, int arg2, int arg3) {}
- public void onTextChanged(CharSequence arg0, int arg1, int arg2, int arg3) {}
- });
- }
- }
编码知识
1.设置背景颜色
* 1、在values目录下新建xml文件color
* 然后设置控件背景颜色
* 但是注意不能直接设置R.color.RED 否则颜色设置无效
* 应该用getResources().getColor(R.color.RED) 设置
*/
mRelativeLayout.setBackgroundColor(getResources().getColor(R.color.RED));
/**
* 2、把你想要设置的颜色强制转换为Color
*/
mRelativeLayout.setBackgroundColor(Color.parseColor("#FF0000"));
2.Android的post()方法究竟运行在哪个线程中
1.如果post方法是handler的,则Runnable执行在handler依附线程中,可能是主线程,也可能是其他线程
下面是Handler里面的post方法
- 1
- 2
- 3
- 4
- 5
- 6
- 7
- 8
- 9
- 10
- 11
- 12
- 13
- 14
- 1
- 2
- 3
- 4
- 5
- 6
- 7
- 8
- 9
- 10
- 11
- 12
- 13
- 14
2.如果post方法是View的,则一定是运行在主线程中的,因为所有view都自带一个handler,所有handler都有post方法,所以它的Runnable是运行在主线程中的
下面是View中的post方法
- 1
- 2
- 3
- 4
- 5
- 6
- 7
- 8
- 9
- 10
- 11
- 12
- 13
- 14
- 15
- 16
- 17
- 18
- 19
- 20
- 21
- 22
- 1
- 2
- 3
- 4
- 5
- 6
- 7
- 8
- 9
- 10
- 11
- 12
- 13
- 14
- 15
- 16
- 17
- 18
- 19
- 20
- 21
- 22
例如:Imageview自带一个handler,它有postDelayed方法,由于imageview是主线程上的,所以Runable是运行在主线程中的代码。


 2628
2628

 被折叠的 条评论
为什么被折叠?
被折叠的 条评论
为什么被折叠?
 到【灌水乐园】发言


