


- public abstract class Context {
- ...
- public abstract Object getSystemService(String name); //获得系统级服务
- public abstract void startActivity(Intent intent); //通过一个Intent启动Activity
- public abstract ComponentName startService(Intent service); //启动Service
- //根据文件名得到SharedPreferences对象
- public abstract SharedPreferences getSharedPreferences(String name,int mode);
- ...
- }
Context在我们实际开发中被广泛用到,比如 startActivity(…)/ getResources()/ getSharedPreferences(…)/ getSystemService(.)等等;书中把Context理解为一个应用场景,一个Activity实例就是一个应用场景,一个Service实例也是一种应用场景,只是他木有前台界面而已;与Context相关类的继承关系如下:
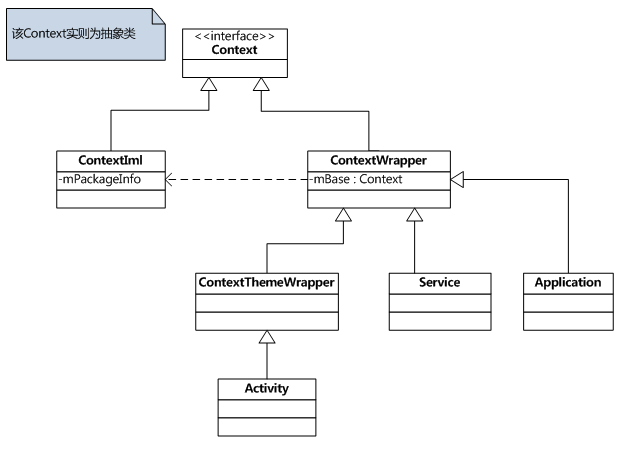
- Context只是一个抽象类,具体的逻辑实现全部都由ContextImpl完成;ContextImpl实例的创建几乎都是在ActivityThread中完成的,比如 handleBindApplication(…)/ createBaseContextForActivity(…)/ handleCreateService(…)分别对应加载APK应用、加载Activity、加载Service;
- ContextWrapper只是一个包装类,同样木有做任何具体的事情,他只是简单的将请求转发给ContextImpl实例完成具体的逻辑执行;
- ContextThemeWrapper内部新增了对主题Theme相关的支持,其主题可以在AndroidManifest.xml中通过android:theme标签为Application、Activity元素指定;
- Activity对应的前台界面,所以需要使用到主题,而后台的Service没有界面,不需要主题,所以直接继承ContextWrapper;
- Application对象是在应用程序第一次启动时最先创建的对象,每个应用有且只有一个Application对象,代表的是一个广义的应用场景,他也与界面无关,所以也直接继承ContextWrapper;开发者可以继承该类实现更多的业务逻辑,比如加入随系统启动时需要加载的资源或服务等;
系统中一共有多少个Context呢?
从上面的描述就可以看出啦,Context个数 = 1个Application + N个Activity + N个Service;
书中本章的大致内容如下:
前言
Context在android中的作用不言而喻,当我们访问当前应用的资源,启动一个新的activity的时候都需要提供Context,而这个Context到底是什么呢,这个问题好像很好回答又好像难以说清楚。从字面意思,Context的意思是“上下文”,或者也可以叫做环境、场景等,尽管如此,还是有点抽象。从类的继承来说,Context作为一个抽象的基类,它的实现子类有三种:Application、Activity和Service(估计这么说,暂时不管ContextWrapper等类),那么这三种有没有区别呢?为什么通过任意的Context访问资源都得到的是同一套资源呢?getApplication和getApplicationContext有什么区别呢?应用中到底有多少个Context呢?本文将围绕这些问题一一展开,所用源码版本为Android4.4。
什么是Context
Context是一个抽象基类,我们通过它访问当前包的资源(getResources、getAssets)和启动其他组件(Activity、Service、Broadcast)以及得到各种服务(getSystemService),当然,通过Context能得到的不仅仅只有上述这些内容。对Context的理解可以来说:Context提供了一个应用的运行环境,在Context的大环境里,应用才可以访问资源,才能完成和其他组件、服务的交互,Context定义了一套基本的功能接口,我们可以理解为一套规范,而Activity和Service是实现这套规范的子类,这么说也许并不准确,因为这套规范实际是被ContextImpl类统一实现的,Activity和Service只是继承并有选择性地重写了某些规范的实现。
Application、Activity和Service作为Context的区别
首先,它们都间接继承了Context,这是它们的相同点。
不同点,可以从几个方面来说:首先看它们的继承关系
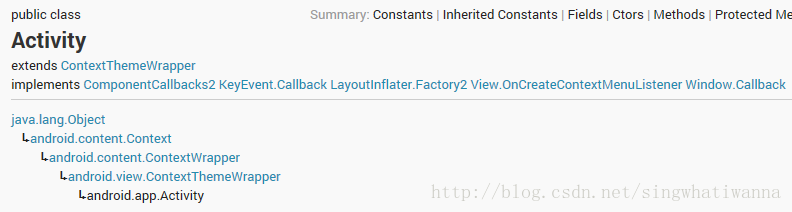
Activity的继承关系
Service和Application的继承关系
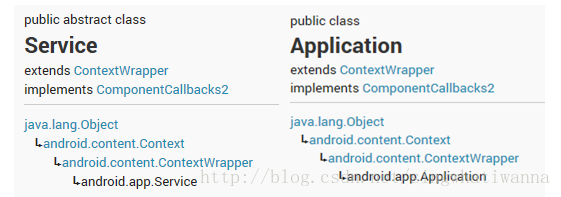
通过对比可以清晰地发现,Service和Application的类继承关系比较像,而Activity还多了一层继承ContextThemeWrapper,这是因为Activity有主题的概念,而Service是没有界面的服务,Application更是一个抽象的东西,它也是通过Activity类呈现的。
下面来看一下三者在Context方面的区别
上文已经指出,Context的真正实现都在ContextImpl中,也就是说Context的大部分方法调用都会转到ContextImpl中,而三者的创建均在ActivityThread中完成,我之前写过一篇文章Android源码分析-Activity的启动过程,在文中我指出Activity启动的核心过程是在ActivityThread中完成的,这里要说明的是,Application和Service的创建也是在ActivityThread中完成的。下面我们看下三者在创建时是怎么和ContextImpl相关联的。
Activity对象中ContextImpl的创建
代码为ActivityThread中的performLaunchActivity方法
- if (activity != null) {
- Context appContext = createBaseContextForActivity(r, activity);
- /**
- * createBaseContextForActivity中创建ContextImpl的代码
- * ContextImpl appContext = new ContextImpl();
- * appContext.init(r.packageInfo, r.token, this);
- * appContext.setOuterContext(activity);
- */
- CharSequence title = r.activityInfo.loadLabel(appContext.getPackageManager());
- Configuration config = new Configuration(mCompatConfiguration);
- if (DEBUG_CONFIGURATION) Slog.v(TAG, "Launching activity "
- + r.activityInfo.name + " with config " + config);
- activity.attach(appContext, this, getInstrumentation(), r.token,
- r.ident, app, r.intent, r.activityInfo, title, r.parent,
- r.embeddedID, r.lastNonConfigurationInstances, config);
- if (customIntent != null) {
- activity.mIntent = customIntent;
- }
- ...
- }
可以看出,Activity在创建的时候会new一个ContextImpl对象并在attach方法中关联它,需要注意的是,创建Activity使用的数据结构是ActivityClientRecord。
Application对象中ContextImpl的创建
代码在ActivityThread中的handleBindApplication方法中,此方法内部调用了makeApplication方法
- public Application makeApplication(boolean forceDefaultAppClass,
- Instrumentation instrumentation) {
- if (mApplication != null) {
- return mApplication;
- }
- Application app = null;
- String appClass = mApplicationInfo.className;
- if (forceDefaultAppClass || (appClass == null)) {
- appClass = "android.app.Application";
- }
- try {
- java.lang.ClassLoader cl = getClassLoader();
- ContextImpl appContext = new ContextImpl();
- appContext.init(this, null, mActivityThread);
- app = mActivityThread.mInstrumentation.newApplication(
- cl, appClass, appContext);
- appContext.setOuterContext(app);
- } catch (Exception e) {
- if (!mActivityThread.mInstrumentation.onException(app, e)) {
- throw new RuntimeException(
- "Unable to instantiate application " + appClass
- + ": " + e.toString(), e);
- }
- }
- ...
- }
看代码发现和Activity中ContextImpl的创建是相同的。
Service对象中ContextImpl的创建
通过查看代码发现和Activity、Application是一致的。分析到这里,那么三者的Context有什么区别呢?没有区别吗?尽管如此,有一些细节是确定的:Dialog的使用需要Activity,在桌面上我们采用Application的Context无法弹出对话框,同时在桌面上想启动新的activity,我们需要为intent设置FLAG_ACTIVITY_NEW_TASK标志,否则无法启动activity,这一切都说明,起码Application的Context和Activity的Context还是有区别的,当然这也可能不是Context的区别,因为在桌面上,我们的应用没有界面,这意味着我们能干的事情可能受到了限制,事情的细节目前我还没有搞的很清楚。
Context对资源的访问
很明确,不同的Context得到的都是同一份资源。这是很好理解的,请看下面的分析
得到资源的方式为context.getResources,而真正的实现位于ContextImpl中的getResources方法,在ContextImpl中有一个成员 private Resources mResources,它就是getResources方法返回的结果,mResources的赋值代码为:
mResources = mResourcesManager.getTopLevelResources(mPackageInfo.getResDir(),
Display.DEFAULT_DISPLAY, null, compatInfo, activityToken);
下面看一下ResourcesManager的getTopLevelResources方法,这个方法的思想是这样的:在ResourcesManager中,所有的资源对象都被存储在ArrayMap中,首先根据当前的请求参数去查找资源,如果找到了就返回,否则就创建一个资源对象放到ArrayMap中。有一点需要说明的是为什么会有多个资源对象,原因很简单,因为res下可能存在多个适配不同设备、不同分辨率、不同系统版本的目录,按照android系统的设计,不同设备在访问同一个应用的时候访问的资源可以不同,比如drawable-hdpi和drawable-xhdpi就是典型的例子。
- public Resources getTopLevelResources(String resDir, int displayId,
- Configuration overrideConfiguration, CompatibilityInfo compatInfo, IBinder token) {
- final float scale = compatInfo.applicationScale;
- ResourcesKey key = new ResourcesKey(resDir, displayId, overrideConfiguration, scale,
- token);
- Resources r;
- synchronized (this) {
- // Resources is app scale dependent.
- if (false) {
- Slog.w(TAG, "getTopLevelResources: " + resDir + " / " + scale);
- }
- WeakReference<Resources> wr = mActiveResources.get(key);
- r = wr != null ? wr.get() : null;
- //if (r != null) Slog.i(TAG, "isUpToDate " + resDir + ": " + r.getAssets().isUpToDate());
- if (r != null && r.getAssets().isUpToDate()) {
- if (false) {
- Slog.w(TAG, "Returning cached resources " + r + " " + resDir
- + ": appScale=" + r.getCompatibilityInfo().applicationScale);
- }
- return r;
- }
- }
- //if (r != null) {
- // Slog.w(TAG, "Throwing away out-of-date resources!!!! "
- // + r + " " + resDir);
- //}
- AssetManager assets = new AssetManager();
- if (assets.addAssetPath(resDir) == 0) {
- return null;
- }
- //Slog.i(TAG, "Resource: key=" + key + ", display metrics=" + metrics);
- DisplayMetrics dm = getDisplayMetricsLocked(displayId);
- Configuration config;
- boolean isDefaultDisplay = (displayId == Display.DEFAULT_DISPLAY);
- final boolean hasOverrideConfig = key.hasOverrideConfiguration();
- if (!isDefaultDisplay || hasOverrideConfig) {
- config = new Configuration(getConfiguration());
- if (!isDefaultDisplay) {
- applyNonDefaultDisplayMetricsToConfigurationLocked(dm, config);
- }
- if (hasOverrideConfig) {
- config.updateFrom(key.mOverrideConfiguration);
- }
- } else {
- config = getConfiguration();
- }
- r = new Resources(assets, dm, config, compatInfo, token);
- if (false) {
- Slog.i(TAG, "Created app resources " + resDir + " " + r + ": "
- + r.getConfiguration() + " appScale="
- + r.getCompatibilityInfo().applicationScale);
- }
- synchronized (this) {
- WeakReference<Resources> wr = mActiveResources.get(key);
- Resources existing = wr != null ? wr.get() : null;
- if (existing != null && existing.getAssets().isUpToDate()) {
- // Someone else already created the resources while we were
- // unlocked; go ahead and use theirs.
- r.getAssets().close();
- return existing;
- }
- // XXX need to remove entries when weak references go away
- mActiveResources.put(key, new WeakReference<Resources>(r));
- return r;
- }
- }
根据上述代码中资源的请求机制,再加上ResourcesManager采用单例模式,这样就保证了不同的ContextImpl访问的是同一套资源。具体可以参照我的另一篇文章android的资源加载机制。 注意,这里说的同一套资源未必是同一个资源,因为资源可能位于不同的目录,但它一定是我们的应用的资源,或许这样来描述更准确,在设备参数和显示参数不变的情况下,不同的ContextImpl访问到的是同一份资源。设备参数不变是指手机的屏幕和android版本不变,显示参数不变是指手机的分辨率和横竖屏状态。也就是说,尽管Application、Activity、Service都有自己的ContextImpl,并且每个ContextImpl都有自己的mResources成员,但是由于它们的mResources成员都来自于唯一的ResourcesManager实例,所以它们看似不同的mResources其实都指向的是同一块内存(C语言的概念),因此,它们的mResources都是同一个对象(在设备参数和显示参数不变的情况下)。在横竖屏切换的情况下且应用中为横竖屏状态提供了不同的资源,处在横屏状态下的ContextImpl和处在竖屏状态下的ContextImpl访问的资源不是同一个资源对象。
代码:单例模式的ResourcesManager类
- public static ResourcesManager getInstance() {
- synchronized (ResourcesManager.class) {
- if (sResourcesManager == null) {
- sResourcesManager = new ResourcesManager();
- }
- return sResourcesManager;
- }
- }
getApplication和getApplicationContext的区别
getApplication返回结果为Application,且不同的Activity和Service返回的Application均为同一个全局对象,在ActivityThread内部有一个列表专门用于维护所有应用的application
final ArrayList<Application> mAllApplications = new ArrayList<Application>();
getApplicationContext返回的也是Application对象,只不过返回类型为Context,看看它的实现
- @Override
- public Context getApplicationContext() {
- return (mPackageInfo != null) ?
- mPackageInfo.getApplication() : mMainThread.getApplication();
- }
上面代码中mPackageInfo是包含当前应用的包信息、比如包名、应用的安装目录等,原则上来说,作为第三方应用,包信息mPackageInfo不可能为空,在这种情况下,getApplicationContext返回的对象和getApplication是同一个。但是对于系统应用,包信息有可能为空,具体就不深入研究了。从这种角度来说,对于第三方应用,一个应用只存在一个Application对象,且通过getApplication和getApplicationContext得到的是同一个对象,两者的区别仅仅是返回类型不同。
应用中Context的数量
到此已经很明了了,一个应用中Context的数量等于Activity的个数 + Service的个数 + 1,这个1为Application。
另外,需要强调一点的是,通过对ContextImp的分析可知,其方法的大多数操作都是直接调用其属性mPackageInfo(该属性类
型为PackageInfo)的相关方法而来。这说明ContextImp是一种轻量级类,而PackageInfo才是真正重量级的类。而一个App里的
所有ContextIml实例,都对应同一个packageInfo对象。
最后给大家分析利用Context获取SharedPreferences类的使用方法,SharedPreferences类想必大家都使用过,其一般获取方
法就是通过调用getSharedPreferences()方法去根据相关信息获取SharedPreferences对象。具体流程如下:
1 、调用 getSharedPreferences()获取对应的的文件,该函数实现功能如下:
- //Context类静态数据集合,以键值对保存了所有读取该xml文件后所形成的数据集合
- private static final HashMap<File, SharedPreferencesImpl> sSharedPrefs =
- new HashMap<File, SharedPreferencesImpl>();
- @Override
- public SharedPreferences getSharedPreferences(String name, int mode){
- //其所对应的SharedPreferencesImpl对象 ,该对象已一个HashMap集合保存了我们对该文件序列化结果
- SharedPreferencesImpl sp;
- File f = getSharedPrefsFile(name); //该包下是否存在对应的文件,不存在就新建一个
- synchronized (sSharedPrefs) { //是否已经读取过该文件,是就直接返回该SharedPreferences对象
- sp = sSharedPrefs.get(f);
- if (sp != null && !sp.hasFileChanged()) {
- //Log.i(TAG, "Returning existing prefs " + name + ": " + sp);
- return sp;
- }
- }
- //以下为序列化该xml文件,同时将数据写到map集合中
- Map map = null;
- if (f.exists() && f.canRead()) {
- try {
- str = new FileInputStream(f);
- map = XmlUtils.readMapXml(str);
- str.close();
- }
- ...
- }
- synchronized (sSharedPrefs) {
- if (sp != null) {
- //Log.i(TAG, "Updating existing prefs " + name + " " + sp + ": " + map);
- sp.replace(map); //更新数据集合
- } else {
- sp = sSharedPrefs.get(f);
- if (sp == null) {
- //新建一个SharedPreferencesImpl对象,并且设置其相关属性
- sp = new SharedPreferencesImpl(f, mode, map);
- sSharedPrefs.put(f, sp);
- }
- }
- return sp;
- }
- }
2、 SharedPreferences 不过是个接口,它定义了一些操作xml文件的方法,其真正实现类为SharedPreferencesImpl ,该类是
ContextIml的内部类,该类如下:
- //soga,这种形式我们在分析Context ContextIml时接触过
- //SharedPreferences只是一种接口,其真正实现类是SharedPreferencesImpl类
- private static final class SharedPreferencesImpl implements SharedPreferences{
- private Map mMap; //保存了该文件序列化结果后的操作, 键值对形式
- //通过key值获取对应的value值
- public String getString(String key, String defValue) {
- synchronized (this) {
- String v = (String)mMap.get(key);
- return v != null ? v : defValue;
- }
- }
- ...
- //获得该SharedPreferencesImpl对象对应的Edito类,对数据进行操作
- public final class EditorImpl implements Editor {
- private final Map<String, Object> mModified = Maps.newHashMap(); //保存了对键值变化的集合
- }
- }
获取SharedPreferences 对象就是以上的过程。


 558
558

 被折叠的 条评论
为什么被折叠?
被折叠的 条评论
为什么被折叠?
 到【灌水乐园】发言


