


提示:文章写完后,目录可以自动生成,如何生成可参考右边的帮助文档
前言
提示:这里可以添加本文要记录的大概内容:
随着人工智能的不断发展,python编程语言这门技术也越来越重要,很多人都开启了学习python编程语言。
提示:以下是本篇文章正文内容,下面案例可供参考
一、vuex是什么?
Vuex是一个专为vue.js应用程序开发的状态管理模式。它解决了组件之间同一状态的共享问题。因为它采用的是集中式存储管理应用的所有组件状态,所以组件就可以和store通讯了。其实Vuex就是用来管理组件之间通信的一个插件
二、使用步骤
1.跨域
代码如下(示例):
module.exports={
    devServer:{
        proxy:'https://major.usemock.com/'
    }
}
2.封装
代码如下(示例):
import Axios from "axios";

export function post(url,params){
    return Axios.post(url,params)
}
export function del(url,params){
    return Axios.delete(url,params)
}
export function put(url,params){
    return Axios.put(url,params)
}
export function get(url,params){
    return Axios.get(url,params)
}
2.vuex
代码如下(示例):
import { createStore } from 'vuex'

export default createStore({
  state: {
    xzhanghao:'',
    xmima:'',
    xzhanghao1:'',
    xmima1:''
  },
  getters: {
  },
  mutations: {
    ad(state,zhanghao){
      state.xzhanghao=zhanghao
      console.log(state.xzhanghao)
    },
    id(state,mima){
      state.xmima=mima
      console.log(state.xmima)
    },
    ad1(state,zhanghao1){
      state.xzhanghao1=zhanghao1
      console.log(state.xzhanghao1)
    },
    id1(state,mima1){
      state.xmima1=mima1
      console.log(state.xmima1)
    },
  },
  actions: {
  },
  modules: {
  }
})
3.注册界面
代码如下(示例):
<template>
  <div>
    <h2>注册页面</h2>
    <p>账号:<input type="text" v-model="zzhanghao"></p>
    <p>密码:<input type="password" v-model="zmima"></p>
    <p><button @click="zhu">注册</button></p>
  </div>
</template>

<script>
import {post} from '../utils/request'
export default {
    data(){
        return{
            zzhanghao:'',
            zmima:''
        }
    },
    methods:{
        zhu(){
            post('/register')
            .then((res)=>{
                console.log(res)
                if(this.zzhanghao != '' || this.zmima !=''){
                    alert('注册成功')
                    this.$store.commit('ad',this.zzhanghao)
                    this.$store.commit('id',this.zmima)
                    this.$router.push('/denglu')
                }else{
                    alert('错误')
                }

            }).catch((err)=>{
                console.log(err)
            })
        }
    }

}
</script>

<style>

</style>
4.登陆界面
代码如下(示例):
<template>
  <div>
    <h2>登陆页面</h2>
    <p>账号:<input type="text" v-model="dzhanghao"></p>
    <p>密码:<input type="password" v-model="dmima"></p>
    <p><button @click="deng">登录</button></p>
  </div>
</template>

<script>
import {post} from '../utils/request'
export default {
    data(){
        return{
            dzhanghao:'',
            dmima:''
        }
    },
    methods:{
        deng(){
            post('/login')
            .then((res)=>{
                console.log(res)
                if(this.dzhanghao == this.$store.state.xzhanghao && this.dmima == this.$store.state.xmima && this.dzhanghao !='' && this.dmima !=''){
                    alert('登陆成功')
                    this.$store.commit('ad1',this.dzhanghao)
                    this.$store.commit('id1',this.dmima)
                    this.$router.push('/zhuye')
                }else{
                    alert('失败')
                }

            }).catch((err)=>{
                console.log(err)
            })
        }
    }

}
</script>

<style>

</style>
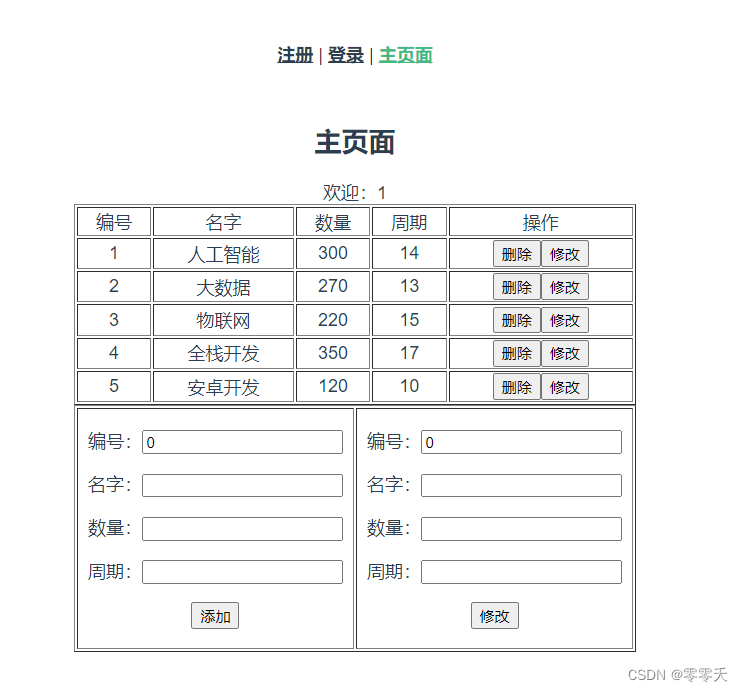
5.主页面
代码如下(示例):
<template>
  <div>
    <h2>主页面</h2>
    欢迎:{{this.$store.state.xzhanghao1}}
    <table border="1px" width="500px" align="center">
        <tr>
            <td>编号</td>
            <td>名字</td>
            <td>数量</td>
            <td>周期</td>
            <td>操作</td>
        </tr>
        <tr v-for="(i,x) in lst" :key="x">
            <td>{{i.id}}</td>
            <td>{{i.name}}</td>
            <td>{{i.count}}</td>
            <td>{{i.period}}</td>
            <td>
                <button @click="shan(x)">删除</button>
                <button @click="gai(x)">修改</button>
            </td>

        </tr>
    </table>
    <table border="1px" width="500px" align="center">
        <tr>
            <td>
                <p>编号:<input type="text" v-model="tj.id"></p>
                <p>名字:<input type="text" v-model="tj.name"></p>
                <p>数量:<input type="text" v-model="tj.count"></p>
                <p>周期:<input type="text" v-model="tj.period"></p>
                <p><button @click="tian">添加</button></p>
            </td>
            <td>
                <p>编号:<input type="text" v-model="xg.id"></p>
                <p>名字:<input type="text" v-model="xg.name"></p>
                <p>数量:<input type="text" v-model="xg.count"></p>
                <p>周期:<input type="text" v-model="xg.period"></p>
                <p><button @click="xiu">修改</button></p>
            </td>
        </tr>

    </table>
  </div>
</template>

<script>
import {get,del,post,put} from '../utils/request'
export default {
    data(){
        return{
            lst:[],
            tj:{id:0,name:'',count:'',period:''},
            xg:{id:0,name:'',count:'',period:''}
        }
    },
    mounted(){
        if(this.$store.state.xzhanghao1 == '' && this.$store.state.xmima1 == ''){
            alert('账号密码不能为空')
            this.$router.push('/denglu')
        }
        get('/getall')
        .then((res)=>{
            console.log(res)
            this.lst = res.data
        }).catch((err)=>{
            console.log(err)
        })
    },
    methods:{
        shan(x){
            del('/delete')
            .then((res)=>{
                console.log(res)
                this.lst.splice(x,1)
            }).catch((err)=>{
                console.log(err)
            })
        },
        tian(){
            post('/add')
            .then((res)=>{
                console.log(res)
                this.lst.push(this.tj)
            }).catch((err)=>{
                console.log(err)
            })
        },
        xiu(){
            alert('修改成功')
        },
        gai(x){
            put('/update')
            .then((res)=>{
                console.log(res)
                this.xg = this.lst[x]
            }).catch((err)=>{
                console.log(err)
            })
        }
    }

}
</script>

<style>

</style>
6.最终效果
总结
使用vuex会更加便利。


 5万+
5万+


 被折叠的 条评论
为什么被折叠?
被折叠的 条评论
为什么被折叠?
 到【灌水乐园】发言


