


 本文介绍了OpenVSwitch硬件卸载的原理和流程,特别是通过TC Flower硬件加速实现网络流量控制。详细阐述了Linux内核的TC模块、硬件卸载功能,以及如何在OVS中启用和配置硬件卸载。此外,还探讨了OVS-TC方案的优势和存在的问题,以及如何通过配置内核态SR-IOV和使用特定网卡来实现硬件卸载。
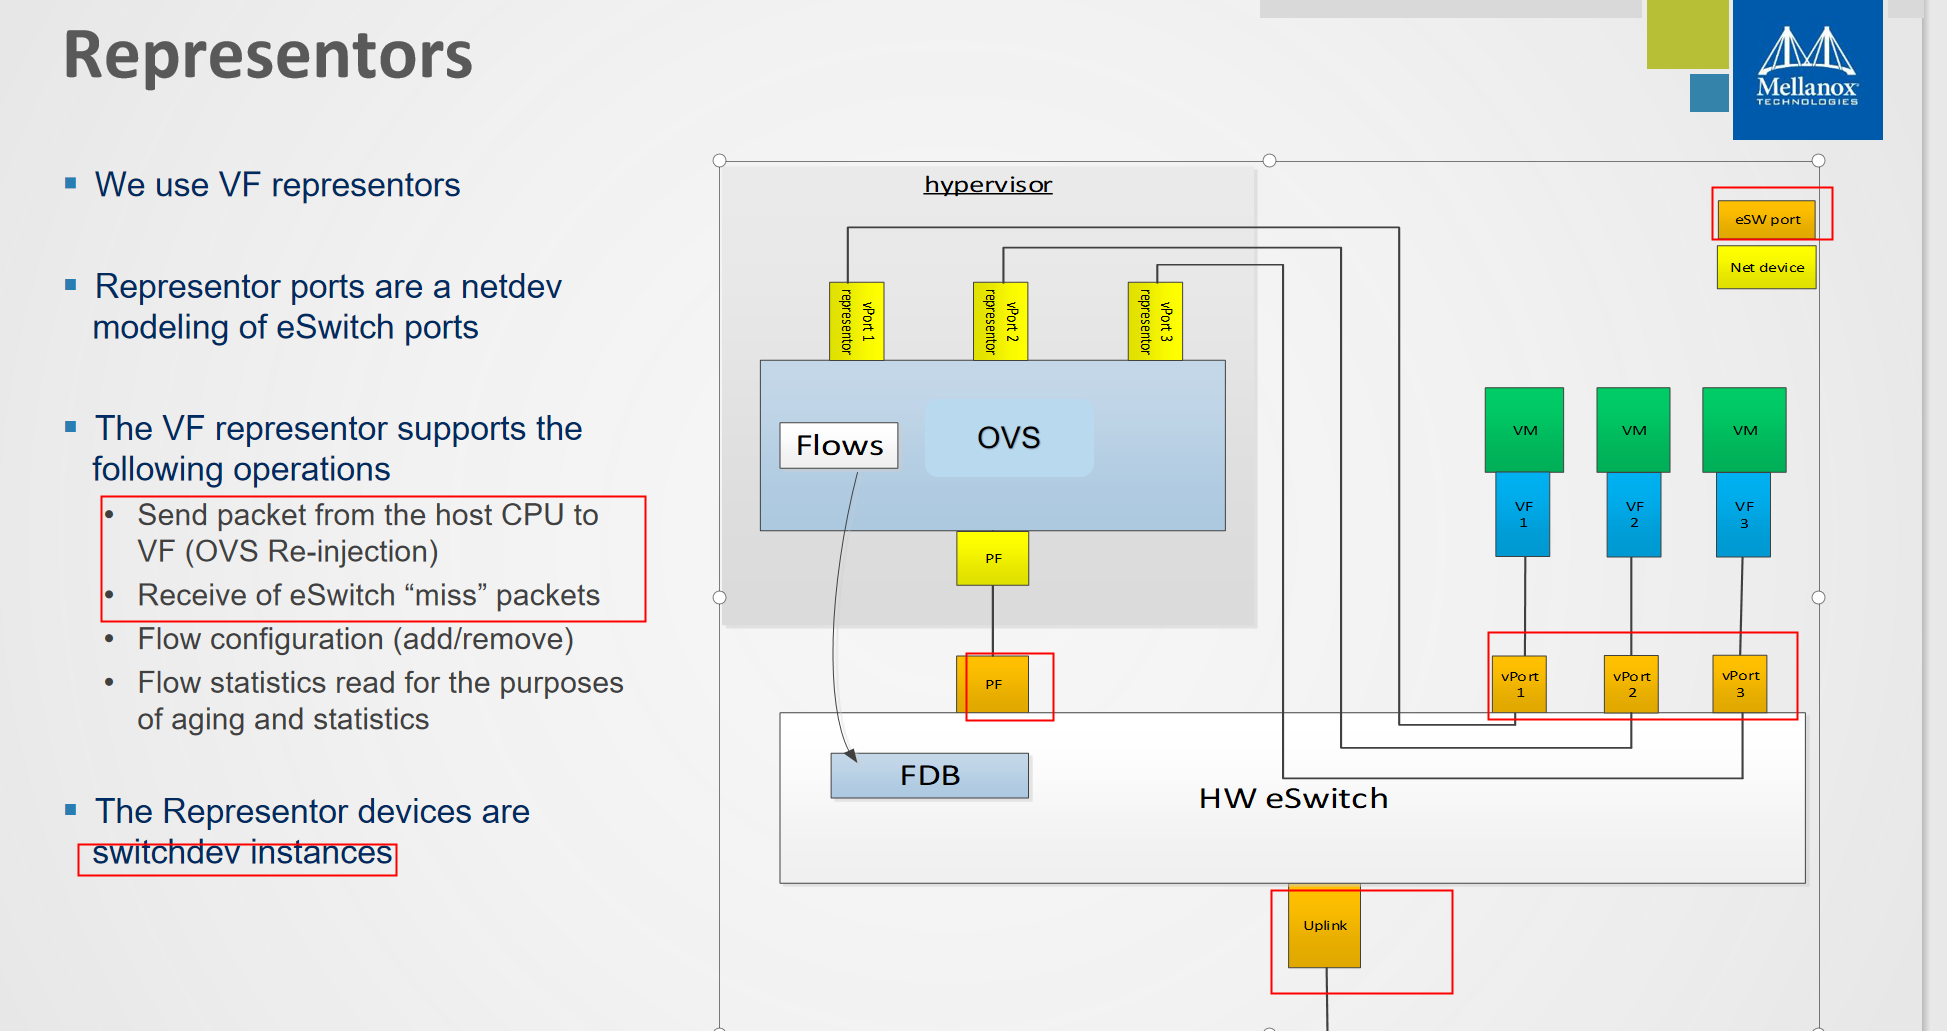
Enable switchdev mode
The VF representor has switchdev ops
Switchdev mode is a mode in E-Switch, that binds between representor and VF. Representor is a port in DPDK that is connected to a VF in such a way that assuming there are no offload flows, each packet that is sent from the VF will be received by the corresponding representor. While each packet that is sent to a representor will be received by the VF. This is very useful in case of SRIOV mode, where the first packet that is sent by the VF will be received by the DPDK application which will decide if this flow should be offloaded to the E-Switch. After offloading the flow packet that the VF that are matching the flow will not be received any more by the DPDK application. Enable SRIOV mode: mlxconfig -d <mst device> set SRIOV_EN=true Configure the max number of VFs: mlxconfig -d <mst device> set NUM_OF_VFS=<num of vfs> Reset the FW: mlxfwreset -d <mst device> reset Configure the actual number of VFs: echo <num of vfs > /sys/class/net/<net device>/device/sriov_numvfs Unbind the device (can be rebind after the switchdev mode): echo -n "<device pci address" > /sys/bus/pci/drivers/mlx5_core/unbind Enbale switchdev mode: echo switchdev > /sys/class/net/<net device>/compat/devlink/mode
(免费订阅,永久学习)学习地址:
LinuxC/C++服务器开发/架构师 面试题、学习资料、教学视频和学习路线图(资料包括C/C++,Linux,Nginx,ZeroMQ,MySQL,Redis、MongoDB,ZK,流媒体,CDN,P2P,K8S,Docker,TCP/IP,协程,DPDK等),或点击这里加qun免费领取,关注我持续更新哦! !
OpenVSwitch Hardware offload
OpenVSwitch 硬件加速浅谈 | SDNLAB | 专注网络创新技术
OpenVSwitch硬件卸载是近几年才提出的方案,到目前为止并不完全成熟。
Linux TC(Traffic Control)Flower 要介绍OVS硬件卸载,必须要从TC说起。TC在Linux Kernel 2.2版本开始提出,并在2.4版本(2001年)完成。最初的Linux TC是为了实现QoS[1],当然TC现在仍然有QoS的功能。它在netdev设备的入方向和出方向增加了挂载点,进而控制网络流量的速度,延时,优先级等。Linux TC在整个Linux Kernel Datapath中的位置如下图所示: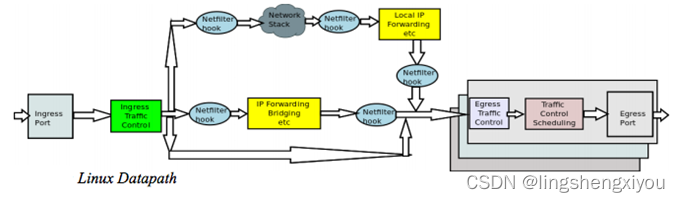
随后,TC增加了Classifier-Action子系统[2],可以根据网络数据包的报头识别报文,并执行相应的Action。与其他的Classifier-Action系统,例如OpenFlow,不一样的是,TC的CA子系统并不只是提供了一种Classifier(识别器),而是提供了一个插件系统,可以接入任意的Classifier,甚至可以是用户自己定义的Classifier。
在2015年,TC的Classifier-Action子系统增加了对OpenFlow的支持[3],所有的OpenFlow规则都可以映射成TC规则。随后不久,OpenFlow Classifier又被改名为Flower Classifier。这就是TC Flower的来源。
Linux TC Flower hardware offload 在2011年,Linux内核增加了基于硬件QoS的支持[4]。因为TC就是Linux内实现QoS的模块,也就是说Linux增加了TC的硬件卸载功能。在2016年,Linux内核又增加了对TC Classifier硬件卸载的支持,但是这个时候只支持了u32类型的Classifier(与TC Flower并列的,但是历史更悠久的一种Classifier)。在4.9~4.14内核,Linux终于增加了对TC Flower硬件卸载的支持。也就是说OpenFlow规则有可能通过TC Flower的硬件卸载能力,在硬件(主要是网卡)中完成转发。
TC Flower硬件卸载的工作原理比较简单。当一条TC Flower规则被添加时,Linux TC会检查这条规则的挂载网卡是否支持并打开了NETIF_F_HW_TC标志位,并且是否实现了ndo_steup_tc(TC硬件卸载的挂载点)。如果都满足的话,这条TC Flower规则会传给网卡的ndo_steup_tc函数,进而下载到网卡内部[5]。
网卡的NETIF_F_HW_TC标志位可以通过ethtool来控制打开关闭:
# ethtool -K eth0 hw-tc-offload on # ethtool -K eth0 hw-tc-offload off
同时,每条规则也可以通过标志位来控制是否进行硬件卸载。相应的标志位包括以下:
-
TCA_CLS_FLAGS_SKIP_HW:只在软件(系统内核TC模块)添加规则,不在硬件添加。如果规则不能添加则报错。
-
TCA_CLS_FLAGS_SKIP_SW:只在硬件(规则挂载的网卡)添加规则,不在软件添加。如果规则不能添加则报错。
-
默认(不带标志位):尝试同时在硬件和软件下载规则,如果规则不能在软件添加则报错。
通过TC命令查看规则,如果规则已经卸载到硬件了,可以看到 in_hw标志位。
Flow install workflow is described in below points,
○ When control plane installs a flow in vRouter. vRouter checks if the offload hook is registered for the flow and invokes the registered offload hook implementer.
○ GOM would have registered the implementer for the hook and hence it gets invoked with vrouter flow structure.
○ GOM’s FlowHandler will check if the flow can be installed using Linux TC flower, it will compare the fields of match and actions in the flow with the supported match and actions of TC.
○ If the flow cannot be installed, then FlowHandler would return -EINVAL to vRouter and vRouter would then install this flow in its datapath.
○ If flow can be installed, then invokes the Qdisc_ops of repr_netdev to setup a flow. skip_sw=True will be set so that flow is only programmed in smartNIC and not in LinuxTC kernel datapath.
○ As explained above, smartNIC driver’s callback is registered for hardware offload with TCF block by invoking tcf_block_cb_register() KPI.
○ Linux TC will invoke the registered callback which will be implemented by driver. Vendor driver would then translate this flow and installs it in NIC.
○ There is a special case here, if smartNIC doesn’t support any of the match/action fields though Linux TC supports it, then in that case vendor driver will return -EINVAL to GOM’s FlowHandler, which will return the same to vRouter and explained above vRouter would then install this flow in its datapath.
OVS-TC
OpenVSwitch在2018年增加了对TC Flower的支持,结合前面的描述,OVS的datapath现在有卸载到网卡的可能了。
前面说过,TC Flower规则现在可以下发到网卡上,相应的网卡上也会有一个虚机交换机。Mellanox称这个虚拟交换机为eSwitch。OVS初始化的时候,会向eSwitch下发一条默认的规则,如果网络包匹配不了任何其他规则,则会被这条默认规则匹配。这条规则的action就是将网络数据包送到eSwitch的管理主机,也就是说送到了位于Linux kernel的datapath上。
如果这个网络数据包是首包的话,那根据前面的描述,在kernel的OVS datapath会继续上送到位于用户空间的ovs-vswitchd。因为ovs-vswitchd中有OpenFlow规则,ovs-vswitchd还是可以完成转发。不一样的地方是,ovs-vswitchd会判断当前数据流对应的规则能否offload(卸载)到网卡。如果可以的话,ovs-vswitchd会调用通过TC接口将flow规则下发至硬件。这样,同一个数据流的后继报文,可以直接在网卡的eSwitch中完成转发,根本不需要走到主机操作系统来。Datapath规则的aging(老化)也是由ovs-vswitchd轮询,最终通过TC接口完成删除。Datapath的变化如下所示。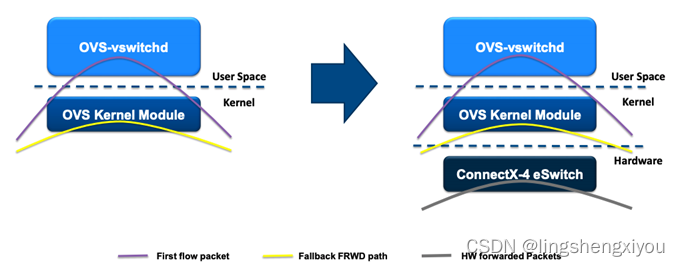
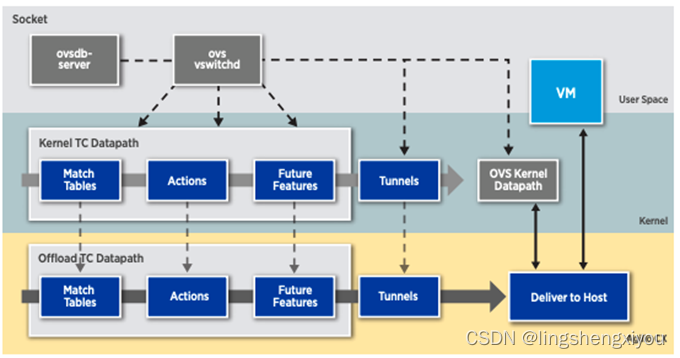
在OVS-TC中,严格来说,现在Datapath有三个,一个是之前的OVS kernel datapath,一个是位于Kernel的TC datapath,另一个是位于网卡的TC datapath。位于kernel的TC datapath一般情况下都是空的,它只是ovs-vswitchd下发硬件TC Flower规则的一个挂载点。

使用OVS-TC方案,可以提供比DPDK更高的网络性能。因为,首先网络转发的路径根本不用进操作系统,因此变的更短了。其次,网卡,作为专用网络设备,转发性能一般要强于基于通用硬件模拟的DPDK。另一方面,网卡的TC Flower offload功能,是随着网卡驱动支持的,在运维上成本远远小于DPDK。
但是OVS-TC方案也有自己的问题。首先,它需要特定网卡支持,不难想象的是,支持这个功能的网卡会更贵,这会导致成本上升,但是考虑到不使用DPDK之后释放出来的CPU和内存资源,这方面的成本能稍微抵消。其次,OVS-TC功能还不完善,例如connection track功能还没有很好的支持。第三,这个问题类似于DPDK,因为不经过Linux kernel,相应的一些工具也不可用了,这使得监控难度更大。
使用 Open vSwitch 硬件卸载
Open vSwitch硬件卸载_redwingz的博客-CSDN博客
为了使能Open vSwitch的硬件卸载功能,需要以下的步骤:
#. 使能 SR-IOV #. 配置NIC为 switchdev 模式 (相关节点) #. 使能 Open vSwitch 硬件卸载
配置内核态SR-IOV
https://support.huaweicloud.com/usermanual-kunpengcpfs/kunpengsriov_06_0006.html
-
给PF网口添加VF。
-
执行添加命令。
echo 8 > /sys/class/net/enp1s0f1/device/sriov_numvfs -
查看添加是否成功。
cat /sys/class/net/enp1s0f1/device/sriov_numvfs

-
-
配置VF端口MAC地址。
-
执行配置命令。
ip link set enp1s0f1 vf 0 mac e4:11:22:33:44:50 ip link set enp1s0f1 vf 1 mac e4:11:22:33:44:51 ip link set enp1s0f1 vf 2 mac e4:11:22:33:44:52 ip link set enp1s0f1 vf 3 mac e4:11:22:33:44:53 ip link set enp1s0f1 vf 4 mac e4:11:22:33:44:54 ip link set enp1s0f1 vf 5 mac e4:11:22:33:44:55 ip link set enp1s0f1 vf 6 mac e4:11:22:33:44:56 ip link set enp1s0f1 vf 7 mac e4:11:22:33:44:57 -
查看配置情况。
ip link show dev enp1s0f1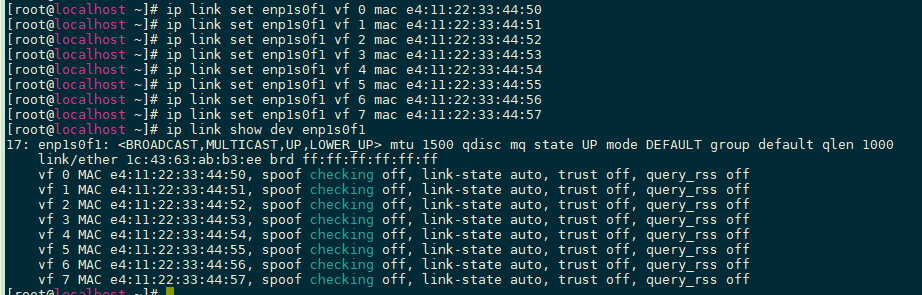
须知:MAC地址不能冲突,包括本机器、对端机器以及交换机上的MAC地址都需保持唯一性。
-
查看8个虚拟端口的PCI端口号。
ls -l /sys/class/net/
-
-
切换网口模式。
-
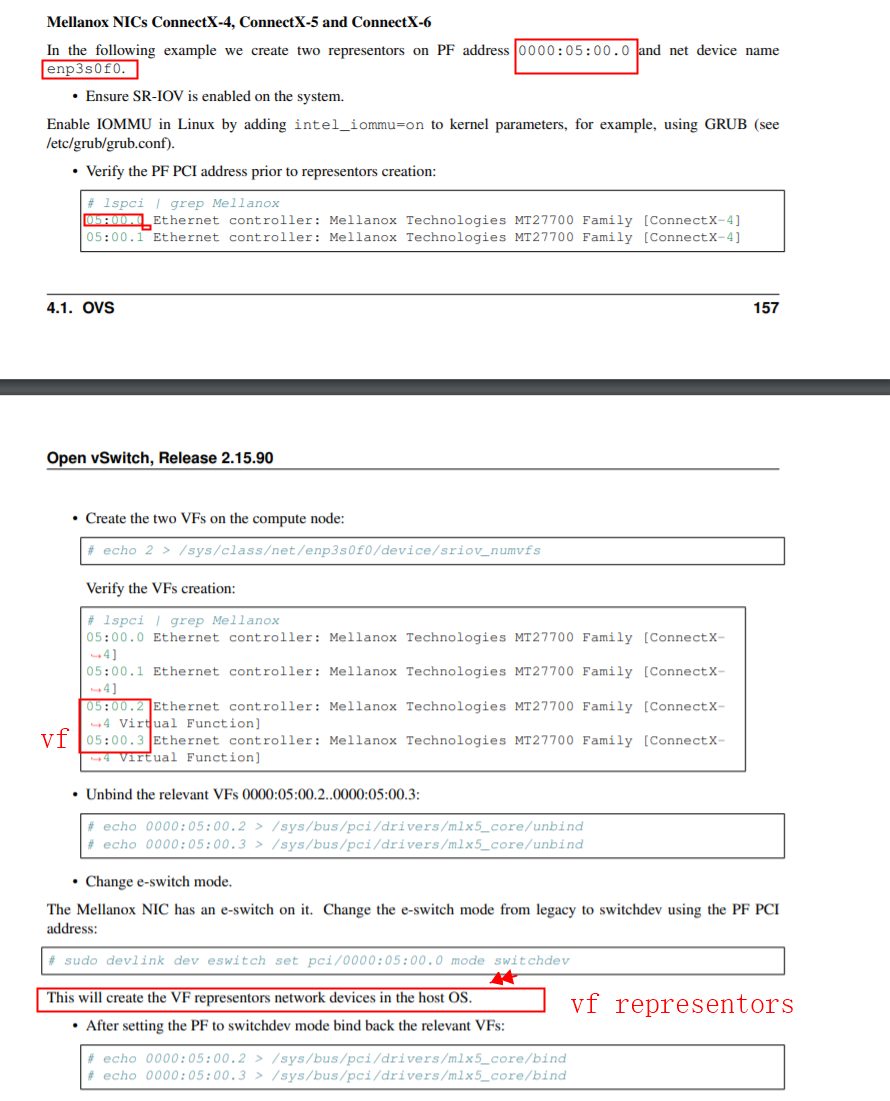
解绑VF。
echo 0000:01:01.2 > /sys/bus/pci/drivers/mlx5_core/unbind echo 0000:01:01.3 > /sys/bus/pci/drivers/mlx5_core/unbind echo 0000:01:01.4 > /sys/bus/pci/drivers/mlx5_core/unbind echo 0000:01:01.5 > /sys/bus/pci/drivers/mlx5_core/unbind echo 0000:01:01.6 > /sys/bus/pci/drivers/mlx5_core/unbind echo 0000:01:01.7 > /sys/bus/pci/drivers/mlx5_core/unbind echo 0000:01:02.0 > /sys/bus/pci/drivers/mlx5_core/unbind echo 0000:01:02.1 > /sys/bus/pci/drivers/mlx5_core/unbind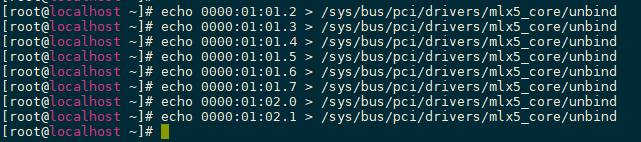
-
将PF设备上的“eSwitch”模式从“Legacy”修改为“SwitchDev”。
devlink dev eswitch set pci/0000:01:00.1 mode switchdev echo switchdev > /sys/class/net/enp1s0f1/compat/devlink/mode cat /sys/class/net/enp1s0f1/compat/devlink/mode
-
检查Representor设备名是否已变更。
ls -l /sys/class/net/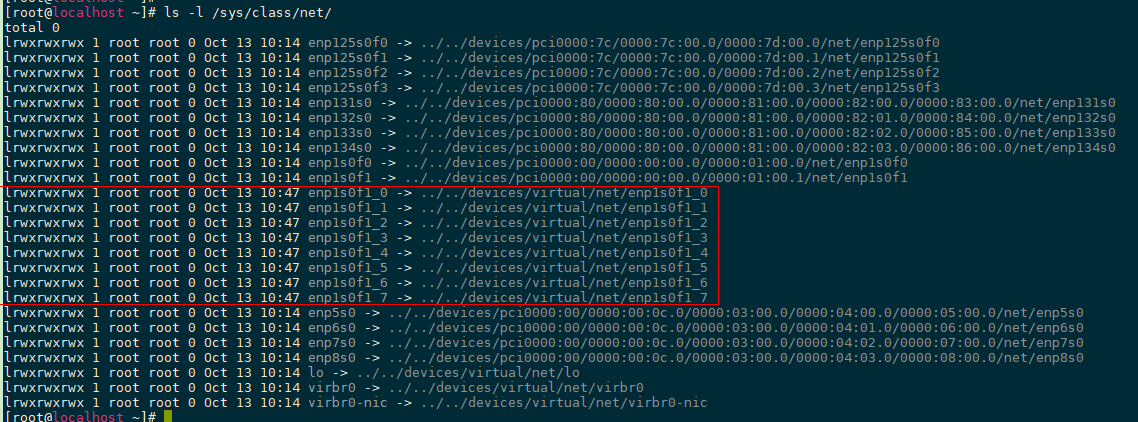
VF设备名由之前的enp1s0f$变更为enp1s0f1_$。
-
-
绑定VF。
echo 0000:01:01.2 > /sys/bus/pci/drivers/mlx5_core/bind echo 0000:01:01.3 > /sys/bus/pci/drivers/mlx5_core/bind echo 0000:01:01.4 > /sys/bus/pci/drivers/mlx5_core/bind echo 0000:01:01.5 > /sys/bus/pci/drivers/mlx5_core/bind echo 0000:01:01.6 > /sys/bus/pci/drivers/mlx5_core/bind echo 0000:01:01.7 > /sys/bus/pci/drivers/mlx5_core/bind echo 0000:01:02.0 > /sys/bus/pci/drivers/mlx5_core/bind echo 0000:01:02.1 > /sys/bus/pci/drivers/mlx5_core/bind
demo
# uname -sr; tail -2/etc/lsb-release Linux 4.15.0-54-generic DISTRIB_CODENAME=bionic DISTRIB_DESCRIPTION="Ubuntu 18.04.2 LTS" VF and Mellanox eswitch/ASAP2 config ------------------------------------------------------------------------------------------ # mst start # mlxconfig -d /dev/mst/mt4121_pciconf0 query # mlxconfig -d /dev/mst/mt4121_pciconf0 set SRIOV_EN=1 # mlxconfig -d /dev/mst/mt4121_pciconf0 set NUM_OF_VFS=32 # sync; sync; sync; reboot # devlink dev show pci/0000:01:00.0 (*PF enp1s0f0 ) # echo 1 >/sys/class/net/enp1s0f0/device/sriov_numvfs # devlink dev show pci/0000:01:00.0 (*PF enp1s0f0 ) pci/0000:01:00.1 (*VF enp1s0f1 ) # echo 0000:01:00.1 >/sys/bus/pci/drivers/mlx5_core/unbind # devlink dev eswitch set pci/0000:01:00.0 mode switchdev # echo 0000:01:00.1 >/sys/bus/pci/drivers/mlx5_core/bind OpenvSwitch with eswitch/ASAP2 config ------------------------------------------------------------------------------------------ # apt install openvswitch-switch -y #/etc/init.d/openvswitch-switch start # ovs-vsctl set Open_vSwitch . other_config:hw-offload=true #/etc/init.d/openvswitch-switch restart # ovs-vsctl add-br ovs-sriov # ovs-vsctl add-port ovs-sriov enp1s0f0 # ovs-vsctl add-port ovs-sriov enp1s0f0_0 Host & VF interface config ------------------------------------------------------------------------------------------ # ifconfig enp1s0f0 up up (*PF) # ifconfig enp1s0f0_0 up up (*VF representor) # ip netns add TEST (*namespace TEST) # ip link set enp1s0f1 netns TEST # ip netns exec TEST ifconfig enp1s0f1 up up (*VF) # ip netns exec TEST dhcient enp1s0f1 (*VF assigned ip address 1.2.3.4) # ip netns exec TEST ping 8.8.8.8

eswitch/ASAP2 network topology map ------------------------------------------------------------------------------------------ _gateway AA:AA:AA:AA:AA:AA | eswthch(PHY) ---------------------------------------> | | enp1s0f0: BB:BB:BB:BB:BB:BB (PF 100GbE) | eswtich/ASAP | | H/W offloaded enp1s0f0_0: CC:CC:CC:CC:CC:CC (VF representor) | w/OpenvSwitch | | enp1s0f1: XX:XX:XX:XX:XX:XX (VF/netns TEST) <--+
OpenvSwitch with eswitch/ASAP2 debug/monitor ------------------------------------------------------------------------------------------ # ovs-dpctl dump-flows type=offloaded in_port(2),eth(src=AA:AA:AA:AA:AA:AA,dst=XX:XX:XX:XX:XX:XX), ... actions:3 in_port(3),eth(src=XX:XX:XX:XX:XX:XX,dst=AA:AA:AA:AA:AA:AA), ... actions:2 # tshark -i enp1s0f0 icmp (PF) 1 0.000000000 1.2.3.4 → 8.8.8.8 ICMP 98 Echo (ping) request 2 0.001447344 8.8.8.8 → 1.2.3.4 ICMP 98 Echo (ping) reply (stop) # tshark -i enp1s0f0_0 icmp (VF representor) 1 0.000000000 1.2.3.4 → 8.8.8.8 ICMP 98 Echo (ping) request 2 0.019405322 8.8.8.8 → 1.2.3.4 ICMP 98 Echo (ping) reply (stop) # ovs-dpctl show system@ovs-system: port 1: ovs-sriov (internal) port 2: enp1s0f0 (*PF) port 3: enp1s0f0_0 (*pair to VF enp1s0f1)
# devlink dev eswitch show pci/0000:01:00.0 pci/0000:01:00.0: mode switchdev inline-mode none encap enable # update-pciids # lspci -tv -[0000:00]-+ +-01.0-[01]--+-00.0 Mellanox Technologies MT28800 Family [ConnectX-5 Ex] \-00.1 Mellanox Technologies MT28800 Family [ConnectX-5 Ex Virtual Function] ------------------------------------------------- # ls/sys/devices/virtual/net/*/phys_port_name # ls/sys/devices/virtual/net/*/phys_switch_id # ls/sys/class/net/*/phys_port_name # ls/sys/class/net/*/phys_switch_id ------------------------------------------------- # ovs-vsctl -V ovs-vsctl (Open vSwitch) 2.9.2 DB Schema 7.15.1 # mlxlink -d/dev/mst/mt4121_pciconf0 -e Operational Info ---------------- State : Active Physical state : LinkUp Speed : 100GbE Width : 4x FEC : Standard RS-FEC - RS(528,514) Loopback Mode : No Loopback Auto Negotiation : ON Supported Info -------------- Enabled Link Speed : 0x48101041 (100G,50G,40G,25G,10G,1G) Supported Cable Speed : 0x48101165 (100G,56G,50G,40G,25G,20G,10G,1G) Troubleshooting Info -------------------- Status Opcode : 0 Group Opcode : N/A Recommendation : No issue was observed. EYE Opening Info ---------------- Physical Grade : 11340, 11581, 11340, 12244 Height Eye Opening [mV] : 260, 239, 198, 172 Phase Eye Opening [psec] : 10, 14, 17, 13 # mlxlink -d/dev/mst/mt4121_pciconf0 --show_ber_monitor : BER Monitor Info ---------------- BER Monitor State : Normal BER Monitor
 最低0.47元/天 解锁文章


 1619
1619

 被折叠的 条评论
为什么被折叠?
被折叠的 条评论
为什么被折叠?
 到【灌水乐园】发言


