


目录
2.1.2 创建DocumentSummaryInformation和SummaryInformation
1.认识NPOI
1.1 什么是NPOI
NPOI,顾名思义,就是POI的.NET版本。用于读取和写入Microsoft Office二进制和OOXML文件格式。
NPOI,顾名思义,就是POI的.NET版本。

那POI又是什么呢?
POI是一套用Java写成的库,能够帮助开发者在没有安装微软Office的情况下读写Office 97-2003的文件,
支持的文件格式包括xls, doc, ppt等。在本文发布时,POI的最新版本是3.5 beta 6。

NPOI 1.x是基于POI 3.x版本开发的,与poi 3.2对应的版本是NPOI 1.2,
目前最新发布的版本是1.2.1,在该版本中仅支持读写Excel文件和Drawing格式,
其他文件格式将在以后的版本中得到支持。
1.2 版权说明
NPOI采用的是Apache 2.0许可证(poi也是采用这个许可证),
这意味着它可以被用于任何商业或非商业项目,你不用担心因为使用它而必须开放你自己的源代码,
所以它对于很多从事业务系统开发的公司来说绝对是很不错的选择。

当然作为一个开源许可证,肯定也是有一些义务的,例如如果你在系统中使用NPOI,
你必须保留NPOI中的所有声明信息。对于源代码的任何修改,必须做出明确的标识。

完整的apache 2.0许可证请见http://www.phpx.com/man/Apache-2/license.html
资料扩展:http://www.cnblogs.com/atao/
1.3 NPOI 1.2中各Assembly的作用
NPOI目前有好几个assembly,每个的作用各有不同,开发人员可以按需加载相应的assembly。在这里大概罗列一下:
NPOI.Util     基础辅助库
NPOI.POIFS    OLE2格式读写库
NPOI.DDF      Microsoft Drawing格式读写库
NPOI.SS       Excel公式计算库
NPOI.HPSF     OLE2的Summary Information和Document Summary Information属性读写库
NPOI.HSSF     Excel BIFF格式读写库
2. 常规操作设置
2.1 创建基本内容
2.1.1 创建Workbook和Sheet
创建Workbook说白了就是创建一个Excel文件,当然在NPOI中更准确的表示是在内存中创建一个Workbook对象流。

NPOI.HSSF是专门负责Excel BIFF格式的命名空间,
供开发者使用的对象主要位于NPOI.HSSF.UserModel和NPOI.HSSF.Util命名空间下,
下面我们要讲到的Workbook的创建用的就是NPOI.HSSF.UserModel.HSSFWorkbook类,这个类负责创建.xls文档。

在开始创建Workbook之前,先要在项目中引用一些必要的NPOI assembly,如下所示:

NPOI.dll

NPOI.POIFS.dll

NPOI.HSSF.dll

NPOI.Util.dll


要创建一个新的xls文件其实很简单,只要我们初始化一个新的`HSSFWorkbook`实例就行了,如下所示:
using NPOI.HSSF.UserModel;
using NPOI.XSSF.UserModel;
using System.IO;
using NPOI.SS.UserModel;
using NPOI.SS.Util;
using NPOI.HSSF.Util;
.....
 IWorkbook workBook;
            string ext = Path.GetExtension(fileName);
            if (ext.Equals(".xls", StringComparison.CurrentCultureIgnoreCase))
            {
                //表示为Excel2007以前的版本
                workBook = new HSSFWorkbook();
            }
            else if (ext.Equals(".xlsx", StringComparison.CurrentCultureIgnoreCase))
            {
                //表示为Excel2007以后的版本
                workBook = new XSSFWorkbook();
            }
            else
            {
                throw new ArgumentException("只能导出为Excel文件");
            }
是不是很方便啊,没有任何参数或设置,但这么创建有一些限制,
这样创建出来的Workbook在Excel中打开是会报错的,
因为Excel规定一个Workbook必须至少带1个Sheet,
这也是为什么在Excel界面中,新建一个Workbook默认都会新建3个Sheet。
所以必须加入下面的创建Sheet的代码才能保证生成的文件正常:
HSSFSheet sheet = hssfworkbook.CreateSheet("newsheet");

// 如果要创建标准的Excel文件,即拥有3个Sheet,可以用下面的代码:

hssfworkbook.CreateSheet("Sheet1");

hssfworkbook.CreateSheet("Sheet2");

hssfworkbook.CreateSheet("Sheet3");

// 最后就是把这个HSSFWorkbook实例写入文件了,代码也很简单,如下所示:

FileStream file = new FileStream(@"test.xls", FileMode.Create);

hssfworkbook.Write(file);

file.Close();
这里假设文件名是test.xls,,在创建完FileStream之后,直接调用HSSFWorkbook类的Write方法就可以了。

最后可以打开test.xls文件确认一下,有3个空的Sheet。

相关范例请见NPOI 1.2正式版中的CreateEmptyExcelFile项目。
2.1.2 创建DocumentSummaryInformation和SummaryInformation
 DocummentSummaryInformation和SummaryInformation并不是Office文件的专利,
 只要是OLE2格式,都可以拥有这两个头信息,主要目的就是为了在没有完整读取文件数据的情况下获得文件的摘要信息,
 同时也可用作桌面搜素的依据。

 要了解DocummentSummaryInformation的全部属性请见http://msdn.microsoft.com/en-us/library/aa380374(VS.85).aspx;
 要了解SummaryInformation的全部属性请见http://msdn.microsoft.com/en-us/library/aa369794(VS.85).aspx。
using NPOI.HSSF.UserModel;

using NPOI.HPSF;

using NPOI.POIFS.FileSystem;

// 其中与DocummentSummaryInformation和SummaryInformation密切相关的是HPSF命名空间。

// 首先创建Workbook

HSSFWorkbook hssfworkbook = new HSSFWorkbook();

// 然后创建DocumentSummaryInformation

DocumentSummaryInformation dsi = PropertySetFactory.CreateDocumentSummaryInformation();

dsi.Company ="NPOI Team";

// 再创建SummaryInformation

SummaryInformation si = PropertySetFactory.CreateSummaryInformation();

si.Subject ="NPOI SDK Example";

// 因为是范例,这里仅各设置了一个属性,其他都没有设置。

// 现在我们把创建好的对象赋给Workbook,这样才能保证这些信息被写入文件。

hssfworkbook.DocumentSummaryInformation= dsi;

hssfworkbook.SummaryInformation= si;
2.1.3 创建单元格
用过Excel的人都知道,单元格是Excel最有意义的东西,我们做任何操作恐怕都要和单元格打交道。
在Excel中我们要添加一个单元格只需要点击任何一个单元格,然后输入内容就是了,
但是Excel底层其实没有这么简单,不同的单元格是有不同的类型的,
比如说数值单元格是用NumberRecord表示,文本单元格是用LabelSSTRecord表示,
空单元格是用BlankRecord表示。这也就意味着,在设置单元格时,
你必须告诉NPOI你需要创建哪种类型的单元格。
要创建单元格首先要创建单元格所在的行,比如,下面的代码创建了第0行:
HSSFSheet sheet1 = hssfworkbook.CreateSheet("Sheet1");
HSSFRow row1=sheet1.CreateRow(0);
// 行建好了,就可以建单元格了,比如创建A1位置的单元格:
row1.CreateCell(0).SetCellValue(1);
这里要说明一下,SetCellValue有好几种重载,
你可以设置单元格为bool、double、DateTime、string和HSSFRichTextString类型。
其中对于string类型的重载调用的就是HSSFRichTextString类型的重载,
所以是一样的,HSSFRichTextString可用于有字体或者Unicode的文本。

如果你觉得每一行要声明一个HSSFRow很麻烦,可以用下面的方式:
sheet1.CreateRow(0).CreateCell(0).SetCellValue("This is a Sample");
// 这么用有个前提,那就是第0行还没创建过,否则得这么用:
sheet1.GetRow(0).CreateCell(0).SetCellValue("This is a Sample");

如果你要获得某一个已经创建的单元格对象,可以用下面的代码:
sheet1.GetRow(row_index).GetCell(column_index);


注意:这里的行在Excel里是从1开始的,但是NPOI内部是从0开始的;
列在Excel里面是用字母表示的,而NPOI中也是用从0开始的数字表示的,所以要注意转换。
2.1.4 创建批注
在过去,我们恐怕没有办法实现这一功能,
因为无论是cvs法、html法、oledb法都没有提供这样的接口,当然Office PIA法可以做到,
但是性能实在太差,而且稳定性不好,经常莫名其妙crash(这是某某兄弟给我的反馈,我引用了下,呵呵)。
在以后的教程中,你将看到更多在过去无法通过传统方法实现的东西,好戏才刚刚开始。

批注主要有三个属性需要设置,一个是批注的位置和大小、一个是批注的文本、还有一个是批注的作者。

批注的位置和大小,在Excel中是与单元格密切相关的,NPOI中通过HSSFClientAnchor的实例来表示,
它的构造函数比较复杂,有8个参数,它们分别是(后面插入图片的时候也将用到该参数)
| 参数 | 说明 |
|---|---|
| dx1 | 第1个单元格中x轴的偏移量 |
| dy1 | 第1个单元格中y轴的偏移量 |
| dx2 | 第2个单元格中x轴的偏移量 |
| dy2 | 第2个单元格中y轴的偏移量 |
| col1 | 第1个单元格的列号 |
| row1 | 第1个单元格的行号 |
| col2 | 第2个单元格的列号 |
| row2 | 第2个单元格的行号 |
// 如果我们打算让注释显示在B3和E5之间,就应该这么写:

HSSFPatriarch patr = sheet.CreateDrawingPatriarch();

HSSFComment comment1 = patr.CreateComment(new HSSFClientAnchor(0, 0, 0, 0, 1, 2 , 4, 4));

//下面我们设置这个批注的内容和作者,这个比较简单:

comment1.String=new HSSFRichTextString("Hello World");

comment1.Author="NPOI Team";

//最后一步就是把批注赋给某个单元格:

HSSFCell cell= sheet.CreateRow(1).CreateCell(1);

cell.CellComment= comment1;
对于批注,你有两种选择,一种是隐藏(默认),一种是显示(即表单一打开就显示该批注),
可以通过comment1.Visible属性来控制。
2.1.5 创建页眉和页脚
很多人并不知道Excel的页眉和页脚功能,因为在界面上是显示不了页眉和页脚的,
必须在打印页面中才能看到,这也直接导致了其设置界面也显得更隐秘,
你必须进入页面设置 –>页眉和页脚才能设置。以下是Office 2007中的设置界面。

当你按“自定义页眉”或“自定义页脚”时,你会看到以下界面,Excel把页眉、页脚分成了左中右三部分,
这一点绝非单纯体现在界面上,在底层的存储中也是如此。
如果你设置的是“左”的内容,底层的存储字符串就会在开头加上&L,如果是“右”的内容则会加上&R,
所以HeaderRecord中的字符串看上去是这样的:"&C&LFooter A&R”,
这个字符串的意思是仅设置了“左”的内容,内容是Footer A。

看了这些我想你应该对页眉和页脚有所了解了,回过头来说NPOI,
NPOI中主要是靠HSSFSheet.Header和HSSFSheet.Footer来设置的,
这两个属性分别是HSSFHeader和HSSFFooter类型的。

参考代码如下:
HSSFSheet s1= hssfworkbook.CreateSheet("Sheet1");
s1.CreateRow(0).CreateCell(1).SetCellValue(123);

//set headertext
s1.Header.Center="This is a test sheet";

//set footertext
s1.Footer.Left="Copyright NPOI Team";
s1.Footer.Right="created by NPOI Team";
2.2 单元格操作
2.2.1 设置格式
在Excel中我们经常要设置格式,比如说日期格式(yyyymmdd)、小数点格式(1.20)、货币格式($2000)、
百分比格式(99.99%)等等,这些东西在过去我们恐怕只能在服务器端生成好,不但增加了服务器端的代码量,
还造成了不必要的字符串替换操作,如今NPOI将让服务器从这种完全没有必要的操作中解放出来,
一切都将由Excel在客户端处理。

使用NPOI时要注意,所有的格式都是通过CellStyle.DataFormat赋给单元格的,而不是直接赋给单元格。
/// 案例一 日期格式
/// 假设我们现在需要显示的日期的格式为2024年5月31日,可以用下面的代码生成:

HSSFSheetsheet = hssfworkbook.CreateSheet("newsheet");

HSSFCell cell= sheet.CreateRow(0).CreateCell(0);

cell.SetCellValue(newDateTime(2024,5,31));

//set dateformat

HSSFCellStylecellStyle = hssfworkbook.CreateCellStyle();

HSSFDataFormatformat = hssfworkbook.CreateDataFormat();

cellStyle.DataFormat= format.GetFormat("yyyy年m月d日");

cell.CellStyle=cellStyle;
由于这里的“yyyy年m月d日”属于自定义格式(区别于Excel内嵌的格式),
所以必须用hssfworkbook.CreateDataFormat()创建一个HSSFDataFormat实例,
然后使用format.GetFormat来获取相应的格式,只要是Excel支持的格式表示方式,
这种方式都能够实现。
/// 案例二保留2位小数
/// 假设我们有个单元格的值为1.2,怎么显示成1.20呢?在Excel中可以用“0.00”来表示,所以下面的代码就能完成:

// Create arow and put some cells in it. Rows are 0 based.

HSSFCell cell= sheet.CreateRow(0).CreateCell(0);

//set valuefor the cell

cell.SetCellValue(1.2);

//numberformat with 2 digits after the decimal point - "1.20"

HSSFCellStylecellStyle = hssfworkbook.CreateCellStyle();

cellStyle.DataFormat= HSSFDataFormat.GetBuiltinFormat("0.00");

cell.CellStyle= cellStyle;

//这里与上面有所不同,用的是HSSFDataFormat.GetBuiltinFormat()方法,之所以用这个,是因为0.00是Excel内嵌的格式
///案例三货币格式
///货币格式在金融的项目中经常用到,比如说人民币符号¥,美元符号$等,这里可以用下面的代码表示:

HSSFCellcell2 = sheet.CreateRow(1).CreateCell(0);

cell2.SetCellValue(20000);

HSSFCellStylecellStyle2 = hssfworkbook.CreateCellStyle();

HSSFDataFormatformat = hssfworkbook.CreateDataFormat();

cellStyle2.DataFormat= format.GetFormat("¥#,##0");

cell2.CellStyle= cellStyle2;
//注意,这里还加入了千分位分隔符,所以是#,##,至于为什么这么写,你得去问微软,呵呵。
///案例四百分比
///百分比在报表中也很常用,其实基本上和上面一样,只是格式表示是0.00%,代码如下:

cellStyle4.DataFormat= HSSFDataFormat.GetBuiltinFormat("0.00%");
//由于这里是内嵌格式,所以直接用HSSFDataFormat.GetBuiltinFormat即可。
/// 案例五中文大写
/// 在表示金额时,我们时常会用到,我也见过不少兄弟实现了数字转中文大小写的工具类,
/// 以后你可以尝试让Excel去处理这一切,代码和刚才差不多,也是改格式的表示:

HSSFDataFormatformat = hssfworkbook.CreateDataFormat();

cellStyle6.DataFormat= format.GetFormat("[DbNum2][$-804]0");
//由于是自定义格式,所以用了HSSFDataFormat.GetFormat.
/// 案例六科学计数法
/// 这东西数学课上我们都学过,虽然用的不多,但是既然Excel支持,这里也提一下:
cellStyle3.DataFormat= HSSFDataFormat.GetBuiltinFormat("0.00E+00");
最后总结一下HSSFDataFormat.GetFormat和HSSFDataFormat.GetBuiltinFormat的区别:

当使用Excel内嵌的(或者说预定义)的格式时,直接用HSSFDataFormat.GetBuiltinFormat静态方法即可。

当使用自己定义的格式时,必须先调用HSSFWorkbook.CreateDataFormat(),
因为这时在底层会先找有没有匹配的内嵌FormatRecord,如果没有就会新建一个FormatRecord,
所以必须先调用这个方法,然后你就可以用获得的HSSFDataFormat实例的GetFormat方法了,
当然相对而言这种方式比较麻烦,所以内嵌格式还是用HSSFDataFormat.GetBuiltinFormat静态方法更加直接一些。
不过自定义的格式也不是天马行空随便定义,还是要参照Excel的格式表示来定义,具体请看相关的Excel教程。

注意:自定义的FormatRecord是嵌入xls文件内部的,所以不用担心对方Excel中有没有定义过这种格式,都是能够正常使用的。
2.2.2 合并单元格
合并单元格在制作表格时很有用,比如说表格的标题就经常是把第一行的单元格合并居中。
那么在NPOI中应该如何实现单元格的合并呢?

为了实现这一功能,NPOI引入了新的概念,即Region,因为合并单元格,其实就是设定一个区域。
下面说一下Region类的参数,Region总共有4个参数,如下所示:
| Region的参数 | 说明 |
|---|---|
| FirstRow | 区域中第一个单元格的行号 |
| FirstColumn | 区域中第一个单元格的列号 |
| LastRow | 区域中最后一个单元格的行号 |
| LastColumn | 区域中最后一个单元格的列号 |
由于单元格的合并都是在表的基础上建立的,所以我们得先建Sheet:
HSSFWorkbook hssfworkbook =new HSSFWorkbook();
HSSFSheet sheet = hssfworkbook.CreateSheet("newsheet");
/// 场景一标题行的合并
/// 这种场景是最常见的,比如说我们要建立一张销售情况表,英文叫Sales Report
/// 我们先设置居中和字体样式,这里我们采用20号字体,代码如下:

HSSFRow row =sheet.CreateRow(0);

HSSFCell cell= row.CreateCell(0);

cell.SetCellValue("Sales Report");

HSSFCellStyle style = hssfworkbook.CreateCellStyle();

style.Alignment= HSSFCellStyle.ALIGN_CENTER;

HSSFFont font= hssfworkbook.CreateFont();

font.FontHeight= 20*20;

style.SetFont(font);

cell.CellStyle= style;

/// 要产生图中的效果,即把A1:F1这6个单元格合并,然后添加合并区域:

sheet.AddMergedRegion(new Region(0, 0, 0,5));
/// 场景二多行合并
/// 看完场景一,你可不要认为多行合并就需要一行一行做,其实也只需要一行代码,
/// 比如说我们要把C3:E5合并为一个单元格,那么就可以用下面的代码:

sheet.AddMergedRegion(new Region(2, 2, 4,4));

/// 提示即使你没有用CreateRow和CreateCell创建过行或单元格,也完全可以直接创建区域然后把这一区域合并,
/// Excel的区域合并信息是单独存储的,和RowRecord、ColumnInfoRecord不存在直接关系。
2.2.3 对齐相关设置
本节将围绕“对齐”选项卡中的设置展开,虽然实际上你会发现该选项卡中的很多设置和对齐没有什么关系。
合并单元格已经在2.2.2节讲过了,这里就不提了。
首先我们用代码创建必要的单元格,代码如下:
HSSFWorkbookhssfworkbook =new HSSFWorkbook();

HSSFSheetsheet1 = hssfworkbook.CreateSheet("Sheet1");

HSSFRow row =sheet1.CreateRow(0);

//这里我们假设在A0单元格中加入了文本Test
row.CreateCell(0).SetCellValue("Test");

//请注意接下来我们要做的所有操作都是在CellStyle的基础上完成的,所以我们创建一个HSSFCellStyle:
HSSFCellStylestyle=hssfworkbook.CreateCellStyle();
/// 水平对齐
/// 这里用的是HSSFCellStyle.Alignment,默认值自然是常规,即HSSFCellStyle.ALIGN_GENERAL。

//如果是左侧对齐就是

style.Alignment= HSSFCellStyle.ALIGN_LEFT;

//如果是居中对齐就是

style.Alignment= HSSFCellStyle.ALIGN_CENTER;

//如果是右侧对齐就是

style.Alignment= HSSFCellStyle.ALIGN_RIGHT;

//如果是跨列举中就是

style.Alignment= HSSFCellStyle.ALIGN_CENTER_SELECTION;

//如果是两端对齐就是

style.Alignment= HSSFCellStyle.ALIGN_JUSTIFY;

//如果是填充就是

style.Alignment= HSSFCellStyle.ALIGN_FILL;
注意:以上选项仅当有足够的宽度时才能产生效果,不设置宽度恐怕看不出区别。
///垂直对齐
///这里用的是HSSFCellStyle.VerticalAlignment,默认值为居中,即HSSFCellStyle.VERTICAL_CENTER

//如果是靠上就是

style.VerticalAlignment=HSSFCellStyle.VERTICAL_TOP

//如果是居中就是

style.VerticalAlignment=HSSFCellStyle.VERTICAL_CENTER

//如果是靠下就是

style.VerticalAlignment=HSSFCellStyle.VERTICAL_BOTTOM

//如果是两端对齐就是

style.VerticalAlignment=HSSFCellStyle.VERTICAL_JUSTIFY
///自动换行
///自动换行翻译成英文其实就是Wrap的意思,所以这里我们应该用WrapText属性,这是一个布尔属性

style.WrapText=true;

///文本缩进
///这是一个不太引人注意的选项,所以这里给张图出来,让大家知道是什么,
///缩进说白了就是文本前面的空白,我们同样可以用属性来设置,这个属性叫做Indention。

style.Indention= 3;

///文本旋转
///文本方向大家一定在Excel中设置过,上图中就是调整界面,主要参数是度数,那么我们如何在NPOI中设置呢?

style.Rotation=(short)90;
//请注意,这里的Rotation取值是从-90到90,而不是0-180度。
2.2.4 使用边框
边框和其他单元格设置一样也是在HSSFCellStyle上操作的,HSSFCellStyle有2种和边框相关的属性,分别是:
| 边框相关属性 | 说明 | 范例 |
|---|---|---|
| Border+方向 | 边框类型 | BorderTop, BorderBottom,BorderLeft, BorderRight |
| 方向+BorderColor | 边框颜色 | TopBorderColor,BottomBorderColor, LeftBorderColor, RightBorderColor |
至于颜色那就很多了,全部在HSSFColor下面,如HSSFColor.GREEN,HSSFColor.RED,都是静态实例,可以直接引用。
下面我们假设我们要把一个单元格的四周边框都设置上,可以用下面的代码:
HSSFSheet sheet = hssfworkbook.CreateSheet("newsheet");

// Create arow and put some cells in it. Rows are 0 based.

HSSFRow row =sheet.CreateRow(1);

// Create acell and put a value in it.

HSSFCell cell= row.CreateCell(1);

// Style thecell with borders all around.

HSSFCellStyle style = hssfworkbook.CreateCellStyle();

style.BorderBottom=HSSFCellStyle.BORDER_THIN;

style.BorderLeft=HSSFCellStyle.BORDER_THIN;

style.BorderRight=HSSFCellStyle.BORDER_THIN;

style.BorderTop= HSSFCellStyle.BORDER_THIN ;

cell.CellStyle=style;
这段代码使用了最普通的细边框,使得这个单元格看上去像块空心砖头。
注意:这里我们没有设置边框的颜色,但这不会影响最终的效果,因为Excel会用默认的黑色给边框上色。
如果要设置颜色的话,也很简单,如下:
style.BottomBorderColor=HSSFColor.GREEN.index;
以上代码将底部边框设置为绿色,要注意,不是直接把HSSFColor.GREEN赋给XXXXBorderColor属性,而是把index的值赋给它。
2.2.5 字体设置
在设置字体之前,我们首先要做的就是创建字体对象,这和创建数字格式很相似。
HSSFFont font= hssfworkbook.CreateFont();
这句话会在Excel文件内部创建相应的FontRecord,所以你不用客户因为自己机器上的Excel没有相应的字体设置而导致设置丢失。
字体在设置完成后,我们就可以把它赋给单元格样式,代码如下:
HSSFCellStyle style1 = hssfworkbook.CreateCellStyle();

style1.SetFont(font);

cell1.CellStyle=style1;
这里的cell1是HSSFCell的一个实例。
好了,下面我们就开始对字体进行设置。
字体名称
这里的字体名称是通过HSSFFont.FontName进行设置的,至于具体的名称,只要是常用字体都可以,比如说Arial, Verdana等,当然也可以是中文字体名,如宋体、黑体等。不过设置字体名称有个前提,那就是假设打开这个xls文件的客户机上有这种字体,如果没有,Excel将使用默认字体。
下面就是设置字体名称为“宋体”的代码:
font.FontName="宋体";
字号
与字号有关的属性有两个,一个是FontHeight,一个是FontHeightInPoints。区别在于,FontHeight的值是FontHeightInPoints的20倍,通常我们在Excel界面中看到的字号,比如说12,对应的是FontHeightInPoints的值,而FontHeight要产生12号字体的大小,值应该是240。所以通常建议你用FontHeightInPoint属性。
如果要设置字号为12,代码就是
font.FontHeightInPoints= 12;
字体颜色
这里可能会与CellStyle上的ForegroundColor和BackgroundColor产生混淆,其实所有的字体颜色都是在HSSFFont的实例上设置的,CellStyle的ForegroundColor和BackgroundColor分别指背景填充色和填充图案的颜色,和文本颜色无关。
要设置字体颜色,我们可以用HSSFFont.Color属性,颜色可以通过HSSFColor获得,代码如下所示:
font.Color =HSSFColor.RED.index;
这行代码把文本设置为红色。
下划线
通常我们所说的下划线都是单线条的,其实Excel支持好几种下划线,如下所示:
| 类型对 | 应的值 |
|---|---|
| 单下划线 | HSSFFont.U_SINGLE |
| 双下划线 | HSSFFont.U_DOUBLE |
| 会计用单下划线 | HSSFFont.U_SINGLE_ACCOUNTING |
| 会计用双下划线 | HSSFFont.U_DOUBLE_ACCOUNTING |
| 无下划线 | HSSFFont.U_NONE |
//当你要设置下划线时,可以用HSSFFont.Underline属性,这是一个byte类型的值,例如

font.Underline=HSSFFont.U_SINGLE
这行代码就是设置单下划线的代码。
上标下标
设置这东西可以用HSSFFont.TypeOffset属性,值有以下几种:
| TypeOffset的值 | 说明 |
|---|---|
| HSSFFont.SS_SUPER | 上标 |
| HSSFFont.SS_SUB | 下标 |
| HSSFFont.SS_NONE | 普通,默认值 |
所以如果你要上标的话,可以用下面的代码:
font.TypeOffset=HSSFFont.SS_SUPER;
删除线
设置这东西可以用HSSFFont.IsStrikeout属性,当为true时,表示有删除线;为false则表示没有删除线。
2.2.6 设置单元格宽高
设置单元格的高度实际是设置其所在行高,所以要在单元格所在行上设置行高,行高设置数值好像是像素点的1/20,所以*20以便达到设置效果;
设置单元格的宽度实际上是设置其所在列宽,所以要在单元格所在列上设置(列的设置在工作表上),宽度数值好像是字符的1/256,所以*256以便达到设置效果。
//设置单元格的高度
row.Height = 30 * 20;
//设置单元格的宽度
sheet.SetColumnWidth(0, 30 * 256);
2.2.7 添加公式
使用Cell的CellFormula来设置公式,是一个字符串,公式前不需要加=号。
//通过Cell的CellFormula向单元格中写入公式
//注:直接写公式内容即可,不需要在最前加'='
ICell cell2 = sheet.CreateRow(1).CreateCell(0);
cell2.CellFormula = "HYPERLINK(\"测试图片.jpg\",\"测试图片.jpg\")";
2.2.8 填充背景
ICellStyle titleStyle = workBook.CreateCellStyle();
titleStyle.FillForegroundColor = IndexedColors.SkyBlue.Index;
titleStyle.FillPattern = FillPattern.SolidForeground;
3,插入图片。
 /// <summary>
        /// 向Sheet中添加图片
        /// </summary>
        /// <param name="workbook">工作薄</param>
        /// <param name="picBytes">添加的图片</param>
        /// <param name="picType">图片类型</param>
        /// <param name="startRow">开始行号</param>
        /// <param name="startColumn">开始列号</param>
        /// <param name="endRow">结束的行号</param>
        /// <param name="endColumn">停止的行号</param>
        /// <param name="sheetAt">工作薄索引</param>
        void InsertImage(IWorkbook workbook, byte[] picBytes, PictureType picType, int startRow, int startColumn, int endRow, int endColumn, int sheetAt = 0)
        {
            //加入图片
            int ip = workbook.AddPicture(picBytes, picType);
            //获取sheet页,可以根据sheet页名称获取,也可以根据sheet页索引(从0开始)获取
            ISheet sheet = workbook.GetSheetAt(sheetAt);
            IDrawing drawing = sheet.CreateDrawingPatriarch();
            IClientAnchor anchor = workbook.GetCreationHelper().CreateClientAnchor();
            // 将图片插到相应的位置
            //左上角的行
            anchor.Row1 = startRow;
            //左上角的列
            anchor.Col1 = startColumn;
            //右下角的行
            anchor.Row2 = endRow;
            //右下角的列
            anchor.Col2 = endColumn;
            //dx1:图片左边相对excel格的位置(x偏移) 范围值为:0~1023;即输100 偏移的位置大概是相对于整个单元格的宽度的100除以1023大概是10分之一
            //dy1:图片上方相对excel格的位置(y偏移) 范围值为:0~256
            //dx2:图片右边相对excel格的位置(x偏移) 范围值为:0~1023
            //dy2:图片下方相对excel格的位置(y偏移) 范围值为:0~256
            //正数为向右偏移,负数为向左偏移
            anchor.Dx1 = 50;
            anchor.Dx2 = -50;
            anchor.Dy1 = 12;
            anchor.Dy2 = -12;
            //  anchor.AnchorType = AnchorType.DontMoveAndResize;
            IPicture picture = drawing.CreatePicture(anchor, ip);
        }
4,自动调整列宽。
sheet.AutoSizeColumn(col_Index)实际上自动调整列宽,效果并不如意,呈现的效果没有使用Excel组件效果好。
以下是自定义的方法进行调整。
 void AutoColumnWidth(ISheet sheet, int cols, IWorkbook workbook)
        {
            for (int col = 0; col < cols; col++)
            {
                sheet.AutoSizeColumn(col);//自适应宽度,但是其实还是比实际文本要宽
                int columnWidth = sheet.GetColumnWidth(col) / 256;//获取当前列宽度
                for (int rowIndex = 1; rowIndex <= sheet.LastRowNum; rowIndex++)
                {
                    IRow row = sheet.GetRow(rowIndex);
                    ICell cell = row.GetCell(col);
                    int mulite = 1;
                    //获取字体大小
                    if (rowIndex == 1)
                    {
                        double fontSize = cell.CellStyle.GetFont(workbook).FontHeightInPoints;
                        mulite = (int)Math.Ceiling(fontSize / 10);
                    }
                    int contextLength = Encoding.UTF8.GetBytes(cell.ToString()).Length * mulite;//获取当前单元格的内容宽度
                    columnWidth = columnWidth < contextLength ? contextLength : columnWidth;
                }
                sheet.SetColumnWidth(col, (columnWidth + 1) * 256);//
            }
5,应用。
using System.Text;
using NPOI.HSSF.UserModel;
using NPOI.XSSF.UserModel;
using System.IO;
using NPOI.SS.UserModel;
using NPOI.SS.Util;
using NPOI.HSSF.Util;
using System.Drawing;
namespace DbHelper.Common
{
    public class NPOIHelper
    {
        /// <summary>
        /// 将集合导出到Excel
        /// </summary>
        /// <typeparam name="T"></typeparam>
        /// <param name="fileName"></param>
        /// <param name="arr"></param>
        /// <param name="columnNames">需要输出的列集合,若非Null将按照顺序输出对应的列</param>
        /// <param name="sheetName"></param>
        /// <returns></returns>
        public bool ExportExcel<T>(string fileName, IList<T> arr, Dictionary<string, string> columnNames = null, string sheetName = "sheet1") where T : class
        {
            IWorkbook workBook;
            string ext = Path.GetExtension(fileName);
            if (ext.Equals(".xls", StringComparison.CurrentCultureIgnoreCase))
            {
                //表示为Excel2007以前的版本
                workBook = new HSSFWorkbook();
            }
            else if (ext.Equals(".xlsx", StringComparison.CurrentCultureIgnoreCase))
            {
                //表示为Excel2007以后的版本
                workBook = new XSSFWorkbook();
            }
            else
            {
                throw new ArgumentException("只能导出为Excel文件");
            }
            #region 1,各部分样式----------------------------------------------------
            //1.1,Title样式
            ICellStyle titleStyle = workBook.CreateCellStyle();
            IFont titleFont = workBook.CreateFont();
            //1.1.2,设置Title字体格式
            titleFont.FontName = "华文行楷";
            titleFont.FontHeightInPoints = 16;
            titleFont.Boldweight = (short)FontBoldWeight.Bold;
            //字体颜色
            titleFont.Color = IndexedColors.White.Index;
            titleStyle.SetFont(titleFont);
            titleStyle.Alignment = HorizontalAlignment.Center;
            titleStyle.VerticalAlignment = VerticalAlignment.Center;
            //1.1.3,设置填充的背景色
            titleStyle.FillForegroundColor = IndexedColors.SkyBlue.Index;
            titleStyle.FillPattern = FillPattern.SolidForeground;
            //1.2,列标题样式
            ICellStyle headerStyle = workBook.CreateCellStyle();
            headerStyle.Alignment = HorizontalAlignment.Center;
            headerStyle.VerticalAlignment = VerticalAlignment.Center;
            //style.WrapText = true;
            IFont headerFont = workBook.CreateFont();
            headerFont.FontName = "宋体";
            //指定字体大小
            // font.FontHeight = 14 * 20;
            headerFont.FontHeightInPoints = 14;
            //加粗
            headerFont.Boldweight = (short)FontBoldWeight.Bold;
            //字体颜色
            headerFont.Color = IndexedColors.Black.Index;
            headerStyle.SetFont(headerFont);
            //设置单元格填充色
            headerStyle.FillForegroundColor = HSSFColor.LightBlue.Index;
            //指定填充样式
            headerStyle.FillPattern = FillPattern.SolidForeground;
            //设置边框
            headerStyle.BorderBottom = BorderStyle.Thin;
            headerStyle.BottomBorderColor = IndexedColors.Black.Index;
            headerStyle.BorderTop = BorderStyle.Thin;
            headerStyle.TopBorderColor = IndexedColors.Black.Index;
            headerStyle.BorderLeft = BorderStyle.Thin;
            headerStyle.LeftBorderColor = IndexedColors.Black.Index;
            headerStyle.BorderRight = BorderStyle.Thin;
            headerStyle.RightBorderColor = IndexedColors.Black.Index;
            //1.3,内容样式
            ICellStyle contentStyle = workBook.CreateCellStyle();
            contentStyle.Alignment = HorizontalAlignment.Center;
            contentStyle.VerticalAlignment = VerticalAlignment.Center;
            //style.WrapText = true;
            IFont contentFont = workBook.CreateFont();
            contentFont.FontName = "微软雅黑";
            //指定字体大小
            //如果是使用FontHeight则需要乘以20倍,例如 font.FontHeight = 14 * 20;
            contentFont.FontHeightInPoints = 10;
            contentFont.Boldweight = (short)FontBoldWeight.Normal;
            //字体颜色
            contentFont.Color = IndexedColors.Black.Index;
            contentStyle.SetFont(contentFont);
            //设置单元格填充色
            contentStyle.FillForegroundColor = HSSFColor.White.Index;
            //指定填充样式
            contentStyle.FillPattern = FillPattern.SolidForeground;
            //设置边框
            contentStyle.BorderBottom = BorderStyle.Thin;
            contentStyle.BottomBorderColor = IndexedColors.Black.Index;
            contentStyle.BorderTop = BorderStyle.Thin;
            contentStyle.TopBorderColor = IndexedColors.Black.Index;
            contentStyle.BorderLeft = BorderStyle.Thin;
            contentStyle.LeftBorderColor = IndexedColors.Black.Index;
            contentStyle.BorderRight = BorderStyle.Thin;
            contentStyle.RightBorderColor = IndexedColors.Black.Index;
            #endregion
            //2,主体部分---------------------------
            ISheet sheet = workBook.CreateSheet(sheetName);
            //2.1,添加title行
            IRow titleRow = sheet.CreateRow(0);
            titleRow.HeightInPoints = 50;
            ICell titleCell = titleRow.CreateCell(0);
            titleCell.CellStyle = titleStyle;
            titleCell.SetCellValue(sheetName);
            //如果columnNames为null时,数据采用默认顺序全部输出
            List<PictureInfo> pictures = new List<PictureInfo>();
            bool hasPicture = false;
            if (columnNames == null)
            {
                System.Reflection.PropertyInfo[] propertys = typeof(T).GetProperties();
                //设置Title行合并区域
                sheet.AddMergedRegion(new CellRangeAddress(0, 0, 0, propertys.Length - 1));
                //2.2,添加列标题行
                IRow headerRow = sheet.CreateRow(1);
                headerRow.HeightInPoints = 35;
                int columnIndex = 0;
                foreach (var p in propertys)
                {
                    ICell cell = headerRow.CreateCell(columnIndex);
                    cell.CellStyle = headerStyle;
                    cell.SetCellValue(p.Name);
                    columnIndex++;
                }
                //2.3,添加内容行
                for (int i = 0; i < arr.Count; i++)
                {
                    IRow row = sheet.CreateRow(i + 2);
                    columnIndex = 0;
                    foreach (var p in propertys)
                    {
                        ICell cell = row.CreateCell(columnIndex);
                        var val = p.GetValue(arr[i]);
                        if (typeof(byte[]).IsInstanceOfType(val))
                        {
                            hasPicture = true;
                            byte[] imgBytes = val as byte[];
                            if (imgBytes.Length == 0)
                            {
                                imgBytes = GetDefaultImage();
                            }
                            pictures.Add(new PictureInfo { RowNum = i + 2, ColumnNum = columnIndex, Image = imgBytes });
                        }
                        else
                        {
                            cell.SetCellValue(val?.ToString());
                        }
                        cell.CellStyle = contentStyle;
                        columnIndex++;
                    }
                }
            }
            else
            {
                System.Reflection.PropertyInfo[] propertys = typeof(T).GetProperties();
                //设置Title行合并区域
                sheet.AddMergedRegion(new CellRangeAddress(0, 0, 0, columnNames.Count - 1));
                //2.2,添加列标题行
                IRow headerRow = sheet.CreateRow(1);
                int columnIndex = 0;
                headerRow.HeightInPoints = 35;
                foreach (var key in columnNames.Keys)
                {
                    ICell cell = headerRow.CreateCell(columnIndex);
                    cell.CellStyle = headerStyle;
                    cell.SetCellValue(columnNames[key]);
                    columnIndex++;
                }
                //2.3,添加内容行
                for (int i = 0; i < arr.Count; i++)
                {
                    IRow row = sheet.CreateRow(i + 2);
                    columnIndex = 0;
                    foreach (var key in columnNames.Keys)
                    {
                        ICell cell = row.CreateCell(columnIndex);
                        var val = propertys.First(item => item.Name.Equals(key)).GetValue(arr[i]);
                        //如果是byte[]则默认其是图片
                        if (typeof(byte[]).IsInstanceOfType(val))
                        {
                            hasPicture = true;
                            byte[] imgBytes = val as byte[];
                            if (imgBytes.Length == 0)
                            {
                                imgBytes = GetDefaultImage();
                            }
                            pictures.Add(new PictureInfo { RowNum = i + 2, ColumnNum = columnIndex, Image = imgBytes });
                        }
                        else
                        {
                            cell.SetCellValue(val?.ToString());
                        }
                        cell.CellStyle = contentStyle;
                        columnIndex++;
                    }
                }
            }
            //3,调整表格列宽
            AutoColumnWidth(sheet, sheet.GetRow(1).LastCellNum, workBook);
            //4,插入可能存在的图片
            //调整行高
            if (hasPicture)
            {
                for (int i = 0; i < arr.Count; i++)
                {
                    IRow row = sheet.GetRow(i + 2);
                    row.HeightInPoints = 100;
                }
            }
            var group = pictures.GroupBy(p => p.ColumnNum);
            foreach (var part in group)
            {
                //设置包含图片的单元格宽度
                sheet.SetColumnWidth(part.Key, 30 * 256);
                foreach (var info in part)
                {
                    InsertImage(workBook, info.Image, PictureType.PNG, info.RowNum, info.ColumnNum, info.RowNum + 1, info.ColumnNum + 1);
                }
            }
            //向表格中添加图片
            //byte[] bytes = File.ReadAllBytes("../../Picture/1.jpg");
            //InsertImage(workBook, bytes, PictureType.JPEG, 3, 5, 8, 7);
            using (FileStream fs = new FileStream(fileName, FileMode.Create))
            {
                workBook.Write(fs);
            }
            workBook.Close();
            //workBook.Dispose();
            return true;
        }
        /// <summary>
        /// 调整列宽
        /// </summary>
        /// <param name="sheet"></param>
        /// <param name="cols"></param>
        /// <param name="workbook"></param>
        void AutoColumnWidth(ISheet sheet, int cols, IWorkbook workbook)
        {
            for (int col = 0; col < cols; col++)
            {
                sheet.AutoSizeColumn(col);//自适应宽度,但是其实还是比实际文本要宽
                int columnWidth = sheet.GetColumnWidth(col) / 256;//获取当前列宽度
                for (int rowIndex = 1; rowIndex <= sheet.LastRowNum; rowIndex++)
                {
                    IRow row = sheet.GetRow(rowIndex);
                    ICell cell = row.GetCell(col);
                    int mulite = 1;
                    //获取字体大小
                    if (rowIndex == 1)
                    {
                        double fontSize = cell.CellStyle.GetFont(workbook).FontHeightInPoints;
                        mulite = (int)Math.Ceiling(fontSize / 10);
                    }
                    int contextLength = Encoding.UTF8.GetBytes(cell.ToString()).Length * mulite;//获取当前单元格的内容宽度
                    columnWidth = columnWidth < contextLength ? contextLength : columnWidth;
                }
                sheet.SetColumnWidth(col, (columnWidth + 1) * 256);//
            }
        }
        /// <summary>
        /// 向Sheet中添加图片
        /// </summary>
        /// <param name="workbook">工作薄</param>
        /// <param name="picBytes">添加的图片</param>
        /// <param name="picType">图片类型</param>
        /// <param name="startRow">开始行号</param>
        /// <param name="startColumn">开始列号</param>
        /// <param name="endRow">结束的行号</param>
        /// <param name="endColumn">停止的行号</param>
        /// <param name="sheetAt">工作薄索引</param>
        void InsertImage(IWorkbook workbook, byte[] picBytes, PictureType picType, int startRow, int startColumn, int endRow, int endColumn, int sheetAt = 0)
        {
            //加入图片
            int ip = workbook.AddPicture(picBytes, picType);
            //获取sheet页,可以根据sheet页名称获取,也可以根据sheet页索引(从0开始)获取
            ISheet sheet = workbook.GetSheetAt(sheetAt);
            IDrawing drawing = sheet.CreateDrawingPatriarch();
            IClientAnchor anchor = workbook.GetCreationHelper().CreateClientAnchor();
            // 将图片插到相应的位置
            //左上角的行
            anchor.Row1 = startRow;
            //左上角的列
            anchor.Col1 = startColumn;
            //右下角的行
            anchor.Row2 = endRow;
            //右下角的列
            anchor.Col2 = endColumn;
            //dx1:图片左边相对excel格的位置(x偏移) 范围值为:0~1023;即输100 偏移的位置大概是相对于整个单元格的宽度的100除以1023大概是10分之一
            //dy1:图片上方相对excel格的位置(y偏移) 范围值为:0~256
            //dx2:图片右边相对excel格的位置(x偏移) 范围值为:0~1023
            //dy2:图片下方相对excel格的位置(y偏移) 范围值为:0~256
            //正数为向右偏移,负数为向左偏移
            anchor.Dx1 = 50;
            anchor.Dx2 = -50;
            anchor.Dy1 = 12;
            anchor.Dy2 = -12;
            //  anchor.AnchorType = AnchorType.DontMoveAndResize;
            IPicture picture = drawing.CreatePicture(anchor, ip);
        }
        /// <summary>
        /// 获取默认图片
        /// </summary>
        /// <returns></returns>
        byte[] GetDefaultImage()
        {
            Bitmap map = new Bitmap(400, 400);
            using (Graphics g = Graphics.FromImage(map))
            {
                g.Clear(Color.SkyBlue);
                Font font = new Font("华文行楷", 50, FontStyle.Bold | FontStyle.Italic, GraphicsUnit.Pixel);
                string txt = "暂无图片";
                SizeF size = g.MeasureString(txt, font);
                PointF originPoint = new PointF((map.Width - size.Width) / 2, (map.Height - size.Height) / 2);
                g.DrawString(txt, font, Brushes.White, originPoint);
            }
            using (MemoryStream ms = new MemoryStream())
            {
                map.Save(ms, System.Drawing.Imaging.ImageFormat.Png);
                return ms.GetBuffer();
            }
        }
    }
    class PictureInfo
    {
        public int RowNum { get; set; }
        public int ColumnNum { get; set; }
        public byte[] Image { get; set; }
    }
}
private void btnExportExel_Click(object sender, EventArgs e)
{
DbHelper.Common.NPOIHelper excel = new DbHelper.Common.NPOIHelper();
if (stus == null || stus.Count == 0)
{
MessageBox.Show("没有可供导出的数据");
return;
}
using (SaveFileDialog sfd = new SaveFileDialog())
{
sfd.Filter = "xls文件|*.xls|xlsx文件|*.xlsx";
if (sfd.ShowDialog() == DialogResult.OK)
{
string filepath = sfd.FileName;
// excel.ExportExcel(filepath, ExportMsgCallBack, stus.ToArray());
//需要导出的列
Dictionary<string, string> dic = new Dictionary<string, string>
{
["StudentId"] = "Id",
["StudentName"] = "姓名",
["Image"] = "照片",
["Birthday"] = "生日",
["Age"] = "年龄",
["Gender"] = "性别",
["CardNo"] = "卡号",
["PhoneNumber"] = "手机号",
["StudentAddress"] = "地址",
["Logo"]="Logo"
};
if (excel.ExportExcel(filepath, stus, dic,"学员信息表"))
{
MessageBox.Show("导出到:" + sfd.FileName);
}
}
}
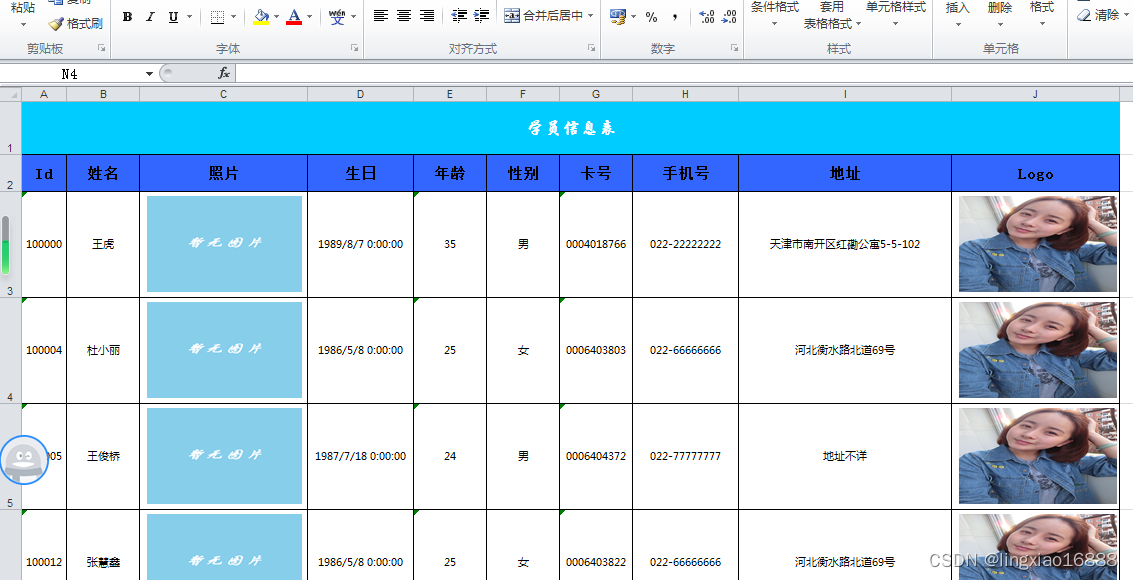
}6,效果。


 1万+
1万+

 被折叠的 条评论
为什么被折叠?
被折叠的 条评论
为什么被折叠?
 到【灌水乐园】发言


