


已经将近一个礼拜没写博客了,有些生疏。最近工作量还不是特别大,所以还可以忙里偷闲来写一篇博客。接下去的一个月里,事情比较多,项目进度非常紧,可能没机会写博客的。
今天想要分享的是自定义控件,自定义控件来许多项目中都会用到。但对刚开始学习Android的朋友来说,也许会比较陌生。我们就拿一个最常用的ListView来作为范例讲解,希望让大家对自定义View有一些比较直观的认识,从而能够写出自己所需要的自定义View.
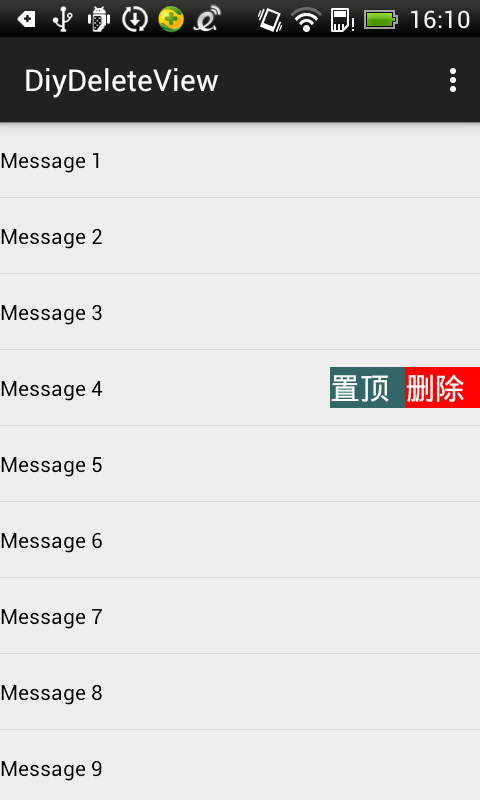
大家都知道,新版手机QQ侧滑有一个动画,出现两个TextView,分别是置顶和删除。在这里的话,我们只是做了一个简单的处理,并没有做出动画,而是进行了TextView的hide和show.同时对置顶和删除提供了监听接口,点击时做出相应的动作。具体的效果如图:
这是左滑相应的item时的情况:
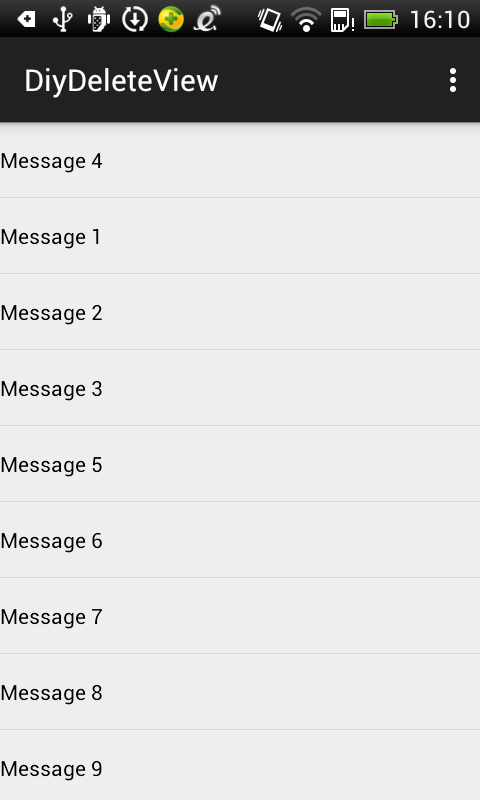
点击置顶时的情况,Message 4已经置顶,删除的情况就不展示了,和置顶的实现差不多:
首先来看一下我们的两个TextView的布局,采取的办法是用LinearLayout把他们包裹起来:
<?xml version="1.0" encoding="utf-8"?>
<LinearLayout xmlns:android="http://schemas.android.com/apk/res/android"
    android:orientation="horizontal"
    android:layout_width="wrap_content"
    android:layout_height="fill_parent">

    <TextView
        android:id="@+id/tv_top"
        android:layout_width="50dp"
        android:layout_height="fill_parent"
        android:visibility="visible"
        android:text="置顶"
        android:background="#336666"
        android:textSize="20sp"
        android:textColor="#ffffff"/>

    <TextView
        android:id="@+id/tv_delete"
        android:layout_width="50dp"
        android:layout_height="fill_parent"
        android:visibility="visible"
        android:text="删除"
        android:background="#FF0000"
        android:textSize="20sp"
        android:textColor="#ffffff"/>


</LinearLayout>
接着我们要在代码中来实现一个自定义View了。
public class DeleteListView extends ListView implements View.OnTouchListener, GestureDetector.OnGestureListener {

    private GestureDetector gestureDetector;

    private OnDeleteListener listener;

    private View layout;

    private View topTextVeiw;

    private View deleteTextView;

    private ViewGroup itemLayout;

    private int selectedItem;

    private boolean isDeleteShown;

    public DeleteListView(Context context, AttributeSet attrs) {
        super(context, attrs);
        gestureDetector = new GestureDetector(getContext(), this);
        setOnTouchListener(this);
    }

    public void setOnDeleteListener(OnDeleteListener l) {
        listener = l;
    }

    /**
     * 在onTouch()方法中进行判断,如果删除按钮已经显示了,就将它移除掉,
     * 如果删除按钮没有显示,就使用GestureDetector来处理当前手势
     */
    @Override
    public boolean onTouch(View v, MotionEvent event) {
        if (isDeleteShown) {
            itemLayout.removeView(layout);
            layout = null;
            isDeleteShown = false;
            return false;
        } else {
            return gestureDetector.onTouchEvent(event);
        }
    }

    @Override
    public boolean onDown(MotionEvent e) {
        if (!isDeleteShown) {
            // 强制转换成int
            // 首先是pointToPosition(int x, int y)
            // Android 官方的解释是” Maps a point to a position in the list”,
            // 可理解为通过x和y的位置来确定这个listView里面这个item的位置。
            selectedItem = pointToPosition((int) e.getX(), (int) e.getY());
        }
        return false;
    }

    @Override
    public void onShowPress(MotionEvent e) {

    }

    @Override
    public boolean onSingleTapUp(MotionEvent e) {
        return false;
    }

    @Override
    public boolean onScroll(MotionEvent e1, MotionEvent e2, float distanceX, float distanceY) {
        return false;
    }

    @Override
    public void onLongPress(MotionEvent e) {

    }

    /**
     * 当手指按下时,会调用OnGestureListener的onDown()方法,
     * 在这里通过pointToPosition()方法来判断出当前选中的是ListView的哪一行。
     * 当手指快速滑动时,会调用onFling()方法,在这里会去加载delete_button.xml这个布局,
     * 然后将删除按钮添加到当前选中的那一行item上。
     * 给删除按钮添加了一个点击事件,当点击了删除按钮时就会回调onDeleteListener的onDelete()方法,
     * 给置顶按钮添加一个点击事件,当点击了置顶按钮时就会回调onDeleteListener的onTop()方法
     * 在回调方法中应该去处理具体的置顶删除操作。
     */
    @Override
    public boolean onFling(MotionEvent e1, MotionEvent e2, float velocityX, float velocityY) {
        // 简单理解:鼠标手势相当于一个向量(当然有可能手势是曲线),
        // e1为向量的起点,e2为向量的终点,velocityX为向量水平方向的速度,velocityY为向量垂直方向的速度
        if (!isDeleteShown && (e1.getX()-e2.getX()>15) && Math.abs(velocityX) > Math.abs(velocityY)) {
            layout = LayoutInflater.from(getContext()).inflate(R.layout.delete_layout, null);
            topTextVeiw = layout.findViewById(R.id.tv_top);
            deleteTextView = layout.findViewById(R.id.tv_delete);
            deleteTextView.setOnClickListener(new OnClickListener() {
                @Override
                public void onClick(View v) {
                    itemLayout.removeView(layout);
                    layout = null;
                    //deleteTextView=null;
                    isDeleteShown = false;
                    listener.onDelete(selectedItem);
                }
            });

            topTextVeiw.setOnClickListener(new OnClickListener() {
                @Override
                public void onClick(View v) {
                    itemLayout.removeView(layout);
                    layout = null;
                    //deleteTextView=null;
                    isDeleteShown = false;
                    listener.onTop(selectedItem);
                }
            });

            // 一系列的LayoutParams设置
            itemLayout = (ViewGroup) getChildAt(selectedItem - getFirstVisiblePosition());
            RelativeLayout.LayoutParams params = new RelativeLayout.LayoutParams(
                    ViewGroup.LayoutParams.WRAP_CONTENT, ViewGroup.LayoutParams.MATCH_PARENT);
            params.addRule(RelativeLayout.ALIGN_PARENT_RIGHT);
            params.addRule(RelativeLayout.CENTER_VERTICAL);
            // 添加layout进入itemLayout
            itemLayout.addView(layout, params);
            isDeleteShown = true;

        }

        return false;
    }

    public interface OnDeleteListener {

        void onDelete(int index);

        void onTop(int index);

    }
}
首先自定义一个DeleteListView(命名有点不规范,包括下面的OnDeleteListener也是,有兴趣的可以下载源码自己修改),继承自ListView,实现了OnTouchListener和OnGestureListener,其中,OnGestureListener可以用来对一些常见手势实现监听。在这两个所提供的方法中,实现我们自己的复写。主要是对onTouch和onFling方法的复写。
首先我们是在onDown方法了使用了pointToPosition(int x, int y);这里Android 官方的解释是” Maps a point to a position in the list”,可理解为通过x和y的位置来确定这个listView里面这个item的位置,返回一个position.
在onTouch( )方法中,我们主要处理了这样一个逻辑:如果置顶删除已经显示出来了,我们点击屏幕的其它位置(除置顶删除这两个位置外),时,置顶删除就会消失。否则可能由于滑动不同的item导致满屏都是置顶删除了。
在onFling( )方法中,我们主要处理了左滑这样一个手势,并由此引发出来的引入置顶删除布局,并为相应的按钮设置监听。
onFling(MotionEvent e1, MotionEvent e2, float velocityX, float velocityY),它有四个参数,分别代表的意义是:
e1: The first down motion event that started the fling.手势起点的移动事件
e2: The move motion event that triggered the current onFling.当前手势点的移动事件
velocityX: The velocity of this fling measured in pixels per second along the x axis.每秒x轴方向移动的像素
velocityY: The velocity of this fling measured in pixels per second along the y axis.每秒y轴方向移动的像素
我们设置了if语句中设置(e1.getX()-e2.getX()>15)这一判断,为的是响应向左侧滑。如果去掉这一个判断,左滑右滑则都可以响应,不太满足实际情况。
置顶删除中监听的onClick中,就是一些remove操作,值得注意的是我们引入了一个listener,这个listener就是用setOnDeleteListener传进来的OnDeleteListener,它有一个接口,定义了两个方法onTop和onDelete用于实现回调的过程。在MainActivity中我们去写想要的回调函数。
注释比较多,逻辑也不复杂,理顺了就好。
有ListView必有适配器Adapter,我们也写了一个简单的adapter,这个地方基本都是一些规范性的东西,写多了就习惯了。
public class MyAdapter extends ArrayAdapter<String> {

    public MyAdapter(Context context, int resource, List<String> objects) {
        super(context, resource, objects);
    }

    @Override
    public View getView(int position, View convertView, ViewGroup parent) {
        View view;
        if (convertView == null) {
            view = LayoutInflater.from(getContext()).inflate(R.layout.list_view_item, null);
        } else {
            view = convertView;
        }
        TextView textView = (TextView) view.findViewById(R.id.text_view);
        textView.setText(getItem(position));
        return view;
    }
}
然后我们还需要去定义了ListView中item的布局以及MainActivity的布局:
item的布局,list_view_item
<?xml version="1.0" encoding="utf-8"?>
<RelativeLayout xmlns:android="http://schemas.android.com/apk/res/android"
    android:layout_width="match_parent"
    android:layout_height="match_parent"
    android:descendantFocusability="blocksDescendants">

    <TextView
        android:id="@+id/text_view"
        android:layout_width="wrap_content"
        android:layout_height="50dp"
        android:layout_centerVertical="true"
        android:gravity="left|center_vertical"
        android:textColor="#000" />

</RelativeLayout>
以及activity_main
<RelativeLayout xmlns:android="http://schemas.android.com/apk/res/android"
    xmlns:tools="http://schemas.android.com/tools" android:layout_width="match_parent"
    android:layout_height="match_parent"
    tools:context=".MainActivity">

    <com.diydeleteview.DeleteListView
        android:id="@+id/my_list_view"
        android:layout_width="match_parent"
        android:layout_height="wrap_content">

    </com.diydeleteview.DeleteListView>

</RelativeLayout>
直接利用com来引入我们之前写好的自定义View。然后就可以把它当作一个普通的控件,使用方法和普通的控件没有区别。
基本工作已经完成,我们再来看看MainActivity中的内容吧:
public class MainActivity extends AppCompatActivity {

    private DeleteListView myListView;

    private MyAdapter adapter;

    private List<String> contentList = new ArrayList<String>();

    @Override
    protected void onCreate(Bundle savedInstanceState) {
        super.onCreate(savedInstanceState);
        setContentView(R.layout.activity_main);
        initList();
        myListView = (DeleteListView) findViewById(R.id.my_list_view);
        myListView.setOnDeleteListener(new DeleteListView.OnDeleteListener() {
            @Override
            public void onDelete(int index) {
                contentList.remove(index);
                adapter.notifyDataSetChanged();
            }

            @Override
            public void onTop(int index) {
                String s = contentList.get(index);
                contentList.remove(index);
                contentList.add(0, s);
                adapter.notifyDataSetChanged();
            }
        });
        adapter = new MyAdapter(this, 0, contentList);
        myListView.setAdapter(adapter);

    }

    private void initList() {

        for (int i = 1; i <= 20; i++) {
            contentList.add("Message " + i);
        }
    }
}我们定义了一个ArrayList<String>的contenList,在contentList中加入通过initList()方法来产生数据源数组。初始化MyListView,并设置监听,重写回调onTop和onDelete,通过操作数据源的顺序来实现置顶和删除功能,notifyDataSetChanged( )来实现更新。
到此为此,我们就已经成功地实现了自定义ListView仿QQ消息的侧滑置顶删除了。写得比较简单,如果存在问题,欢迎大神们提出讨论。


 645
645

 被折叠的 条评论
为什么被折叠?
被折叠的 条评论
为什么被折叠?
 到【灌水乐园】发言


