


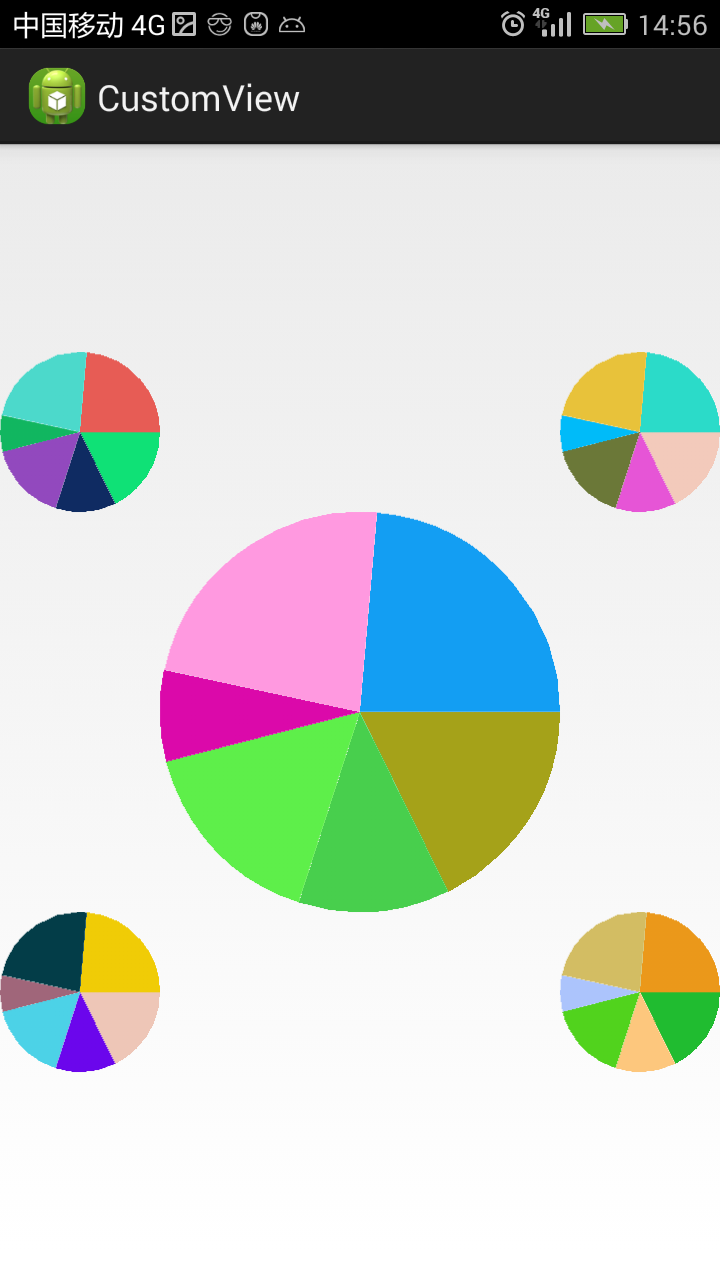
先展示下效果图:
接下来,我们将目标定义清楚:
目标是饼状图,那么,使用canvas画弧形是基础了。
既然是提供一个饼状图,那么,是需要自定义View的用户来使用的,就需要有数据的输入接口。
另外,还有View的属性,包括颜色以及View的大小(我用直径来表示)。
下面来具体实现:
1、自定义View的属性
在values下面新建一个attr.xml,现在里面定义我们的属性,
<?xml version="1.0" encoding="utf-8"?>
<resources>

    <attr name="diameter" format="dimension" />
    <attr name="backColor" format="color" />
    <attr name="frontColor" format="color" />

    <declare-styleable name="PieChartView">
        <attr name="backColor" />
        <attr name="frontColor" />
        <attr name="diameter" />
    </declare-styleable>

</resources>
2、在View的构造中获得属性
    public PieChartView(Context context, AttributeSet attrs, int defStyle)
    {
        super(context, attrs, defStyle);

        //获得我们所定义的自定义样式属性
        TypedArray a = context.getTheme().obtainStyledAttributes(attrs, R.styleable.PieChartView, defStyle, 0);
        int n = a.getIndexCount();
        for (int i = 0; i < n; i++)
        {
            int attr = a.getIndex(i);
            switch (attr)
            {
            case R.styleable.PieChartView_backColor:
                // 默认颜色设置为黑色
                mBackColor = a.getColor(attr, Color.BLACK);
                Log.i("view","mBackColor="+Integer.toHexString(mBackColor));
                break;
            case R.styleable.PieChartView_frontColor:
                // 默认颜色设置为黑色
                mFrontColor = a.getColor(attr, Color.BLACK);
                Log.i("view","mFrontColor="+Integer.toHexString(mFrontColor));
                break;
            case R.styleable.PieChartView_diameter:
                // 默认设置为40dp
                mDiameter = a.getDimensionPixelSize(attr, (int) TypedValue.applyDimension(
                        TypedValue.COMPLEX_UNIT_SP, 40, getResources().getDisplayMetrics()));
                break;
            }
        }
        a.recycle();

        mPaint = new Paint();
        random = new Random();
        rect = new RectF();

        //支持用户点击,重新绘图
        this.setOnClickListener(new OnClickListener()
        {
            @Override
            public void onClick(View v)
            {
                postInvalidate();
            }
        });
    }
3、重写onMeasure
    protected void onMeasure(int widthMeasureSpec, int heightMeasureSpec)
    {
        int width = 0;
        int height = 0;
        //设定直径的最小值
        if(mDiameter<40){
            mDiameter=40;
        }
        height=mDiameter;
        width=mDiameter;
        Log.i("view","w="+width+" h="+height);
        setMeasuredDimension(width, height);
    }
4、重写onDraw
    protected void onDraw(Canvas canvas)
    {
        mPaint.setColor(Color.YELLOW);
        int width = getMeasuredWidth();
        int height = getMeasuredHeight();

        //保证输入数据的有效性
        if(inputData==null){
            Log.i("view","inputData is null");
            return;
        }
        if((inputData.length==0)){
            Log.i("view","inputData is invalid: lenth=0");
            return;
        }

        //将数据转换为角度
        int num=inputData.length;
        float[] angles=new float[num];
        int[] colors=new int[num];
        Double sum=0.0;
        for(int i=0;i<num;i++){
            sum+=inputData[i];
        }
        if(sum==0){
            Log.i("view","inputData is invalid: sum=0");
            return;
        }
        float angleSum=0;
        for(int i=0;i<num;i++){
            angles[i]=(float)(inputData[i]*360/sum);
            angleSum+=angles[i];
            Log.i("view","angles["+i+"]="+angles[i]+" sum="+angleSum);
        }

        //产生随机颜色值
        int r,g,b;
        for(int i=0;i<num;i++){
            r=random.nextInt(256);
            g=random.nextInt(256);
            b=random.nextInt(256);
            colors[i]=Color.argb(255, r, g, b);
            Log.i("view","colors["+i+"]="+Integer.toHexString(colors[i]));
        }
        Log.i("view","mBackColor="+Integer.toHexString(mBackColor)+"mFrontColor="+Integer.toHexString(mFrontColor));
        mPaint.setColor(mFrontColor);

        //画出饼状图
        float startAngle=0;
        float sweepAngle=0;
        rect.set(0, 0, width, height);
        for(int i=0;i<num;i++){
            startAngle+=sweepAngle;
            sweepAngle=angles[i];
            mPaint.setColor(colors[i]);
            canvas.drawArc(rect, startAngle, sweepAngle, true, mPaint);
        }
    }
5、提供对外接口
这是一个很重要的对外接口,用于获取饼状图中各部分的原始数据:
    public Boolean setInputData(Double[] inputData1){
        if(inputData1.length>0){
            this.inputData = new Double[inputData1.length];
            System.arraycopy(inputData1, 0, this.inputData, 0, inputData1.length);
            Log.i("view","inputData.length="+this.inputData.length);
            return true;
        } else {
            return false;
        }
    }
6、在布局文件中使用
在布局文件中我定义了5个view,中间一个大的,四角四个小的,这样效果比较炫:
<RelativeLayout xmlns:android="http://schemas.android.com/apk/res/android"
    xmlns:tools="http://schemas.android.com/tools"
    xmlns:custom="http://schemas.android.com/apk/res/com.customview"
    android:layout_width="match_parent"
    android:layout_height="match_parent" >

     <com.customview.view.PieChartView
        android:id="@+id/pie_chart_view1"
        android:layout_width="wrap_content"
        android:layout_height="wrap_content"
        android:layout_centerHorizontal="true"
        android:layout_centerVertical="true"
        android:padding="10dp"
        custom:backColor="#ff203030"
        custom:frontColor="#ff60E0E0"
        custom:diameter="200dp"
        />

     <com.customview.view.PieChartView
        android:id="@+id/pie_chart_view2"
        android:layout_width="wrap_content"
        android:layout_height="wrap_content"
        android:layout_toLeftOf="@id/pie_chart_view1"
        android:layout_below="@id/pie_chart_view1"
        android:layout_centerHorizontal="true"
        android:padding="10dp"
        custom:backColor="#ff203030"
        custom:frontColor="#ff60E0E0"
        custom:diameter="80dp"
        />

     <com.customview.view.PieChartView
        android:id="@+id/pie_chart_view3"
        android:layout_width="wrap_content"
        android:layout_height="wrap_content"
        android:layout_toRightOf="@id/pie_chart_view1"
        android:layout_below="@id/pie_chart_view1"
        android:layout_centerHorizontal="true"
        android:padding="10dp"
        custom:backColor="#ff203030"
        custom:frontColor="#ff60E0E0"
        custom:diameter="80dp"
        />

     <com.customview.view.PieChartView
        android:id="@+id/pie_chart_view4"
        android:layout_width="wrap_content"
        android:layout_height="wrap_content"
        android:layout_toLeftOf="@id/pie_chart_view1"
        android:layout_above="@id/pie_chart_view1"
        android:layout_centerHorizontal="true"
        android:padding="10dp"
        custom:backColor="#ff203030"
        custom:frontColor="#ff60E0E0"
        custom:diameter="80dp"
        />

     <com.customview.view.PieChartView
        android:id="@+id/pie_chart_view5"
        android:layout_width="wrap_content"
        android:layout_height="wrap_content"
        android:layout_toRightOf="@id/pie_chart_view1"
        android:layout_above="@id/pie_chart_view1"
        android:layout_centerHorizontal="true"
        android:padding="10dp"
        custom:backColor="#ff203030"
        custom:frontColor="#ff60E0E0"
        custom:diameter="80dp"
        />

</RelativeLayout>
7、在activity中使用
主要是产生饼状图的原始数据,并送给自定义View来使用:
package com.customview;

import android.os.Bundle;
import android.util.Log;
import java.util.Random;
import com.customview.view.PieChartView;
import android.app.Activity;

public class MainActivity extends Activity
{
    PieChartView pie_chart_view1;
    PieChartView pie_chart_view2;
    PieChartView pie_chart_view3;
    PieChartView pie_chart_view4;
    PieChartView pie_chart_view5;

    @Override
    protected void onCreate(Bundle savedInstanceState)
    {
        super.onCreate(savedInstanceState);
        setContentView(R.layout.activity_main);

        pie_chart_view1 = (PieChartView)findViewById(R.id.pie_chart_view1);
        pie_chart_view2 = (PieChartView)findViewById(R.id.pie_chart_view2);
        pie_chart_view3 = (PieChartView)findViewById(R.id.pie_chart_view3);
        pie_chart_view4 = (PieChartView)findViewById(R.id.pie_chart_view4);
        pie_chart_view5 = (PieChartView)findViewById(R.id.pie_chart_view5);

        //产生随机数据,做为饼状图的输入
        Double[] inputData = new Double[6];
        Random random = new Random();
        for(int i=0;i<inputData.length;i++){
            inputData[i]=random.nextDouble()*30;
            Log.i("view", "log: inputData["+i+"]="+inputData[i]);
        }

        pie_chart_view1.setInputData(inputData);
        pie_chart_view2.setInputData(inputData);
        pie_chart_view3.setInputData(inputData);
        pie_chart_view4.setInputData(inputData);
        pie_chart_view5.setInputData(inputData);

    }

}
至此,完美收工。
这样就实现了一个自定义的饼状图,里面每一部分的颜色是随机生成的。同时,这个自定义View支持点击,每次点击,会重新执行onDraw,而在onDraw里面,又更新了颜色,所以,每次点击,会修改饼状图的颜色,效果杠杠滴!
完整代码见如下地址:
http://download.csdn.net/detail/lintax/9615083


 1522
1522

 被折叠的 条评论
为什么被折叠?
被折叠的 条评论
为什么被折叠?
 到【灌水乐园】发言


