


今天项目中碰到一个需求,就是在填信用卡的时候,需要填信用卡的有效期(包括年月,没有日),但是正常的日期选择器都是有日的。。。。另外项目中希望弹出个dialog来显示日期选择器,所以这里采用DatePickerDialog。
实现的效果是:无论在什么语言的系统下,都只显示年月,并且月在前,年在后(在英文的系统中,是mmddyy的顺序,但是在中文系统中是yymmdd的顺序)
看下代码:
        final Calendar calendar = Calendar.getInstance();
        int yy = calendar.get(Calendar.YEAR);
        int mm = calendar.get(Calendar.MONTH);
        int dd = calendar.get(Calendar.DAY_OF_MONTH);

        DatePickerDialog dlg = new DatePickerDialog(new ContextThemeWrapper(getActivity(),
                android.R.style.Theme_Holo_Light_Dialog_NoActionBar), null, yy, mm, dd) {
            @Override
            protected void onCreate(Bundle savedInstanceState) {
                super.onCreate(savedInstanceState);
                LinearLayout mSpinners = (LinearLayout) findViewById(getContext().getResources().getIdentifier("android:id/pickers", null, null));
                if (mSpinners != null) {
                    NumberPicker mMonthSpinner = (NumberPicker) findViewById(getContext().getResources().getIdentifier("android:id/month", null, null));
                    NumberPicker mYearSpinner = (NumberPicker) findViewById(getContext().getResources().getIdentifier("android:id/year", null, null));
                    mSpinners.removeAllViews();
                    if (mMonthSpinner != null) {
                        mSpinners.addView(mMonthSpinner);
                    }
                    if (mYearSpinner != null) {
                        mSpinners.addView(mYearSpinner);
                    }
                }
                View dayPickerView = findViewById(getContext().getResources().getIdentifier("android:id/day", null, null));
                if(dayPickerView != null){
                    dayPickerView.setVisibility(View.GONE);
                }
            }

            @Override
            public void onDateChanged(DatePicker view, int year, int month, int day) {
                super.onDateChanged(view, year, month, day);
                setTitle("请选择信用卡有效期");
            }
        };
        dlg.setTitle("请选择信用卡有效期");
运行上述代码的效果是这样的:
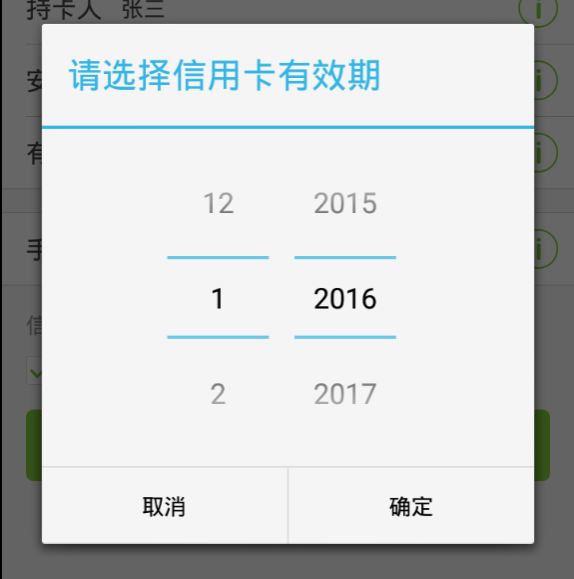
怎么样,是不是好看了很多?效果的变化来源于在声明DatePickerDialog的时候,传了一个主题theme给它:
new ContextThemeWrapper(getActivity(),android.R.style.Theme_Holo_Light_Dialog_NoActionBar)
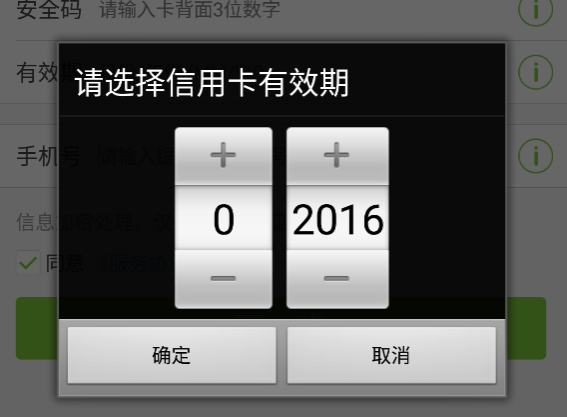
如果没有传入style的话,长这个样子:
现在再来看看,是如何做到隐藏日的选择器,只显示年和月的,并且让月显示在年前面的。
在DatePickerDialog中,也是有一个DatePicker的,现在来看下DatePicker的代码,我找到了他引用的layout资源:

打开该资源文件:
<?xml version="1.0" encoding="utf-8"?>
<!--
**
** Copyright 2007, The Android Open Source Project
**
** Licensed under the Apache License, Version 2.0 (the "License");
** you may not use this file except in compliance with the License.
** You may obtain a copy of the License at
**
**     http://www.apache.org/licenses/LICENSE-2.0
**
** Unless required by applicable law or agreed to in writing, software
** distributed under the License is distributed on an "AS IS" BASIS,
** WITHOUT WARRANTIES OR CONDITIONS OF ANY KIND, either express or implied.
** See the License for the specific language governing permissions and
** limitations under the License.
*/
-->

<!-- Layout of date picker-->

<!-- Warning: everything within the "pickers" layout is removed and re-ordered
     depending on the date format selected by the user.
-->
<LinearLayout xmlns:android="http://schemas.android.com/apk/res/android"
    android:layout_width="fill_parent"
    android:layout_height="fill_parent"
    android:layout_gravity="center_horizontal"
    android:orientation="horizontal"
    android:gravity="center">

    <LinearLayout android:id="@+id/pickers"
        android:layout_width="wrap_content"
        android:layout_height="wrap_content"
        android:layout_weight="1"
        android:orientation="horizontal"
        android:gravity="center">

        <!-- Month -->
        <NumberPicker
            android:id="@+id/month"
            android:layout_width="wrap_content"
            android:layout_height="wrap_content"
            android:layout_marginStart="1dip"
            android:layout_marginEnd="1dip"
            android:focusable="true"
            android:focusableInTouchMode="true"
            />

        <!-- Day -->
        <NumberPicker
            android:id="@+id/day"
            android:layout_width="wrap_content"
            android:layout_height="wrap_content"
            android:layout_marginStart="1dip"
            android:layout_marginEnd="1dip"
            android:focusable="true"
            android:focusableInTouchMode="true"
            />

        <!-- Year -->
        <NumberPicker
            android:id="@+id/year"
            android:layout_width="wrap_content"
            android:layout_height="wrap_content"
            android:layout_marginStart="1dip"
            android:layout_marginEnd="1dip"
            android:focusable="true"
            android:focusableInTouchMode="true"
            />

    </LinearLayout>

    <!-- calendar view -->
    <CalendarView
        android:id="@+id/calendar_view"
        android:layout_width="245dip"
        android:layout_height="280dip"
        android:layout_marginStart="44dip"
        android:layout_weight="1"
        android:focusable="true"
        android:focusableInTouchMode="true"
        android:visibility="gone"
        />

</LinearLayout>
看到了吧,其实内部是三个NumberPicker,外部的布局是LinearLayout,横向排列。那我在想隐藏日的选择器很简单,直接获取该view,然后设置为gone就好了。(看上面的代码你就懂了,这里不说明了)
但是再一看代码,发现该layout原来的顺序就是month-day-year,那为什么中文系统中会修改顺序呢?继续找代码!
往下翻找,找到了一个reorderSpinner的方法,原来就是这段代码,根据当前系统的语言,来重排序了!
/**
         * Reorders the spinners according to the date format that is
         * explicitly set by the user and if no such is set fall back
         * to the current locale's default format.
         */
        private void reorderSpinners() {
            mSpinners.removeAllViews();
            // We use numeric spinners for year and day, but textual months. Ask icu4c what
            // order the user's locale uses for that combination. http://b/7207103.
            String pattern = DateFormat.getBestDateTimePattern(Locale.getDefault(), "yyyyMMMdd");
            char[] order = ICU.getDateFormatOrder(pattern);
            final int spinnerCount = order.length;
            for (int i = 0; i < spinnerCount; i++) {
                switch (order[i]) {
                    case 'd':
                        mSpinners.addView(mDaySpinner);
                        setImeOptions(mDaySpinner, spinnerCount, i);
                        break;
                    case 'M':
                        mSpinners.addView(mMonthSpinner);
                        setImeOptions(mMonthSpinner, spinnerCount, i);
                        break;
                    case 'y':
                        mSpinners.addView(mYearSpinner);
                        setImeOptions(mYearSpinner, spinnerCount, i);
                        break;
                    default:
                        throw new IllegalArgumentException(Arrays.toString(order));
                }
            }
        }


 775
775

 被折叠的 条评论
为什么被折叠?
被折叠的 条评论
为什么被折叠?
 到【灌水乐园】发言


