积累的问题多了,就不怕问题来。
一,Eclipse配置问题
1.启动项目,内存溢出
Eclipse->Window->Preferences->Server->RuntimeEnvironments->选中Apache Tomcat v5.0->点击Edit按钮->在弹出对话框里点击JRE后面的InstalledJREs按钮->在弹出对话框中选中tomcat使用的那个JRE->点击Edit按钮->在弹出对话框中,找到DefaultVM Arguments,并在输入框中输入:-Xms512M-Xmx1024M -XX:MaxPermSize=512m,然后finish->OK->OK。
2.java文件,实心J变成了空心J
http://blog.sina.com.cn/s/blog_a7d7993f0102wcp3.html
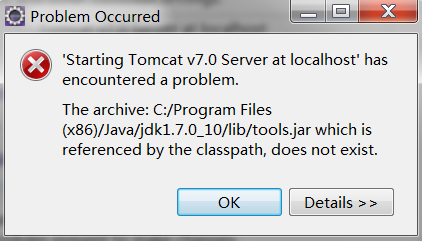
3.修改了JDK后,启动tomcat报错,提示:
The archive: C:/Program Files(x86)/Java/jdk1.7.0_10/lib/tools.jar which is referenced by the classpath, doesnot exist.
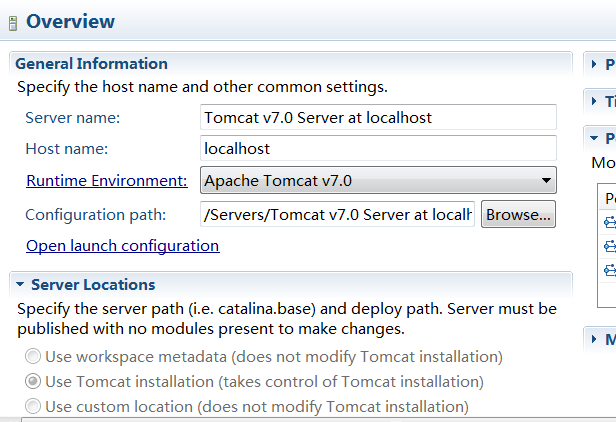
打开Eclipse中tomcat配置,就是双击server选项卡中的tomcat,然后选择openlaunch configuration,如下图所示:
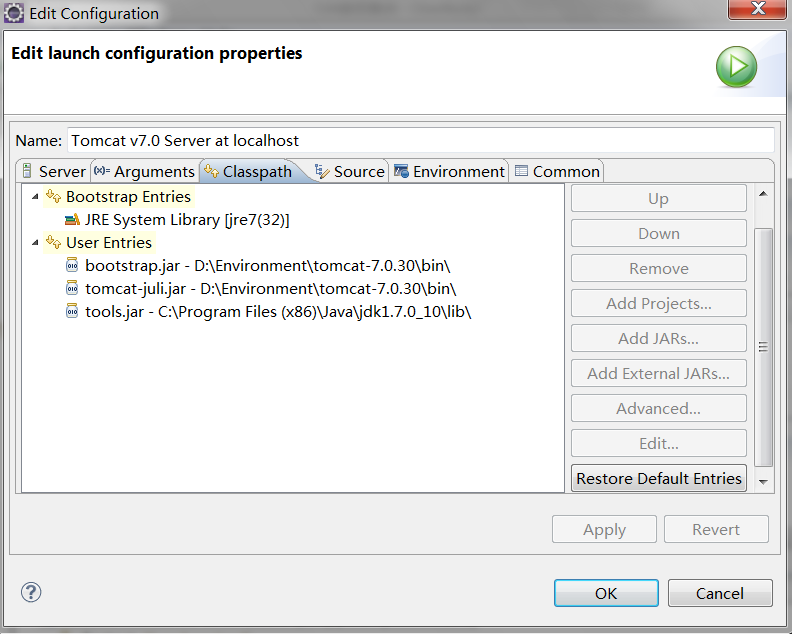
打开以后会出现如下界面:
如上图所示,我标注出了错误路径,将这个错误路径删除,并保证正确配置tools.jar和bootstrap.jar这两个jar包的路径。
二,开发问题
1.struts2:
配置多个拦截器,before正常执行所有拦截器,after只执行最后一个拦截器,待解决。
2.ibatis连接数据库mysql
报错内容: Connection is read-only. Queries leading to data modification are not allowed
(连接是只读的。查询导致数据修改不允许)
问题原因,在spring中没有配置事务的权限:
<bean id="baseTransactionProxy"
		class="org.springframework.transaction.interceptor.TransactionProxyFactoryBean"
		abstract="true">
		<property name="transactionManager" ref="transactionManager" />
		<property name="transactionAttributes">
			<props>
				<prop key="insertSynchronized*">PROPAGATION_REQUIRES_NEW</prop>
				<prop key="insert*">PROPAGATION_REQUIRED</prop>
				<prop key="create*">PROPAGATION_REQUIRED</prop>
				<prop key="add*">PROPAGATION_REQUIRED</prop>
				<prop key="update*">PROPAGATION_REQUIRED</prop>
				<prop key="reset*">PROPAGATION_REQUIRED</prop>
				<prop key="delete*">PROPAGATION_REQUIRED</prop>
				<prop key="del*">PROPAGATION_REQUIRED</prop>
				<prop key="save*">PROPAGATION_REQUIRED</prop>
				<prop key="edit*">PROPAGATION_REQUIRED</prop>
				<prop key="release*">PROPAGATION_REQUIRED</prop>
				<prop key="modify*">PROPAGATION_REQUIRED</prop>
				<prop key="change*">PROPAGATION_REQUIRED</prop>
				<prop key="invoke*">PROPAGATION_REQUIRED</prop>
				<prop key="submit*">PROPAGATION_REQUIRED</prop>
				<prop key="batchImport*">PROPAGATION_REQUIRED</prop>
				<prop key="flush*">PROPAGATION_REQUIRED</prop>
				<prop key="excute*">PROPAGATION_REQUIRED</prop>
				<prop key="replace*">PROPAGATION_REQUIRED</prop>
				<prop key="export*">PROPAGATION_REQUIRED</prop>
				<prop key="*">PROPAGATION_REQUIRED,readOnly</prop>
			</props>
		</property>
	</bean>
2.spring 配置
在application.xml中添加
<context:component-scan base-package="com.core.mvc" />报错:The prefix "context" for element "context:component-scan" is not bound.
将<beans>里面的内容从
<beans xmlns="http://www.springframework.org/schema/beans"
	xmlns:xsi="http://www.w3.org/2001/XMLSchema-instance" xmlns:aop="http://www.springframework.org/schema/aop"
	xmlns:tx="http://www.springframework.org/schema/tx"
	xsi:schemaLocation="http://www.springframework.org/schema/beans http://www.springframework.org/schema/beans/spring-beans-2.5.xsd
           http://www.springframework.org/schema/aop http://www.springframework.org/schema/aop/spring-aop-2.5.xsd
           http://www.springframework.org/schema/tx http://www.springframework.org/schema/tx/spring-tx-2.5.xsd"
	default-autowire="byName" default-lazy-init="true">
改为
<beans xmlns="http://www.springframework.org/schema/beans"
	xmlns:xsi="http://www.w3.org/2001/XMLSchema-instance" xmlns:context="http://www.springframework.org/schema/context"
	xmlns:aop="http://www.springframework.org/schema/aop"
	xsi:schemaLocation="http://www.springframework.org/schema/beans
           http://www.springframework.org/schema/beans/spring-beans-2.5.xsd
           http://www.springframework.org/schema/context
           http://www.springframework.org/schema/context/spring-context-2.5.xsd
http://www.springframework.org/schema/aop http://www.springframework.org/schema/aop/spring-aop-2.5.xsd">3.springmvc
3.1 springmvc 传参
controller
@Controller
@RequestMapping("/test")
public class MyController {
	@Resource
	MyService myService;


	@RequestMapping("/lzz")
	public String test(HttpServletRequest request,
			HttpServletResponse response, User user) {
		System.out.println(user.getUsername());
		myService.login(user.getUsername());
		return "test";
	}
user对象:
package com.core.mvc.model;

public class User {
	private int age;
	private String username;
	private String password;

	public int getAge() {
		return age;
	}

	public void setAge(int age) {
		this.age = age;
	}

	public String getUsername() {
		return username;
	}

	public void setUsername(String username) {
		this.username = username;
	}

	public String getPassword() {
		return password;
	}

	public void setPassword(String password) {
		this.password = password;
	}
}
jsp:
	<form action="<%=path%>/test/lzz">
		<input type="text" name="user.username">
		<input type="text" name="user.password">
		<input type="submit" value="test_lzz">
</form> <form action="<%=path%>/test/lzz">
<input type="text" name="username">
<input type="text" name="password">
<input type="submit" value="test_lzz">
</form>能在后台获取参数!!!
这里必须用name="test"而不是user.name="test",因为默认情况下springMVC是不支持user.name这种传参方式的。
参考地址:http://blog.csdn.net/subuser/article/details/19919121
mysql连接出错,提示:java.sql.SQLException: Unknown system variable 'language'
原因:mysql的驱动版本过高,修改:
mysql-connector-java-5.1.36.jar 版本太高了,换成
mysql-connector-java-5.1.24.jar 问题解决!


 478
478

 被折叠的 条评论
为什么被折叠?


