


1、简介
最近打算搭建一个鉴权中心服务,采用springboot+FastMybatis装配Druid,考虑后续拓展采用Druid多数据源配置,以一个数据源为主,多个动态数据源为辅的结构。除了数据库,后续会结合shiro安全框架来搭建。
2、引用
在pom.xml添加框架Springboot +FastMybatis + Druid相关maven引用。
<dependency>
    <groupId>org.springframework.boot</groupId>
    <artifactId>spring-boot-starter-web</artifactId>
</dependency>
<dependency>
    <groupId>net.oschina.durcframework</groupId>
    <artifactId>fastmybatis-spring-boot-starter</artifactId>
    <version>${fastmybatis.version}</version>
</dependency>
<dependency>
    <groupId>com.alibaba</groupId>
    <artifactId>druid-spring-boot-starter</artifactId>
    <version>${druid.version}</version>
</dependency>
<dependency>
    <groupId>org.apache.shiro</groupId>
    <artifactId>shiro-core</artifactId>
    <version>${shiro.version}</version>
</dependency>
<dependency>
    <groupId>org.apache.shiro</groupId>
    <artifactId>shiro-spring</artifactId>
    <version>${shiro.version}</version>
</dependency>
3、数据源队列
我们采用的是一个数据源为主,多个动态数据源为辅的结构,在后续添加新的数据源,我们只要调整新数据源配置就可以了,不用再改原来结构。所以我们要有自己的数据源队列来存储动态的数据源。
/**
* 多数据源队列
*
* @author lisk
*/
public class DynamicContextUtils {

    private static final ThreadLocal<Deque<String>> CONTEXT = new ThreadLocal() {
        @Override
        protected Object initialValue() {
            return new ArrayDeque();
        }
    };

    /**
     * 获得当前线程数据源
     *
     * @return 数据源名称
     */
    public static String peek() {
        return CONTEXT.get().peek();
    }

    /**
     * 设置当前线程数据源
     *
     * @param dataSource 数据源名称
     */
    public static void push(String dataSource) {
        CONTEXT.get().push(dataSource);
    }

    /**
     * 清空当前线程数据源
     */
    public static void poll() {
        Deque<String> deque = CONTEXT.get();
        deque.poll();
        if (deque.isEmpty()) {
            CONTEXT.remove();
        }
    }

}
4、数据源切面
首先我们要添加自己的annotion,并可以切面中可以拦截并加载动态数据源。
@Target({ElementType.METHOD, ElementType.TYPE})
@Retention(RetentionPolicy.RUNTIME)
@Documented
@Inherited
public @interface DataSource {
    String value() default "";
}
现在我们在切面中拦截自己添加的annotion,然后通过@Aspect添加到我们定义的数据源队列中。
@Aspect
@Component
@Order(Ordered.HIGHEST_PRECEDENCE)
public class DataSourceAspect {
    protected Logger logger = LoggerFactory.getLogger(DataSourceAspect.class);

    @Pointcut("@annotation(com.xhl.lk.auth2.datasource.annotation.DataSource)" +
            "|| @within(com.xhl.lk.auth2.datasource.annotation.DataSource)")
    public  void dataSourcePointCut(){

    }

    @Around("dataSourcePointCut()")
    public  Object around(@NotNull ProceedingJoinPoint point) throws Throwable{
        MethodSignature signature = (MethodSignature) point.getSignature();
        Class targetClass = point.getTarget().getClass();
        Method method = signature.getMethod();

        DataSource targetDataSource = (DataSource) targetClass.getAnnotation(DataSource.class);
        DataSource methodDataSource = method.getAnnotation(DataSource.class);
        if(Objects.nonNull(targetDataSource) || Objects.nonNull(methodDataSource)){

            String value = Objects.nonNull(methodDataSource) ? methodDataSource.value() : targetDataSource.value();
            DynamicContextUtils.push(value);
            logger.debug("set datasource is {}", value);
        }

        try{
            return point.proceed();
        }finally {
            DynamicContextUtils.poll();
            logger.info("clean datasource");
        }
    }
}
5、数据源属性
添加Druid主数据源和动态数据源参数映射类,以便可以通过映射来调整和链接数据库。
/**
 * 多数据源属性
 *
 * @author lisk
 */
@Data
public class DataSourceProperty {
    private String driverClassName;
    private String url;
    private String username;
    private String password;

    /**
     * Druid默认参数
     */
    private int initialSize = 2;
    private int maxActive = 10;
    private int minIdle = -1;
    private long maxWait = 60 * 1000L;
    private long timeBetweenEvictionRunsMillis = 60 * 1000L;
    private long minEvictableIdleTimeMillis = 1000L * 60L * 30L;
    private long maxEvictableIdleTimeMillis = 1000L * 60L * 60L * 7;
    private String validationQuery = "select 1";
    private int validationQueryTimeout = -1;
    private boolean testOnBorrow = false;
    private boolean testOnReturn = false;
    private boolean testWhileIdle = true;
    private boolean poolPreparedStatements = false;
    private int maxOpenPreparedStatements = -1;
    private boolean sharePreparedStatements = false;
    private String filters = "stat,wall";
}
动态数据源属性以当前主数据源为主,从队列中获取。通过@ConfigurationProperties来标识动态数据源前缀。
@Data
@ConfigurationProperties(prefix = "dynamic")
public class DynamicDataSourceProperty {
    private Map<String, DataSourceProperty> datasource = new LinkedHashMap<>();
}
我们在配置文件application.yml定义多个数据源配置:
spring:
    datasource:
        type: com.alibaba.druid.pool.DruidDataSource
        druid:
            driver-class-name: com.mysql.cj.jdbc.Driver
            url: jdbc:mysql://192.168.254.128:3306/sys_xhl?useUnicode=true&characterEncoding=UTF-8&useSSL=false&serverTimezone=Asia/Shanghai
            username: shdxhl
            password: shdxhl
            initial-size: 10
            max-active: 100
            min-idle: 10
            max-wait: 60000
            pool-prepared-statements: true
            max-pool-prepared-statement-per-connection-size: 20
            time-between-eviction-runs-millis: 60000
            min-evictable-idle-time-millis: 300000
            #Oracle需要打开注释
            #validation-query: SELECT 1 FROM DUAL
            #spring.datasource.druid.test-on-borrow=true
            #spring.datasource.druid.test-while-idle=true
            test-while-idle: true
            test-on-borrow: true
            test-on-return: false
            stat-view-servlet:
                enabled: true
                url-pattern: /druid/*
                #login-username: admin
                #login-password: admin
            filter:
                stat:
                    log-slow-sql: true
                    slow-sql-millis: 1000
                    merge-sql: false
                wall:
                    config:
                        multi-statement-allow: true
##多数据源的配置
dynamic:
  datasource:
    slave1:
        driver-class-name: com.mysql.cj.jdbc.Driver
        url: jdbc:mysql://192.168.254.128:3306/blog_weike?useUnicode=true&characterEncoding=UTF-8&useSSL=false&serverTimezone=Asia/Shanghai
        username: blog
        password: wiloveyou
#    slave2:
#      driver-class-name: org.postgresql.Driver
#      url: jdbc:postgresql://localhost:5432/renren_security
#      username: renren
#      password: 123456
6、Config初始化
在@Configuration中实现主数据源和多个动态数据源数据链接初始化,同时通过继承AbstractRoutingDataSource来实现动态数据源切换。
//通过重载determineCurrentLookupKey 来获取切换的数据源Key。
public class DynamicDataSource extends AbstractRoutingDataSource {
    @Override
    protected Object determineCurrentLookupKey() {
        return DynamicContextUtils.peek();
    }
}
创建一个Dynamic数据源的Factory来实现动态数据源参数映射和Druid数据源初始化:
public class DynamicDataSourceFactory {
    protected static Logger logger = LoggerFactory.getLogger(DynamicDataSourceFactory.class);
    //build动态数据源,初始化
    public static DruidDataSource buildDruidDataSource(DataSourceProperty properties) {
        DruidDataSource druidDataSource = new DruidDataSource();
        druidDataSource.setDriverClassName(properties.getDriverClassName());
        druidDataSource.setUrl(properties.getUrl());
        druidDataSource.setUsername(properties.getUsername());
        druidDataSource.setPassword(properties.getPassword());

        druidDataSource.setInitialSize(properties.getInitialSize());
        druidDataSource.setMaxActive(properties.getMaxActive());
        druidDataSource.setMinIdle(properties.getMinIdle());
        druidDataSource.setMaxWait(properties.getMaxWait());
        druidDataSource.setTimeBetweenEvictionRunsMillis(properties.getTimeBetweenEvictionRunsMillis());
        druidDataSource.setMinEvictableIdleTimeMillis(properties.getMinEvictableIdleTimeMillis());
        druidDataSource.setMaxEvictableIdleTimeMillis(properties.getMaxEvictableIdleTimeMillis());
        druidDataSource.setValidationQuery(properties.getValidationQuery());
        druidDataSource.setValidationQueryTimeout(properties.getValidationQueryTimeout());
        druidDataSource.setTestOnBorrow(properties.isTestOnBorrow());
        druidDataSource.setTestOnReturn(properties.isTestOnReturn());
        druidDataSource.setPoolPreparedStatements(properties.isPoolPreparedStatements());
        druidDataSource.setMaxOpenPreparedStatements(properties.getMaxOpenPreparedStatements());
        druidDataSource.setSharePreparedStatements(properties.isSharePreparedStatements());

        try {
            druidDataSource.setFilters(properties.getFilters());
            druidDataSource.init();
        } catch (SQLException e) {
            logger.error("DynamicDataSourceFactory is error:" + e.toString());
        }
        return druidDataSource;
    }
}
最后我们在@Configuration添加多个数据源对象bean实例:
@Configuration
@EnableConfigurationProperties(DynamicDataSourceProperty.class)
public class DynamicDataSourceConfig {
    @Autowired
    private DynamicDataSourceProperty properties;

    @Bean
    @ConfigurationProperties(prefix = "spring.datasource.druid")
    public DataSourceProperty dataSourceProperty() {
        return new DataSourceProperty();
    }

    @Bean
    public DynamicDataSource dynamicDataSource(DataSourceProperty dataSourceProperty) {
        DynamicDataSource dynamicDataSource = new DynamicDataSource();
        dynamicDataSource.setTargetDataSources(getDynamicDataSource());

        //默认数据源
        DruidDataSource defaultDataSource = DynamicDataSourceFactory.buildDruidDataSource(dataSourceProperty);
        dynamicDataSource.setDefaultTargetDataSource(defaultDataSource);

        return dynamicDataSource;
    }

    private Map<Object, Object> getDynamicDataSource(){
        Map<String, DataSourceProperty> dataSourcePropertyMap = properties.getDatasource();
        Map<Object, Object> targetDataSources = new ConcurrentHashMap<>(dataSourcePropertyMap.size());
        dataSourcePropertyMap.forEach((k, v) -> {
            DruidDataSource druidDataSource = DynamicDataSourceFactory.buildDruidDataSource(v);
            targetDataSources.put(k, druidDataSource);
        });
        return targetDataSources;
    }
}
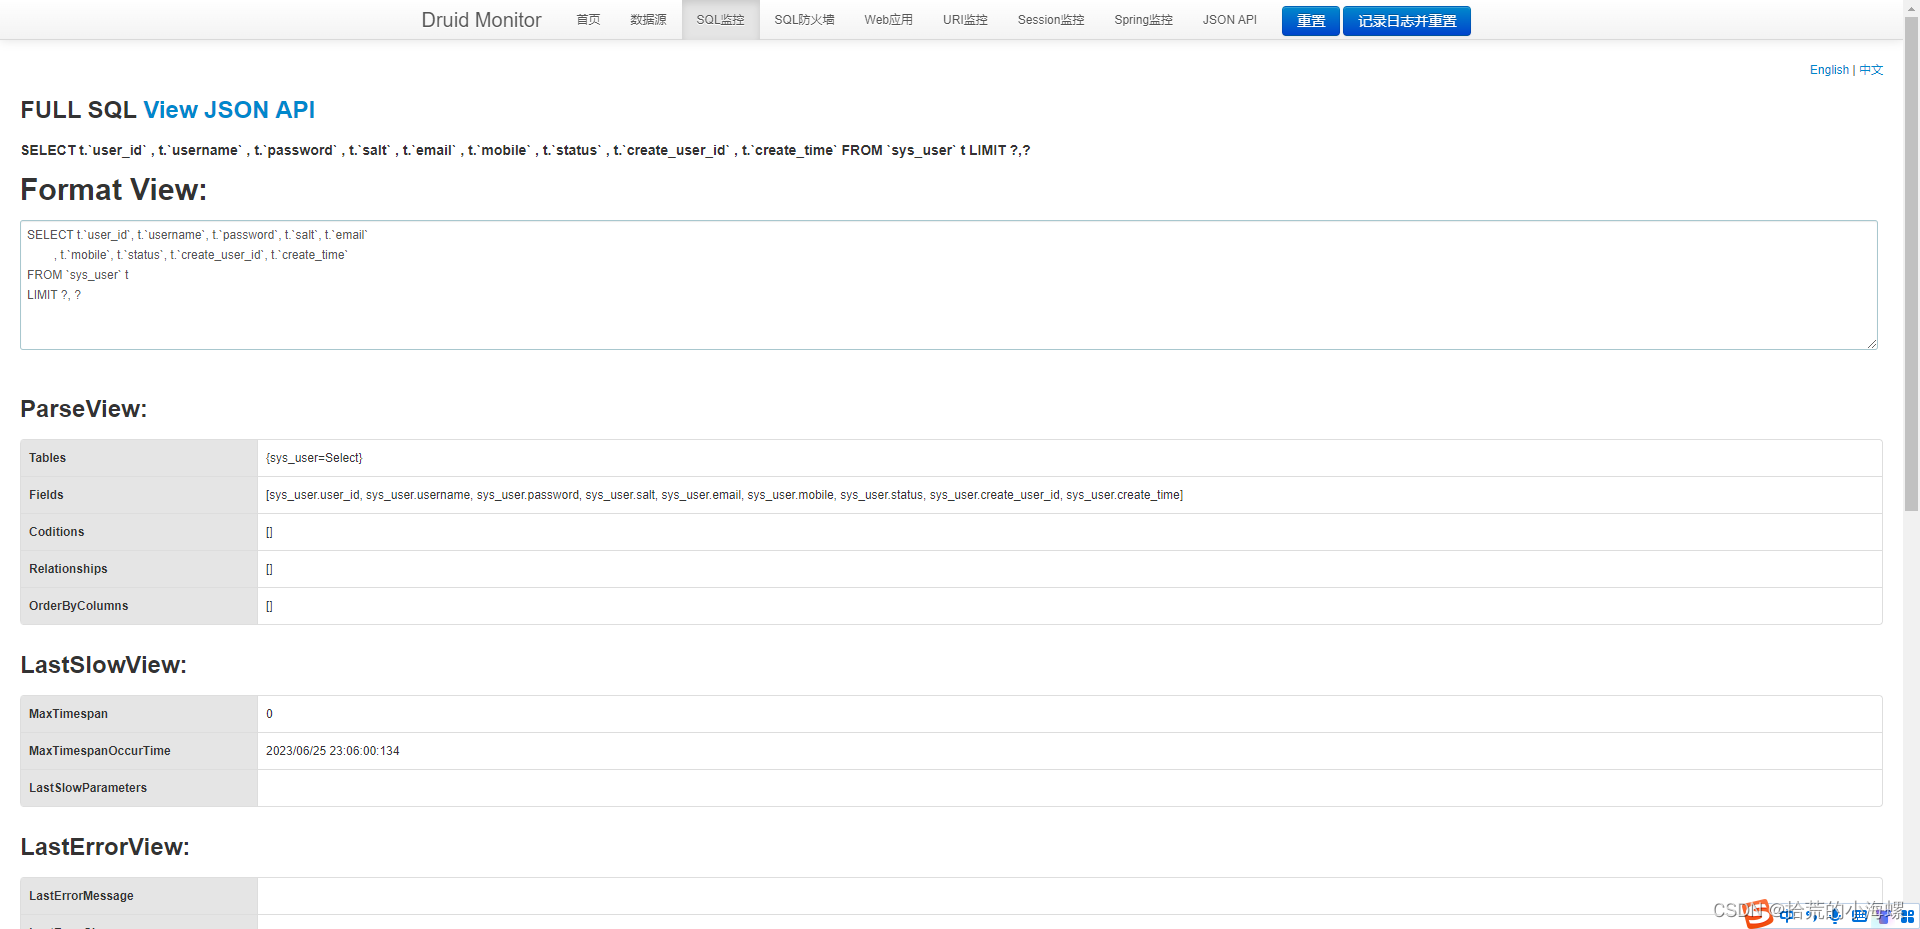
7、验证
最后我们可以很轻松的验证当前Druid多数据源配置是否生效,通过访问http://localhost:8080/lk-auth/druid/的地址,可以很清楚的看到数据库执行语句和数据源的各种指标。代码链接:https://gitee.com/lhdxhl/lk-auth.git


 1万+
1万+


 被折叠的 条评论
为什么被折叠?
被折叠的 条评论
为什么被折叠?
 到【灌水乐园】发言


