本文为转载,原文:http://blog.csdn.net/loften_93663469/article/details/51471831
前言
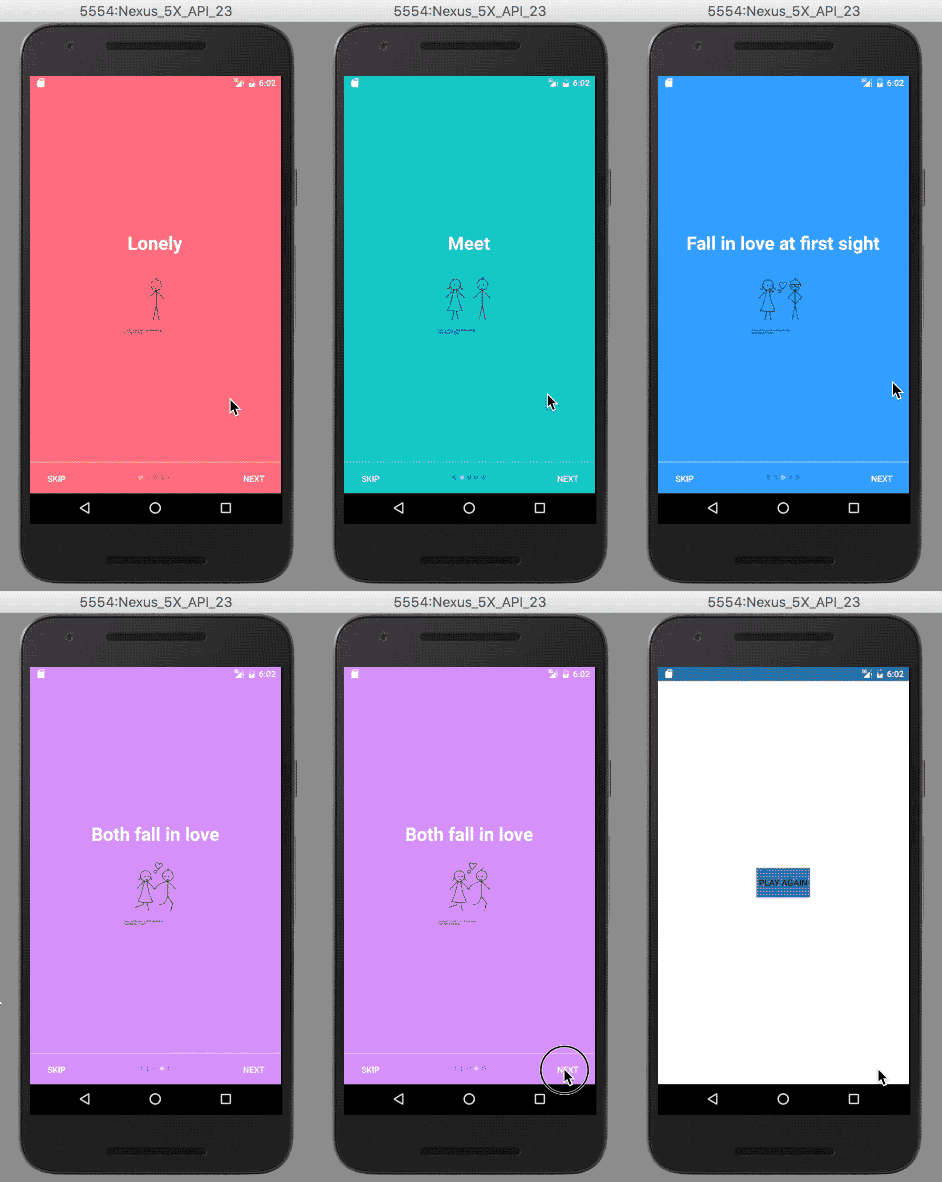
当你第一次打开一款应用的时候常常会看到精美的引导页设计,它们在你未使用产品之前提前告知你产品的主要功能与特点,第一次印象的好坏会极大地影响到后续的产品使用体验。因此各个公司都在努力将这几个页面设计好,从一开始就引人入胜。那接下来我就来一步步实现引导页的功能。
效果图
实现步骤
创建新项目:
在Android Studio中新建项目,添加引导页所需图片
设置values值
- 给你的引导页设置背景颜色及滑动时圆点的颜色,在 colors.xml 中添加如下颜色值:
<?xml version="1.0" encoding="utf-8"?>
<resources>
    <color name="colorPrimary">#3F51B5</color>
    <color name="colorPrimaryDark">#303F9F</color>
    <color name="colorAccent">#FF4081</color>

    <!-- Screens background color-->
    <color name="bg_screen1">#f64c73</color>
    <color name="bg_screen2">#20d2bb</color>
    <color name="bg_screen3">#3395ff</color>
    <color name="bg_screen4">#c873f4</color>
    <color name="bg_screen5">#f59825</color>

    <!-- dots inactive colors -->
    <color name="dot_dark_screen1">#d1395c</color>
    <color name="dot_dark_screen2">#14a895</color>
    <color name="dot_dark_screen3">#2278d4</color>
    <color name="dot_dark_screen4">#a854d4</color>
    <color name="dot_dark_screen5">#f57f17</color>

    <!-- dots active colors -->
    <color name="dot_light_screen1">#f98da5</color>
    <color name="dot_light_screen2">#8cf9eb</color>
    <color name="dot_light_screen3">#93c6fd</color>
    <color name="dot_light_screen4">#e4b5fc</color>
    <color name="dot_light_screen5">#fbc02d</color>

    <array name="array_dot_active">
        <item>@color/dot_light_screen1</item>
        <item>@color/dot_light_screen2</item>
        <item>@color/dot_light_screen3</item>
        <item>@color/dot_light_screen4</item>
        <item>@color/dot_light_screen5</item>
    </array>

    <array name="array_dot_inactive">
        <item>@color/dot_dark_screen1</item>
        <item>@color/dot_dark_screen2</item>
        <item>@color/dot_dark_screen3</item>
        <item>@color/dot_dark_screen4</item>
        <item>@color/dot_dark_screen5</item>
    </array>
</resources>
- 在 strings.xml 中设置如下
<resources>
    <string name="app_name">IntroSliderSample</string>
    <string name="title_activity_welcome">Home Screen</string>
    <string name="next">NEXT</string>
    <string name="skip">SKIP</string>
    <string name="start">GOT IT</string>

    <string name="slide_1_title">Lonely</string>
    <string name="slide_2_title">Meet</string>
    <string name="slide_3_title">Fall in love at first sight</string>
    <string name="slide_4_title">Both fall in love</string>
    <string name="slide_5_title">Together forever</string>

    <string name="play_again">play again</string>
</resources>- 在 dimens.xml 设置如下:
<resources>
    <!-- Default screen margins, per the Android Design guidelines. -->
    <dimen name="activity_horizontal_margin">16dp</dimen>
    <dimen name="activity_vertical_margin">16dp</dimen>
    <dimen name="fab_margin">16dp</dimen>
    <dimen name="dots_height">30dp</dimen>
    <dimen name="dots_margin_bottom">20dp</dimen>
    <dimen name="img_width_height">120dp</dimen>
    <dimen name="slide_title">30dp</dimen>
    <dimen name="slide_desc">16dp</dimen>
    <dimen name="desc_padding">40dp</dimen>
</resources>
- 在 styles.xml 设置如下
<resources>

    <!-- Base application theme. -->
    <style name="AppTheme" parent="Theme.AppCompat.Light.DarkActionBar">
        <!-- Customize your theme here. -->
        <item name="colorPrimary">@color/colorPrimary</item>
        <item name="colorPrimaryDark">@color/colorPrimaryDark</item>
        <item name="colorAccent">@color/colorAccent</item>
        <item name="windowActionBar">false</item>
        <item name="windowNoTitle">true</item>
    </style>

    <style name="AppTheme.AppBarOverlay" parent="ThemeOverlay.AppCompat.Dark.ActionBar" />

    <style name="AppTheme.PopupOverlay" parent="ThemeOverlay.AppCompat.Light" />


</resources>
添加SharedPreferences管理类
引导页应该是只有第一次启动应用时才出现,第二次打开应用则直接跳到主页面,故这里用SharedPreferences存储一个布尔值来判断是否第一次打开应用程序。故新建PrefManager类
public class PrefManager {
    SharedPreferences pref;
    SharedPreferences.Editor editor;
    Context _context;

    int PRIVATE_MODE = 0;

    //SharedPreferences 文件名
    private static final String PREF_NAME = "intro_slider";

    private static final String IS_FIRST_TIME_LAUNCH = "IsFirstTimeLaunch";

    public PrefManager(Context context){
        this._context = context;
        pref = _context.getSharedPreferences(PREF_NAME,PRIVATE_MODE);
        editor = pref.edit();
    }

    public void setFirstTimeLaunch(boolean isFirstTime){
        editor.putBoolean(IS_FIRST_TIME_LAUNCH, isFirstTime);
        editor.commit();
    }

    public boolean isFirstTimeLaunch(){
        return pref.getBoolean(IS_FIRST_TIME_LAUNCH, true);
    }

}
设置引导页面布局
- 这里5个引导页面只有颜色及图片不一样,就只给一个示例代码
<?xml version="1.0" encoding="utf-8"?>
<RelativeLayout xmlns:android="http://schemas.android.com/apk/res/android"
    android:layout_width="match_parent"
    android:layout_height="match_parent"
    android:background="@color/bg_screen1">

    <LinearLayout
        android:layout_width="wrap_content"
        android:layout_height="wrap_content"
        android:orientation="vertical"
        android:layout_centerInParent="true"
        android:gravity="center_horizontal">

        <TextView
            android:layout_width="wrap_content"
            android:layout_height="wrap_content"
            android:text="@string/slide_1_title"
            android:textColor="@android:color/white"
            android:textSize="@dimen/slide_title"
            android:textStyle="bold"/>

        <ImageView
            android:layout_width="@dimen/img_width_height"
            android:layout_height="@dimen/img_width_height"
            android:layout_marginTop="@dimen/activity_vertical_margin"
            android:src="@drawable/img1" />
    </LinearLayout>
</RelativeLayout>- 在引导页activity中对应的页面如下设置:
<?xml version="1.0" encoding="utf-8"?>
<RelativeLayout xmlns:android="http://schemas.android.com/apk/res/android"
    xmlns:tools="http://schemas.android.com/tools"
    android:layout_width="match_parent"
    android:layout_height="match_parent"
    tools:context=".WelcomeActivity">

    <android.support.v4.view.ViewPager
        android:id="@+id/view_pager"
        android:layout_width="match_parent"
        android:layout_height="match_parent" />

    <LinearLayout
        android:id="@+id/layoutDots"
        android:layout_width="match_parent"
        android:layout_height="@dimen/dots_height"
        android:gravity="center"
        android:layout_alignParentBottom="true"
        android:layout_marginBottom="@dimen/dots_margin_bottom"
        android:orientation="horizontal"></LinearLayout>

    <View
        android:layout_width="match_parent"
        android:layout_height="1dp"
        android:layout_above="@id/layoutDots"
        android:alpha=".5"
        android:background="@android:color/white" />

    <Button
        android:id="@+id/btn_skip"
        android:layout_width="wrap_content"
        android:layout_height="wrap_content"
        android:layout_alignParentBottom="true"
        android:layout_alignParentLeft="true"
        android:background="@null"
        android:text="@string/skip"
        android:textColor="@android:color/white" />

    <Button
        android:id="@+id/btn_next"
        android:layout_width="wrap_content"
        android:layout_height="wrap_content"
        android:layout_alignParentBottom="true"
        android:layout_alignParentRight="true"
        android:background="@null"
        android:text="@string/next"
        android:textColor="@android:color/white" />

</RelativeLayout>
在WelcomeActivity实现具体逻辑
- 判断是否第一次打开应用
- 设置状态栏透明
- 添加ViewPager 及事件
- 添加点击按钮“跳过和下一步“事件
public class WelcomeActivity extends AppCompatActivity {
private ViewPager viewPager;
private MyViewPagerAdapter myViewPagerAdapter;
private LinearLayout dotsLayout;
private TextView[] dots;
private int[] layouts;
private Button btnSkip,btnNext;
private PrefManager prefManager;
@Override
protected void onCreate(Bundle savedInstanceState) {
super.onCreate(savedInstanceState);
//在setContentView()前检查是否第一次运行
prefManager = new PrefManager(this);
if(!prefManager.isFirstTimeLaunch()){
launchHomeScreen();
finish();
}
//让状态栏透明
if(Build.VERSION.SDK_INT >= 21){
getWindow().getDecorView().setSystemUiVisibility(View.SYSTEM_UI_FLAG_LAYOUT_STABLE|View.SYSTEM_UI_FLAG_LAYOUT_FULLSCREEN);
}
setContentView(R.layout.activity_welcom);
viewPager = (ViewPager)findViewById(R.id.view_pager);
dotsLayout = (LinearLayout)findViewById(R.id.layoutDots);
btnNext = (Button) findViewById(R.id.btn_next);
btnSkip = (Button) findViewById(R.id.btn_skip);
//添加欢迎页面
layouts = new int[]{
R.layout.welcome_slide1,
R.layout.welcome_slide2,
R.layout.welcome_slide3,
R.layout.welcome_slide4,
R.layout.welcome_slide5
};
//添加点
addBottomDots(0);
//让状态栏透明
changeStatusBarColor();
myViewPagerAdapter = new MyViewPagerAdapter();
viewPager.setAdapter(myViewPagerAdapter);
viewPager.addOnPageChangeListener(viewPagerPageChangeListener);
btnSkip.setOnClickListener(new View.OnClickListener() {
@Override
public void onClick(View v) {
launchHomeScreen();
}
});
btnNext.setOnClickListener(new View.OnClickListener() {
@Override
public void onClick(View v) {
int current = getItem(+1);
if(current < layouts.length){
viewPager.setCurrentItem(current);
}else{
launchHomeScreen();
}
}
});
}
private void addBottomDots(int currentPage){
dots = new TextView[layouts.length];
int[] colorsActive = getResources().getIntArray(R.array.array_dot_active);
int[] colorsInactive = getResources().getIntArray(R.array.array_dot_inactive);
dotsLayout.removeAllViews();
for(int i = 0; i < dots.length; i++){
dots[i] = new TextView(this);
dots[i].setText(Html.fromHtml("•"));//圆点
dots[i].setTextSize(35);
dots[i].setTextColor(colorsInactive[currentPage]);
dotsLayout.addView(dots[i]);
}
if(dots.length > 0){
dots[currentPage].setTextColor(colorsActive[currentPage]);
}
}
private int getItem(int i){
return viewPager.getCurrentItem() + i;
}
private void launchHomeScreen(){
prefManager.setFirstTimeLaunch(false);
startActivity(new Intent(this,MainActivity.class));
finish();
}
/**
* 让状态栏变透明
*/
private void changeStatusBarColor(){
if(Build.VERSION.SDK_INT >= Build.VERSION_CODES.LOLLIPOP){
Window window = getWindow();
window.addFlags(WindowManager.LayoutParams.FLAG_DRAWS_SYSTEM_BAR_BACKGROUNDS);
window.setStatusBarColor(Color.TRANSPARENT);
}
}
ViewPager.OnPageChangeListener viewPagerPageChangeListener = new ViewPager.OnPageChangeListener(){
@Override
public void onPageScrolled(int position, float positionOffset, int positionOffsetPixels) {
}
@Override
public void onPageSelected(int position) {
addBottomDots(position);
//改变下一步按钮text “NEXT”或“GOT IT”
if(position == layouts.length - 1){
btnNext.setText(getString(R.string.start));
btnSkip.setVisibility(View.GONE);
}else{
btnNext.setText(getString(R.string.next));
btnSkip.setVisibility(View.VISIBLE);
}
}
@Override
public void onPageScrollStateChanged(int state) {
}
};
public class MyViewPagerAdapter extends PagerAdapter{
private LayoutInflater layoutInflater;
public MyViewPagerAdapter(){}
@Override
public Object instantiateItem(ViewGroup container, int position) {
layoutInflater = (LayoutInflater) getSystemService(Context.LAYOUT_INFLATER_SERVICE);
View view = layoutInflater.inflate(layouts[position],container,false);
container.addView(view);
return view;
}
@Override
public int getCount() {
return layouts.length;
}
@Override
public boolean isViewFromObject(View view, Object object) {
return view == object;
}
@Override
public void destroyItem(ViewGroup container, int position, Object object) {
View view = (View)object;
container.removeView(view);
}
}
}


 1万+
1万+

 被折叠的 条评论
为什么被折叠?


