


基本概念
什么是Sharding Shpere
官网地址:http://shardingsphere.apache.org/index_zh.html
目前它由两个互相独立,却又能混合部署配合使用的产品:Sharding-JDBC 和 Sharding-Proxy,它提供了标准化的数据分片,分布式事务和数据库治理功能,可适用于如java同构,异构语言,云原生等各种多样化的应用场景。
什么是分库分表
1.数据库数据量是不可控的,随着时间和业务的发展,造成表里面的数据会越来越多,如果再去对数据库表curd操作的时候,照成性能问题。
2.方案1:加硬件
3.方案2:分库分表
为了解决由于数据量过大而照成的数据库性能降低问题。
分库分表的方式
1.垂直拆分:
1.1.垂直分表:操作数据库中的某张表,把这张表中的一部分字段存到一张新表里面,再把这张表另一部分字段存到另外一张表里面
1.2.垂直分库:把单一的数据库按照业务进行划分,转库转表。
2.水平分表:
2.1.水平分表:数据库结构相同的多张表存储数据,比如基数的数据存放A表偶数的数据存放B表
2.2.水平分库:与水平分表类似,多个结构一致的数据库存放数据。
垂直拆字段,水平拆记录
分库分表的应用和问题
1.应用
1.1.在数据库设计时候考虑垂直分库和垂直分表
1.2.随着数据库数据量增加,不要马上考虑做水平切分,首先考虑缓存处理,读写分离,使用索引等等。如果这些方式不能解决根本的问题,在考虑水平分库和水平分表。
2.问题
2.1.跨节点连接查询问题(分页,排序)
2.2.多数据源管理问题
Sharding-JDBC
简介
1.轻量化的java驱动,是增强版的JDBC驱动。
2.Sharding-JDBC不是做分库分表,主要做两个功能,数据分片和读写分离。
实现水平分表
1.搭建环境
1.1.SpringBoot + MybatisPlus + Sharding-JDBC + Druid连接池
2按照水平分表的方式,创建数据库,创建数据库表
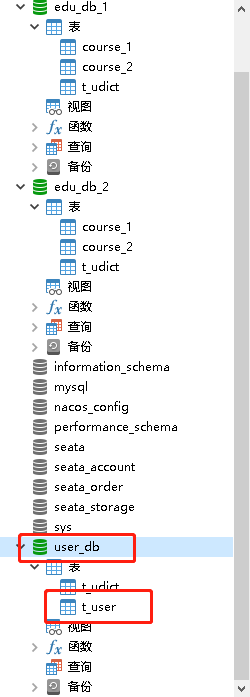
2.1.创建数据库course_db
2.2.在数据库中创建两张表course_1 和 course_2
2.3.约定规则:如果添加课程id是偶数把数据添加到course_1,如果是奇数添加到course_2
3.配置Sharding-JDBC分片策略
# sharding-jdbc 分片策略
# 配置数据源
spring.shardingsphere.datasource.names=m1

# 配置数据源具体内容,包含连接池,驱动,地址,用户名和密码
spring.shardingsphere.datasource.m1.type=com.alibaba.druid.pool.DruidDataSource
spring.shardingsphere.datasource.m1.driver-class-name=com.mysql.cj.jdbc.Driver
spring.shardingsphere.datasource.m1.url=jdbc:mysql://localhost:3306/course_db?serverTimezone=GMT%2B8
spring.shardingsphere.datasource.m1.username=root
spring.shardingsphere.datasource.m1.password=123456

# 指定course表分布情况,配置表在哪个数据库里面,表名称都是什么 m1.course1 m1.course2
spring.shardingsphere.sharding.tables.course.actual-data-nodes=m1.course_$->{0..1}


# 指定course表里面主键生成的策略 SNOWFLAKE:雪花算法
spring.shardingsphere.sharding.tables.course.key-generator.column=cid
spring.shardingsphere.sharding.tables.course.key-generator.type=SNOWFLAKE

# 指定分片策略 约定cid值偶数course_1表,如果cid是奇数添加到course_2表
spring.shardingsphere.sharding.tables.course.table-strategy.inline.sharding-column=cid
spring.shardingsphere.sharding.tables.course.table-strategy.inline.algorithm-expression=course_$->{cid % 2 + 1}

# 打开sql输出日志
spring.shardingsphere.props.sql.show=true

# 一个实体类对应两张表,覆盖
spring.main.allow-bean-definition-overriding=true
4.编写测试代码
package com.atguigu.shardingjdbcdemo;

import com.atguigu.shardingjdbcdemo.entity.Course;
import com.atguigu.shardingjdbcdemo.mapper.CourseMapper;
import com.baomidou.mybatisplus.core.conditions.query.QueryWrapper;
import org.junit.jupiter.api.Test;
import org.springframework.beans.factory.annotation.Autowired;
import org.springframework.boot.test.context.SpringBootTest;

@SpringBootTest
class ShardingjdbcdemoApplicationTests {

    //注入mapper
    @Autowired
    private CourseMapper courseMapper;

    @Test
    void addCourse() {
        for (int i = 1; i <= 10;i++){
            Course course = new Course();
            course.setCname("java"+i);
            course.setUserId(100L);
            course.setCstatus("normal"+i);
            courseMapper.insert(course);
        }

    }

    //查询课程方法
    @Test
    public void findCourse(){
        QueryWrapper<Course> queryWrapper = new QueryWrapper<>();
        queryWrapper.eq("cid", 626078533466193920L);
        Course course = courseMapper.selectOne(queryWrapper);
        System.out.println(course.toString());
    }

}
sharding-JDBC实现水平分库
1.需求分析
1.1.创建两个数据库 edu_db_1,edu_db_2
1.2.约定规则
1.2.1.数据库规则:userid为偶数edu_db_1数据库为奇数数据库添加edu_db_2
1.2.2.表规则:cid为偶数添加course_1表,为奇数添加到course_2表
2.创建数据库和表
create TABLE course_1 (
	cid BIGINT(20) PRIMARY key,
	cname VARCHAR(50) not NULL,
	user_id BIGINT(20) not NULL,
	cstatus VARCHAR(10) not null
);

create TABLE course_2 (
	cid BIGINT(20) PRIMARY key,
	cname VARCHAR(50) not NULL,
	user_id BIGINT(20) not NULL,
	cstatus VARCHAR(10) not null
);
3.在SpringBoot配置文件配置分片的规则
# sharding-jdbc 分片策略
# 配置数据源
# 水平分库
spring.shardingsphere.datasource.names=m1,m2

# 配置第一个数据源具体内容,包含连接池,驱动,地址,用户名和密码
spring.shardingsphere.datasource.m1.type=com.alibaba.druid.pool.DruidDataSource
spring.shardingsphere.datasource.m1.driver-class-name=com.mysql.cj.jdbc.Driver
spring.shardingsphere.datasource.m1.url=jdbc:mysql://localhost:3306/edu_db_1?serverTimezone=GMT%2B8
spring.shardingsphere.datasource.m1.username=root
spring.shardingsphere.datasource.m1.password=123456

# 配置第二个数据源具体内容,包含连接池,驱动,地址,用户名和密码
spring.shardingsphere.datasource.m2.type=com.alibaba.druid.pool.DruidDataSource
spring.shardingsphere.datasource.m2.driver-class-name=com.mysql.cj.jdbc.Driver
spring.shardingsphere.datasource.m2.url=jdbc:mysql://localhost:3306/edu_db_2?serverTimezone=GMT%2B8
spring.shardingsphere.datasource.m2.username=root
spring.shardingsphere.datasource.m2.password=123456

# 指定大户巨款分布情况,数据库里面表的分布情况
# m1 m2 course_1 course_2
spring.shardingsphere.sharding.tables.course.actual-data-nodes=m$->{1..2}.course_$->{1..2}


# 指定course表里面主键生成的策略 SNOWFLAKE:雪花算法
spring.shardingsphere.sharding.tables.course.key-generator.column=cid
spring.shardingsphere.sharding.tables.course.key-generator.type=SNOWFLAKE

# 指定表分片策略 约定cid值偶数course_1表,如果cid是奇数添加到course_2表
spring.shardingsphere.sharding.tables.course.table-strategy.inline.sharding-column=cid
spring.shardingsphere.sharding.tables.course.table-strategy.inline.algorithm-expression=course_$->{cid % 2 + 1}

#指定数据库分片策略 约定 user_id是偶数添加为m1,是奇数添加为m2
#spring.shardingsphere.sharding.default-database-strategy.inline.sharding-column=user_id
#spring.shardingsphere.sharding.default-database-strategy.inline.algorithm-expression=m$->{user_id % 2 +1}
spring.shardingsphere.sharding.tables.course.database-strategy.inline.sharding-column=user_id
spring.shardingsphere.sharding.tables.course.database-strategy.inline.algorithm-expression=m$->{user_id % 2 +1}


# 打开sql输出日志
spring.shardingsphere.props.sql.show=true

# 一个实体类对应两张表,覆盖
spring.main.allow-bean-definition-overriding=true
4.编写测试方法
  //====================测试水平分库=============================

    /**
     * 插入操作
     */
    @Test
    public void addCourseDb(){
        Course course = new Course();
        course.setCname("javaDemo1");
        //分库根据userId去区分
        course.setUserId(101L);
        course.setCstatus("normal");
        courseMapper.insert(course);
    }

    /**
     * 查询操作
     */
    @Test
    public void findCourseDb(){
        QueryWrapper<Course> wrapper = new QueryWrapper<>();
        List<Course> courses = courseMapper.selectList(wrapper);
        System.out.println(courses.toString());
    }
sharding-JDBC实现垂直分库
1.需求
1.1.专库专表,一个数据库只做一件事
2.创建数据库
3.编写操作代码
3.1.创建user实体类和mapper
3.2.配置文件
# sharding-jdbc 分片策略
# 配置数据源
# 水平分库
spring.shardingsphere.datasource.names=m1,m2,m0

# 配置第一个数据源具体内容,包含连接池,驱动,地址,用户名和密码
spring.shardingsphere.datasource.m1.type=com.alibaba.druid.pool.DruidDataSource
spring.shardingsphere.datasource.m1.driver-class-name=com.mysql.cj.jdbc.Driver
spring.shardingsphere.datasource.m1.url=jdbc:mysql://localhost:3306/edu_db_1?serverTimezone=GMT%2B8
spring.shardingsphere.datasource.m1.username=root
spring.shardingsphere.datasource.m1.password=123456

# 配置第二个数据源具体内容,包含连接池,驱动,地址,用户名和密码
spring.shardingsphere.datasource.m2.type=com.alibaba.druid.pool.DruidDataSource
spring.shardingsphere.datasource.m2.driver-class-name=com.mysql.cj.jdbc.Driver
spring.shardingsphere.datasource.m2.url=jdbc:mysql://localhost:3306/edu_db_2?serverTimezone=GMT%2B8
spring.shardingsphere.datasource.m2.username=root
spring.shardingsphere.datasource.m2.password=123456

# 配置第三个数据源具体内容,包含连接池,驱动,地址,用户名和密码
spring.shardingsphere.datasource.m0.type=com.alibaba.druid.pool.DruidDataSource
spring.shardingsphere.datasource.m0.driver-class-name=com.mysql.cj.jdbc.Driver
spring.shardingsphere.datasource.m0.url=jdbc:mysql://localhost:3306/user_db?serverTimezone=GMT%2B8
spring.shardingsphere.datasource.m0.username=root
spring.shardingsphere.datasource.m0.password=123456

# 配置user_db数据库里面t_user专库专表
spring.shardingsphere.sharding.tables.t_user.actual-data-nodes=m$->{0}.t_user
spring.shardingsphere.sharding.tables.t_user.key-generator.column=user_id
spring.shardingsphere.sharding.tables.t_user.key-generator.type=SNOWFLAKE
spring.shardingsphere.sharding.tables.t_user.table-strategy.inline.sharding-column=user_id
spring.shardingsphere.sharding.tables.t_user.table-strategy.inline.algorithm-expression=t_user


# 指定大户巨款分布情况,数据库里面表的分布情况
# m1 m2 course_1 course_2
spring.shardingsphere.sharding.tables.course.actual-data-nodes=m$->{1..2}.course_$->{1..2}


# 指定course表里面主键生成的策略 SNOWFLAKE:雪花算法
spring.shardingsphere.sharding.tables.course.key-generator.column=cid
spring.shardingsphere.sharding.tables.course.key-generator.type=SNOWFLAKE

# 指定表分片策略 约定cid值偶数course_1表,如果cid是奇数添加到course_2表
spring.shardingsphere.sharding.tables.course.table-strategy.inline.sharding-column=cid
spring.shardingsphere.sharding.tables.course.table-strategy.inline.algorithm-expression=course_$->{cid % 2 + 1}

#指定数据库分片策略 约定 user_id是偶数添加为m1,是奇数添加为m2
#spring.shardingsphere.sharding.default-database-strategy.inline.sharding-column=user_id
#spring.shardingsphere.sharding.default-database-strategy.inline.algorithm-expression=m$->{user_id % 2 +1}
spring.shardingsphere.sharding.tables.course.database-strategy.inline.sharding-column=user_id
spring.shardingsphere.sharding.tables.course.database-strategy.inline.algorithm-expression=m$->{user_id % 2 +1}


# 打开sql输出日志
spring.shardingsphere.props.sql.show=true

# 一个实体类对应两张表,覆盖
spring.main.allow-bean-definition-overriding=true
sharding-JDBC公共表
1.公共表
1.1.存储固定数据的表,表数据很少发送变化,查询时经常进行关联
1.2.在每个数据库中创建相同结构公共表
2.在多个数据库中都创建相同结构的公共表

3.在项目配置文件application.properites进行公共表配置
# sharding-jdbc 分片策略
# 配置数据源
# 水平分库
spring.shardingsphere.datasource.names=m1,m2,m0

# 配置第一个数据源具体内容,包含连接池,驱动,地址,用户名和密码
spring.shardingsphere.datasource.m1.type=com.alibaba.druid.pool.DruidDataSource
spring.shardingsphere.datasource.m1.driver-class-name=com.mysql.cj.jdbc.Driver
spring.shardingsphere.datasource.m1.url=jdbc:mysql://localhost:3306/edu_db_1?serverTimezone=GMT%2B8
spring.shardingsphere.datasource.m1.username=root
spring.shardingsphere.datasource.m1.password=123456

# 配置第二个数据源具体内容,包含连接池,驱动,地址,用户名和密码
spring.shardingsphere.datasource.m2.type=com.alibaba.druid.pool.DruidDataSource
spring.shardingsphere.datasource.m2.driver-class-name=com.mysql.cj.jdbc.Driver
spring.shardingsphere.datasource.m2.url=jdbc:mysql://localhost:3306/edu_db_2?serverTimezone=GMT%2B8
spring.shardingsphere.datasource.m2.username=root
spring.shardingsphere.datasource.m2.password=123456

# 配置第三个数据源具体内容,包含连接池,驱动,地址,用户名和密码
spring.shardingsphere.datasource.m0.type=com.alibaba.druid.pool.DruidDataSource
spring.shardingsphere.datasource.m0.driver-class-name=com.mysql.cj.jdbc.Driver
spring.shardingsphere.datasource.m0.url=jdbc:mysql://localhost:3306/user_db?serverTimezone=GMT%2B8
spring.shardingsphere.datasource.m0.username=root
spring.shardingsphere.datasource.m0.password=123456

# 配置user_db数据库里面t_user专库专表
spring.shardingsphere.sharding.tables.t_user.actual-data-nodes=m$->{0}.t_user
spring.shardingsphere.sharding.tables.t_user.key-generator.column=user_id
spring.shardingsphere.sharding.tables.t_user.key-generator.type=SNOWFLAKE
spring.shardingsphere.sharding.tables.t_user.table-strategy.inline.sharding-column=user_id
spring.shardingsphere.sharding.tables.t_user.table-strategy.inline.algorithm-expression=t_user


# 指定大户巨款分布情况,数据库里面表的分布情况
# m1 m2 course_1 course_2
spring.shardingsphere.sharding.tables.course.actual-data-nodes=m$->{1..2}.course_$->{1..2}


# 指定course表里面主键生成的策略 SNOWFLAKE:雪花算法
spring.shardingsphere.sharding.tables.course.key-generator.column=cid
spring.shardingsphere.sharding.tables.course.key-generator.type=SNOWFLAKE

# 指定表分片策略 约定cid值偶数course_1表,如果cid是奇数添加到course_2表
spring.shardingsphere.sharding.tables.course.table-strategy.inline.sharding-column=cid
spring.shardingsphere.sharding.tables.course.table-strategy.inline.algorithm-expression=course_$->{cid % 2 + 1}

#指定数据库分片策略 约定 user_id是偶数添加为m1,是奇数添加为m2
#spring.shardingsphere.sharding.default-database-strategy.inline.sharding-column=user_id
#spring.shardingsphere.sharding.default-database-strategy.inline.algorithm-expression=m$->{user_id % 2 +1}
spring.shardingsphere.sharding.tables.course.database-strategy.inline.sharding-column=user_id
spring.shardingsphere.sharding.tables.course.database-strategy.inline.algorithm-expression=m$->{user_id % 2 +1}

#公共表配置
spring.shardingsphere.sharding.broadcast-tables=t_udict
spring.shardingsphere.sharding.tables.t_udict.key-generator.column=dictid
spring.shardingsphere.sharding.tables.t_udict.key-generator.type=SNOWFLAKE


# 打开sql输出日志
spring.shardingsphere.props.sql.show=true

# 一个实体类对应两张表,覆盖
spring.main.allow-bean-definition-overriding=true
4.编写测试代码
4.1.创建新实体类mapper
4.2.编写添加和删除方法进行测试
    /**
     * 插入操作
     */
    @Test
    public void addDict(){
        Udict udict = new Udict();
        udict.setUstatus("on");
        udict.setUvalue("open");
        udictMapper.insert(udict);
    }

    /**
     * 删除操作
     */
    @Test
    public void delDict(){
        QueryWrapper<Udict> wrapper = new QueryWrapper<>();
        wrapper.eq("dictid",626432079936094209L);
        udictMapper.delete(wrapper);
    }
读写分离
1.安装多一个mysql服务
mysqld install mysqls1 --defaults-file="D:\mysql5.7.34\mysql-5.7.34-winx64-s1\my.ini"
2.配置主从服务
2.1.在主服务器配置文件中配置
#配置主从架构此服务器为主 star

#开启日志
log-bin = myql-bin
#设置服务器id主从不能一致
server-id = 1
#设置需要同步的数据库
binlog-do-db = user_db
#屏蔽系统同步
binlog-ignore-db = mysql
binlog-ignore-db = information_schema
biglog-ignore-db = performance_schema

#配置主从架构此服务器为主 end
2.2.在从服务器配置文件中配置
#设置主从服务此服务为从数据库 star

#开启日志
log‐bin = mysql‐bin
#设置服务id,主从不能一致
server‐id = 2
#设置需要同步的数据库
replicate_wild_do_table=user_db.%
#屏蔽系统库同步
replicate_wild_ignore_table=mysql.%
replicate_wild_ignore_table=information_schema.%
replicate_wild_ignore_table=performance_schema.%

#设置主从服务此服务为从数据库 end
3.创建账号用于主从复制
#切换至主库bin目录,登录主库
mysql ‐h localhost ‐uroot ‐p
#授权主备复制专用账号
GRANT REPLICATION SLAVE ON *.* TO 'db_sync'@'%' IDENTIFIED BY 'db_sync';
#刷新权限
FLUSH PRIVILEGES;
查询位点

4.主从数据同步设置
#切换至从库bin目录,登录从库
mysql ‐h localhost ‐P3307 ‐uroot ‐p
#先停止同步
STOP SLAVE;
#修改从库指向到主库,使用上一步记录的文件名以及位点
CHANGE MASTER TO
master_host = 'localhost',
master_user = 'db_sync',
master_password = 'db_sync',
master_log_file = 'myql-bin.000001',
master_log_pos = 592;
#启动同步
START SLAVE;
#查看Slave_IO_Runing和Slave_SQL_Runing字段值都为Yes,表示同步配置成功。如果不为Yes,请排
查相关异常。
show slave status
5.sharding-JDBC操作
sharding-JDBC是根据语义的分析实现读写分离,不会做数据同步
5.1.配置读写分离策略
# sharding-jdbc 分片策略
# 配置数据源
# 水平分库
spring.shardingsphere.datasource.names=m1,m2,m0,s0

# 配置第一个数据源具体内容,包含连接池,驱动,地址,用户名和密码
spring.shardingsphere.datasource.m1.type=com.alibaba.druid.pool.DruidDataSource
spring.shardingsphere.datasource.m1.driver-class-name=com.mysql.cj.jdbc.Driver
spring.shardingsphere.datasource.m1.url=jdbc:mysql://localhost:3306/edu_db_1?serverTimezone=GMT%2B8
spring.shardingsphere.datasource.m1.username=root
spring.shardingsphere.datasource.m1.password=123456

# 配置第二个数据源具体内容,包含连接池,驱动,地址,用户名和密码
spring.shardingsphere.datasource.m2.type=com.alibaba.druid.pool.DruidDataSource
spring.shardingsphere.datasource.m2.driver-class-name=com.mysql.cj.jdbc.Driver
spring.shardingsphere.datasource.m2.url=jdbc:mysql://localhost:3306/edu_db_2?serverTimezone=GMT%2B8
spring.shardingsphere.datasource.m2.username=root
spring.shardingsphere.datasource.m2.password=123456

# 配置第三个数据源具体内容,包含连接池,驱动,地址,用户名和密码
# user_db主服务器
spring.shardingsphere.datasource.m0.type=com.alibaba.druid.pool.DruidDataSource
spring.shardingsphere.datasource.m0.driver-class-name=com.mysql.cj.jdbc.Driver
spring.shardingsphere.datasource.m0.url=jdbc:mysql://localhost:3306/user_db?serverTimezone=GMT%2B8
spring.shardingsphere.datasource.m0.username=root
spring.shardingsphere.datasource.m0.password=123456

# user_db从服务器
spring.shardingsphere.datasource.s0.type=com.alibaba.druid.pool.DruidDataSource
spring.shardingsphere.datasource.s0.driver-class-name=com.mysql.cj.jdbc.Driver
spring.shardingsphere.datasource.s0.url=jdbc:mysql://localhost:3307/user_db?serverTimezone=GMT%2B8
spring.shardingsphere.datasource.s0.username=root
spring.shardingsphere.datasource.s0.password=123456

# 主库从库逻辑数据源定义 ds0 为 user_db
spring.shardingsphere.sharding.master-slave-rules.ds0.master-data-source-name=m0
spring.shardingsphere.sharding.master-slave-rules.ds0.slave-data-source-names=s0


# 配置user_db数据库里面t_user专库专表
#spring.shardingsphere.sharding.tables.t_user.actual-data-nodes=m$->{0}.t_user
# t_user分表策略,固定分配到ds0的t_user真实表
spring.shardingsphere.sharding.tables.t_user.actual-data-nodes=ds0.t_user

spring.shardingsphere.sharding.tables.t_user.key-generator.column=user_id
spring.shardingsphere.sharding.tables.t_user.key-generator.type=SNOWFLAKE
spring.shardingsphere.sharding.tables.t_user.table-strategy.inline.sharding-column=user_id
spring.shardingsphere.sharding.tables.t_user.table-strategy.inline.algorithm-expression=t_user


# 指定大户巨款分布情况,数据库里面表的分布情况
# m1 m2 course_1 course_2
spring.shardingsphere.sharding.tables.course.actual-data-nodes=m$->{1..2}.course_$->{1..2}


# 指定course表里面主键生成的策略 SNOWFLAKE:雪花算法
spring.shardingsphere.sharding.tables.course.key-generator.column=cid
spring.shardingsphere.sharding.tables.course.key-generator.type=SNOWFLAKE

# 指定表分片策略 约定cid值偶数course_1表,如果cid是奇数添加到course_2表
spring.shardingsphere.sharding.tables.course.table-strategy.inline.sharding-column=cid
spring.shardingsphere.sharding.tables.course.table-strategy.inline.algorithm-expression=course_$->{cid % 2 + 1}

#指定数据库分片策略 约定 user_id是偶数添加为m1,是奇数添加为m2
#spring.shardingsphere.sharding.default-database-strategy.inline.sharding-column=user_id
#spring.shardingsphere.sharding.default-database-strategy.inline.algorithm-expression=m$->{user_id % 2 +1}
spring.shardingsphere.sharding.tables.course.database-strategy.inline.sharding-column=user_id
spring.shardingsphere.sharding.tables.course.database-strategy.inline.algorithm-expression=m$->{user_id % 2 +1}

#公共表配置
spring.shardingsphere.sharding.broadcast-tables=t_udict
spring.shardingsphere.sharding.tables.t_udict.key-generator.column=dictid
spring.shardingsphere.sharding.tables.t_udict.key-generator.type=SNOWFLAKE


# 打开sql输出日志
spring.shardingsphere.props.sql.show=true

# 一个实体类对应两张表,覆盖
spring.main.allow-bean-definition-overriding=true
Sharding-Proxy
什么是Sharding-Proxy
1.定位为透明的数据库代理端
2.Sharding-Proxy 独立应用,使用安装服务,进行分库分表或者读写分离配置,启动
3.安装
3.1下载安装的软件
https://archive.apache.org/dist/incubator/shardingsphere/4.0.1/apache-shardingsphere-incubating-4.0.1-sharding-proxy-bin.tar.gz
3.2.解压进入bin 目录运行启动脚本
sharding-Proxy配置
1.server.yaml
#
# Licensed to the Apache Software Foundation (ASF) under one or more
# contributor license agreements.  See the NOTICE file distributed with
# this work for additional information regarding copyright ownership.
# The ASF licenses this file to You under the Apache License, Version 2.0
# (the "License"); you may not use this file except in compliance with
# the License.  You may obtain a copy of the License at
#
#     http://www.apache.org/licenses/LICENSE-2.0
#
# Unless required by applicable law or agreed to in writing, software
# distributed under the License is distributed on an "AS IS" BASIS,
# WITHOUT WARRANTIES OR CONDITIONS OF ANY KIND, either express or implied.
# See the License for the specific language governing permissions and
# limitations under the License.
#

######################################################################################################
#
# If you want to configure orchestration, authorization and proxy properties, please refer to this file.
#
######################################################################################################
#
#orchestration:
#  name: orchestration_ds
#  overwrite: true
#  registry:
#    type: zookeeper
#    serverLists: localhost:2181
#    namespace: orchestration
#
authentication:
 users:
   root:
     password: root
   sharding:
     password: sharding
     authorizedSchemas: sharding_db

props:
 max.connections.size.per.query: 1
 acceptor.size: 16  # The default value is available processors count * 2.
 executor.size: 16  # Infinite by default.
 proxy.frontend.flush.threshold: 128  # The default value is 128.
   # LOCAL: Proxy will run with LOCAL transaction.
   # XA: Proxy will run with XA transaction.
   # BASE: Proxy will run with B.A.S.E transaction.
 proxy.transaction.type: LOCAL
 proxy.opentracing.enabled: false
 query.with.cipher.column: true
 sql.show: false
2.config-sharding.yaml
2.1.复制mysql驱动jar包到lib里面去
2.2.配置分库分表规则
#
# Licensed to the Apache Software Foundation (ASF) under one or more
# contributor license agreements.  See the NOTICE file distributed with
# this work for additional information regarding copyright ownership.
# The ASF licenses this file to You under the Apache License, Version 2.0
# (the "License"); you may not use this file except in compliance with
# the License.  You may obtain a copy of the License at
#
#     http://www.apache.org/licenses/LICENSE-2.0
#
# Unless required by applicable law or agreed to in writing, software
# distributed under the License is distributed on an "AS IS" BASIS,
# WITHOUT WARRANTIES OR CONDITIONS OF ANY KIND, either express or implied.
# See the License for the specific language governing permissions and
# limitations under the License.
#

######################################################################################################
#
# Here you can configure the rules for the proxy.
# This example is configuration of sharding rule.
#
# If you want to use sharding, please refer to this file;
# if you want to use master-slave, please refer to the config-master_slave.yaml.
#
######################################################################################################
#
#schemaName: sharding_db
#
#dataSources:
#  ds_0:
#    url: jdbc:postgresql://127.0.0.1:5432/demo_ds_0?serverTimezone=UTC&useSSL=false
#    username: postgres
#    password: postgres
#    connectionTimeoutMilliseconds: 30000
#    idleTimeoutMilliseconds: 60000
#    maxLifetimeMilliseconds: 1800000
#    maxPoolSize: 50
#  ds_1:
#    url: jdbc:postgresql://127.0.0.1:5432/demo_ds_1?serverTimezone=UTC&useSSL=false
#    username: postgres
#    password: postgres
#    connectionTimeoutMilliseconds: 30000
#    idleTimeoutMilliseconds: 60000
#    maxLifetimeMilliseconds: 1800000
#    maxPoolSize: 50
#
#shardingRule:
#  tables:
#    t_order:
#      actualDataNodes: ds_${0..1}.t_order_${0..1}
#      tableStrategy:
#        inline:
#          shardingColumn: order_id
#          algorithmExpression: t_order_${order_id % 2}
#      keyGenerator:
#        type: SNOWFLAKE
#        column: order_id
#    t_order_item:
#      actualDataNodes: ds_${0..1}.t_order_item_${0..1}
#      tableStrategy:
#        inline:
#          shardingColumn: order_id
#          algorithmExpression: t_order_item_${order_id % 2}
#      keyGenerator:
#        type: SNOWFLAKE
#        column: order_item_id
#  bindingTables:
#    - t_order,t_order_item
#  defaultDatabaseStrategy:
#    inline:
#      shardingColumn: user_id
#      algorithmExpression: ds_${user_id % 2}
#  defaultTableStrategy:
#    none:

######################################################################################################
#
# If you want to connect to MySQL, you should manually copy MySQL driver to lib directory.
#
######################################################################################################

schemaName: sharding_db

dataSources:
 ds_0:
   url: jdbc:mysql://127.0.0.1:3306/demo_ds_0?serverTimezone=UTC&useSSL=false
   username: root
   password:
   connectionTimeoutMilliseconds: 30000
   idleTimeoutMilliseconds: 60000
   maxLifetimeMilliseconds: 1800000
   maxPoolSize: 50
#  ds_1:
#    url: jdbc:mysql://127.0.0.1:3306/edu_1?serverTimezone=UTC&useSSL=false
#    username: root
#    password:
#    connectionTimeoutMilliseconds: 30000
#    idleTimeoutMilliseconds: 60000
#    maxLifetimeMilliseconds: 1800000
#    maxPoolSize: 50

shardingRule:
 tables:
   t_order:
     actualDataNodes: ds_${0}.t_order_${0..1}
     tableStrategy:
       inline:
         shardingColumn: order_id
         algorithmExpression: t_order_${order_id % 2}
     keyGenerator:
       type: SNOWFLAKE
       column: order_id
  #  t_order_item:
  #    actualDataNodes: ds_${0}.t_order_item_${0..1}
  #    tableStrategy:
  #      inline:
  #        shardingColumn: order_id
  #        algorithmExpression: t_order_item_${order_id % 2}
  #    keyGenerator:
  #      type: SNOWFLAKE
  #      column: order_item_id
 bindingTables:
   - t_order
 defaultDatabaseStrategy:
   inline:
     shardingColumn: user_id
     algorithmExpression: ds_${0}
 defaultTableStrategy:
   none:
2.3.启动sharding-proxy
bin>start.bat 3308
2.4.通过Sharding_proxy 启动端口进行连接
2.4.1.打开cmd窗口
2.4.2.连接sharding-proxy
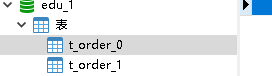
2.4.3.创建表t_order
2.4.4.在表中添加数据
2.4.5.回到3306发现sharding-proxy帮我们创建好了两张表,还做了分表操作
Sharding-proxy配置分库
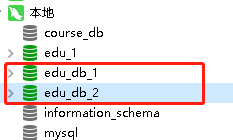
1.创建两个数据库
2.找到conf目录 config-sharding.yaml
#
# Licensed to the Apache Software Foundation (ASF) under one or more
# contributor license agreements.  See the NOTICE file distributed with
# this work for additional information regarding copyright ownership.
# The ASF licenses this file to You under the Apache License, Version 2.0
# (the "License"); you may not use this file except in compliance with
# the License.  You may obtain a copy of the License at
#
#     http://www.apache.org/licenses/LICENSE-2.0
#
# Unless required by applicable law or agreed to in writing, software
# distributed under the License is distributed on an "AS IS" BASIS,
# WITHOUT WARRANTIES OR CONDITIONS OF ANY KIND, either express or implied.
# See the License for the specific language governing permissions and
# limitations under the License.
#

######################################################################################################
#
# Here you can configure the rules for the proxy.
# This example is configuration of sharding rule.
#
# If you want to use sharding, please refer to this file;
# if you want to use master-slave, please refer to the config-master_slave.yaml.
#
######################################################################################################
#
#schemaName: sharding_db
#
#dataSources:
#  ds_0:
#    url: jdbc:postgresql://127.0.0.1:5432/demo_ds_0?serverTimezone=UTC&useSSL=false
#    username: postgres
#    password: postgres
#    connectionTimeoutMilliseconds: 30000
#    idleTimeoutMilliseconds: 60000
#    maxLifetimeMilliseconds: 1800000
#    maxPoolSize: 50
#  ds_1:
#    url: jdbc:postgresql://127.0.0.1:5432/demo_ds_1?serverTimezone=UTC&useSSL=false
#    username: postgres
#    password: postgres
#    connectionTimeoutMilliseconds: 30000
#    idleTimeoutMilliseconds: 60000
#    maxLifetimeMilliseconds: 1800000
#    maxPoolSize: 50
#
#shardingRule:
#  tables:
#    t_order:
#      actualDataNodes: ds_${0..1}.t_order_${0..1}
#      tableStrategy:
#        inline:
#          shardingColumn: order_id
#          algorithmExpression: t_order_${order_id % 2}
#      keyGenerator:
#        type: SNOWFLAKE
#        column: order_id
#    t_order_item:
#      actualDataNodes: ds_${0..1}.t_order_item_${0..1}
#      tableStrategy:
#        inline:
#          shardingColumn: order_id
#          algorithmExpression: t_order_item_${order_id % 2}
#      keyGenerator:
#        type: SNOWFLAKE
#        column: order_item_id
#  bindingTables:
#    - t_order,t_order_item
#  defaultDatabaseStrategy:
#    inline:
#      shardingColumn: user_id
#      algorithmExpression: ds_${user_id % 2}
#  defaultTableStrategy:
#    none:

######################################################################################################
#
# If you want to connect to MySQL, you should manually copy MySQL driver to lib directory.
#
######################################################################################################

schemaName: sharding_db

dataSources:
 ds_0:
   url: jdbc:mysql://127.0.0.1:3306/edu_db_1?serverTimezone=UTC&useSSL=false
   username: root
   password: 123456
   connectionTimeoutMilliseconds: 30000
   idleTimeoutMilliseconds: 60000
   maxLifetimeMilliseconds: 1800000
   maxPoolSize: 50
 ds_1:
   url: jdbc:mysql://127.0.0.1:3306/edu_db_2?serverTimezone=UTC&useSSL=false
   username: root
   password: 123456
   connectionTimeoutMilliseconds: 30000
   idleTimeoutMilliseconds: 60000
   maxLifetimeMilliseconds: 1800000
   maxPoolSize: 50

shardingRule:
 tables:
   t_order:
     actualDataNodes: ds_${0..1}.t_order_${1..2}
     tableStrategy:
       inline:
         shardingColumn: order_id
         algorithmExpression: t_order_${order_id % 2 + 1}
     keyGenerator:
       type: SNOWFLAKE
       column: order_id
  #  t_order_item:
  #    actualDataNodes: ds_${0}.t_order_item_${0..1}
  #    tableStrategy:
  #      inline:
  #        shardingColumn: order_id
  #        algorithmExpression: t_order_item_${order_id % 2}
  #    keyGenerator:
  #      type: SNOWFLAKE
  #      column: order_item_id
 bindingTables:
   - t_order
 defaultDatabaseStrategy:
   inline:
     shardingColumn: user_id
     algorithmExpression: ds_${user_id % 2}
 defaultTableStrategy:
   none:
3.启动sharding-proxy
4.连接sharding-proxy
5.创建数据库表,向表里面添加记录
6.查看3306数据库表
sharding-Proxy读写分离
1.创建两个数据库 3306,3307
2.修改conf里面的config-master-slave.yaml
schemaName: master_slave_db

dataSources:
 master_ds:
   url: jdbc:mysql://127.0.0.1:3306/edu_db_1?serverTimezone=UTC&useSSL=false
   username: root
   password: 123456
   connectionTimeoutMilliseconds: 30000
   idleTimeoutMilliseconds: 60000
   maxLifetimeMilliseconds: 1800000
   maxPoolSize: 50
 slave_ds_0:
   url: jdbc:mysql://127.0.0.1:3307/edu_db_2?serverTimezone=UTC&useSSL=false
   username: root
   password: 123456
   connectionTimeoutMilliseconds: 30000
   idleTimeoutMilliseconds: 60000
   maxLifetimeMilliseconds: 1800000
   maxPoolSize: 50
#  slave_ds_1:
#    url: jdbc:mysql://127.0.0.1:3306/demo_ds_slave_1?serverTimezone=UTC&useSSL=false
#    username: root
#    password:
#    connectionTimeoutMilliseconds: 30000
#    idleTimeoutMilliseconds: 60000
#    maxLifetimeMilliseconds: 1800000
#    maxPoolSize: 50

masterSlaveRule:
 name: ms_ds
 masterDataSourceName: master_ds
 slaveDataSourceNames:
   - slave_ds_0
  #  - slave_ds_1


 665
665


 被折叠的 条评论
为什么被折叠?
被折叠的 条评论
为什么被折叠?
 到【灌水乐园】发言


