


https://paul.pub/gtest-and-coverage/ gcc
1 背景
从质量的角度考虑,需要评估代码的执行情况,现对linux平台的代码生成覆盖率报告。
目前公司采用CodeSourcery GCC 4.3的编译工具链编译。
在windows上完成交叉编译,在linux平台上运行。
2 gcov简介
关于覆盖率,常用的方法是 gcc编译套件自带gcov. 查阅gcc的官方网站也有介绍。网址如下:
Cross-profiling (Using the GNU Compiler Collection (GCC))
关于gcov的使用说明,有一部分是交叉编译的使用方法,现在摘录如下:


10.5 Data File Relocation to Support Cross-Profiling

Running the program will cause profile output to be generated. For each source file compiled with -fprofile-arcs, an accompanying .gcda file will be placed in the object file directory. That implicitly requires running the program on the same system as it was built or having the same absolute directory structure on the target system. The program will try to create the needed directory structure, if it is not already present.

To support cross-profiling, a program compiled with -fprofile-arcs can relocate the data files based on two environment variables:

GCOV_PREFIX contains the prefix to add to the absolute paths in the object file. Prefix can be absolute, or relative. The default is no prefix.

GCOV_PREFIX_STRIP indicates the how many initial directory names to strip off the hardwired absolute paths. Default value is 0.

Note: If GCOV_PREFIX_STRIP is set without GCOV_PREFIX is undefined, then a relative path is made out of the hardwired absolute paths.

For example, if the object file /user/build/foo.o was built with -fprofile-arcs, the final executable will try to create the data file /user/build/foo.gcda when running on the target system. This will fail if the corresponding directory does not exist and it is unable to create it. This can be overcome by, for example, setting the environment as ‘GCOV_PREFIX=/target/run’ and ‘GCOV_PREFIX_STRIP=1’. Such a setting will name the data file /target/run/build/foo.gcda.

You must move the data files to the expected directory tree in order to use them for profile directed optimizations (-fprofile-use), or to use the gcov tool.

其中提到了两个环境变量GCOV_PREFIX和GCOV_PREFIX_STRIP,这两个变量在下面的例子中会使用到。
3 gcov的基本原理
百言不如一图,引用vaughn.huang中的介绍:
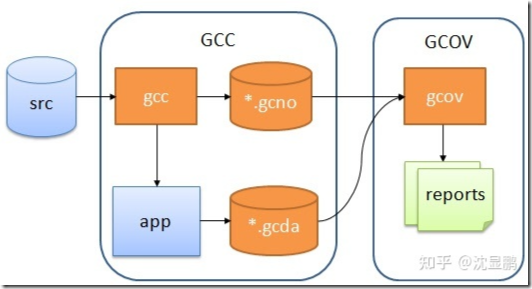
- 在 GCC 编译的时加入特殊的编译选项,生成可执行文件,和 *.gcno;
- 运行(测试)生成的可执行文件,生成了 *.gcda 数据文件;
- 有了 *.gcno 和 *.gcda,通过源码生成 gcov 文件,最后生成代码覆盖率报告。
4 使用演示
4.1 示例代码

1 // example.cpp
2
3 int foo(int param)
4 {
5   if (param)
6   {
7      return 1;
8   }
9   else
10  {
11     return 0;
12  }
13 }
14
15 int main(int argc, char* argv[])
16 {
17    foo(0);
18
19    return 0;
20 }

4.2 在windows上交叉编译
E:\ddd_terry\coverage\arm>arm-none-linux-gnueabi-g++.exe -fprofile-arcs -ftest-coverage -O0 example.cpp -o program
得到文件如下:

E:\ddd_terry\coverage\arm>dir
驱动器 E 中的卷是 新加卷
卷的序列号是 1CCD-08B2

E:\ddd_terry\coverage\arm 的目录
2022/07/20 14:50 <DIR> .
2022/07/20 14:50 <DIR> ..
2022/07/20 14:47 92 build.bat
2022/07/20 14:48 206 example.cpp
2022/07/20 14:48 568 example.gcno
2022/07/20 14:48 17,065 program

4 个文件 17,931 字节
2 个目录 357,037,658,112 可用字节

4.3 在linux上运行程序
根据gcov关于交叉编译的解释,设置环境变量,设置好的变量如下:

说明:
GCOV_PREFIX表示产生*gcda的文件路径。本处放到/var/log/gcov路径
GCOV_PREFIX_STRIP表示裁剪掉编译时,绝对路径中的级数。具体这个数值的配置取决于编译时的目录结构。
比如本例:example在编译的时候,使用的路径是:E:\ddd_terry\coverage\arm>,可以看到是3级目录。现在需要在program执行的时候,忽略掉这3组目录,因为linux系统不认识这个目标路径。
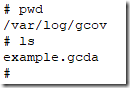
在linux运行program程序后,会生成*.gcda文件。跳转到/var/log/gcov目录,可以看到example.gcda文件。
把*.gcda文件拷贝到windows磁盘中。

E:\ddd_terry\coverage\arm>dir
驱动器 E 中的卷是 新加卷
卷的序列号是 1CCD-08B2

E:\ddd_terry\coverage\arm 的目录
2022/07/20 15:04 <DIR> .
2022/07/20 15:04 <DIR> ..
..
2022/07/20 14:47 92 build.bat
2022/07/20 14:48 206 example.cpp
2022/07/20 15:04 184 example.gcda
2022/07/20 14:48 568 example.gcno
2022/07/20 14:48 17,065 program

5 个文件 18,115 字节
2 个目录 357,037,658,112 可用字节
E:\ddd_terry\coverage\arm>

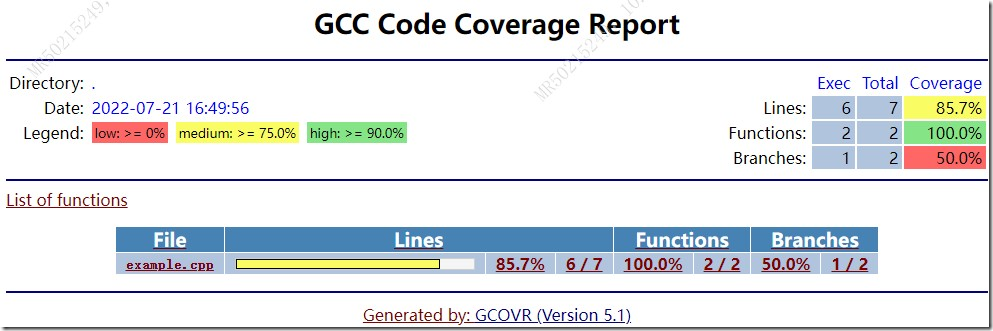
4.4 gcov生成覆盖率报告
使用gcov可以直接生成覆盖率报告
E:\ddd_terry\coverage\arm>gcov example.gcda
File 'example.cpp'
Lines executed:85.71% of 7
example.cpp:creating 'example.cpp.gcov'
得到gcov的文本文件。内容如下:

        -:    0:Source:example.cpp
        -:    0:Graph:example.gcno
        -:    0:Data:example.gcda
        -:    0:Runs:1
        -:    0:Programs:1
        -:    1:// example.cpp
        -:    2:
        1:    3:int foo(int param)
        -:    4:{
        1:    5:    if (param)
        -:    6:    {
    #####:    7:        return 1;
        -:    8:    }
        -:    9:    else
        -:   10:    {
        1:   11:        return 0;
        -:   12:    }
        -:   13:}
        -:   14:
        1:   15:int main(int argc, char* argv[])
        -:   16:{
        1:   17:    foo(0);
        -:   18:
        1:   19:    return 0;
        -:   20:}

这个文件太原始,没有整体的报告。测试的兄弟们不答应。
4.5 lcov生成覆盖率报告
Linux Test Project - Coverage » lcov (sourceforge.net)
lcov是一个linux平台的工具,没有看到windows平台的介绍,这显然也不符合需求。
不过,也不是没有办法。对于windows平台需要借助wsl的环境。
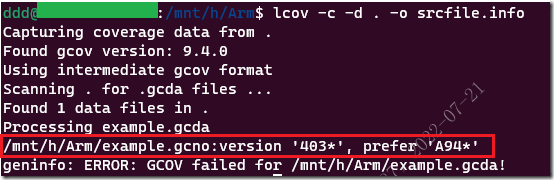
但生成失败了。主是因为windows交叉编译使用的是gcc是4.3的版本,wsl环境中的gcc安装的9.4的版本。两个不匹配。
如果在wsl安装gcc4.3的老版本,太折腾了。而且ubuntu 20.04LTS自带的软件源中也没有这么老的gcc版本。能否正常安装上,还是一个问题。果断放弃了。
有兴趣的同学可以继续研究。
4.6 gcovr生成覆盖率报告
gcovr是一个python插件,帮生成覆盖率报告需要先安装Python。笔者使用的是Python 3.10.5 x64位版本。安装过程略。
gcover的官方网站如下:
gcovr — gcovr 5.1 documentation
4.6.1 gcovr的安装
Installation
Gcovr is available as a Python package that can be installed via pip.
Install newest stable gcovr release from PyPI:
pip install gcovr
Install development version from GitHub:
pip install git+https://github.com/gcovr/gcovr.git
根据官方的提示安装完成。需要注意的时,这里要下载源代码。因为后面将会用到。
4.6.2 gcovr生成html
You can also generate detailed HTML reports:
gcovr --html-details coverage.html
Gcovr will create one HTML report per source file next to the coverage.html summary.
根据上面的指令操作生成html
E:\ddd_terry\coverage\arm>gcovr -v --html-details coverage.html
html如下:
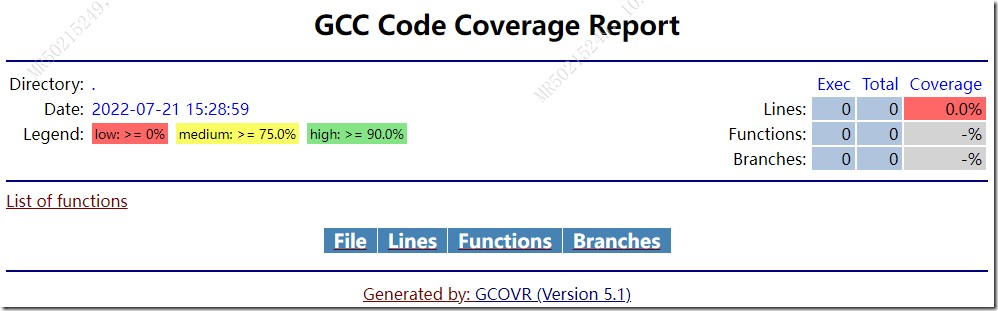
看到没有,啥也没有!List of functions中:main函数都没有。
加上-v参数再试一次,看看gcov插件做了什么?

E:\ddd_terry\coverage\arm>gcovr -v --html-details coverage.html
(DEBUG) Filters for --root: (1)
(DEBUG) - re.compile('^E:\\\\ddd_terry\\\\coverage\\\\arm\\\\'
(DEBUG) Filters for --filter: (1)
(DEBUG) - DirectoryPrefixFilter(E:/ddd_terry/coverage/arm/)
(DEBUG) Filters for --exclude: (0)
(DEBUG) Filters for --gcov-filter: (1)
(DEBUG) - AlwaysMatchFilter()
(DEBUG) Filters for --gcov-exclude: (0)
(DEBUG) Filters for --exclude-directories: (0)
(DEBUG) Scanning directory . for gcda/gcno files...
(DEBUG) Found 2 files (and will process 1)
(DEBUG) Pool started with 1 threads
(DEBUG) Processing file: E:\ddd_terry\coverage\arm\example.gcda
(DEBUG) Running gcov: 'gcov --help' in '.'
(DEBUG) Running gcov: 'gcov --help-hidden' in '.'
(DEBUG) Running gcov: 'gcov E:\ddd_terry\coverage\arm\example.gcda --branch-counts --branch-probabilities --preserve-paths --object-directory E:\ddd_terry\coverage\arm' in 'E:\ddd_terry\coverage\arm'
(WARNING) GCOV produced the following errors processing E:\ddd_terry\coverage\arm\example.gcda:
E:\ddd_terry\coverage\arm/E:\ddd_terry\coverage\arm\example.gcno:cannot open graph file
(gcovr could not infer a working directory that resolved it.)
(DEBUG) Gathered coveraged data for 0 files

从上面的控制台输出,看到路径出现问题。生成了0个文件的报告。
4.6.3 为什么没有生成报告?修改gcovr
查阅了gcovr网站上的所有内容。其中在讲述Filters时,有一段话引起了注意:
Using Filters — gcovr 5.1 documentation
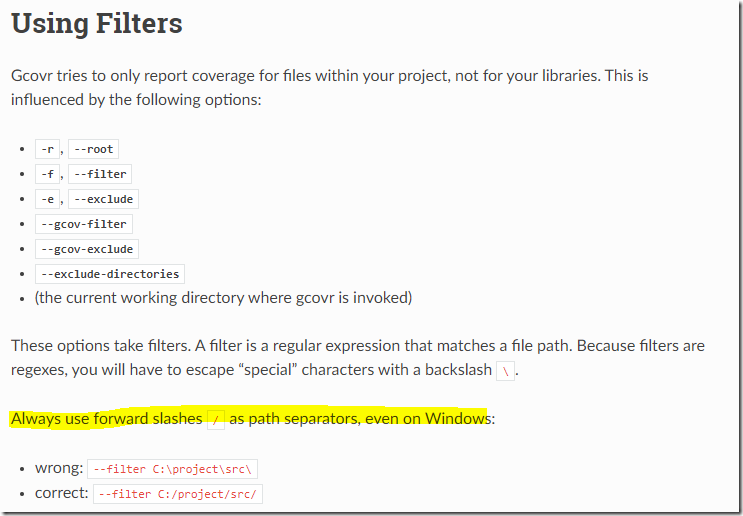
再看DEBUG信息中的路径,和上面的斜杠说明不符。
(DEBUG) Processing file: E:\ddd_terry\coverage\arm\example.gcda
找到gcovr中的python代码,尝试把它改掉。
打开C:\Users\$用户名$\AppData\Local\Programs\Python\Python310\Lib\site-packages\gcovr\gcov.py文件,在第295行增加如下代码
abs_filename = abs_filename.replace("\\","/")
logger.debug(f"Processing file1: {abs_filename}")
更改后的效果如下图:

4.6.4 gcovr再次生成报告

E:\ddd_terry\coverage\arm>gcovr -v --html-details coverage.html
(DEBUG) Filters for --root: (1)
(DEBUG) - re.compile('^E:\\\\ddd_terry\\\\coverage\\\\arm\\\\')
(DEBUG) Filters for --filter: (1)
(DEBUG) - DirectoryPrefixFilter(E:/ddd_terry/coverage/arm/)
(DEBUG) Filters for --exclude: (0)
(DEBUG) Filters for --gcov-filter: (1)
(DEBUG) - AlwaysMatchFilter()
(DEBUG) Filters for --gcov-exclude: (0)
(DEBUG) Filters for --exclude-directories: (0)
(DEBUG) Scanning directory . for gcda/gcno files...
(DEBUG) Found 2 files (and will process 1)
(DEBUG) Pool started with 1 threads
(DEBUG) Processing file: E:\ddd_terry\coverage\arm\example.gcda
(DEBUG) Processing file1: E:/ddd_terry/coverage/arm/example.gcda
(DEBUG) Running gcov: 'gcov --help' in '.'
(DEBUG) Running gcov: 'gcov --help-hidden' in '.'
(DEBUG) Running gcov: 'gcov E:/ddd_terry/coverage/arm/example.gcda --branch-counts --branch-probabilities --preserve-paths --object-directory E:/ddd_terry/coverage/arm' in 'E:\ddd_terry\coverage\arm'
(DEBUG) Finding source file corresponding to a gcov data file
currdir E:\ddd_terry\coverage\arm
gcov_fname E:\ddd_terry\coverage\arm\example.cpp.gcov
source_fname E:/ddd_terry/coverage/arm/example.gcda
root E:\ddd_terry\coverage\arm
fname E:\ddd_terry\coverage\arm\example.cpp
(DEBUG) Parsing coverage data for file E:\ddd_terry\coverage\arm\example.cpp
(DEBUG) Gathered coveraged data for 1 files

看到没有,example.cpp文件中的函数被列出来的。
5 总结
1、在windows上,使用gcc_4.3的编译源代码,生成可执行文件program和*.gcno文件
2、把可执行文件program拷贝到linux目标机器
3、在linux目标机器上,正确配置GCOV_PREFIX和GCOV_PREFIX_STRIP环境变量
4、在linux上,运行可执行文件program。把生成*.gcda文件拷贝到windows机器
5、在windows环境上,准备gcovr环境,并修改gcovr模块中的python源代码
6、通过gcovr生成html报告。
6 注意
在过程中,也遇到了一些坑,主要有:
1、如果安装了多个gcc版本(CodeSourcery/MinGW等),且在windows环境变量中可以找到多个gcov.exe,请清理环境,确认只有gcc4.3的版本。(笔者使用的是这个版本)
2、gcov.exe的版本与gcc的版本要相同。否则会出现4.5节的报错。
参考资料
Cross-profiling (Using the GNU Compiler Collection (GCC))
Linux Test Project - Coverage » lcov (sourceforge.net)
Using Filters — gcovr 5.1 documentation
Linux 交叉编译使用代码覆盖GCOV及LCOV - vaughn.huang - 博客园 (cnblogs.com)


 726
726

 被折叠的 条评论
为什么被折叠?
被折叠的 条评论
为什么被折叠?
 到【灌水乐园】发言


